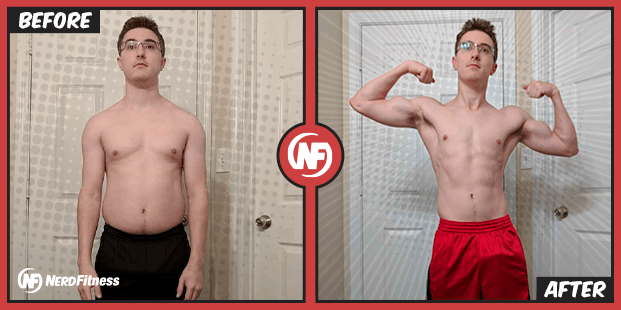
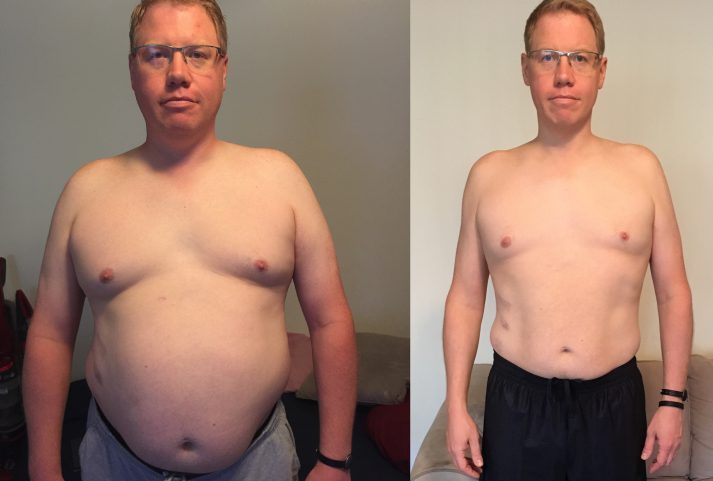
So you want to lose weight and get in shape, but don’t want to leave your house?
Well, as your fitness Yoda, I will teach you a great bodyweight workout routine that you can do ANYWHERE: In your living room, at a park, or in a galaxy far, far away…
These are the types of workouts we build for our busy Online Coaching Clients, and I’m pumped to share it with you today!
Let’s dig into the different parts of this workout and get to the action:
You just need to make sure you have the right program to follow.
Enter the Beginner Bodyweight Workout.
I’m going to take you through a basic home workout today that can be completed anywhere – in your house, apartment, out at a park, in your basement, on the moon, wherever.
Beginner Body Weight Workout Video & exercises
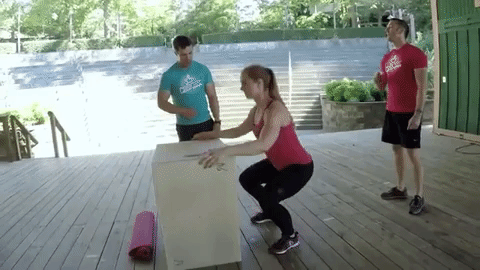
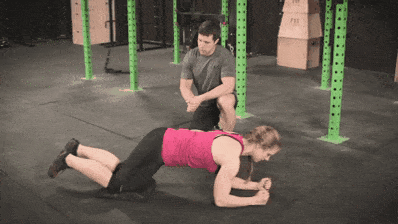
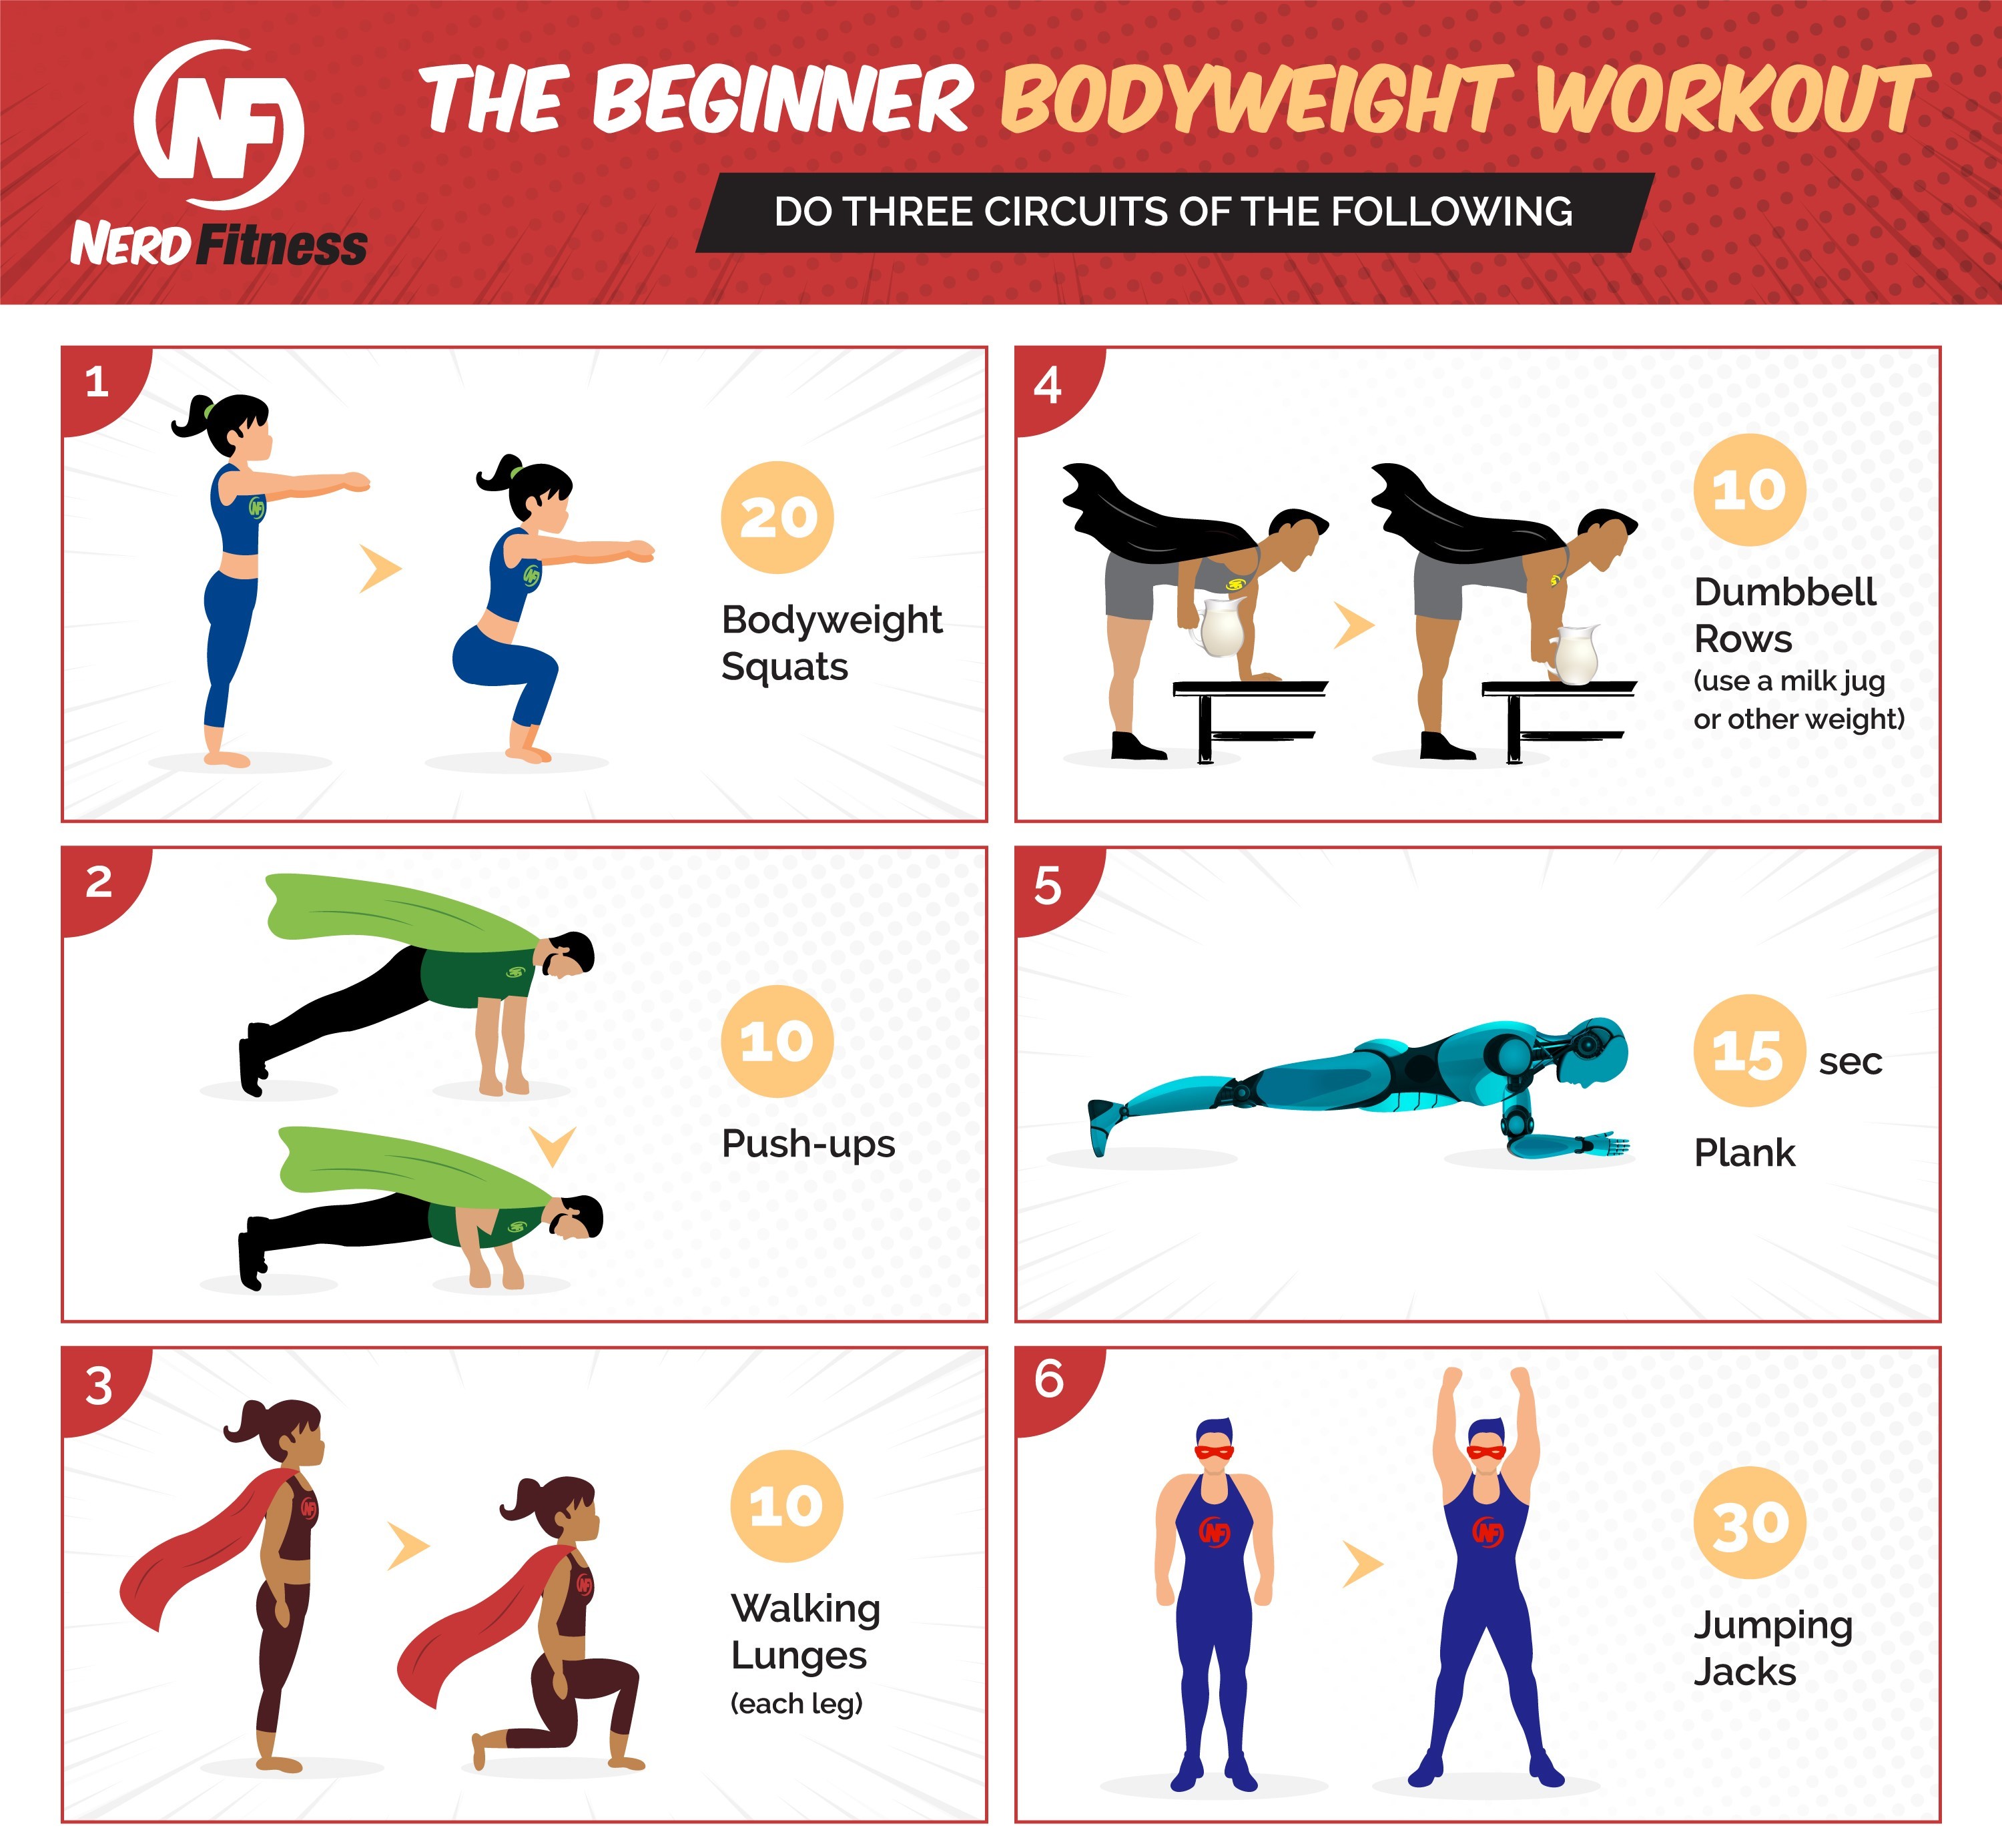
This is the Beginner Bodyweight Workout (3 Circuits):
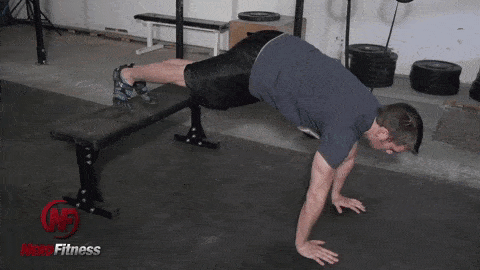
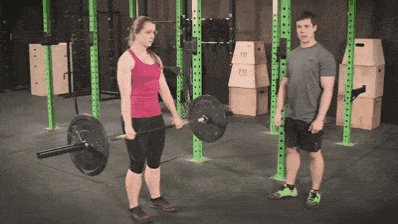
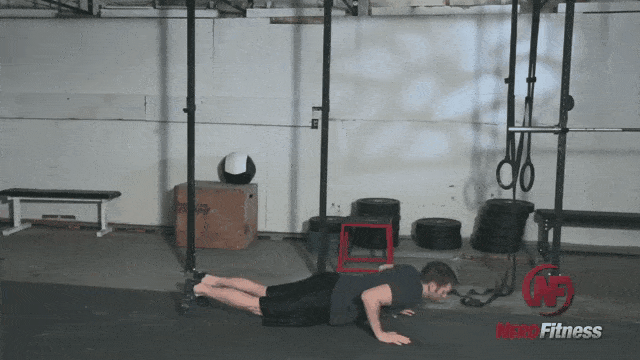
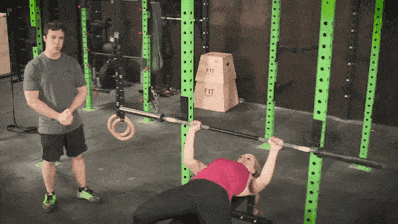
20 Bodyweight squats.
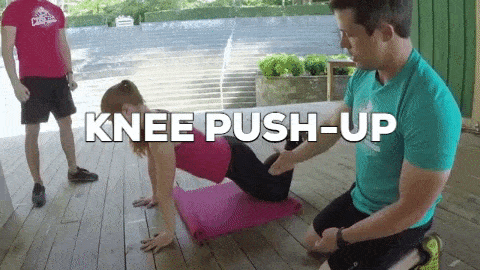
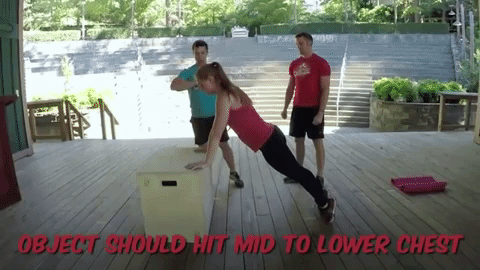
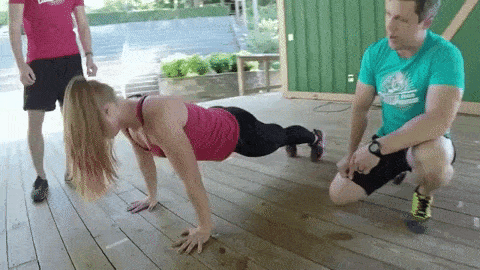
10 Push-ups.
10 Walking lunges (each leg).
10 Dumbbell rows (use a milk jug or other weight).
15 Second Plank.
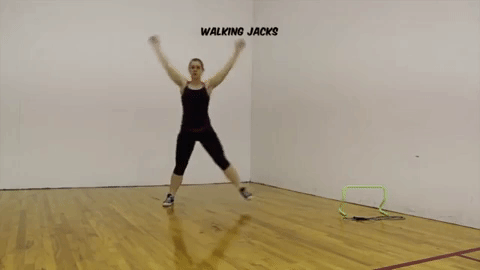
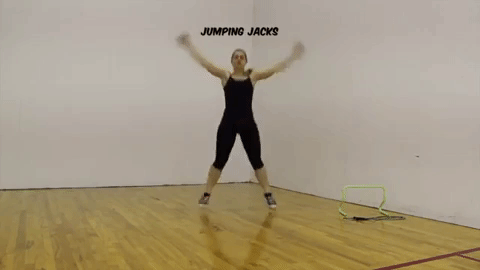
30 Jumping jacks
We turned this bodyweight workout into a fun infographic, because that’s how we roll around here:
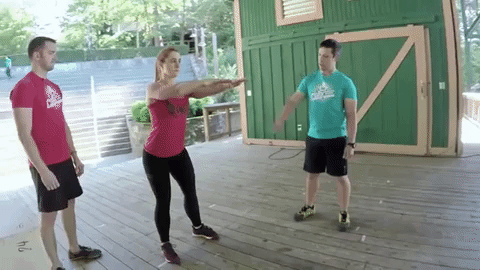
In a circuit routine, you’ll do each exercise in succession without a break in between (if you’re able).
Once you’ve finished all exercises in the circuit, do it again.
If you’re still able after the 2nd run through, go for a third.
Because all of these exercises come one after another, you’re bound to get tired – and that’s okay!
It’s better to stop and take a break than to do an exercise incorrectly.
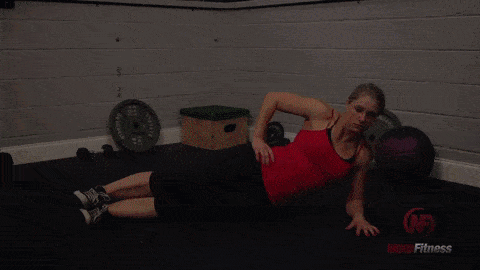
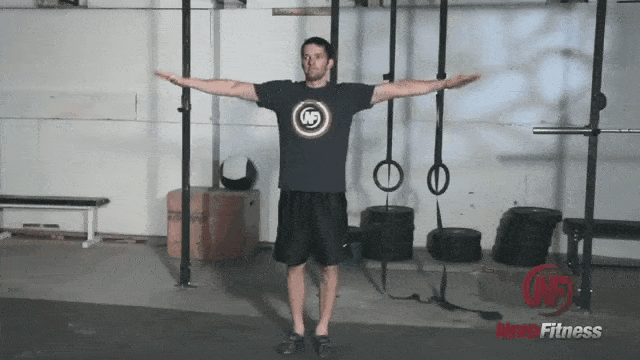
Before you start, don’t forget to do a Dynamic Warm-Up – Make sure to get your heart rate pumping and get your muscles warmed or you’re just asking for injury.
You can run in place, jump rope, do a few push-ups, pedal on a stationary bike, do some punches and kicks, jog up and down your stairs, and/or twist and swing your arms and legs to get them moving!
“HOW OFTEN SHOULD I DO THE BEGINNER BODYWEIGHT WORKOUT?”
Do this routine 2-3 times a week, but never on consecutive days.
You don’t build muscle when you’re exercising, you build muscle when you’re resting, so try not to do a strength training routine (of the same muscle groups) two days in a row.
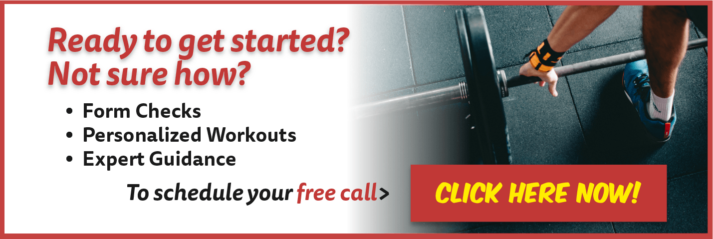
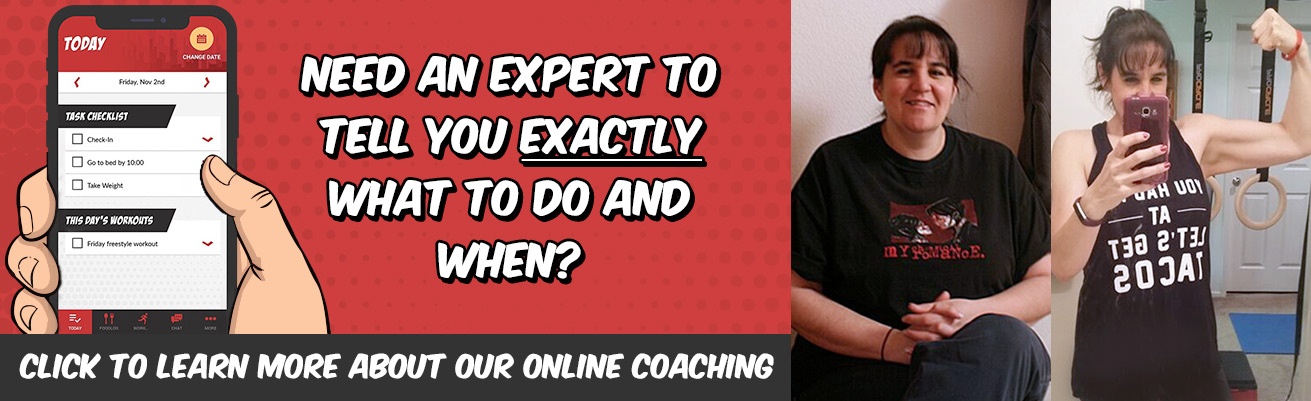
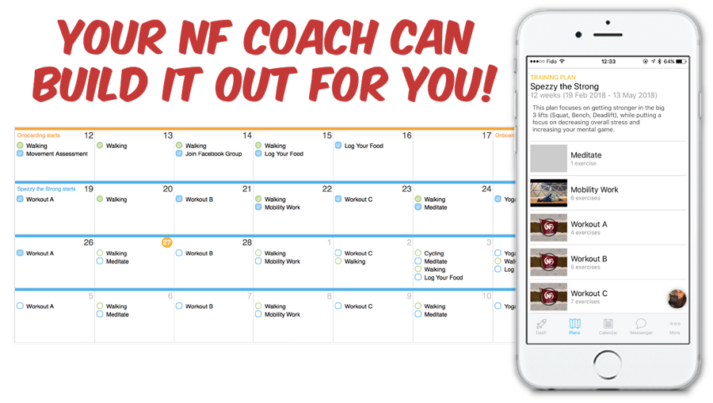
In addition to checking out our Online Coaching Program, make sure you download the worksheet for this workout by joining the Rebellion (our free online community)!
I’ll send it to you right away when you sign up in the box below:
Grab Your Beginner Bodyweight Routine Worksheet. No Gym Required!
Complete this workout at home, no equipment required
Avoid the common mistakes everybody makes when doing bodyweight exercises
Note: We have helped hundreds of 1-on-1 Coaching clients get started with strength training and other awesomeness – but EVERYBODY starts with bodyweight training like these movements and this workout!
Is Bodyweight Training Effective for Weight Loss?
The question of the day is:
Is bodyweight training effective for weight loss?
Yep! Bodyweight training can be great for weight loss, as long as you have your nutrition dialed in.
If you don’t…then no, it won’t be your magic bullet.
We’ve actually developed our own 10-level nutrition system and mindset blueprint in Nerd Fitness Prime, but let me break this down into some basics:
Eat natural, whole foods whenever possible.
Cut back on sugar and liquid calories wherever you can. The stuff is in everything!
Put vegetables and fruit on your plate!
Know your fats and carbs – these are the foods we can overeat without realizing it.
Make sure you get enough protein each day (meat, chicken, fish) – this helps with rebuilding muscles and things like that.
You can download a Free 10 Level Diet Guide too when you join the Rebellion and sign up in the box below:
Download our free weight loss guide
THE NERD FITNESS DIET: 10 Levels to Change Your Life
Follow our 10-level nutrition system at your own pace
What you need to know about weight loss and healthy eating
3 Simple rules we follow every day to stay on target
The raw honest truth:how you eat will be responsible for at least 80% of your success or failure.
If you’re doing bodyweight workouts because you’re interested in losing weight, know that training is only 10-20% of the puzzle!
If you need help figuring this all out, or you just want your own Yoda to tell you what to do, you’re in the right place!
We’ve been helping busy people like you train at home and make better food decisions without hating life! It’s our 1-on-1 Online Coaching Program, and it might be a great fit for you.
Schedule a call with us to learn more by clicking on the image below:
After the Beginner Bodyweight Workout: Next Steps!
Do this Beginner Bodyweight Workout for the next 4-6 weeks and focus on getting better.
If doing just one circuit of the workout was really challenging, no big deal!
Write down how you did, and try to do just 1 more rep or exercise next time through.
The whole point is “do a bit more than last time.”
I also have MULTIPLE options for you to take for your next step too. Pick the option below that best aligns with your goals and timeline:
1) If you want step-by-step guidance on how to lose weight, eat better, and get stronger, check out our killer 1-on-1 coaching program:
2) If you want a daily prompt for doing workouts at home, check out NF Journey. Our fun habit-building app helps you exercise more frequently, eat healthier, and level up your life (literally).
Try your free trial right here:
3) Join the Rebellion! We need good people like you in our community, the Nerd Fitness Rebellion.
Sign up in the box below to enlist and get the Beginner Bodyweight Workout sheet so you can print out the sheet and train at home!
Grab Your Beginner Bodyweight Routine Worksheet. No Gym Required!
Complete this workout at home, no equipment required
Avoid the common mistakes everybody makes when doing bodyweight exercises
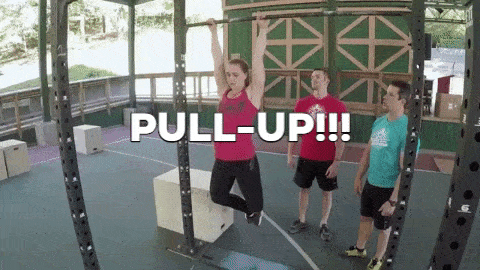
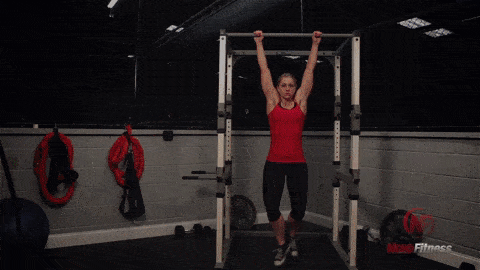
Learn how to finally get your first pull-up
I’d love to hear how this workout went for you, and how else we can help!
This is what we’ve dedicated our lives to, and you’re now part of a killer community.
Welcome to the Nerd Fitness Rebellion!
You can do this, we got your back!
-Steve
PS: If you’re looking for more workout routines to follow, I got you covered:
These are the types of programs that we create for our 1-on-1 Online Coaching Clients, and we’re getting amazing results for people.
And make sure you download our Kettlebell Worksheet! It’ll come in handy in just a moment.
Grab Your Beginner Kettlebell Routine Worksheet!
Complete this workout at home or gym with 1 kettlebell.
Avoid the common mistakes everybody makes when doing kettlebell exercises.
Build strength, burn fat, level up your life!
Okie dokie, let’s jump right in.
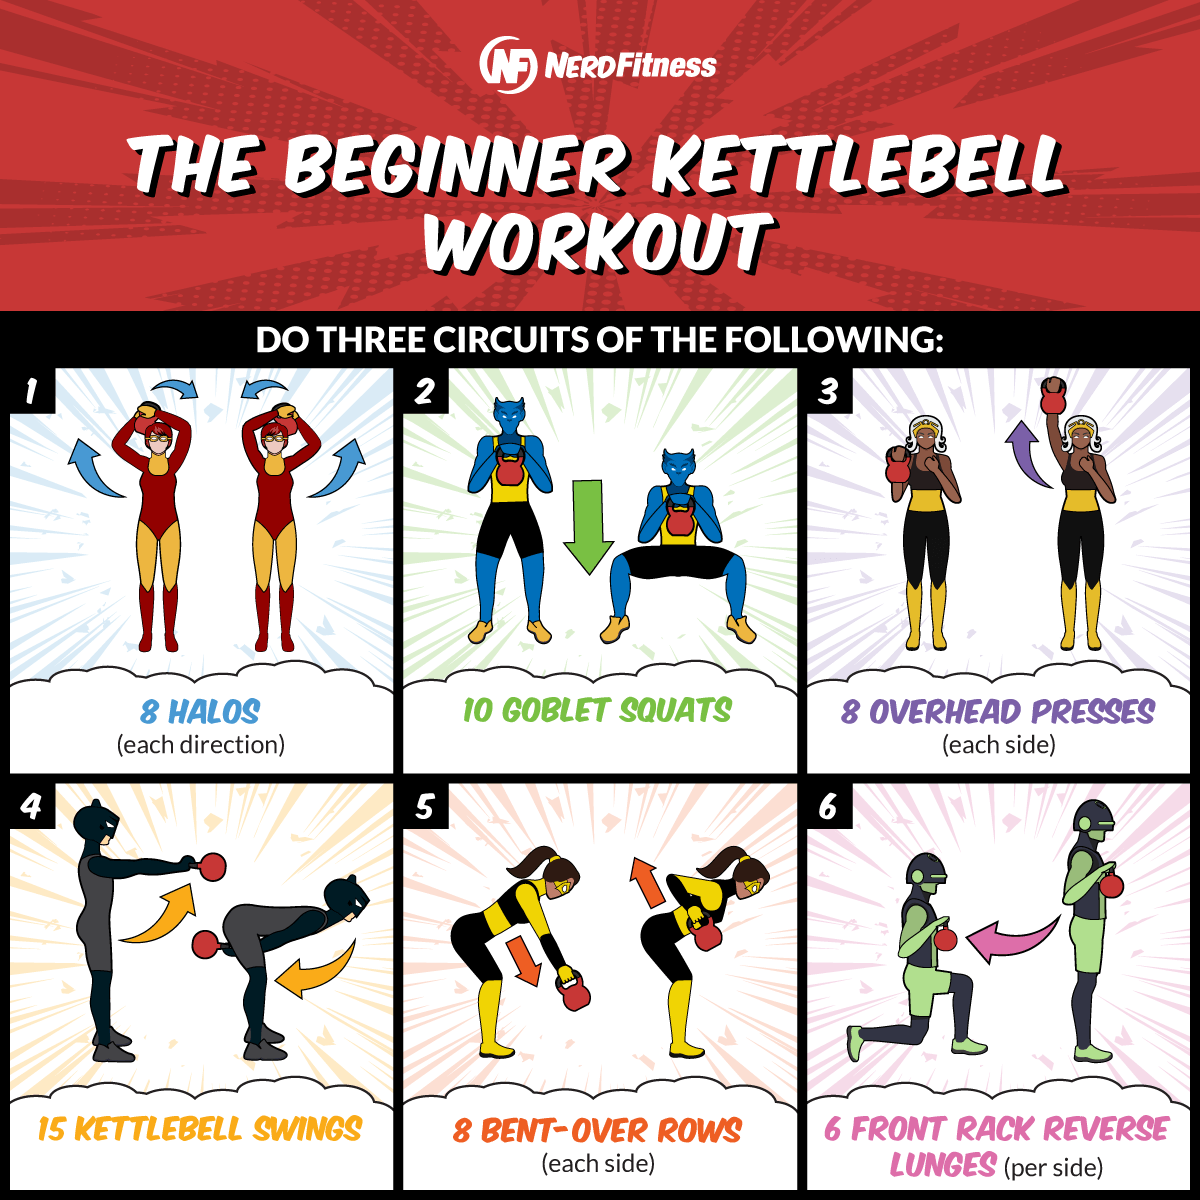
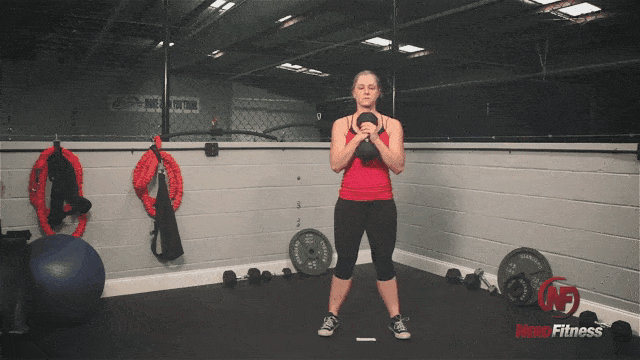
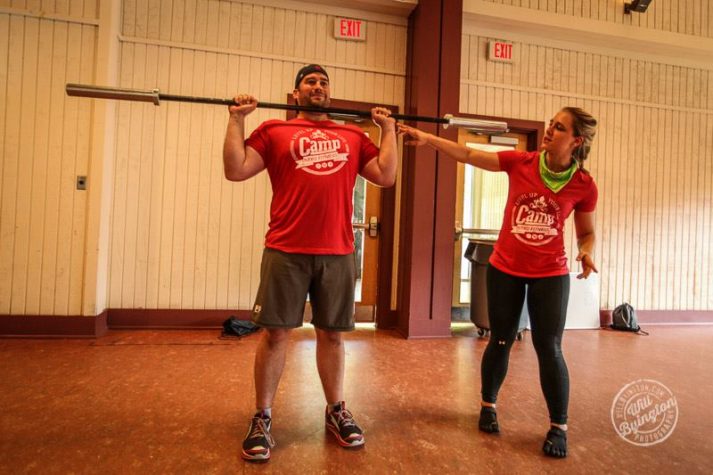
The 20 Minute Beginner Kettlebell Workout (with Video Demonstration)
Once you’ve watched the video above (featuring Matt Shortis, a lead trainer in our 1-on-1 Coaching Program) here’s a quick recap with repetitions for the workout here:
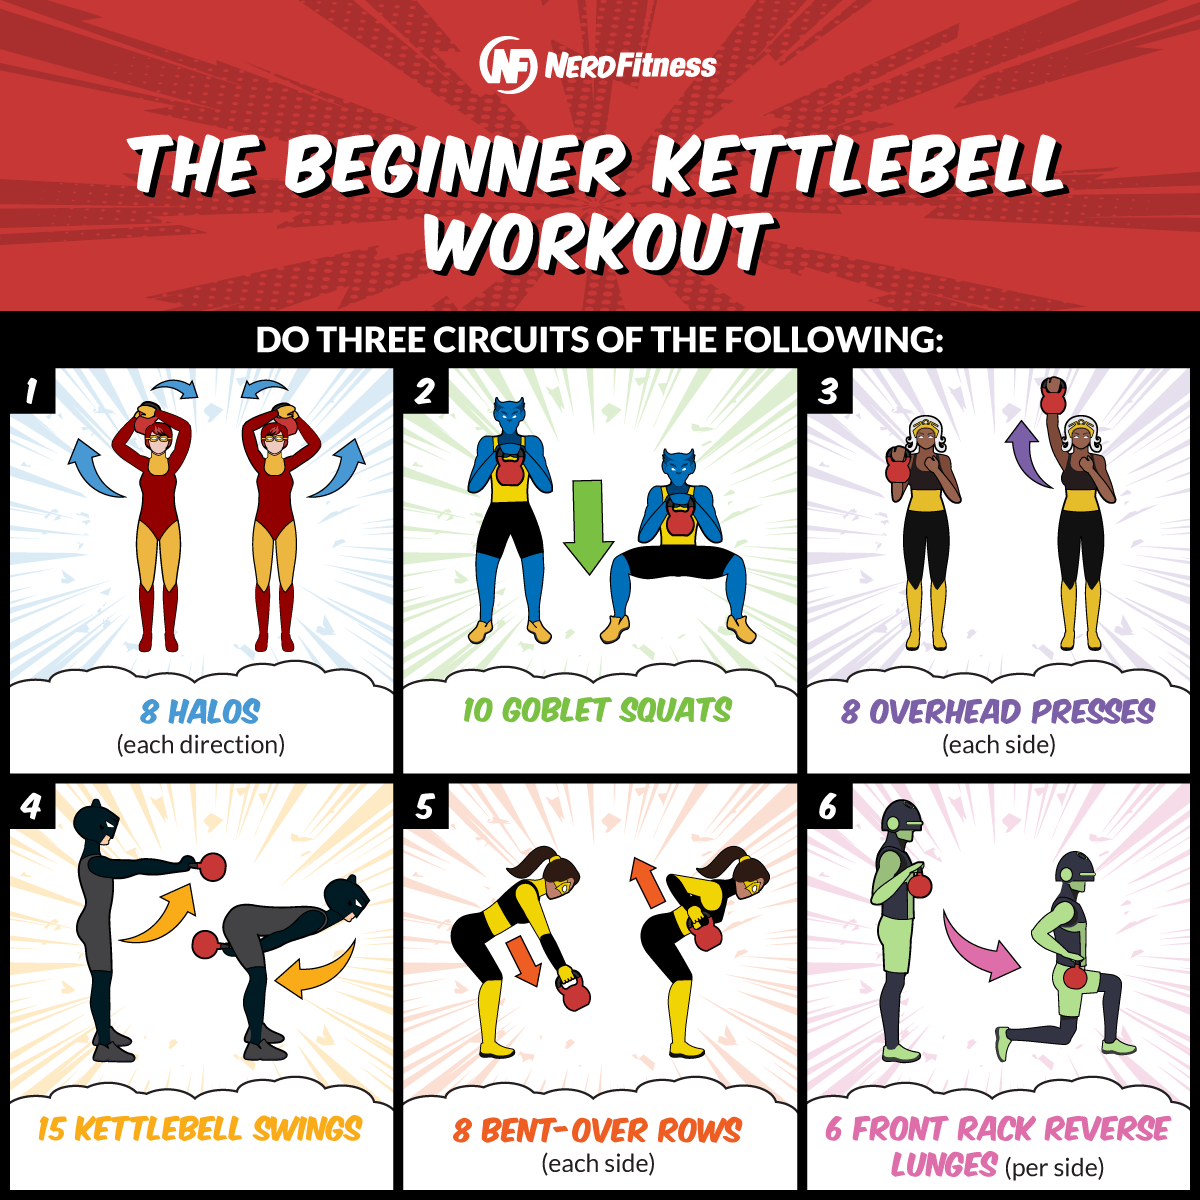
COMPLETE THE FOLLOWING KETTLEBELL CIRCUIT 3 TIMES:
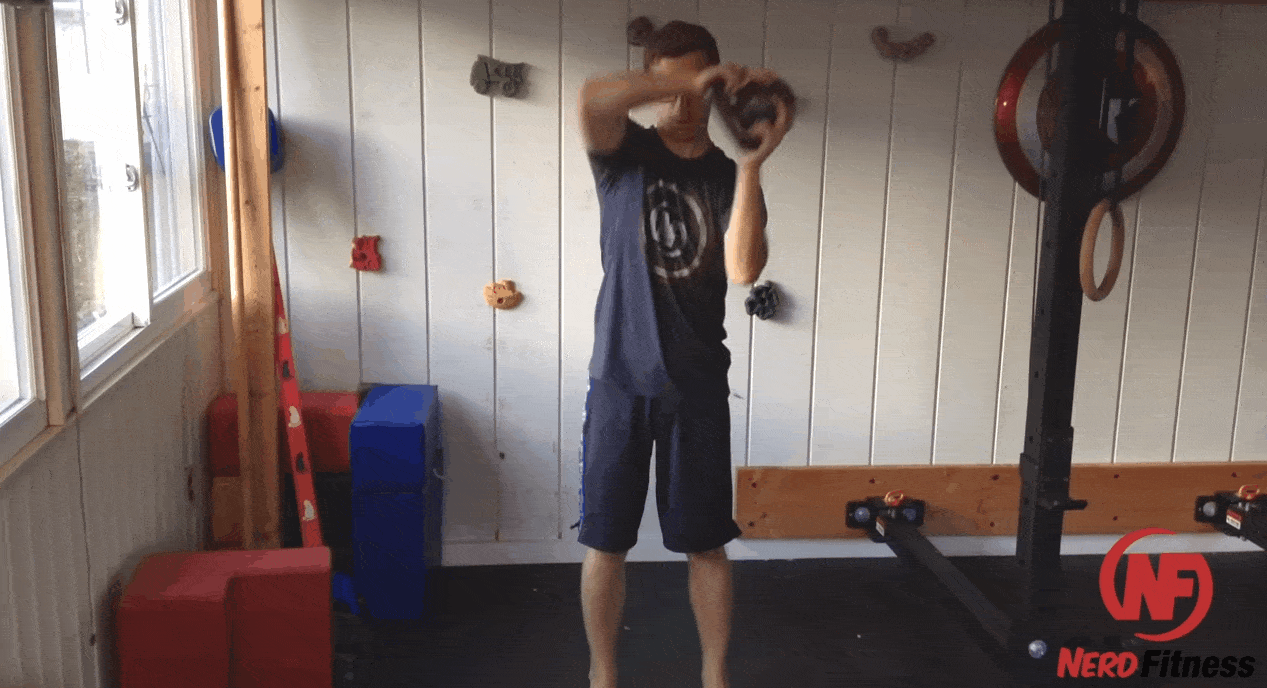
8 Halos (each side)
10 Goblet Squats
8 Overhead Presses (each side)
15 Kettlebell Swings
8 Bent Over Rows (each side)
6 Front Rack Reverse Lunge (per side)
And because we like to have fun around here, we made a graphic where superheroes do the workout.
Here’s the Beginner Kettlebell Workout as an infographic:
Our Beginner Kettlebell Workout is what’s called a circuit (you can learn all about circuit training here). That’s just a fancy term for doing a workout like so:
1 set of exercise A, go immediately to
1 set of exercise B, go immediately to
1 set of exercise C, and so on…
Repeat from the top!
Your long-term goal should be to do 3 full circuits, back to back, for a complete workout.
4 if you’re on fire, like in NBA Jam.
If you can only go through it once or twice, that’s okay too!
And if you need to take a break at any time between sets or after a circuit, do it! You do you.
Prior to jumping into the kettlebell circuit, don’t forget to do some mobility warm-up (you can see our warm-up routine here):
Nothing too crazy, just something to “grease the groove” and get your body used to movement so you don’t pull any muscles once you start swinging the kettlebell.
In other words, preparing your muscles and joints to move some weight around!
A few minutes of running in place, air punches and kicks, some jumping jacks, and arm swings, should get your heart rate up and your muscles warmed for the Kettlebell Workout.
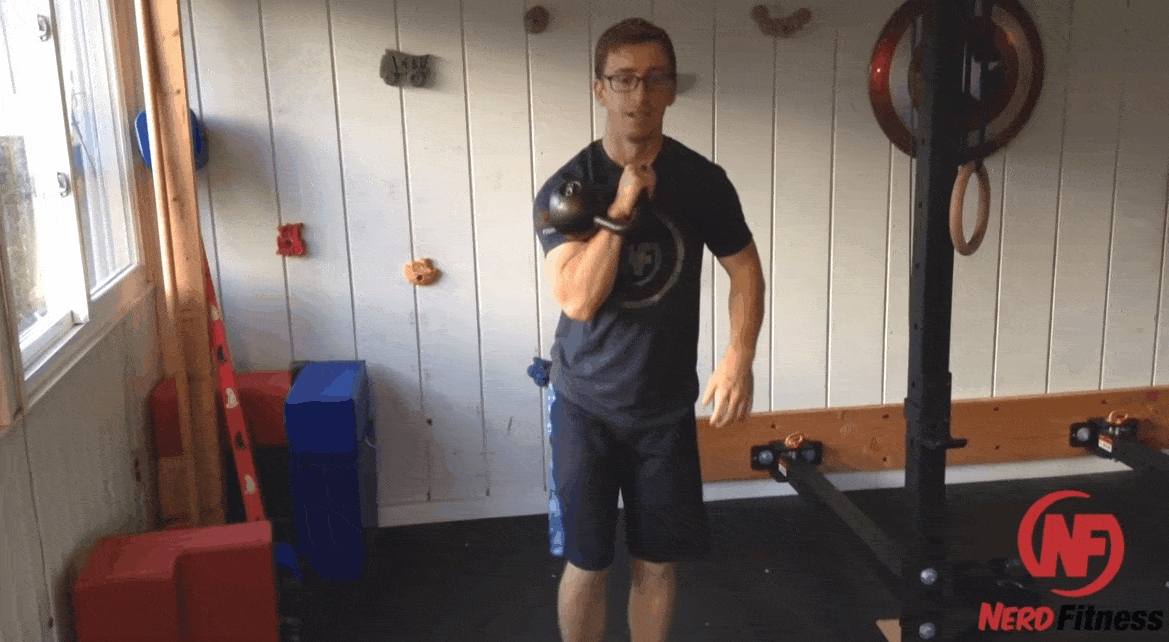
You can do all of the Beginner Kettlebell Workout with one single bell, from anywhere.
We’ll go over each more in our next section, so you can perfect your kettlebell technique.
Tip from Coach Matt: for the goblet squat, focus on depth. It’s more important to practice doing a full squat than to pump out reps. If you can’t make 10, don’t stress it. Do what you can.
#3) KETTLEBELL OVERHEAD PRESS
Grab the kettlebell with one hand, with the handle going down your palm (if the handle is too close to your fingers it’ll pull your wrist down).
Press straight up with your fist driving the movement (your fist would be pointing up the entire time).
Reverse the movement and bring the kettlebell back down. Then repeat.
Tip from Coach Matt: when doing the overhead press, get tight. Tightening your muscles will engage your core, offering a fuller body workout.
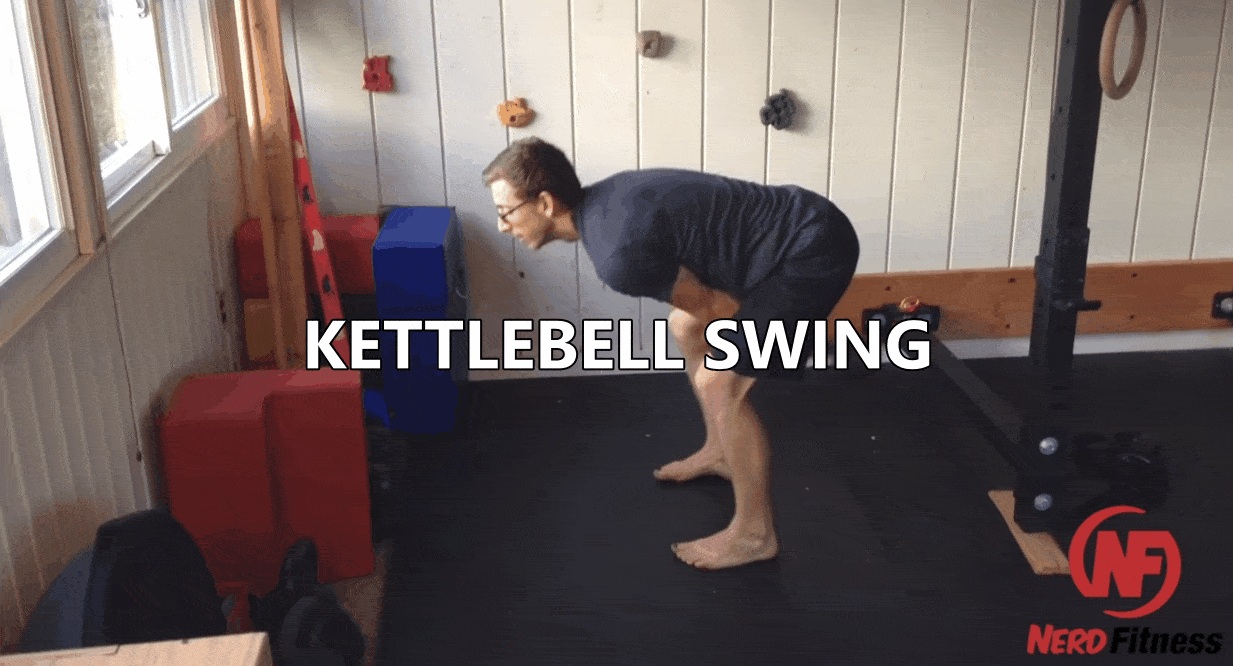
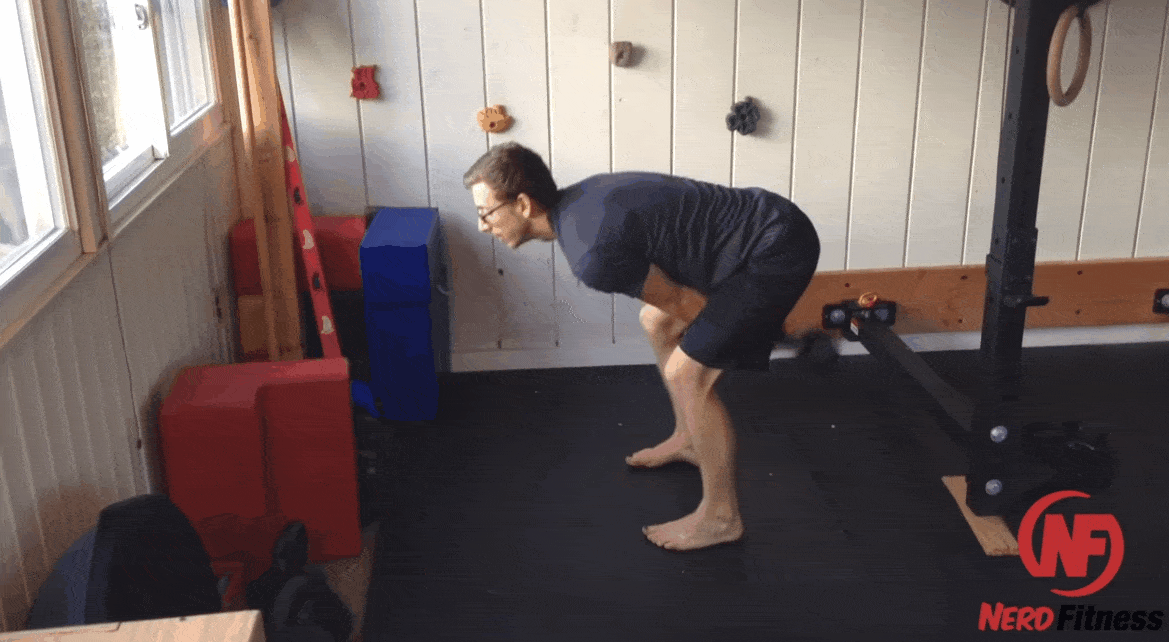
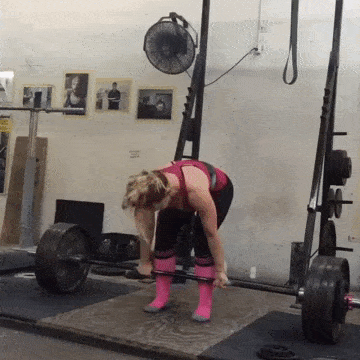
#4) KETTLEBELL SWING
Get down into a bent-over, flat-back position and grab the kettlebell with both hands from the handle.
Swing the kettlebell behind you, then get ready to jump up.
Jump up (without leaving the ground) and swing the kettlebell up. You should be standing tall at the peak of the movement.
Reverse the movement and bring the kettlebell back down and behind you.
Repeat.
Tip from Coach Matt: during the kettlebell swing, focus on hinging your hips. The swing is like a deadlift movement, so you should feel it in your hamstring and glutes.
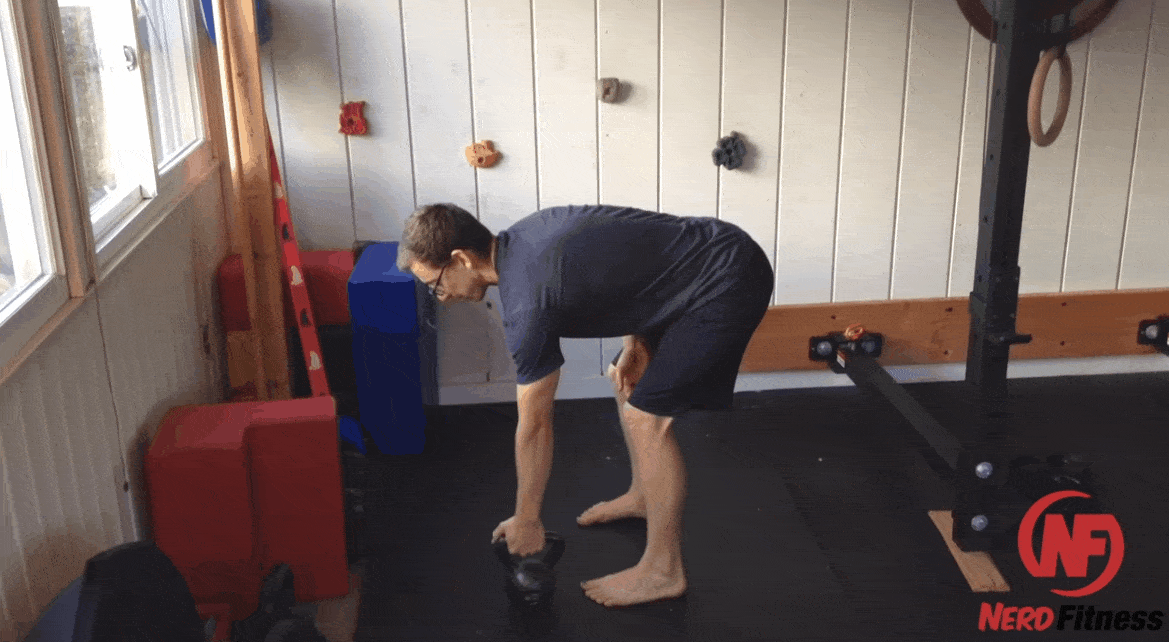
#5) BENT OVER ROW
Get down into a bent-over, flat-back position and grab the kettlebell with one arm.
Pick up the kettlebell by driving your elbow up into your rib cage.
Lower the kettlebell back down by reversing the movement.
Tip from Coach Matt: try to keep your back straight and stomach tight during the row. This will help engage your legs for stabilization as you pull the kettlebell toward your stomach.
#6) FRONT RACK REVERSE LUNGE
Grab the kettlebell with one hand and rest the weight between your arm and chest.
Step your leg back (the same side your kettlebell is on) and lower down until your shin is parallel-ish with the ground (or as low as you can).
Spring back up to your starting position.
Tip from Coach Matt: for the lunges, again keep your back straight. By keeping your shoulders back, you’ll get a fuller body workout when you come in and out of your lunge.
Boom! There you have it.
The 6 best kettlebell exercises for beginners.
If you want someone to review your form on any of these kettlebell movements, or you’re looking to level up your kettlebell game, our coaches can do just that! Our spiffy mobile app lets you send a video of your exercises directly to your coach, who will provide feedback so you can perfect your technique.
In case you’re still on the fence about grabbing a kettlebell, let’s dig into them a little bit more.[1]
What Type of Kettlebell Is Best? What Is the Best Kettlebell Weight for Me?
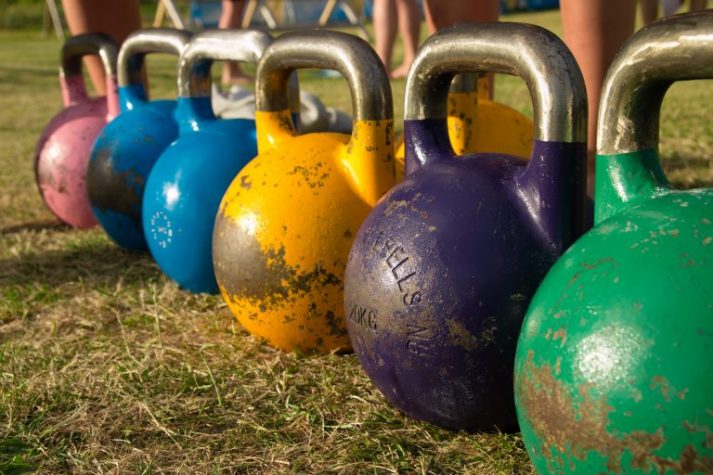
So you want to buy a kettlebell, eh?
They come in all sorts of materials, in all sorts of shapes, and in all sorts of sizes.
Which one you pick will come down to your personal preference, your budget, and your experience with kettlebells.
Let’s contemplate the following when picking the right kettlebell:
#1) Standard vs.Competition. A standard traditional kettlebell will be cast iron, and as the weight goes up, the dimensions go up.
For example, a 16kg (35 lb.) bell will be larger than a 6kg (15lb) bell. This isn’t true for competitive kettlebells.
No matter their weight, competitive kettlebells will have the same dimensions for bell shape, base, and handle width.
So the 16kg will look just like the 6kg. This can be helpful to make sure you are consistent with your technique.
#2) Weight. In general, pick a weight that allows you to complete a workout with good form.
When in doubt, start with a lighter weight, as you can always increase the weight/size later. If you’re forcing me to pick one for you, knowing NOTHING about you, I’d say consider purchasing a 16kg if you’re a male or 8kg if you’re a female.
Now, this isn’t an exact science, and we are all unique snowflakes. If you think you’re stronger than average, go heavier. Not quite there? Go lighter.
#3) Ballistic vs. Grind. You’ll often hear the terms ballistic and grinding in kettlebell workout discussions, for fast and slow movements respectively.
Ballistic movements would be quick, like the kettlebell swing.
Grinding movements would be slow, like the overhead press. For ballistic movements, you might actually want a heavier kettlebell, to help with momentum.
For grinding movements, less weight might be in order to help with control.
For now, if you are just starting out, go ahead and stick to one kettlebell. Branch out as you advance in experience.
#4) Handle. This is where quality comes into play. You’ll be doing many, many repetitions with your kettlebell.
If the handle has rough edges, you’ll feel each and every one of the movements cut into your hand.
Not fun.
Quality matters when it comes to handles. So we’ll chat about ideal brands in a moment. I’ll end our discussion on handles by saying they are generally standardized at 35mm for thickness.
Use this as your baseline for differences when comparing bell grips.
Okay, let’s talk about kettlebell brands:
#1) Cap Barbell. This would be an ideal first kettlebell. Not too expensive and of decent quality, Cap Barbell kettlebells can be found on Amazon or at any Walmart.
The Cap Barbell is the most highly reviewed and reasonably priced kettlebell we have encountered. Do you have any experience with one?
Let us know in the comments if you like it!
#2) Kettlebell Kings. You see Kettlebell Kings ranked as some of the best bells out there. Not a bad price for the quality.
Plus, they offer free shipping in the US, which is nice since you’re essentially mailing a cannonball.
#3) Dragon Door. Some call Dragon Door the gold standard of anything and everything “kettlebell.”
I wouldn’t disagree, but expect to pay for it.
#4) Onnit. Onnit rocks and they offer good quality bells that are quite popular.
OUR ADVICE: Before you go buy an expensive kettlebell, check your gym!
I bet it has kettlebells, and you can try out different brands/ sizes/ weights/ styles to see which one you like the best.
Check out Craigslist or a used sporting goods store like Play it Again Sports for a previously owned kettlebell from a person who no longer needs it.
A used kettlebell is still a kettlebell.
Crafty? Build your own!
Here’s a video on how to make a kettlebell:
If you make your own kettlebell (be careful – you don’t want it breaking mid-swing!), please email me. I would be so pumped!
And if you need help with ALL of this and just want somebody to tell you how to train, I got you covered too.
Can You Lose Weight with Kettlebells?
If you’re trying to lose weight, a kettlebell and the workout routine above would be a great part of the plan!
The other part of the plan should be your nutrition.
As we lay out in our Coaching Program and our massive guide on “Healthy Eating,” we believe that proper nutrition is 80-90% of the equation for weight loss.
No joke.
It’s by far the biggest factor for success.
So will you lose weight training with kettlebells?
Maybe!
If you fix your diet AND begin to incorporate our kettlebell routine a few times per week, you’ll will find yourself building muscle, losing fat, and getting stronger!
If your goal is weight loss, you have to eat less than you burn each day. This can be through eating less and burning more (from the kettlebell workout above)
Processed foods and junk food make it really tough to lose weight: They have lots of calories and carbs, low nutritional value, don’t fill you up, and cause you to overeat.
Liquid calories are sabotaging your efforts. Soda, juice, sports drinks: they’re all pretty much high-calorie sugar water with minimal nutritional value. Get your caffeine from black coffee or tea, fizzy-drink fix from sparkling water.
Not losing weight? Track your calories and work on consuming slightly less each day. We tackle this point in-depth in our article “Why can’t I lose weight?”
Eat more protein! Protein helps rebuild muscle, and can help you stay under your calorie limit because it’s satiating and filling. Here’s exactly how much protein you should be eating every day.
Those tips should get you started, but if you want more specific instruction and guidance, check out the NF Coaching Program – Your Coach will build a routine tailored to your individual needs and what equipment you have available:
Download the Kettlebell Worksheet!
Like most things in life, the important aspect of any exercise regimen is starting it.
No matter what strength training program you choose, start TODAY.
You don’t need to get strong before you can play with a kettlebell. You can play with a kettlebell to get stronger!
Here’s that Beginner Kettlebell Workout one more time to recap:
Halos: 8 reps each side
Goblet Squats: 10 reps
Overhead Presses: 8 reps
Kettlebell Swings: 15 reps
Bent Over Rows: 8 reps each side
Front Rack Reverse Lunge: 6 reps each side
Here are the next two steps you can take with our community if you dig what we do!
1) Check out our 1-on-1 Online Coaching program. Our coaches can work with you to pick up a kettlebell for the first time or to learn more advanced moves.
Whether you are brand new to your fitness journey, or ready to take it to the next level, we have your back!
2) If you want an exact blueprint for growing strong, check out NF Journey. Our fun habit-building app helps you exercise more frequently, eat healthier, and level up your life (literally).
We even have a fun kettlebell adventure that you can follow!
Try your free trial right here:
3) Join the Rebellion! Join our free community with a biweekly newsletter, and I’ll send you our Beginner Kettlebell Worksheet.
Simply sign up in the box below, and let us know what you think of it!
Grab Your Beginner Kettlebell Routine Worksheet!
Complete this workout at home or gym with 1 kettlebell.
Avoid the common mistakes everybody makes when doing kettlebell exercises.
Build strength, burn fat, level up your life!
I’d love to hear how this goes for you! Simply leave a comment below.
Hell, leave a comment if there’s anything else we can help you with too.
For the Rebellion!
-Steve
PS: If you are using Kettlebells to get started with Strength Training, make sure you read the other articles in our Strength Training series!
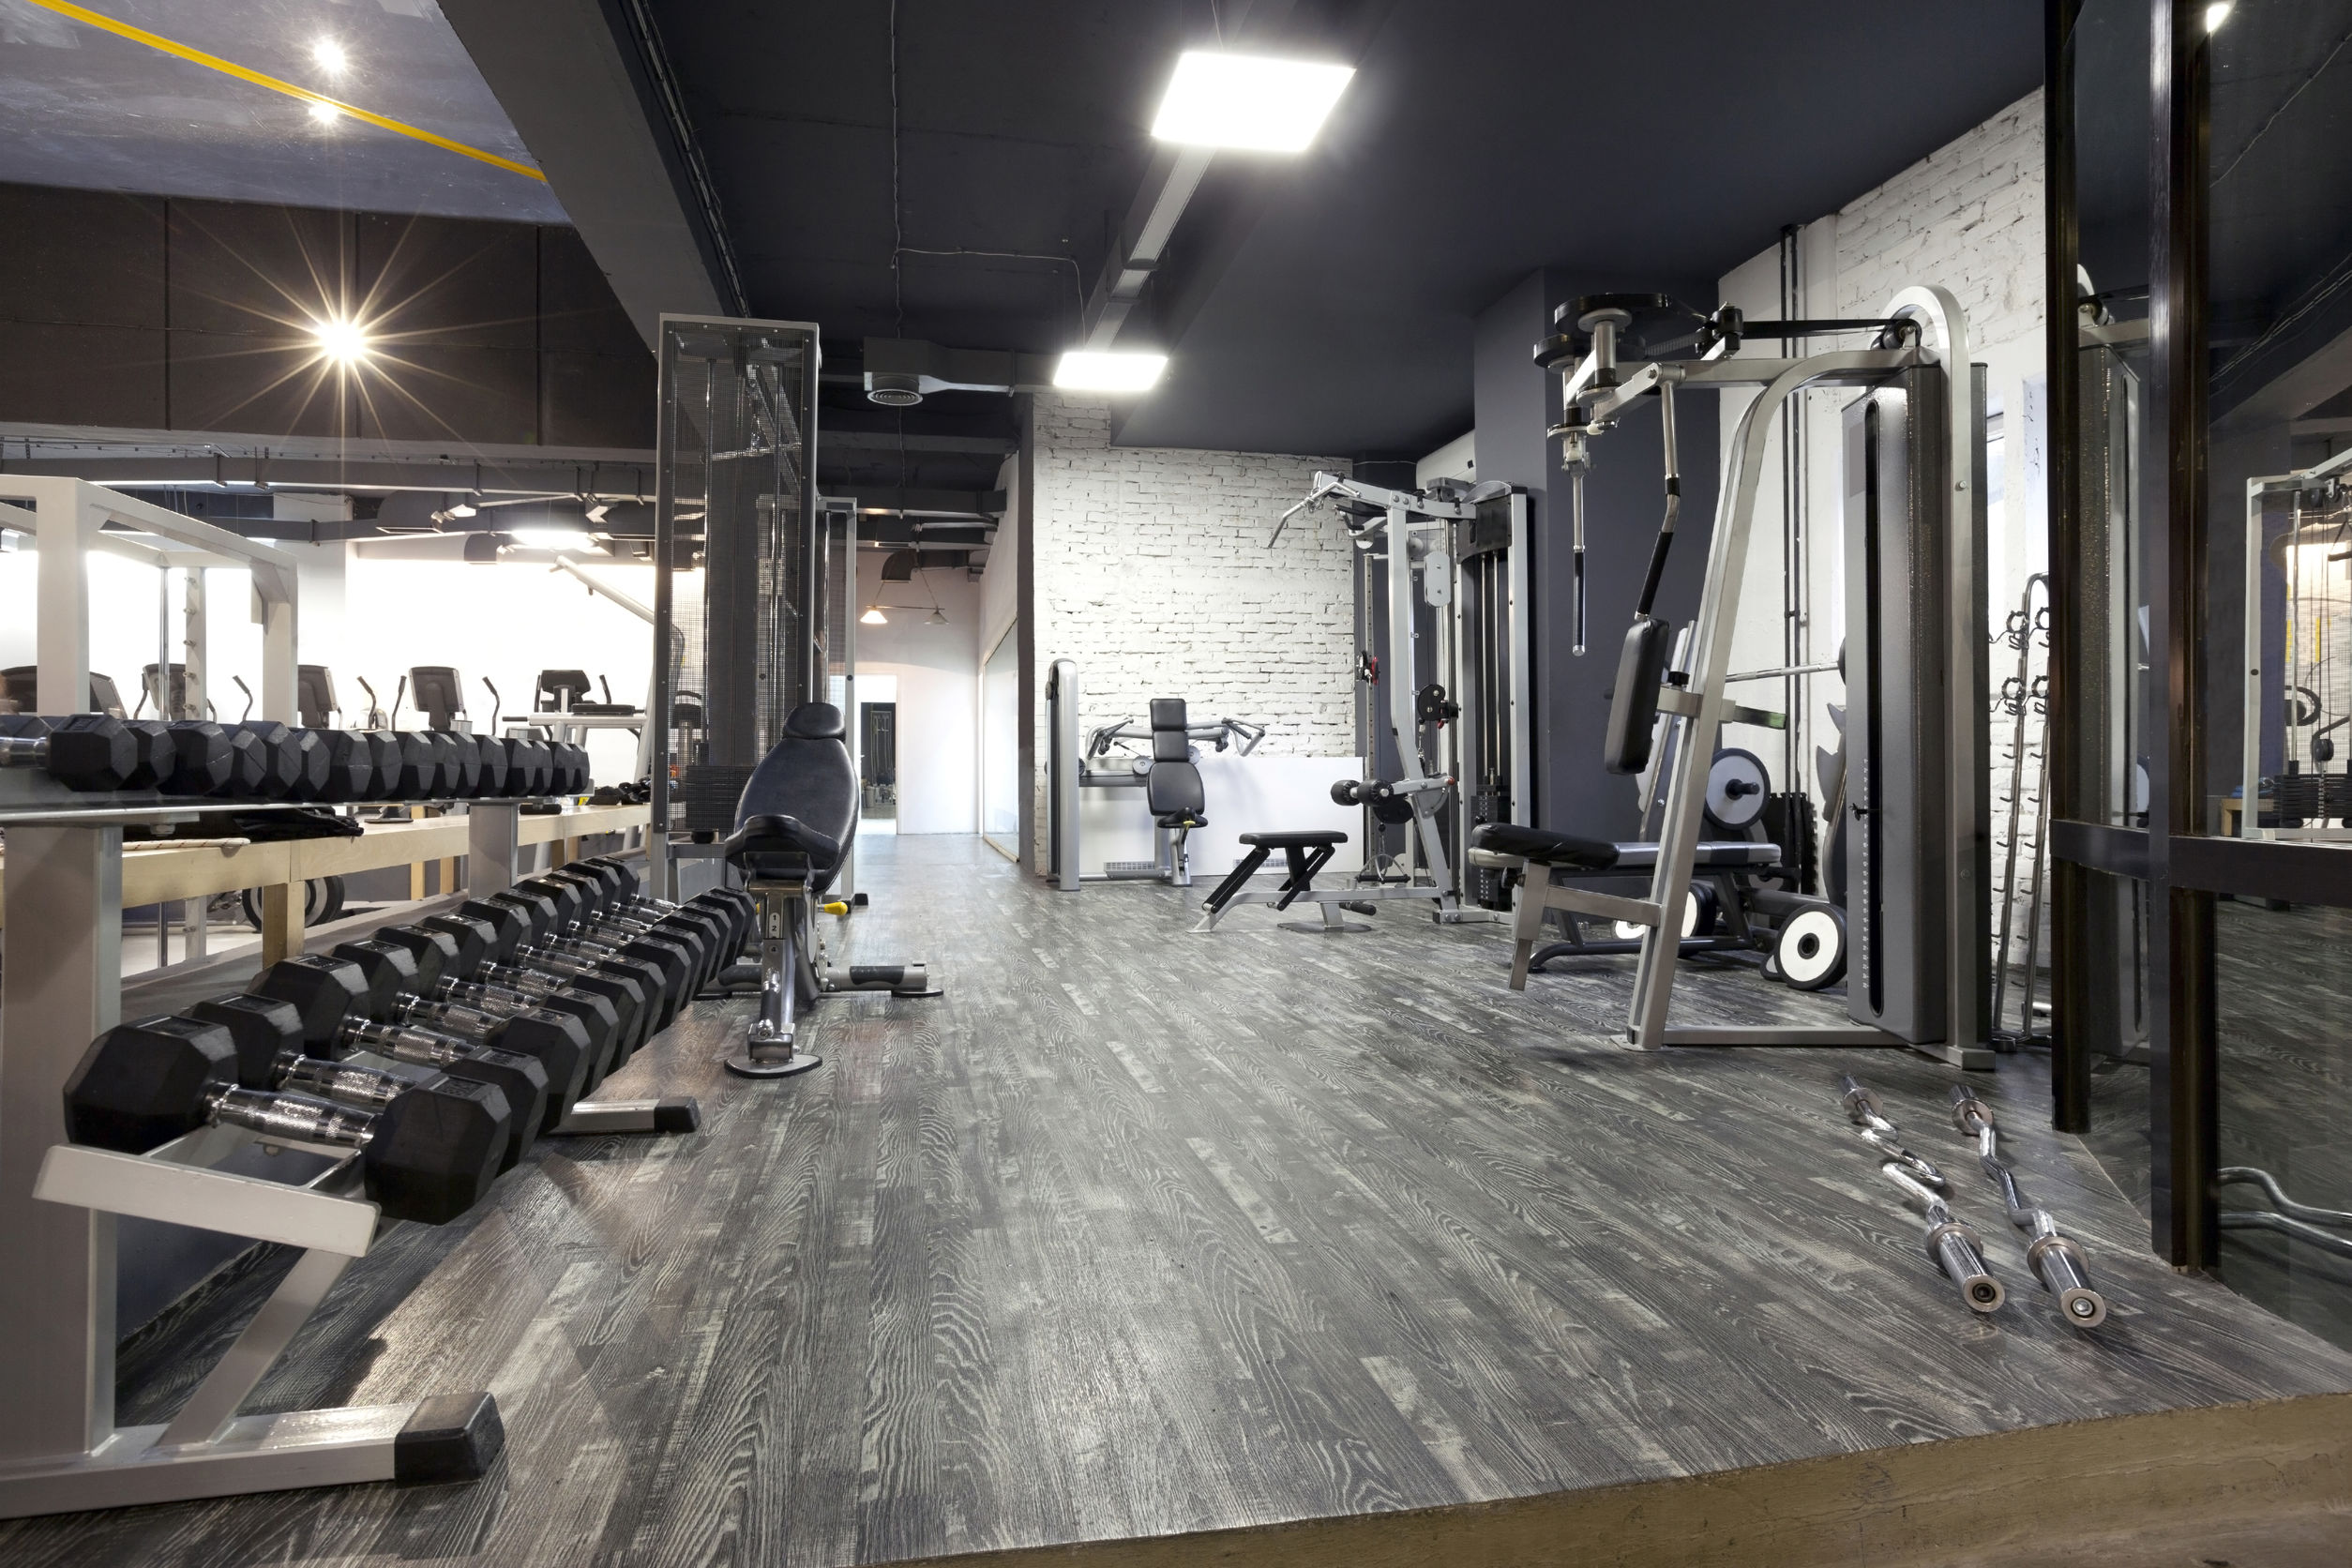
Welcome to the Ultimate Beginner’s Guide to the Gym!
As part of our Strength 101 series, this guide will dive deep into everything you need to know about working out properly in a gym.
By the time you finish reading, you’ll never have to wonder “what should I do in the gym?”
Plus, I bet I also make you laugh once or twice with bad jokes and perfect gifs.
We’ve helped thousands of Online Coaching Clients build confidence and start strength training in the gym, so I worked with our coaches to create today’s Ultimate Beginner Gym Guide!
Okay, time to start working out. Let’s hit the gym and explore the following:
Regardless of your physique, if you are 400 pounds or 100 pounds, going to a regular commercial gym for the first time can be intimidating as hell.
And that’s only if you can get yourself to use 20 Seconds of Courage to walk in the door!
I explain exactly what I mean by it in this video:
I know many people who say “gyms are not for me,” or “gyms are dumb” and never even go into one, simply because gyms can be scary/not welcoming/not cool.
Now, if you CAN work up the courage to walk through the door, you’ll be faced with the following:
#1) People with pained looks on their faces dutifully using machines that somewhat resemble medieval torture devices.
#2) Others on cardio machines, treadmills, and ellipticals, and you can already picture yourself wiping out and ending up in a YouTube fail montage.
#3) Really strong jacked people picking up heavy free weights so effortlessly that you can’t help but instantly compare yourself to them…and get intimidated.
If you struggle with self-confidence, or you don’t love how you look, you might assume that everybody around you will be judging you the whole time and don’t want to subject yourself to this torture.
In fact, you might think that somehow you need to get in shape FIRST, and THEN you can go to the gym…
Wrong!
You go to the gym TO get in shape. And I will get you there.
If you are going to start using a gym, here are some truths you need to know:
Everybody around you is just as self-conscious as you are. Yes, that super jacked dude. Or that thin (or jacked) fit woman on the elliptical. They aren’t focused on you, because they’re too busy living inside their own head wondering if everybody is thinking about them.
Everybody starts somewhere. You don’t look good so that you can then go to the gym. You go to the gym to get stronger, more confident, and then look good.
MOST will applaud you for trying. When I see somebody who is severely overweight at the gym, it makes me happy – they’re trying to better themselves! That’s freaking AWESOME. This is the mentality 90%+ of the people will have.
MANY will be too self-focused to even notice you. These are the dudes lifting up their shirt in the mirror to check their abs, doing bicep curls in the squat rack, and/or making sure they take photos to post on Facebook to prove they did in fact go to the gym. #Fitspo #Instagram #OtherNonsensicalHashtags
A RARE few will judge. Though, they’re not just judging you, I promise. They’re judging EVERYBODY around you, because they can’t help but compare themselves to others and they’re terrible people. This is no different than in real life. Screw these people, haters gonna hate, slaters gonna slate.
Sure, you can say “people are mean, the gym is scary, I just won’t show up.” But then, the terrorists win. And so do those people. So f*** that!.
Instead, this is going to be your gym mentality:
Accept that some people suck (like anywhere in life), and most people are indifferent or focused on being self-conscious themselves. Everybody else will applaud you for trying and being there.
Make an epic Spotify playlist that makes you feel heroic.
Wear clothes that you feel comfortable in.
Keep your headphones on, zone out everybody, and go about your business. Imagine you’re the only one there.
These are tips Coach Matt brings up in his video How to Overcome Gym Anxiety:
We work with all of our Online Coaching clients who are worried about looking foolish in the gym. We know this is a huge challenge, so we create small levels and missions for our clients to get them comfortable in the gym.
We’ve helped people just like you go from sheepish beginner to barbell-wielding badass. Let us help you!
Sign up in the box below and I’ll send you this workout free (along with some other goodies):
Grab Your Beginner Bodyweight Routine Worksheet. No Gym Required!
Complete this workout at home, no equipment required
Avoid the common mistakes everybody makes when doing bodyweight exercises
Learn how to finally get your first pull-up
How Often Should I go to the Gym?
Many people think they need to hit the gym 6 days per week, dutifully alternating weight training with cardio and bootcamps to get that jacked/toned body they’re after.
That sounds exhausting and miserable to me…
…and I LOVE the gym!
So here’s what you need to know about gym frequency:
Go as much as you can, or as little as you want.
All of the workouts in this guide are “full-body workouts” which means they work out all of the muscles in your body.
And as we lay out in “Strength 101: Beginner Strength Workouts,” your muscles get broken down in the gym and then they rebuild themselves stronger over the next 48 hours.
For that reason, we recommend you hit the gym 2-3 times per week, with a day off or more in between each session.
This advice comes with a few caveats:
If you’re a single mom or working two jobs or just busy living your life and you can only go to the gym once, great! Once a week is better than zero times a week!
If you have specific athletic or cardiovascular goals you’re training for, then hitting the gym more frequently might get you faster results.
We craft our workout routines for our coaching clients around their schedules – some people hit the gym 5 days per week, while others only go once a week. We’re all unique snowflakes!
Okay! Now that we got THAT out of the way, are we ready!?
Great! Let’s level up in the gym!
Level One Gym Workout: First Day At the Gym
The toughest part about going to a gym for the first time is just walking through the door.
If you do that, you’ve already gone farther than 74% of the population (a totally made-up statistic that I’m using to prove my point), so give yourself a pat on the back.*
So on your first day in the gym, just GOING to the gym is a big step in the right direction. And I’m proud of you.
Note: You might need to also change into gym clothes if you’re coming from work. I know walking out onto the floor in gym clothes might be intimidating too (another chance to use 20 Seconds of Courage).
But now you’re wondering, “Steve you half-witted, scruffy-looking nerf herder, what do I DO on my first day at the gym?”
If you haven’t already done so, ask somebody at the front desk the following:
“Hey I’m new here, could I get a tour of the gym?”
“Excuse me, today’s my first day, can you point me in the direction of a place I can stretch?”
“Can you help me work the treadmill?”
Go full YOLO and try to figure these things out on your own.
If you’re able to get a personal tour, great! Ask the treadmill question when you get to them. If they can’t walk you through, just do a lap yourself and see where things are and who is doing what.
Pro tip (also works outside of the gym): pretend you’re confident – even if you’re dying inside – walk with purpose, and nobody will question why you’re doing what you’re doing.
So, when you’re ready, walk over towards the stretching area, and do a few basic mobility/warm-up stretches while continuing to get the lay of the land and see what people are doing (don’t stare excessively, cool? cool).
Roll your head in half-circles slowly, from shoulder to shoulder. 5 circles in each direction
Slowly roll your shoulders forwards and backwards. 10 each way.
Keep your legs stationary, and twist your torso, left and right. 10 twists on each side.
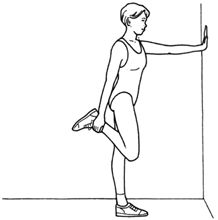
Quad stretch: Hold each stretch for 5 seconds. Do 3 on each side:
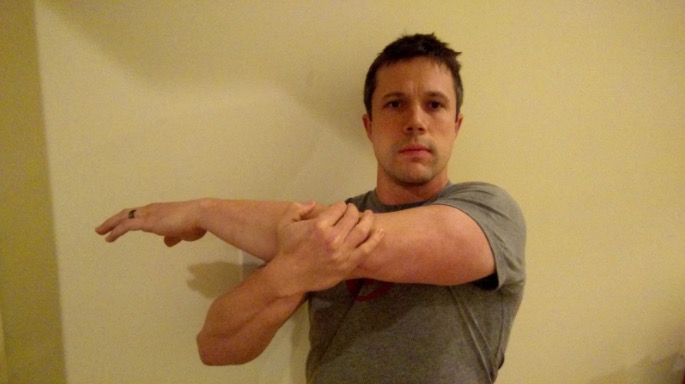
Cross one arm in front of your chest, then the other, as demonstrated here by lead coach Jim: Hold each stretch for 5 seconds. Do 3 on each side:
These movements have the awesome side-effect of you being able to look around the gym and get the “flow” of things, while still looking busy. Jim STILL uses this “trick” when checking out new gyms.
Really, just get your body moving. We don’t have to make you a gym warrior on Day 1. Some stretches and sightseeing will be good enough.
LEVEL 1 MISSION:
Take a lap around the gym and do your stretches.
If you walked out right now after doing these things, it’s still a win for Day 1 in a gym. Seriously – I don’t care what you do on Day 1 – as long as it leaves you feeling good enough to come back for a Day 2!
GYM LEVEL 1 RECAP:
Walking through the door makes you a winner.
Ask for a tour if you need to know where things are!
Change into workout clothes.
Stand in one spot, do a few stretches, get the lay of the land.
If you’re up for MORE or ready to level up consider going to the next level, become a cardio cadet!
Level 2 Gym Workout: Join the Cardio Cadets
Get on the treadmill and start it up, based on the staff’s instructions.
If you weren’t able to get instructions, many treadmills have a “quick start” button that will start things up.
Why start with just walking?
It gets you moving and out of your head! I know you’re smart – you’re reading NERD Fitness. But you also probably deal with “paralysis by analysis” a lot by overanalyzing everything, so we need to get OUT of our heads and get moving!!
So, for your first 10-15 minutes, just walk. Set the treadmill at 3mph or 3.5 or whatever speed is comfortable but not too strenuous.
A speed that gets you moving and gives you a chance to decide what you’ll do next while you look around the gym. (Aka, it gives you a chance to get out of your head and stop thinking everyone is looking at you. They’re not)
LEVEL 2 MISSION:
Do your Level 1 stretches, then spend 15 minutes walking, and then you are free to go home.
Repeat this as many days in a row that you need to until this starts to feel comfortable and you stop feeling self-conscious.
Scientists, Benedictine monks, and German scholars refer to such a thing as a “routine.”
As you get more comfortable, you can increase your walking speed or length of walking (20 minutes, 60 minutes, whatever)
If I’m gonna walk, I like to crush podcasts while doing so (My favorites: Watch out for Fireballs, Pardon My Take, and Bill Burr). Maybe you listen to Harry Potter on Audible.
Whatever floats your boat.
GYM LEVEL 2 RECAP:
What you do in the gym doesn’t matter – build the habit of going regularly.
Develop confidence at the treadmill with just walking.
Start to realize you have just as much of a right to be there as anybody else.
Give yourself a high five for being you.
This routine of walking and stretching might only be one day in the gym for you, or it might be two months of this before you finally feel like you don’t want to jump out of your own skin while in the gym.
Going to the gym is the habit I want you to build, so this is a great start. Remember, you should be thinking in terms of “days and years,” not “weeks and months”:
We have many coaching clients who spend MONTHS just walking and working up the courage to move beyond the treadmill. That’s cool. We’re all on our own journey, at our own pace, so go at the pace that fits YOUR schedule.
Level 3 Workout: Join the Bodyweight Brigade!
After getting comfortable with the stretching/treadmill routine, you may want to hop on a weight lifting machine at this point like the leg press or chest press machine.
Is this progress? Sure!
Can you do this? Absolutely!
But, but, but… we are going to recommend you try some bodyweight exercises instead as your next step.
Controlling your body through space (not outer space) is going to be more beneficial in the long run than strapping into a machine and moving through a set path.
If you can do bodyweight exercises proficiently, then stepping into a machine is “easy.”
The reverse is not always the case.
So, if we’ve convinced you to try some bodyweight exercises, then next thing is to identify a place in the gym you can do bodyweight exercises where you’re not in the way. This oftentimes might double as the place that some people are doing stretches, where you’ve already been before!
If you don’t know, ask the front desk or find a trainer! That’s what they’re there for!
LEVEL 3 MISSION:
After your 5 minutes of warm-up (Level 1) and 10 minutes on the treadmill (Level 2), your next step is to go to a place you can do the Level 3 Gym Workout:
10 bodyweight squats
10 push-ups
10 bodyweight squats
10 push-ups
10 bodyweight squats
10 push-ups
Can’t get through it all? No worries, do what you can.
This style of alternating one exercise with another is called a circuit workout, by the way!
If you don’t know how to do those movements well, watch coaches Jim, Staci, and myself show you how!
If you just did the above mini-workout for a month, you’d be off to a great start! If you’re feeling frisky and starting to find some confidence in the gym, it’s time to branch out more!
GYM LEVEL 3 RECAP:
Warm up on the treadmill with a 10-minute walk
Find a place where you can do bodyweight movements out of the way
Complete 3 circuits of 10 push-ups and 10 bodyweight squats each at a pace that works for you
Stay at this stage as long as you need, until you can move on!
Note: If you enjoy the bodyweight brigade, or you’re not quite ready to start doing weight training yet, that’s cool too.
We have tons of 1-on-1 coaching clients who have gotten in GREAT shape without ever picking up a weight. It all comes down to constantly increasing the challenge and making progress each week.
Level 4 Gym Workout: Join the Dumbbell Division
It’s time to wander into the place that strikes fear in the heart of most gymgoers:
The free weight section.
Gulp.
DO NOT FORGET THIS:If you are a 400-pound woman, or 85 years old, or a 100-pound man, you have just as much of a right to be in the free weight section as anybody else.
It might take yet another 20 Seconds of Courage to wander in there, so I’m challenging you to try it.
LEVEL 4 MISSION:
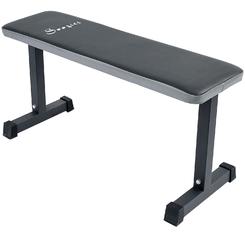
After you do 10 minutes of walking on the treadmill, go to the dumbbell section, grab a single 10 lb (4.5kg) dumbbell, and find a flat bench like this:
Stand next to that bench, and make sure nobody is using it. If somebody is at a bench nearby, ask them “is anybody using this bench?” If they say no, put your towel on the bench, your 10 lb dumbbell on it, and stand next to it.
We’re going to add a 1-arm dumbbell row to our circuit above:
The last dumbbell exercise to learn is the dumbbell Romanian deadlift (RDL). This is like a cousin of the bodyweight squat where we move through the hips more than the knees.
Grab a pair of dumbbells now, push your hips back and bow forward like you’re being polite. Or, you’re like one of those novelty “drinking birds.”
Bring the dumbbells down to about your knees, not to the ground, then stand back up.
You can see the exercise right here:
Every other workout, swap out the goblet squat for the dumbbell Romanian deadlift.
So our circuit is now alternating with each gym workout.
Do 3 circuits of each if you can! If the weight is too light, use heavier dumbbells the next time you train.
Level 4 Gym Workout: Dumbbell Division C:
10 goblet squats OR 10 dumbbell Romanian deadlifts
10 push-ups
10 dumbbell rows per arm.
GYM LEVEL 4 RECAP:
Remember you have just as much a right as everybody else to use the free weights.
Take a deep breath, go into free weights section, and get a 10 lb. dumbbell.
Learn to do a bent over row and goblet squats.
Learn to do dumbbell Romanian deadlifts.
High five yourself for weight training.
Training with dumbbells opens up infinite possibilities.
Okay, probably not INFINITE possibilities, but close enough.
If you are somebody that wants to learn how to train with dumbbells even more seriously, or you’re looking for ways to put that dumbbell set you have in your garage to proper use, let us help!
If you have a great program to follow, you can get in incredible shape with just a set of dumbbells.
Level 5: Enlist in the Barbell Battalion
The two final pieces of the puzzle are things I want for you so badly, I can taste it. These two exercises have changed my life, our lead coach Jim’s life, Staci’s life, and the lives of hundreds of thousands of people in the Nerd Fitness Rebellion:
And here is a quick video demonstration of the Squat, but I would REALLY read our full article!
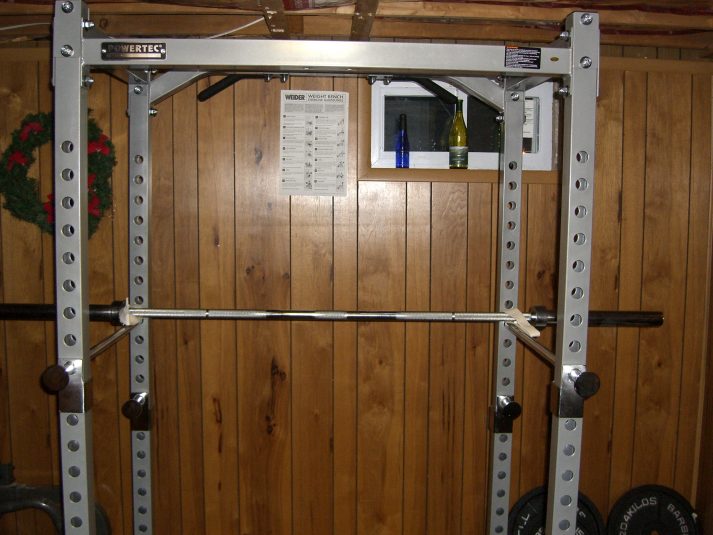
And then I want you to find a squat rack:
THIS IS ONE TYPE OF SQUAT RACK (the barbell is NOT connected to the apparatus). USE THESE:
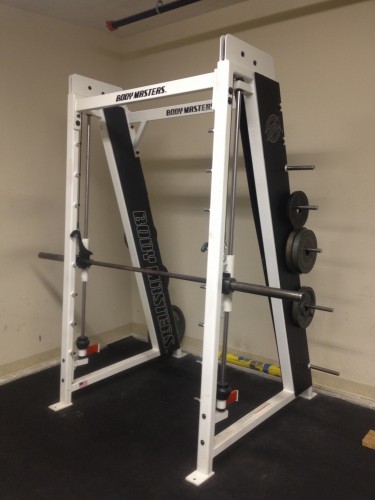
THIS IS A SMITH MACHINE (bar is attached to apparatus). THIS IS DIFFERENT FROM A “SQUAT RACK”:
Note: if you are training in a hotel gym, an apartment gym, or at some locations like Planet Fitness, they might NOT have a squat rack!
This can be for a variety of issues (liability, lack of space, most people just want to use a Smith Machine, etc.). They might even tell you, “A Smith Machine is the same thing.” It is not, in fact, the same thing. You hopefully can find a gym that has an ACTUAL squat rack with a free barbell.
If your gym doesn’t have a squat rack, and you want to start barbell training, I would consider finding a new gym or just hanging out in the Level 4: Dumbbell Division!
If using a squat rack scares the crap out of you: wait to attempt your FIRST trip to the squat rack when the gym is nearly empty, or recruit a buddy who knows what they’re doing. If there’s a special day you can go VERY early to the gym, or VERY late, or during the workday, do it then.
Watch this video from The Nerd Fitness Prime about how to set the ‘pins’ in the squat rack to put the bar at the proper height!
YOUR NEXT LEVEL 5 MISSION:
Attempt 1 set of a 5 barbell squats with JUST the bar (first ask the staff or a trainer how much the bar weighs: most standard barbells weigh 45 lbs (20Kg) but your gym might not have standard barbells).
You can then complete our tried and true circuit – replacing goblet squats with barbell squats.
So our circuit is now 3 circuits.
Level 5 Gym Workout: Barbell Battalion A:
10 barbell squats or 10 dumbbell Romanian deadlifts
10 push-ups
10 dumbbell rows/side
(See Level 4 for explanations on the Dumbbell deadlifts and rows)
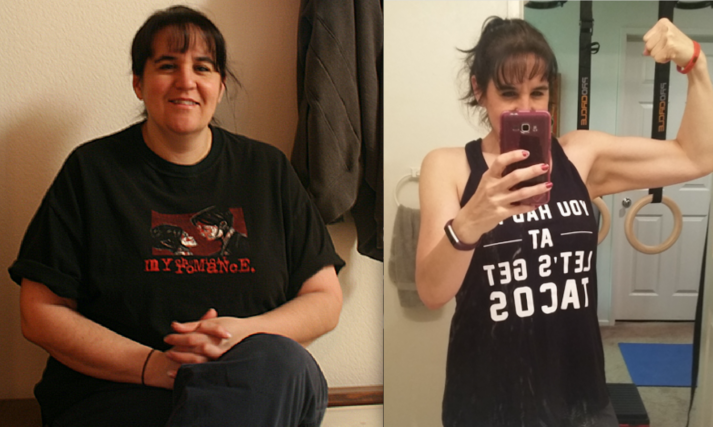
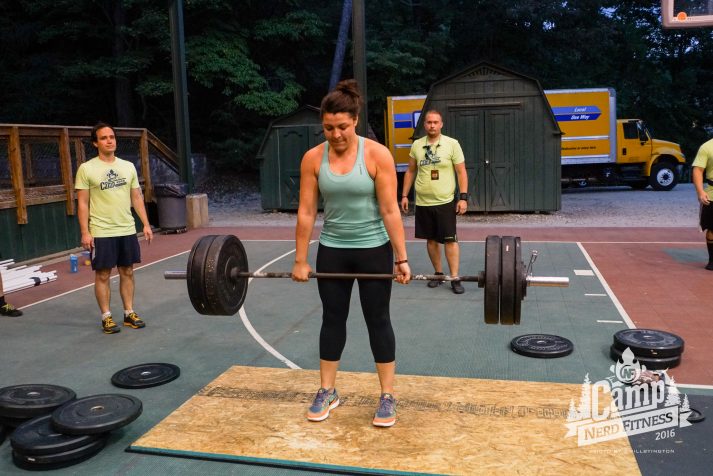
Congrats! You’re using barbells! If you haven’t already read NF’s Senior Coach Staci’s transformation story of how she went from barely being able to lift a 10 lb dumbbell to now deadlifting 425 lbs, it’s a really inspiring story!
Speaking of Staci, let’s move on to her favorite exercise (and mine!)…
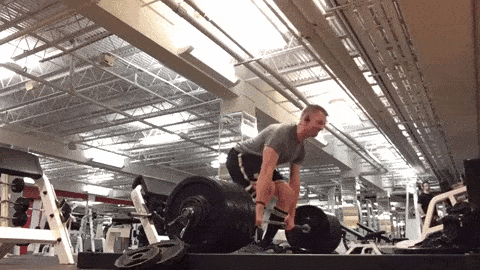
The deadlift movements starts with the weight on the ground, and ends with it back on the ground.
If you’ve got regular, large weights (usually 45 lbs/20 kgs) on each side then the bar sits the proper height off the ground.
Some facilities have lighter plates at that same large diameter. Use them.
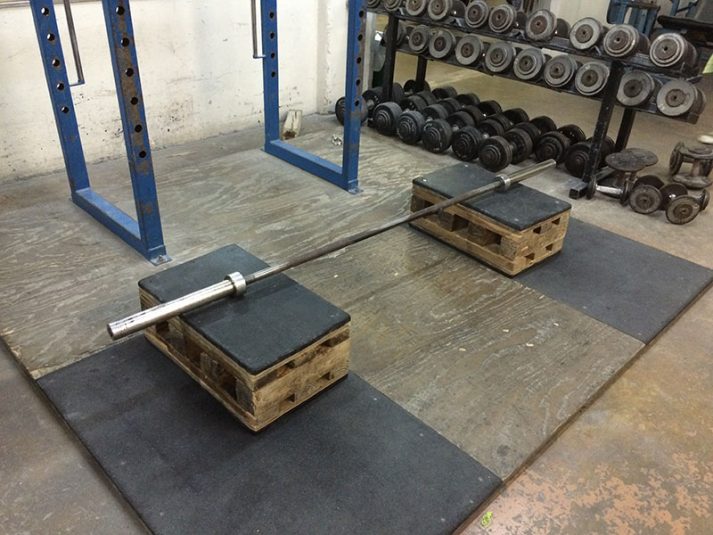
If you are lifting less weight (or just using the bar to start off) then DON’T do the deadlift from the ground. The bar will be too low to the ground and mess up proper technique.
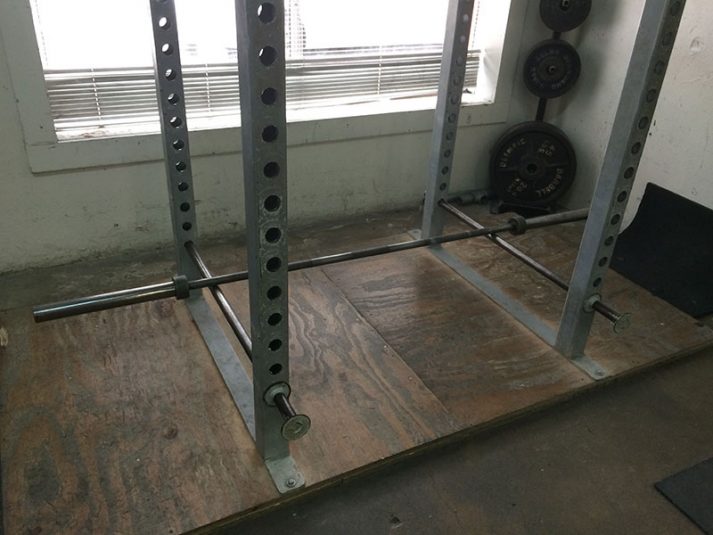
Instead, do the following to start your deadlifts at proper height:
1) Use blocks to adjust the barbell starting height:
2) Use the safety bars in a squat rack to set the height of the bar correctly!
3) Do the Romanian deadlift instead! (Whew, glad we learned that!). It’s the exact same movement as the dumbbell Romanian deadlifts, you’re just using a barbell instead.
START WITH A LIGHT WEIGHT – JUST the bar. As we cover in our “How much weight should I lift?”, you should ALWAYS start with just the bar.
And work on technique.
Only then should you start adding more weight, and add it slowly – you’ll be picking up heavy weights in no time, so don’t rush it.
Here’s Staci demonstrating a proper barbell Romanian deadlift from Nerd Fitness Prime:
Once you’ve started doing these two movements in your routine, your two alternating gym days will look like this. Simply alternate every time you go to the gym (with a day off in between sessions).
Focus on proper form, and slowly start to add weight to the bar.
You are now a gym “regular” and I salute you!
Now, I know the barbell squat and barbell deadlift are two complex, potentially scary exercises. It’s important to get your form correctly now when you are just lifting the bar, so that you don’t hurt yourself once you start adding weight!
If you want a professional to check your form, tell you when to add weight to the bar, and teach you other barbell movements, check out our online coaching program!
Level 6 Gym Workout: Gym Class Hero
Did I tell you that I’m proud of you yet? I really am, I promise. Your mom is proud too. So is your dad, but he just doesn’t know how to express it.
So now you’re thinking: “Steve, I did a barbell squat. It was terrifying but I did it. I tried deadlifts too and those are kind of fun.
What’s next? Give me MOAR!!”
It’s like you’ve finally learned to cook, and now you’re asking for more spices.
So, here in Level 6, we’re going to turn you into a full Gym Class Hero. And it requires you to learn a super standard, incredibly challenging exercise that also happens to be amazing for you…
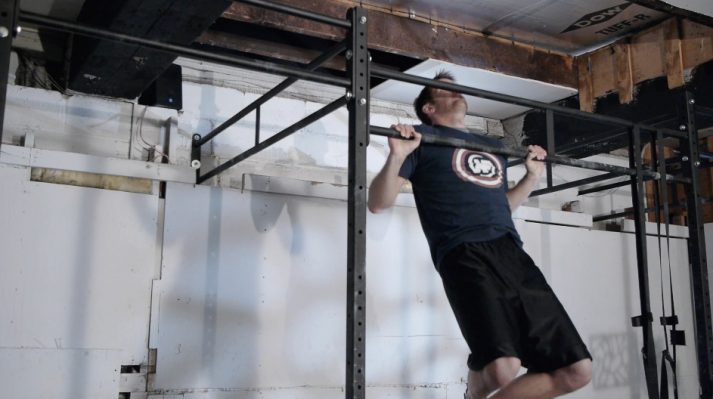
Alternate inverted bodyweight rows with pull-ups or an easier pull-up variation every other workout.
So our circuit will be alternating these movements on your A and B Days:
LEVEL 6 DAY A CIRCUIT – 3 rounds of:
10 barbell squats
10 push-ups
10 pull-ups or pull-up alternatives!
LEVEL 6 DAY B CIRCUIT – 3 rounds of:
10 barbell Romanian deadlifts/regular deadlifts
10 push-ups
10 inverted bodyweight rows
Spice it up further! If you’ve read up to this point, and put the work in, we hope you feel like a Gym Class Hero, and you can start to build your own workout!
Coach Staci explains exactly how to design an exercise routine in this video:
SO what can you do to add some variety? Throw in or replace another exercise!
Want to do some planks? Put them in the circuit after your other movements!
Lunges to replace the squats or deadlifts one day? Sounds good!
There are a ton of different options for what to do and where to go.
If we’ve gotten you more comfortable in the gym, we’ve done our job!
WANT MORE HANDS-ON INSTRUCTION? If you’re looking to get out of the generic workout programs and follow along with a routine that fits your goals and lifestyle, consider checking out our 1-on-1 Coaching Program!
Sure, we help beginners get started with strength training. But we also help seasoned gym-goers take their training more seriously, and even help some folks start competing in powerlifting competitions.
I personally hired an online coach in 2014, and I’ve been with him ever since. It’s the best money I spend every month, and the best investment I make in myself.
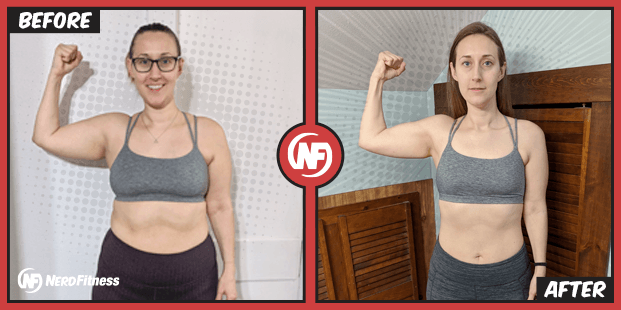
We’ve worked with men and women like Leslie here, a single mom that lost 100 + pounds thanks to following Coach Jim’s program.
She now works on things like gymnastic training and handstands and deadlifts and squats!
Interested in having expert guidance in your pocket? Click on the image below to book a free call with our team!
Gym Etiquette: Tips and Tricks
I asked the entire 15-person staff in our Online Coaching Program – most of whom have trained clients in a gym for 5+ years – what information they would share with new gym-goers:
#1) Take your time. The above 6-level workout plan might take you 12+ months to move through, and that’s okay! I would rather you slowly wade into the water instead of terrifying yourself with the thought of cannonballing into the deep end and never even starting a gym routine.
Stick with what you know, and then bit by bit, one movement at a time, branch out and try new things.
Remember: “days and years,” not “weeks and months.”
#2) Do what makes you happy. You might have noticed above I didn’t mention things like bicep curls, bench press, cardio classes, spin class, etc.
If those things make you happy, start adding them to the mix. However, if you are only doing those things because you think you are supposed to, don’t!
The above 6-Stage strategy combined with a healthy nutritional strategy will get you 95% of the way to where you want to go.
I promise. Nerd’s honor.
#3) Write down everything you’re doing and track your progress. Keep a simple note on your phone, write in a notebook, use Evernote, whatever. Write down what you do so that you know what to do next time.
When you get stronger and things feel too easy, you know to move up in weight slowly (and record that too!).
Keeping track of everything is one of the easiest and most important ways to make progress. Staci, Jim, and I ALL still record every workout and never stop trying to get a teeny, tiny bit stronger with each session.
#4) It’s better to lift a TOO LIGHT weight than try one that’s TOO HEAVY. You want to finish the workout saying “hey I could do more, this is encouraging” rather than “that was too much, I hurt myself/failed/and I’m demoralized.”
#5) If you don’t know, ask somebody who works there. If you’re worried that you’re using a machine incorrectly, and you’re sheepish and self-conscious about it, ask somebody who works in the gym.
Usually, there will be trainers that work there walking around the floor – ask them! That’s what they’re there for.
They can help you set the safety bars and pins on the squat rack if you’re not sure how. They can tell you how to adjust the seat on a machine, or how the treadmill works. That is what they are there for!
#6) If you want to hire a trainer for a few sessions, it might be a great investment! Good trainers are hard to come by, but if you happen to like our style of doing things here at Nerd Fitness, we have our own 1-on-1 Coaching Program that will program your workouts and help you fix your diet:
#7) Work out with what you can work with.
If you are a member at a Planet Fitness or similar gym: Your gym might not allow you to do barbell deadlifts, might not have a squat rack, or ONLY have a Smith Machine. If this is true of your gym, this is okay!
Do the best you can with what you have. Like MacGyver.
You can still get quite strong with the dumbbell workouts and bodyweight movements in Stage 4! And you’ll be that much more prepared when you do start working with barbells if you eventually join a different gym.
#8) Don’t let perfect be the enemy of the good. Just going to the gym takes courage.
Trying a machine for the first time takes courage.
Picking up a dumbbell takes courage.
Using the squat rack takes a lot of courage.
Don’t worry about perfect, or having perfect form or the perfect routine after you finish this article, just START! It’s how we all learn: like scientists trying new experiments and subtly tweaking the variables.
These are our favorite tips and tricks with regard to the gym. But I’d be remiss if I didn’t also mention something equally important:
Gym etiquette!
We’ve created another article in this gym series called “29 Unwritten Rules to the Gym,” to make sure you won’t be an accidental ass in the gym.
This list includes some obvious things like wiping down the bench after you use it, or not monopolizing a squat rack, but then some other more subtle things that will keep you in everybody’s good graces!
How to Build the Routine of Going to the Gym.
If you read this far, 6000 words later, I have to imagine it means you’re really interested in getting started with strength training!
The first time going to a gym can be nerve-wracking and exciting, but it’s the 100th, 500th, 1000th trip to the gym where results get made.
1) Accountability! If you’re new to going to the gym, it’s really easy to fall off the wagon once life gets busy. For that reason, I encourage you to be accountable to somebody other than yourself.
2) Focus on hacking into the Matrix and setting up your system! Put your workout time and place into your Google Calendar so that you always know when your next workout is. Focus on creating an environment where you are more likely than not gonna DO THE THING you want to do (go to the gym). We call this “Building your Batcave.”
3) Cultivate a love of constant improvement. Imagine this: you’re no longer going to the gym just to lose weight or look good. Those things are a happy consequence of what you’re really there for:
Because you ACTUALLY like to work out!
I cannot tell you how many NF Coaching Clients I’ve seen message me and say “Holy crap Steve, I don’t know how it happened, but I actually LIKE working out now!”
Every week, you’re excited to hit the gym because:
You’re adding more weight to your squats.
You are attempting a new personal best for the deadlift.
You get to see your gym friend and hear how his day went.
You LOVE how you feel after the gym.
Getting there takes time and energy, but that’s really when life changes and sh** gets magical with regards to your health and fitness.
These are the tools we’ve created to help you turn the gym into something you look forward to:
1) Our popular 1-on-1 coaching program. No more guesswork, no wondering if you’re doing the right program, no shame or guilt. Just results that don’t suck, and a plan that doesn’t make you miserable.
We keep you accountable to make sure you actually do your workout, we answer any questions you have, and we cheer you on every step of the way:
2) If you want a daily prompt for doing workouts at the gym (or at home), check out NF Journey. Our fun habit-building app helps you exercise more frequently, eat healthier, and level up your life (literally).
Try your free trial right here:
3) Join the Rebellion! Our free community numbers in the hundreds of thousands scattered throughout the globe, and we need good people like you!
You can join by signing up in the awesome yellow box below, and I’ll send you a bunch of free guides and printable workouts, including our Strength 101 guide!
Download our comprehensive guideSTRENGTH TRAINING 101!
Everything you need to know about getting strong.
Workout routines for bodyweight AND weight training.
How to find the right gym and train properly in one.
PHEW!
Okay, by now you should have all of the tools you need to get started in the gym, but maybe you have more questions. If you do, I have answers!
Simply leave a comment below and I’ll do my best to answer it soon!
I’d love to hear from you too if you found this article helpful. Which gym workout are you following?
Have you made it all the way to Level 6 yet!?
-Steve
PS: Make sure you read the other 3 articles in our gym series:
We all want to help our kids cultivate a healthy relationship with food, but this can be easier said than done. Many of us are still repairing our own relationship with food. Add in changing nutrition data, emotional elements, and comments and advice from family and friends and this topic can become a minefield.
I’ve invited Rachel Rothman to share her expertise and help us navigate this complex topic. Rachel is a registered dietitian and childhood nutrition expert with a background in food science.
Our conversation isn’t solely focused on what to feed your kids (although we do touch on that), it encompasses navigating the challenges and stresses regarding picky eaters, mealtimes, and sugary snacks and desserts.
Since it is such an expansive topic, we split the episode into two parts so that you can take time to reflect on what you learn. Make sure that you’re subscribed to the podcast so that you’ll know when the next episode publishes.
You will want to hear this episode if you are interested in…
What led her to do what she is doing today [5:22]
What is a food scientist [8:38]
How to talk about food with kids to cultivate a healthy relationship [11:40]
How to deal with the sweets and treats [19:20]
Dinnertime questions [28:34]
Do you have to finish dinner if you want dessert? [36:00]
How Rachel Rothman Became a Pediatric dietitian
Rachel Rothman first saw her relationship with food change at age nine when she was told to go on a diet. This suggestion gave her the impression that there was something wrong with her body which led to low self-esteem, poor body image, and an unhealthy relationship with food.
Becoming a pediatric dietitian was her way to help kids and families combat negative experiences and cultivate a healthy relationship with food from the start.
After getting a bachelor’s in food science and a master’s in nutrition education, Rachel describes the difference between the two disciplines. Food science is the science of food before we eat it and nutrition is the science of what food does for the body after we eat it. Rachel started Nutrition in Bloom five years ago to combine her extensive training and practical experience to support families as they change their relationships with food, trust their bodies, and enjoy the food they’re eating.
Creating a Healthy Relationship with Food Starts with Conversations at Home
Many of us grew up with the negative messaging surrounding food stemming from the diet culture of the 80s and 90s. Even though we know better now it can still be a challenge to overcome our ingrained mindsets about food.
Our relationship with food impacts our whole life. Food not only provides nourishment, but it also affects our mood, immune system, and quality of life. This is why giving our kids the best start is important by encouraging them to develop a positive relationship with food.
Rachel recommends keeping a positive discussion around food by putting all food on a level playing field and removing the stigma of labeling food as good or bad.
Create healthy discussions around food by talking about the sensory properties of food–taste, feel, smell, and visual. Rather than looking at food and nutrition from a fixed mindset, open up and approach the subject from a growth mindset. Remember it’s never too late to change the conversation about food.
Don’t Put So Much Pressure on Yourself to Get Mealtimes ‘Right’
Under Ellen Satter’s division of responsibility, parents are responsible for the what, when, and where of eating. Children are then responsible for deciding how much and whether to eat. This gives children a say in their food choices.
A nourishing relationship with food starts at mealtimes. We put such pressure on ourselves and our families to get dinner right, but dinner is only one meal of the day and not necessarily the most important.
Dinner can be a challenging time–family traditions, culture, and exhaustion can all create a stressful atmosphere around the table. It may not be realistic to try and create an ideal family meal at this time. Not everyone may be hungry or ready to eat. One way to improve the atmosphere at the dinner table is to take away the pressure.
Listen in to hear what Rachel thinks about dessert and snacks–it may be different than what you would expect from a pediatric dietitian.
Join Lindywell to get our fantastic, family-friendly, quick, and easy recipes.
An unhealthy relationship with food can form for many reasons. Whether your parents or caregivers were long-term dieters or you simply took on the many messages of the $946-billion global diet industry, the relationship to food is fraught for many.
In fact, disordered eating habits are more common than you might think. For example, more than 28 million Americans will suffer from an eating disorder at some point in their lives, starting as young as five years old. Even if your behaviors don’t fall into the diagnostic criteria of an eating disorder, you can still be plagued by disordered eating patterns.
For example, you may feel guilty about eating certain foods or not choosing the “healthy” ones. Or maybe you restrict your food intake during the week and then end up binging all weekend. This keeps you stuck in the same eating patterns and habits that lead to more stress and more anxiety.
Healing an unhealthy relationship often starts by shifting your mindset and howyou approach eating as a whole. Food is nourishment and pleasure-inducing. It’s an essential part of life and an experience to savor. If it doesn’t feel this way right now, you’ve come to the right place.
Use the following strategies to cultivate self-compassion, enjoyment, and acceptance with food.
This article is not to be substituted for medical advice. If you’re struggling with an eating disorder, we encourage you to reach out for professional support at NationalEatingDisorders.org.
Rethink Your Food Vocabulary
Words are powerful. The more you repeat a certain message to yourself, the more it will influence your thoughts, decisions, and behaviors.
In a recent TED Talk, neuroscientist Dr. Lisa Feldman Barrett explains that consuming harmful words will overtax your bloodstream and nervous system with stress hormones. Over time, this chronic stress affects your brain wiring, which can impact how you think and act as a result.
Words are an important part of your relationship with food. Think about the meaning you give to terms like “good” (to describe a piece of fruit) versus “bad” (to describe a bowl of chips). While one food may be nutritionally superior to another food (apple vs. potato chips) that doesn’t mean it needs to be morally superior or that it has to have a reflection on if you, as a person, are good or bad.
The demonization of certain foods through this language, and the meaning those words carry, can promote caloric restriction and other extreme forms of dieting. This only further strains your unhealthy relationship with foods, causing more stress and anxiety.
To start healing, intentionally work to remove words that attach a moral value to food. Here’s a long list of words you might not realize have an impact, but can be harmful to your relationship with food:
Clean
Cheat/cheat day
Splurge
Guilt-free
Can’t/shouldn’t
Bad
Fattening
Off-limits
Instead, bring new words into your vocabulary that promote a relationship with food filled with enjoyment and pleasure:
Satisfying
Tasty
Flavorful
Nourishing
Delicious
Refreshing
Focus on the Mind-Body Connection
The concept of intuitive eating is basic in theory: listen to your hunger and fullness cues and choose food that you want to eat. However, if you have an unhealthy relationship with food, intuitive eating can feel complicated in practice.
For example, if you’ve learned to deny the hunger impulse in order to restrict calorie intake, you might not even notice when you’re actually hungry. Conversely, if you often reach for food that hurts your body to cope with uncomfortable emotions, you perpetuate the feeling that you cannot trust yourself.
What’s more, it can be challenging to eat “intuitively” if certain foods affect your body in uncomfortable ways, like causing bloat or digestive discomfort.
This is why mindful eating, and awareness of the mind-body connection, are important. Being mindful of hunger cues and your food choices allows you to honor the unique needs of your own body while still feeling satisfied. This way of eating prioritizes flexibility and satisfaction over rigidity and restriction while also ensuring your body is being cared for.
Listening to this inner wisdom with mindfulness is powerful. Your body knows what it wants, when, and how much. Part of this work is learning how to tune into that and then trusting it.
Tuning into your body may feel overwhelming and Pilates and breathwork can both be helpful with this piece of your healing. At Lindywell we offer realistic, easy starting points to practice this skill.
Sign up for a free trial of our app or log into your account to access our calming, mini-breathwork sessions or our 14-day mind-body reset series, perfect for beginners.
Examine Your Own Food Story
Everyone has a unique set of attitudes, beliefs, customs, rituals, and preferences around food. These are shaped by many factors, from the environment you’re born into, to the culture you’re raised in and the societal messages internalized over the course of your life.
Together, these create the script you follow when interacting with food. Certified eating psychologist and nutrition expert Elise Museles calls this your food story. As with all narratives, however, certain elements of it are simply untrue (or at least could use some re-evaluation).
A food story is complex and multi-layered, so it’s helpful to understand where yours originated and how it continues to inform your relationship with food. Healing the parts of your food story that are no longer serving you will allow you to clear space to write a new, authentic one.
You can start to do this by writing out your food story or sharing it with someone you trust. Think about your connection, stories, and experiences with food at age 5, age 10, age 15, and so on. At each age, ask yourself:
Did I learn a new belief or story related to food?
Can I recall a specific moment (good or bad) around food?
What was I being told about food?
Use this as a starting point and seek additional professional support if it feels helpful or necessary for you.
Create Awareness Around Stress
Stress, no matter what causes it, can impact your relationship with food. Primarily, stress can result in over-eating and under-eating. While it’s normal for your food intake to vary from day to day when it’s directly linked to stress, it becomes less about listening to your body and its needs and more about using food as a coping mechanism.
Simply creating more awareness around what causes you stress and how you react in those times can help you replace food with coping mechanisms that can be more supportive. However, recognizing you’re stressed in the moment can be difficult. Start by setting aside time at the end of the day to reflect. When doing this, ask yourself:
Was I stressed or anxious at all?
If so, what caused that feeling? A person? A situation?
How did I use food to cope, as a result, if at all?
With this awareness, you can start to be more mindful in stressful moments in the future. You can recognize when that stress or anxiety creeps in and use a supportive strategy to ease yourself out of it, like intentional breathing or light movement.
Healing your relationship with food requires a shift in the way you think about and approach food, which in turn, affects your behaviors and relationship. This type of change doesn’t happen overnight. It took years, maybe even decades, to cultivate your unhealthy relationship with food, which means it will take time to heal it as well.
There will be moments when you fall back into old toxic patterns of relating to food. It’s normal to gravitate toward what feels comfortable or familiar, even when it’s hurtful or stressful. When this happens, focus on grace and release the guilt. Not only will this help you connect with more self-compassion, but it can also help ease the stress and anxiety that can impact your relationship with food.
Change is a nonlinear process. Embrace the beauty of the journey to create a new reality for yourself.
You Can Rebuild Your Unhealthy Relationship With Food
It can feel impossible to let go of the habits and thoughts you have around food, and in many cases, this requires deep healing and time. This is why it can be helpful to reach out for support. Here’s a great resource on how to get started with your relationship with food.
As you move through the process of healing your unhealthy relationship with food, use these strategies to help you nurture a new, loving, guilt-free relationship with food. You deserve that and it’s absolutely within your reach!
No matter which at-home workout you pick, I want you to start with one important thing:
Warm-up!
I cover why you should always warm up in an article found right here. It doesn’t have to be much though, give it about five minutes to get your muscles active and your heart rate up.
This will help you do exercises properly and help prevent injury. You can run in place, do air punches and kicks, or some jumping jacks.
Here is NF Senior Coach Staci (you might know her incredible story) showing you many beginner options you can use to warm up as well:
If you’re curious, here’s my personal (advanced) warm-up:
Advanced Warm-up Routine:
Jump rope: 2-3 minutes
Jumping jacks: 25 reps
Bodyweight squats: 20 reps
Lunges: 5 reps each leg.
Hip extensions: 10 reps each side
Hip rotations: 5 each leg
Forward leg swings: 10 each leg
Side leg swings: 10 each leg
Push-ups: 10-20 reps
Spider-man steps: 10 reps
Our goal isn’t to tire you out, instead we want to warm you up.
That’s step one.
Completing your chosen at-home workout would be step two.
Below, you’ll find 8 sequences you can follow along with!
I warn you, the above sequence will hurt… in a good way. You should be proud if you can get through this three times.
Do you want to get as strong as possible so this workout ain’t no thang?
Sign up in the box below to grab our guide, Strength Training 101: Everything You Need to Know. It’ll teach you all of these advanced bodyweight exercises!
Download our comprehensive guideSTRENGTH TRAINING 101!
Everything you need to know about getting strong.
Workout routines for bodyweight AND weight training.
How to find the right gym and train properly in one.
Home Workout #3: The 20-Min Hotel Routine
Sometimes, you just plain find yourself stuck in a hotel room. Maybe you can find the hotel gym, but I bet it’s terrible! It probably has 2 machines, a broken treadmill, and no free weights.
Ugh.
Instead, how about a 20-min workout you can do in the room itself! Utilize the furniture to its full potential.
If you don’t have time to run through the whole sequence, no problem!
Depending on how much time you have during the day, you can do your whole workout at once, or break up your training into four different sessions throughout the day (with each session being ONE of the exercises).
Here’s a sample day for your No-Equipment Workout:
Wake up, do 40 jumping jacks to warm up, and then do bodyweight squats.
At lunch, you grab your suitcase (if you’re at work, milk jug if you’re at home) and do inverted rows.
After work, you do another 50 jumping jacks and then do your push-ups.
After dinner, you do your planks while watching TV.
You could even split it up over two days if needed, but the goal would be to do it the whole sequence at once.
The main Angry Birds Workout article describes in detail Levels 1-6, but here’s Level 3 for you:
Bonus points if you somehow do this no-equipment workout in a cave, as that’s how Bruce Wayne would roll.[1]
This workout is separated into two days for you.
Here’s a video for the first day:
Batman No-Equipment Workout Day 1:
Rolling squat tuck-up jumps: 5 reps
Side to side push-ups: 5 reps
Modified headstand push-ups: 5 reps
Jump pull-up with tuck / Pull-up with Tuck-up: 5 reps
Handstands against wall: 8 seconds
Here’s a video for the second day:
Batman No-Equipment Workout Day 2:
‘180 Degree’ jump turns: 5 reps
Tuck front lever hold: 8 seconds
Tuck back lever hold: 8 seconds
Low frog hold: 8 seconds
This is a relatively advanced workout already, but if you want to progress to the next level, check out the main Batman Bodyweight Workout for tips on how to do just that.
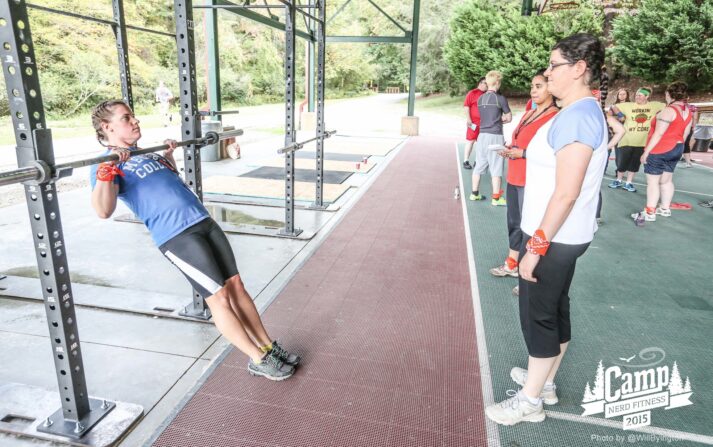
NOTE: This is NOT a beginner program, and should not be attempted unless you have been training consistently and can do multiple repetitions of pull-ups and push-ups with great form.
Like this perfect push-up:
And this perfect pull-up:
Here’s how the PLP Progression works:
Day 1:
Pull-ups: 10 reps
Push-ups: 10 reps
Lunges: 10 reps (each leg)
Day 2:
Pull-ups: 11 reps
Push-ups: 11 reps
Lunges: 11 reps (each leg)
Day 3:
Pull-ups: 12 reps
Push-ups: 12 reps
Lunges: 12 reps (each leg)
How long do you keep doing this?
As originally envisioned by Chad Waterbury, the PLP Workout lasts 60 days.[3]
Yeah…by the end of it you’ll be doing more than 50 pull-ups.
There are two versions:
If you can do 10 straight pull-ups: Start day 1 with 10 reps of each.
If you cannot do 10 straight pull-ups: Start day 1 with 1 rep of each.
Complete your required reps each day in as many sets as you need, whenever you need to. The goal is to do it in as few sets as possible, but enough so that you can complete each rep with proper form.
If you want to advance to the Jedi Knight or Master Levels, check out The Star Wars Workout, which will also offer you a full description of each move.
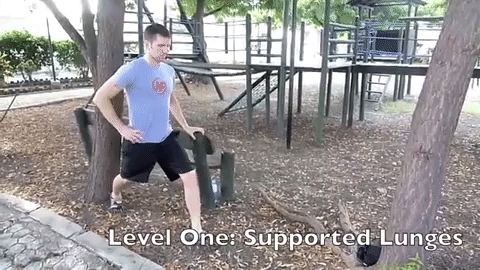
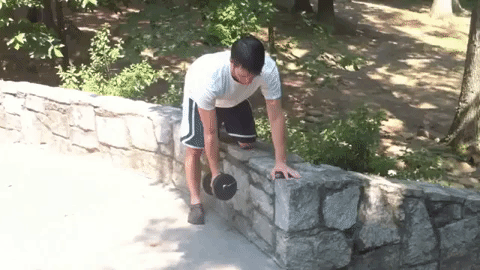
Bonus No-Equipment Workout: The Playground Circuit
Do you have a nearby playground? Why not work out there! If you have kids, you can do it together. Or let them ignore you.
The trick here is to couple your home workouts with adjustments to your nutrition.
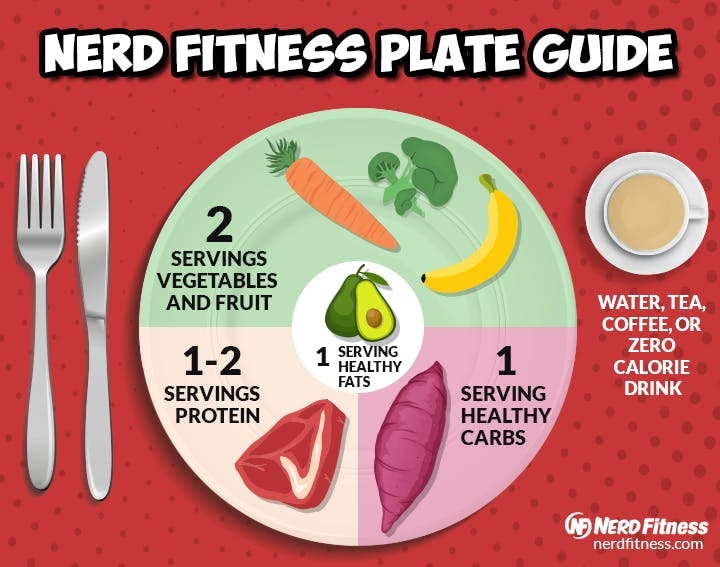
We’re big believers that you can’t outrun your fork, so any successful weight loss plan will include a focus on building a healthy plate.
That will look something like this:
If you want some help on adjusting your nutrition, I’ve got two great resources for you:
The Nerd Fitness Guide to Healthy Eating. This massive resource will help you slowly adjust your nutrition, without forcing you to give up the food you love (yes, you can still eat pizza here and there). No more diets, instead we’ll work on building habits together.
Nerd Fitness Coaching. If you want to take it to the next level, one of our trained professionals can help you adjust your way of eating to help you reach your goals. No shame. No judgment. Just a like-minded nerd who will show you the way.
I have two resources to help you design your own no-equipment workout:
The 42 Best Bodyweight Exercises: This guide will teach you how to perform the best bodyweight exercises – no equipment required! Check it out if you are unfamiliar with any of the movements referenced in today’s guide.
How To Build Your Own Workout Routine: Once you’re comfortable with a handful of bodyweight exercises, use this guide to pull them all together into a full-body workout!
That should get you going on building a workout you can do in the comfort of your own home.
Want more? Alright, eager beaver, I got you.
We built THREE options for people just like you:
1) If you want step-by-step guidance, a custom workout program that levels up as you get stronger, and a coach to keep you accountable, check out our killer 1-on-1 coaching program:
2) If you want a daily prompt for doing workouts at home, check out NF Journey. Our fun habit-building app helps you exercise more frequently, eat healthier, and level up your life (literally).
Try your free trial right here:
3) Join the Rebellion! We need good people like you in our community, the Nerd Fitness Rebellion.
Sign up in the box below to enlist and get our guide, Strength Training 101: Everything You Need to Know. It’ll help you start incorporating these bodyweight moves into your training.
Download our comprehensive guideSTRENGTH TRAINING 101!
Everything you need to know about getting strong.
Workout routines for bodyweight AND weight training.
How to find the right gym and train properly in one.
Alright, your turn: I’d love to hear how your home training is going!
Which workout above did you try? Did you make one of your own?
Leave a comment below with your results or any questions you have on working out at home.
For the Rebellion!
-Steve
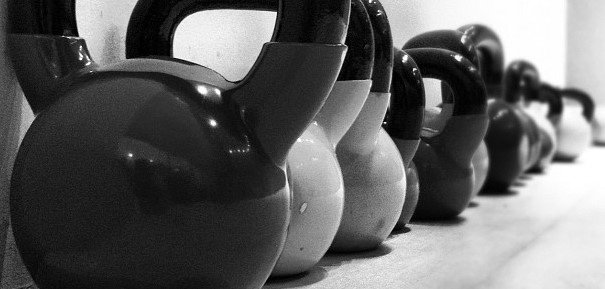
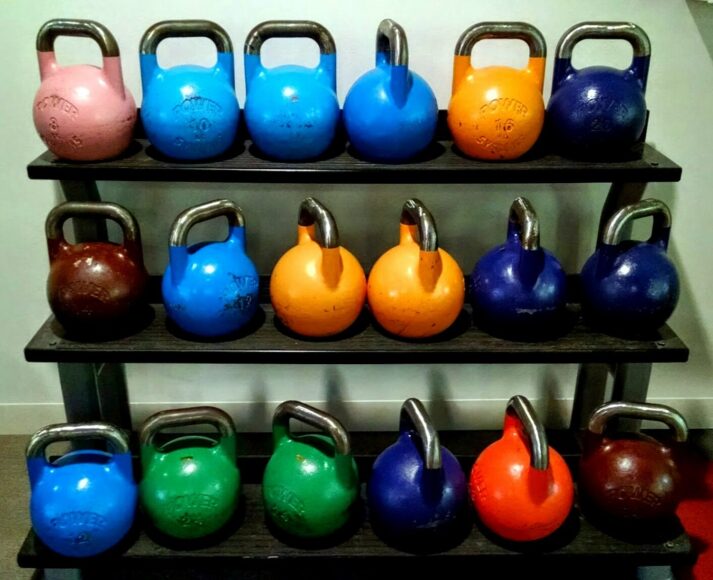
PS: If you were going to buy one piece of equipment to utilize in your home, a kettlebell would offer you a lot of versatility:
I get multiple emails and messages per day asking:
“Steve, what should I do for a workout?”
Well, partner, today is your lucky day.
I’m gonna help build you a custom workout program, step-by-step!
After all, a workout should be developed around a person’s age, goals, nutritional strategy, free time, etc.
Not only that, but it’s easy to overcomplicate this process – there are an infinite number of exercises, sets, reps, and programs to choose from.
Now, if you’re somebody that wants to skip all of that, and JUST want to be told what exactly to do:
We build customized workouts for our Online Coaching Clientsand would love to have you. We get to know your story and struggles, your goals, and your lifestyle, and develop a workout plan that fits your schedule.
Now, if you’re more of a “figure this stuff out on my own” kind of person – we’re going to dig into how to build your own workout plan today!
We’ve also created a free resource for folks who want to build their own workout but would love some more specific direction and instruction.
You can download our free guide, Strength Training 101: Everything You Need to Know, which covers all of this stuff in a single guide:
Download our comprehensive guideSTRENGTH TRAINING 101!
Everything you need to know about getting strong.
Workout routines for bodyweight AND weight training.
How to find the right gym and train properly in one.
OKAY! Are you ready to start building your own routine and want to know how it’s done?
Whatever your goals are, it’s good to write them down and be aware of what you’re trying to accomplish.
These goals will shape HOW you build your workout.
An effective way to create goals is by using the SMART method, which stands for specific, measurable, attainable, relevant, and timely.[1]
Specific – Your goals must specifically state what is to be accomplished. They must be clear and easy to understand.
Measurable – Your goals must be measurable so you can tell if you’re making progress or not. For example, I want to gain 5 pounds of muscle. To track your progress you will need body composition equipment that is designed to assess your fat and muscle mass.
Attainable – Your goals should be realistically attainable. Remember, a realistic amount of muscle mass to gain per week is about 0.5 pounds. For example, gaining 5 pounds of muscle should realistically take about 10 weeks
Relevant – Your goals must be relevant to your particular interests, needs, likes/dislikes, and abilities. Another thing to remember is that your goals need to be generated by you and you alone!
Timely – Your goals must have a timeline for completion. If your goal is to gain 5 pounds of muscle then a reasonable end-point should be at minimum 10 weeks.
A SMART goal is a good goal.
QUESTION 2: How much time can you devote to exercise?
If you can do an hour a day, that’s fantastic.
But maybe you have a wife or husband, three kids, a dog, two jobs, and no robot butler…
…then maybe you only have thirty minutes, twice a week.
That’s fine too!
Also, break up your workout! According to the American College of Sports Medicine (ACSM), if you accumulate three 10-minute bouts of exercise throughout the day to total 30-minutes of exercise, then that is as effective as someone who does one 30-minute bout of exercise.[2]
Now, no matter how much time you have, developing the most efficient workout is crucial.
Why spend two hours in a gym when you can get just as much accomplished in 30 minutes, right?
So whether you are building muscle or looking to lose weight, a strength training workout will get you the results you’re after (when combined with the right eating strategy!)
While we’re talking about time, let me quickly mention something important:
As we mention in that guide, here are some realistic timeframes for weight loss or muscle gain:[3]
If you are trying to lose weight it is recommended that you seek a calorie deficit by consuming 250-500 fewer calories per day below your typical calorie intake. This will result in a realistic weight loss goal of 1-2 pounds per week
If you’re trying to gain muscle mass, then it is recommended that you seek a calorie surplus by consuming 250-500 additional calories above your typical calorie intake. This will result in a gain in lean muscle mass of about 0.5 pounds per week.
Unless you’ve been strength training for years and know what you’re doing, we recommend that you pick a full-body routine that you can do 2-3 times a week.
You want a workout routine that has at least one exercise for your:
Quads (front of your legs).
Butt and hamstrings (back of your legs).
Chest, shoulders, and triceps: (“push” muscles).
Back, biceps, and grip ( “pull” muscles).
Core (abdominals and lower back).
I have a trick for you: by targeting compound movements that recruit multiple muscles at the same time, you can build a full-body routine that uses only four or five exercises.
How’s THAT for efficiency!?!
A compound exercise would be the yin to the yang of the isolation exercise.
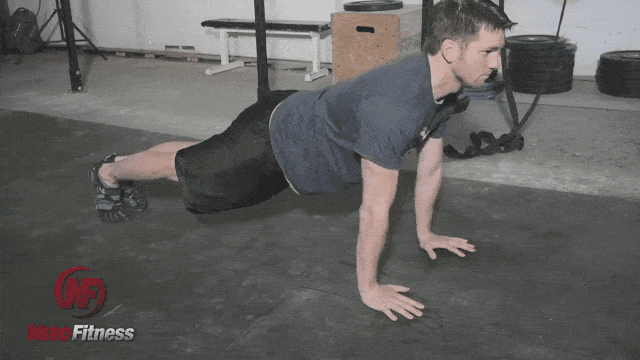
Think of a push-up (compound):
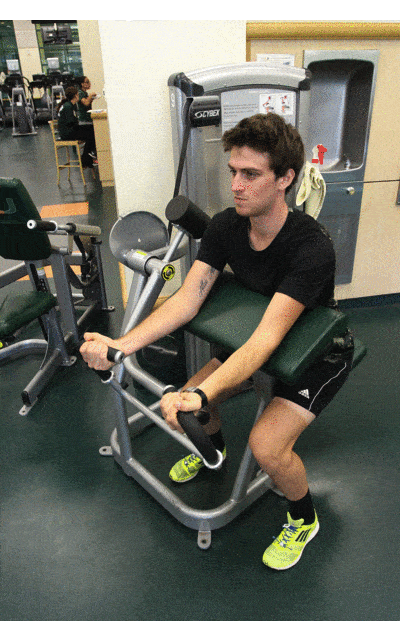
Compared to bicep curls through a machine (isolation):
Compound exercises have been found to result in improvements in aerobic endurance, muscular fitness, and flexibility, since you’re recruiting all sorts of muscle groups at once.[5]
Where an isolation exercise would be a single-joint movement involving only one single muscle group, like the biceps, in our example above.
I will say, there is a time and place for implementing compound and isolation exercises.
You don’t need to make things more complicated than this!
(Not that we humans have a tendency to overcomplicate things to the point of paralysis and inaction…)
Ahem.
If you’re not sure how to do any of the movements above, click on their links for thorough write-ups and video demonstrations.
Pick one exercise from EACH category above, specifically ones that scare you the least, and that will be your workout every other day for the next week.
Get really good at these basic movements and focus on getting stronger each week (I’ll cover how below).
If you get really strong at squats, deadlifts, pull-ups, and push-ups, you will build an incredible physique to be proud of.
Plus, building strength with these exercises will also help in other areas such as improving your performance in sports, decreasing your risk of chronic diseases (e.g., CVD) and premature mortality (an early death).[6]
*mic drop*
**picks up mic**
Then, once you get confident in those movements, feel free to add some variety.
Why?
If you do the same exact routine, three days a week, for months and months, you might get bored, and start slacking…
Do deadlifts every Wednesday, but change up the sets and reps you pick!
If you hit a plateau or find yourself getting bored, pick a different exercise to improve so you’ll stay challenged, and you’ll actually DO the workout!
I know it’s really easy to overcomplicate this process as there’s an infinite number of exercises, sets, reps, and programs to choose from.
And yes, we have a solution for people that JUST want to be told what exactly to do: our uber-popular 1-on-1 coaching program pairs you with your own Nerd Fitness Coach who will get to know you, your goals, and your lifestyle, and develop a workout plan that’s specific to not only your body, but also to your schedule and life:
Step #3: How Many Sets And Reps Should I Do?
SIMPLE ANSWER: Not including a warm-up set or two, I recommend:
If you can do more than 15 reps without much of a challenge, consider increasing the weight or the difficulty of the movement. This is true for things like lunges, bodyweight squats, push-ups, pull-ups, etc.
There are some other generally accepted ‘rules’ – as pointed out in Starting Strength – about how to determine how many reps you should target per set, based on your goals:
Reps in the 1-5 range build super dense muscle and strength (called myofibrillar hypertrophy).
Reps in the 6-12 range build a somewhat equal amount of muscular strength and muscular size (this is called sarcoplasmic hypertrophy).
Reps in the 12+ range build muscular endurance.
A 2015 study [10] called into question the best rep strategy for building muscle or size:
It appears that high-intensity resistance (sets of 3-5 reps) training stimulates greater improvements in some measures of strength and hypertrophy in resistance-trained men during a short-term training period [compared to sets of 8-10 reps].
What this means: Do not freak yourself out by worrying if you should do 4 sets or 5 sets of 8 reps or 10 reps.
Our advice would be to START with lighter weights and more reps as you learn the movement, and then decide if you want to stay at higher reps and lower weight or vice versa.
You do you, because either way will get you results!
The only thing you need to worry about: get stronger the next time you do that movement.
Either pick up a heavier weight, or do 1 more repetition than last time.
“JUST GIVE ME THE ANSWER!”
Keep your TOTAL (all exercises combined) workout number of sets for all exercises in the 15-25 set range, with 8-10 reps per set:
5 exercises total, each with 4 “work sets” is a good start.
Remember, the most important part is to get started – you’ll learn how your body responds and you can adapt as you go.
What you DON’T need to do: multiple exercises for each body part with 10 sets.
This will result in significant fatigue during your workout increasing your risk of sustaining an injury. It can also result in overtraining, in which you will experience a decrease in performance and plateauing (will not see muscular improvements).[11]
So calm down you eager beaver.
A BIG CAVEAT:How you eat will determine if you get bigger or stronger. Nutrition is 80-90% of the equation. So pick a range that feels good, and then focus on nutrition.
And if you don’t want to figure any of this out and just want to be told exactly how what exercises, sets, and reps to do, our online coaches can take care of that for you.
Step #4: How Long Should I Wait Between Sets?
Keep it simple, you “smart, good-looking, funny, modest person” you.
Below is a basic formula for you to determine how long you should wait between sets, but this can be adjusted based on your level of health.
The goal is to wait the least amount of time you need, but still rest enough that you can perform all reps of the next set safely and properly!
Adequate rest in-between sets will allow your body to regenerate energy, so you can execute the next set of reps with good form and technique, therefore, decreasing your risk of injury.
I’ll provide some guidelines for how long to rest based on how heavy you’re lifting (not rules set in stone!):
1-3 Reps (lifting heavy for strength/power): Rest for 3 to 5 minutes between sets.
4-7 Reps (lifting for strength): Rest for 2 to 3 minutes between sets.
8-12 Reps (lifting for size/strength): Rest for 1 to 2 minutes between sets.
13 Reps+ (lifting for endurance): Rest long enough to recover to allow you to do the next long-ass set!
If you need more or less rest than the above recommendations, that’s fine.[13]
Do the best you can, record how long it takes you to rest between sets, and try to rest for shorter periods in the future.
Your body will adjust as you get stronger and healthier!
If you want more information on how much you should lift, how many reps, and when to scale certain movements or adjust your workout, check out our Strength 101: Everything You Need to Know.
It’s free when you join the Rebellion with your email in the box below:
Download our comprehensive guideSTRENGTH TRAINING 101!
Everything you need to know about getting strong.
Workout routines for bodyweight AND weight training.
How to find the right gym and train properly in one.
The simple-to-learn but tough-to-implement answer:
Lift enough so that you can get through the set, but not too much that you have NO fuel left in the tank at the end.
How do you determine how much that is?
Trial and error.
ALWAYS err on the side of “too light” versus “too heavy” when starting out.
It’s better to say “I bet I could have done more!” instead of “that was too much, and now I need to go to the hospital!”
Plus, when you start working out, you’re actually programming your neuromuscular systems to do the movement correctly.[14] You can’t rush this, so it’s best not to start off too heavy.[15]
If a person can do two reps (or more) over their set goal, then they should increase the load.
How much should you increase weight by?
For less trained people (i.e., beginners), it is recommended that for upper body exercises you increase the load by 2 – 5 pounds and by 5 – 10 pounds for lower body exercises.
For more trained people (i.e., advanced), it is recommended that for upper body exercises you increase the load by 5 – 10 pounds or more and by 10 – 15 pounds or more for lower body exercises
I will say, if you’re doing exercises with just your body weight, you need to make each exercise more difficult as you get in shape – once you get past 20 reps for a particular exercise and you’re not gassed, it’s time to mix things up.
20 bodyweight squats too easy? Hold some weights high above your head as you do the next set. Eventually, you can scale up to do exercises like the pistol squat:
And if you’re not sure how to scale bodyweight movements, or you are interested in mixing things up and want guidance…
Step #6: How Long Should I Exercise For? How Long Should My Workout Be?
Easy answer: 45 minutes to an hour.
Longer answer: If you’re doing 15-25 sets of total exercise (3-5 sets for your 5 exercises), you should be able to get everything done within that 45-minute block.[17]
Now, factor in a five or ten-minute warm-up, and then some stretching afterward, and the workout can go a little bit longer.[18]
If you can go for over an hour and you’re not completely worn out, try increasing the intensity.
You’re getting a cardiovascular workout by consistently moving from exercise to exercise.
You’re exercising different muscles back to back, giving each muscle group a chance to recover, but in a condensed amount of time. Efficiency for the win!
If you’re familiar with CrossFit, many of the workouts are built on circuit principles.
This is also the most effective way to make you involuntarily swear at inanimate objects because you’re so tired and beat up.
And lastly, we love building circuit training routines for our Coaching Clients – and we’d love to build them for you too:
Step #8: How Many Days per Week Should I Train?
We get this question quite a bit, usually from overeager beavers who decide they are going to go from “sitting on the couch watching The Office on repeat” to “exercising 7 days per week.”
I would advise something different.
I mean you can still watch The Office…
…but you don’t need to be training 7 days a week!
We don’t want you burning out quickly and falling back to square one, a concern we mention in our guide “How Often Should I Work Out?“
Just pick “exercise” that’s fun for you and that won’t exhaust your muscles.[26][[26]]However, don’t forget that recovery is key to preventing injuries and allowing the body to rebuild itself after the stress of exercise. If you are looking to exercise on your off days we suggest that you cross-train. Cross-training involves engaging in a training routine or exercises that are different from what you normally would do. For example, if you always run for cardio, we would suggest that you change things up and go on the elliptical or bike. This allows you to stay active on your off days while also allowing the muscles that are always stressed from running to rest and recuperate. (Haff G, Triplett NT. (2016). Essentials of strength training and conditioning. Fourth edition. Champaign, IL: Human Kinetics).[[25]]
Also, here’s a lifehack: Program your workouts INTO your Google calendar (or Outlook).
You’re much more likely to do a workout that has been planned for in your work week!
Alternatively, you can hire a coach to program your workouts for you, so every day you know exactly what you need to do!
Step #9: Keep Track Of Everything!
Last but not least, keep a workout journal!
As they say, that which gets measured gets improved.
You should be getting stronger, faster, or more fit with each day of exercise.
Around these parts, we say “Level up your life, every single day.”
If you want to build from scratch, great! Let’s break it down into easy chunks with this recap:
ALWAYS warm up – 5-10 minutes on a bike, rowing machine, jumping jacks, running up and down your stairs, etc. Get the blood flowing and your muscles warm.[29]
Pick one exercise for each big muscle group – quads, butt and hamstrings, push, pull, and core.[30]
Do 3-5 sets for each exercise.
Do 5-10 reps per set for each exercise.
Determine how many reps and how long you’ll wait between sets for each exercise. Keep it simple. 60 seconds.[31]
Increase your efficiency and work your heart by doing supersets or circuits. This results in a higher EPOC meaning greater caloric expenditure and weight loss!
Give yourself permission to mess up, learn a little, and keep improving as you train more regularly!
More often than not, when I email people back and tell them how to build their own workout, they generally respond with:
“Steve, can’t you just TELL me what to do? I’m afraid of building a crappy workout.”
Why we built THREE options for people like that:
1) If you are somebody that wants to know they are following a program that is tailor-made for their life and situation and goals, check out our Online Coaching Program.
You’ll work with our certified NF instructors who will get to know you better than you know yourself and program your workouts and nutrition for you.
2) Exercising at home and need a plan to follow? Check out Nerd Fitness Journey!
Our fun habit-building app helps you exercise more frequently, eat healthier, and level up your life (literally). Plus, NF Journey will build a workout for you!
Try your free trial right here:
3) Join the Rebellion (our free community) and I’ll send you free guides, workouts, and worksheets that you can read at your leisure.
We need good people like you!
Download our comprehensive guideSTRENGTH TRAINING 101!
Everything you need to know about getting strong.
Workout routines for bodyweight AND weight training.
How to find the right gym and train properly in one.
I certainly encourage you to try and build your own workout routine.
It can really help you develop a sense of excitement and pride when you start to get in shape based on your workout!
If you have more questions, or have a workout program you’re really proud of, share it in the comments below!
-Steve
PS: Check out the rest of our beginner content. I promise, it kicks ass 🙂
American College of Sports Medicine. ACSM’s Guidelines for Exercise Testing and Prescription. Philadelphia: Lippincott Williams & Wilkins, 2000
Read, “Effect of short moderate intensity exercise bouts on cardiovascular function and maximal oxygen consumption in sedentary older adults.” Souce, BMJ Journals
(Spano MA, Kruskall LJ, Thomas DT. (2018). Nutrition for Sport, Exercise, and Health).
American College of Sports Medicine. ACSM’s Guidelines for Exercise Testing and Prescription. Philadelphia: Lippincott Williams & Wilkins, 2000
Haff G, Triplett NT. (2016). Essentials of strength training and conditioning. Fourth edition. Champaign, IL: Human Kinetics
Remember, it all comes down to a caloric deficit or surplus. if you are trying to lose weight it is recommended that you seek a calorie deficit by consuming 250-500 less calories per day below your typical calorie intake. This will result in a realistic weight loss goal of 1-2 pounds per week. If you’re trying to gain muscle mass, then it is recommended that you seek a calorie surplus by consuming 250-500 additional calories above your typical calorie intake. This will result in a realistic gain in lean muscle mass of about 0.5 pounds per week. Source: Spano MA, Kruskall LJ, Thomas DT. (2018). Nutrition for Sport, Exercise, and Health
American College of Sports Medicine. ACSM’s Guidelines for Exercise Testing and Prescription. Philadelphia: Lippincott Williams & Wilkins, 2000)
This goes back to the progressive overload principle. Remember, in order to achieve your training goals or to see improvements, your training must gradually and constantly increase Source: Haff G, Triplett NT. (2016). Essentials of strength training and conditioning. Fourth edition. Champaign, IL: Human Kinetics.
If you do not progress your workout, then you will reach a plateau because your body has met the demands of your exercise or stress that you have placed upon it. If you progress your workout (e.g., do more reps, lift heavier weights, do different exercises, etc.), then those microscopic tears (that don’t hurt) will happen and your muscles will go through hypertrophy and grow bigger and stronger. Source: Powers SK, Howley ET. (2011). Exercise physiology: Theory and application to fitness and performance. New York: McGraw-Hill Humanities/Social Sciences/Languages).
You’ll see a few different recommendations around this. The National Strength and Conditioning Association (NSCA) recommends 6-12 reps for 3-6 sets for muscle hypertrophy and more than 12 reps for 2-3 sets for muscular endurance (Source: Haff G, Triplett NT. (2016). Essentials of strength training and conditioning. Fourth edition. Champaign, IL: Human Kinetics). While the American College of Sports Medicine (ACSM) simply recommends 8-12 reps for 2-4 sets for healthy individuals (Read, American College of Sports Medicine position stand. Progression models in resistance training for healthy adults. Source, PubMed.
Read, “Musculoskeletal adaptations and injuries due to overtraining.” Soucre, PubMed.
Excessive muscle fatigue, often resulting by engaging in higher intensity exercise or engaging in exercise with short rest intervals has been found to increase one’s risk for muscle strains due to fatigue eliciting poor exercise technique. For more, read “Muscle strain injury: diagnosis and treatment.” Source, PubMed.
The NSCA also has guidelines in-place to help you determine your rest intervals in-between sets: 2 to 5 minutes for strength and power, 30 seconds to 1.5 minutes for hypertrophy, and 30 seconds or less for muscular endurance (Haff G, Triplett NT. (2016). Essentials of strength training and conditioning. Fourth edition. Champaign, IL: Human Kinetics).
Plus, ACSM has a basic recommendation of 2 to 3 minutes (American College of Sports Medicine. ACSM’s Guidelines for Exercise Testing and Prescription. Philadelphia: Lippincott Williams & Wilkins, 2000). So we don’t have to get overly dogmatic here.
More efficient communication between your neuromuscular systems results in proper motor unit recruitment. A motor unit is a single motor neuron and the muscle fibers it innervates. We have small motor units, meaning that a single motor neuron innervates relatively few muscle fibers, and these smaller motor units are good for precise and detailed movements (e.g., moving your fingers). On the other hand, we have large motor units, meaning that a single motor neuron innervates hundreds of muscle fibers, and these larger motor units are good for generating a lot of force (e.g., getting larger muscle groups like the quads to generate a lot of force to help in running) (Powers SK, Howley ET. (2011). Exercise physiology: Theory and application to fitness and performance. New York: McGraw-Hill Humanities/Social Sciences/Languages; Heckman CJ, Enoka RM. Motor unit. Compr Physiol. 2012 Oct;2(4):2629-82. doi: 10.1002/cphy.c100087. PMID: 23720261).
When you first start strength training, your motor units don’t fire as quickly and smaller motor units that don’t generate a lot of force are recruited. As you continue working out and become more trained, your motor units fire more rapidly and your brain recruits larger motor units that can generate more force allowing you to lift heavier weights. This is why the progressive overload principle is important! As your neuromuscular system communicates more efficiently, you will see improvements in your exercise technique and muscle adaptations (e.g., hypertrophy) taking place.
Haff G, Triplett NT. (2016). Essentials of strength training and conditioning. Fourth edition. Champaign, IL: Human Kinetics.
According to ACSM and the CDC, all healthy adults aged 18-65 years should participate in moderate-intensity aerobic physical activity for a minimum of 30-minutes on five days per week, or vigorous-intensity aerobic activity for a minimum of 20-minutes on three days per week. Additionally, every adult should perform activities that maintain or increase muscular strength and endurance for a minimum of two days per week. Performing exercise at a moderate-to-vigorous intensity will result in greater caloric expenditure and weight loss. (American College of Sports Medicine. ACSM’s Guidelines for Exercise Testing and Prescription. Philadelphia: Lippincott Williams & Wilkins, 2000).
The NSCA recommends a 5-10 minute warm-up to prepare the body for the exercise session, and the exercise session should be followed by a 5-10 minute cool-down to bring the body back down to rest (Haff G, Triplett NT. (2016). Essentials of strength training and conditioning. Fourth edition. Champaign, IL: Human Kinetics).
The ACSM and other researchers have found that if you ACCUMULATE 10-minute bouts of exercise throughout the day that can be as effective as one who does one 30-minute bout of exercise. Read, “The Effects of Continuous Compared to Accumulated Exercise on Health: A Meta-Analytic Review.” Source, PubMed.
Circuit training results in a higher excess post-exercise oxygen consumption (EPOC) resulting in great caloric expenditure when compared to traditional strength training with longer rest intervals in-between sets and exercises. Read, “Circuit weight training and its effects on excess postexercise oxygen consumption.” Souce, PubMed.
Haff G, Triplett NT. (2016). Essentials of strength training and conditioning. Fourth edition. Champaign, IL: Human Kinetics
Oh, and even if you aren’t doing a ciruict, don’t use your cell phone for other purposes besides using it to listen to music! Other cell phone functions such as texting and talking have been found to lower the intensity of exercise resulting in lower caloric expenditure, and disrupt balance leading to a greater risk of musculoskeletal injuries. Read, “The Impact of Cell Phone Use on the Intensity and Liking of a Bout of Treadmill Exercise.” Source, PubMed. Read, “The impact of different cell phone functions and their effects on postural stability.” Source, ScienceDirect.
The NSCA recommends 2-3 training sessions for novice or beginners, 3 sessions if using total body training or 4 sessions if using a split routine for intermediates, and 4-6 sessions for advanced lifters (Haff G, Triplett NT. (2016). Essentials of strength training and conditioning. Fourth edition. Champaign, IL: Human Kinetics).
Strength training results in microscopic muscle tears in the muscles. This causes a cascade of events eventually leading to muscle repair and growth (i.e., hypertrophy). Our muscles adapt to the overload stress of strength training immediately after each bout of exercise, but it takes roughly eight weeks to see physical improvements (Powers SK, Howley ET. (2011). Exercise physiology: Theory and application to fitness and performance. New York: McGraw-Hill Humanities/Social Sciences/Languages).
Adequate recovery is essential to prevent overtraining. When we become overtrained, our injury risk increases and we reach a plateau and no longer see any improvements from our training. For more, read “The effects of resistance training, overtraining, and early specialization on youth athlete injury and development.” Source, PubMed.
This applies to all healthcare professionals who are working with clients, athletes, military personnel, special populations (e.g., cardiac rehab). These healthcare professionals are tracking everything so they can see if you are improving or not. And if you’re not improving, that is okay. At least you know and then you can start making changes to your exercise routine: change your exercises from bodyweight to free weights; change the number of sets and rep; shorten or lengthen your rest intervals, etc.
And if you’re not improving, that is okay. At least you know and then you can start making changes to your exercise routine: change your exercises from body weight to free weights; change the number of sets and rep; shorten or lengthen your rest intervals, etc.
A traditional warm-up usually consists of two components. The first is a general warm-up of 5-10 minutes of low- to moderate-intensity aerobic exercise, such as jogging or stationary cycling. The second is a specific warm-up that involves less intense movements similar to the sport or activity about to be performed. This second part involves performing dynamic stretches such as high knees, butt-kicks, skipping, shuffling, carioca, etc. The purpose of this type of warm-up is to allow the body to gradually adjust to the demands of exercise by allowing for increases in heart rate, blood flow, muscle temperature, and core body temperature (Haff G, Triplett NT. (2016). Essentials of strength training and conditioning. Fourth edition. Champaign, IL: Human Kinetics).
These big muscle groups allow for everyday activities to be performed with more ease and for you to maintain a more independent lifestyle for a longer period of time. For more, read “American College of Sports Medicine position stand. Progression models in resistance training for healthy adults. Source, PubMed.
But remember, the sets, reps, and rest intervals will change as your training goals change.
The longer your workout the more fatigue you will experience, therefore, increasing your risk of injury. Keep your cell phone in the locker room if you’re having a difficult time keeping your workout to less than an hour!
The same rules apply as for the warm-up. After you are done with your exercise session perform 5-10 minutes of low- to moderate-intensity aerobic exercise. The second part of the cool-down will consist of static stretching instead of dynamic stretching. Static stretching involves slowly moving a muscle to the end of its range of motion and then holding that position for a period of time (10-30 seconds or 30-60 seconds for its greatest benefits). You should stretch the muscle enough to feel a slight discomfort, but don’t go too far where you start to feel pain. For more, read “American College of Sports Medicine position stand. Quantity and quality of exercise for developing and maintaining cardiorespiratory, musculoskeletal, and neuromotor fitness in apparently healthy adults: guidance for prescribing exercise.” Source, PubMed.
Remember, the only way you’re going to know if you’re improving and if your program works is if you’re recording the data. If it’s not working, at least you can catch it early and make the necessary adjustments.
It’s very rare that anyone is taught to run, right? We learn to walk, then run, by just doing it which means over time we develop our own individual and unique running form. Ans although I subscribe to the school…
I can remember so clearly the day I found out that there was going to be a parkrun near me. I’d gone to Mile End parkrun (about 45mins away on public transport) to run with a friend who was emigrating…
Read my updated coconut accounting review! Coconut has changed so much since it launched – from a bank account / banking app to accounting for sole traders. Check out my tips on how to manage your freelance finances using Coconut…