Categories
Uncategorized

#holistic #getfit #nutrition The Flexitarian Diet Plan: The Ultimate Beginner’s Guide to Semi-Vegetarianism

That LEGO is going to need to eat those if he wants to be a flexitarian.

It’s time to explore the Flexitarian Diet.

You may have questions like:

What is it? 

Why’s it so popular? 

Will it make me more flexible?

The answer to that last one is “nope,” but the others we’ll explore today!

Have no fear, you’re in good hands.

We analyze different diets in our 1-on-1 Online Coaching Program, so you’ve come to the right place to learn all about semi-vegetarianism. 


Here’s what we’ll cover in our Beginner’s Guide to the Flexitarian Diet:

Let’s get right to it!

What Is the Flexitarian Diet? (Exploring “Semi-Vegetarians”)

Eating lots of broccoli can help you become a flexitarian.

The Flexitarian Diet is a plant-based or vegetarian style of eating that allows for some animal products in moderation.

“Flex” comes from “flexible” and “tarian” comes from “vegetarian,” so a flexitarian is more or less a “flexible vegetarian.” 

In 2012, the term “flexitarian” actually entered the Merriam-Webster Dictionary as:

One whose normally meatless diet occasionally includes meat or fish.

Another way to think of flexitarians would be as “semi-vegetarians.”

This version of semi-vegetarianism was first formulated by dietitian Dawn Jackson Blatner, in her book The Flexitarian Diet. 

I wonder what he's reading...

In Blanter’s word:

“You can think of this diet as a ‘vegetarian-ish’ way of eating since this plan touts the basic principles and benefits of a plant-based diet, along with the inclusion of some animal proteins to a lesser extent.”

The goal of the Flexitarian Diet would be to minimize or reduce the frequency of eating meat, without removing it completely. 

This is what separates flexitarians from normal omnivores: the former are actively trying to limit meat consumption. 

Flexitarians just don’t want to eliminate meat 100% (for health or personal reasons), so they allow some into their diet. 

What Do Flexitarians Eat? (The Flexitarian Diet Plan)

A LEGO one with his flexitarian diet.

Since the Flexitarian Diet actively tries to reduce the consumption of meat, the meal plan will be predominantly plant-based. 

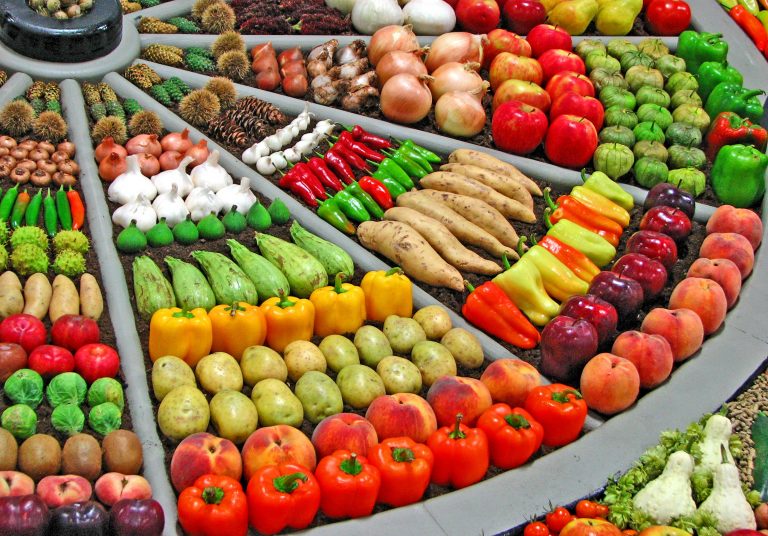
Plant-based food choices on the Flexitarian Diet plan include:

  • Whole grains. Rice, oats, barley, and buckwheat would all be examples of whole grains. Most plant-based diets include a sizable amount of whole grains as their base.
  • Vegetables. Of course, even semi-vegetarian diets are going to include lots of vegetables! And they should because vegetables are great for you! They’re packed full of nutrients, fiber, and generally low in calories. Most people could stand to eat more veggies. If you find yourself not being able to stomach greens, I got you. Check out this post for tips on how to turn around any vegetable hater.
  • Legumes. Beans, lentils, and soy make up the legume family. When cutting out meat, legumes would be a great way to get protein (more on this to follow).
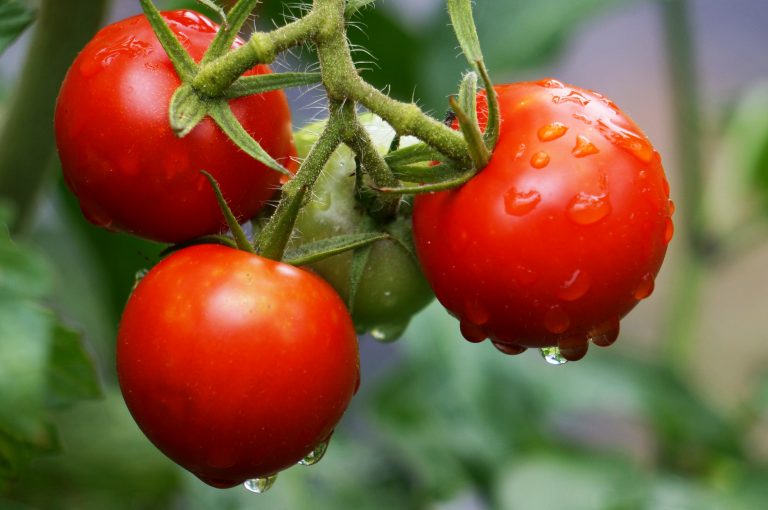
  • Fruit. Bananas, apples, and oranges all come from plants, so all are vegetarian-friendly. While high in fructose (sugar), they are also nutrient-dense. Our general stance on fruit around these parts is to eat “stick to whole fruit, avoid fruit juices.”
  • Nuts and seeds. Again, they come from plants, so almonds, cashews, and pumpkin seeds are good to go on any vegetarian plan you pick. So is quinoa, which although is often thought of as a grain, is actually a seed. Mind=blown. Nuts and seeds, although high in fat and calories, are another great way to get protein on a semi-vegetarian diet.

Have as much of the above as you like (assuming it meets your calorie goals).

I know you’re curious about meat consumption and the Flexitarian Diet

The good thing about the Carnivore Diet is you can eat as much steak as you want. The bad thing is, that's about it.

We’ll devote our entire next section to it.

Before we get there, let’s talk about foods that you might NOT want to build your flexitarian meal plan around.

Since the Flexitarian Diet is an attempt to eat nutritiously, it not only encourages the consumption of whole plants but also discourages the consumption of certain foods too.

When following a Flexitarian Diet, try to minimize:

  • Processed meat: bacon, sausage, and bologna. Proponents of flexitarianism advocate for unprocessed meat like grass-fed beef, pasture-raised chicken, fresh fish, etc. More on this next section.
  • Refined carbs: white bread, bagels, pasta, etc. These foods have much of their fiber destroyed during the refinement process, making them more like sugar during digestion. 
  • Added sugar: soda, donuts, cookies, etc. Also known as “junk food.” Delicious, of course. But these foods are high in calories and low on nutrients, so they belong in the “rare treat” category. 

The above list likely isn’t too shocking. Most health sites (and us in our healthy eating guide) recommend these foods be eaten sparingly.

Now, it’s time to talk meat!

How Often Do Flexitarians Eat Meat? (The “Flex” in “Flexitarian”)

This much ham might knock you out of the flexitarian community.

The answer to “How much meat can you eat on a flexitarian diet?” depends on who you ask.

There are lots of variations of semi-vegetarianism, meaning there are a lot of different answers to this question.

Dawn Blatner discusses different levels of meat restriction in her book The Flexitarian Diet, which we’ll review below.

Here’s the progression plan for The Flexitarian Diet:

  • Beginner Flexitarian:
    • Two meat-free days a week
    • No more than 26 ounces of meat the remainder of the week
  • Advanced Flexitarian: 
    • Three to four meat-free days a week
    • No more than 18 ounces of meat the remainder of the week
  • Expert Flexitarian:
    • Meat-free five days a week
    • 9 ounces of meat allowed the remaining two days

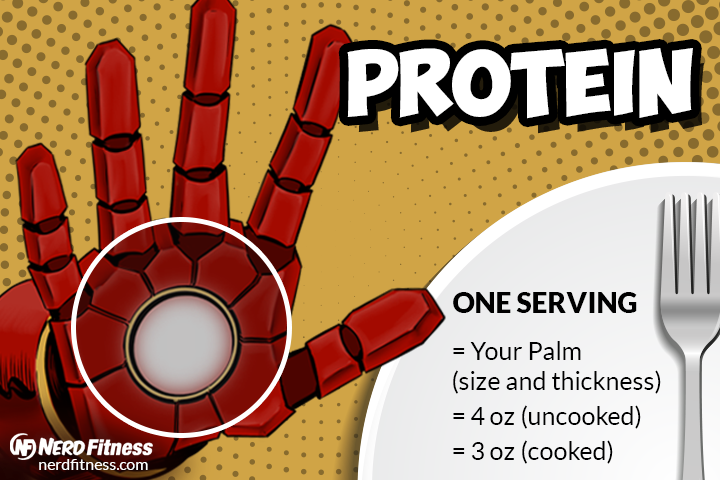
For reference, a three-ounce piece of chicken breast is about the size of your palm:

A serving of protein should be about the size of your palm, like so.

Another popular form of flexitarianism comes from VB6 (Vegan Before 6:00) which is exactly what it sounds like: follow a vegan meal plan until dinnertime. 

Naturally, there’s a book about this one too, this time from Mark Bittman. 

Like Blatner, Bittman encourages the consumption of whole plants and discourages the consumption of junk food.

These image shows some real food, critical if you're trying to lose body fat.

That’s not too surprising, because every diet encourages the consumption of whole plants and discourages junk food (well, not the Carnivore Diet or the Military Diet). 

Other than following a 100% plant-based diet until 6pm, Bittman offers no specific rules for VB6.

You do you.

This is going to lead us to a larger point: “flexitarian” is up to interpretation

Since there are multiple plans for semi-vegetarianism, how much meat you eat will really depend on your goals and motives.

Does Cutting out Meat Help You Lose Weight?

This rabbit definetly follows a plant-based diet. Should you?

Many proponents of flexitarianism will claim it can help with weight loss:

  • Mark Bittman created VB6 (Vegan before 6) after his doctor told him to lose some weight.
  • Dawn Jackson claims her Flexitarian Diet can help those struggling with obesity.

However, anyone selling a diet book is gonna tell you it can help with weight loss.

What does the science say?

Every day is a good day for science.

Since there’s no set-in-stone interpretation of what makes a “flexitarian” a flexitarian, it can be hard to prescribe any specific benefits to the diet.

This is a concern Emma J. Derbyshire brought up in a review of semi-vegetarian diets in Frontiers of Nutrition.[1] Derbyshire states that before any formal recommendations can be done on flexitarians, “official definitions of these diets are needed.”

You need to know exactly what you’re researching before you can make heads or tails of what’s going on.

However, weight loss itself has been studied a lot, so we aren’t completely stumbling in the dark here.

As we address in our guide How to Lose Weight (The 5 Rules of Weight Loss), our bodies obey the Laws of Conservation of Energy and Thermodynamics: 

To lose weight, we need to burn more calories than we consume regularly

It’s about as close to fact as we can get in nutrition science.[2]

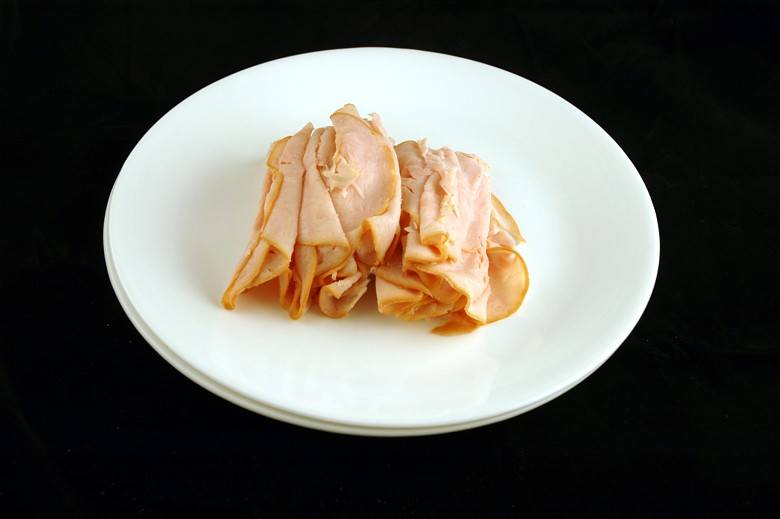
Here’s the thing about meat: it’s actually pretty calorically dense, especially when you compare it to fruits and vegetables.

This is 200 calories worth of sliced turkey (thanks to wiseGEEK):

This plate shows 200 calories of turkey

Here is 200 calories worth of Saltine crackers (which are vegan):

This plate shows 200 calories of Saltine Crackers

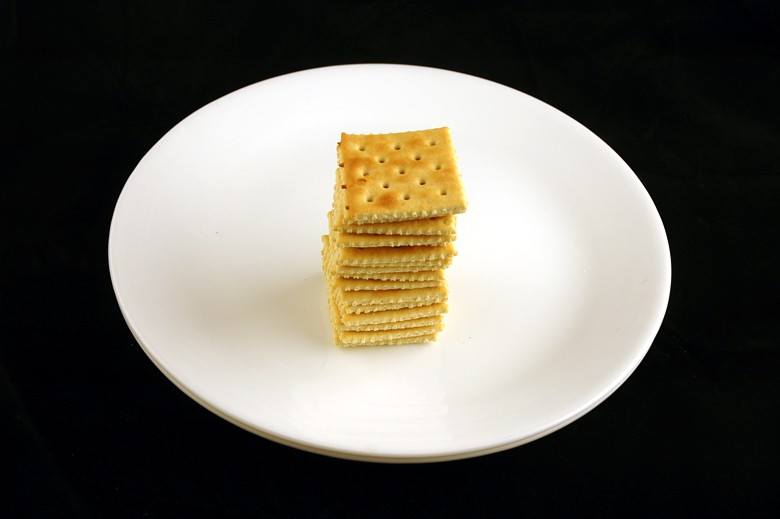
When comparing a plate of meat to a handful of crackers, you might think: “Steve, there’s no way those crackers will satisfy me, I’ll need to eat more food,” then you’d be right. 

It’s why focusing on foods that fill you up without being overloaded with calories can help with weight loss. 

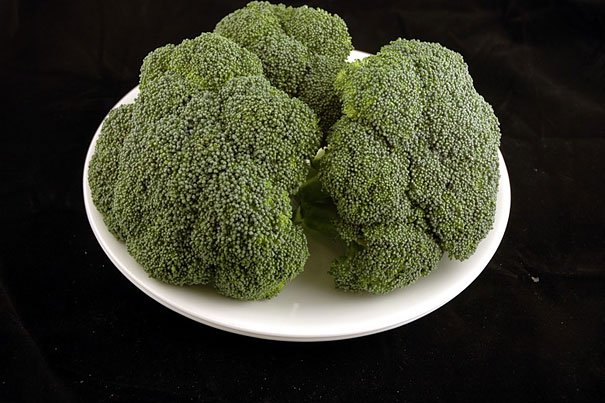
Let me share one more example:

This is what 200 calories worth of broccoli looks like:

A pic of 200 calories of broccoli

So, YES, if you replace your meat lovers pizza, chicken parm with pasta, and bacon cheeseburgers with mostly fruits, vegetables, and other whole plants, you’ll most likely lose weight. 

It comes down to total energy (calories) consumed!

This is something we bring up throughout our Guide for Plant-Based Diets: be careful about replacing calorie bomb meat products with heavily processed junk food.

You might end up with the same amount of calories (if not more), which means you’ll have no weight loss.

Because from a protein perspective, meat can be a great source of nutrients.

Let’s compare chicken against black beans, since legumes (beans) are some of the most protein-dense plants you can eat:

  • 100 grams of black beans: 22 grams of protein, 339 calories, 63 grams of carbohydrates (16 grams of which are fiber).
  • 100 grams of chicken breast: 30 grams of protein, 165 calories, 0 grams of carbohydrates.

The same size serving of black beans has less protein, twice as many calories, and more carbs compared to chicken.

This isn’t to say you can’t get adequate protein from plants (we tell you exactly how to do it in our guide to vegetarianism), it’s just something you have to appropriately plan for!

All this to say: you can lose weight on a flexitarian diet as long as you burn more calories than you eat consistently. 

If semi-vegetarianism actually helps with that, great!

If not, no biggie, just try another path (here’s what I personally do).

The Tick is stoked you are putting on weight, muscle or fat, it means our strategy is working.

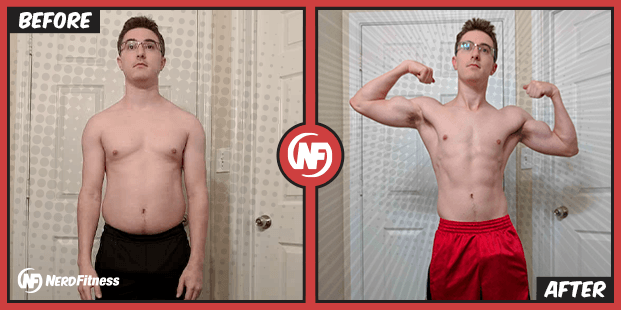
Let me say that if you’re trying to lose weight and wondering if a flexitarian diet is the solution, I’m proud of you for at least THINKING about different nutritional strategies that might align with your lifestyle and goals. 

Lots of our coaching clients come to us with all sorts of different fitness questions, like what to eat and how to exercise, proving we all start from unique situations. The important thing is that you’re beginning to ask questions and looking for answers. 

If you want help on your journey, we’re here for you. Our 1-on-1 Online Coaching Program partners busy people just like you with a coach who will get to know you better than you know yourself.


What Are the Benefits of Being a Flexitarian?

No matter what type of plant-based diet you pick, eat lots of fruits and vegetables.

There are all sorts of benefits from eating lots of plants.

Now granted, I’m on the record for stating I don’t buy into the claim that meat is inherently bad for you (we dig into it in this article). 

However, I’m also on the record for stating you should eat your fruits and veggies (scope out our Guide to Healthy Eating).

Let’s rap about the good things found in the plant kingdom:

  • Fiber: studies have shown that eating dietary fiber (found in plants) can have loads of health benefits. Fiber from plants can help lower raised blood pressure, improve insulin sensitivity, and help with digestive issues.[3]
  • Vitamins and minerals: plants contain vitamins E, C, K2, and calcium, to name just a few. You need these things to survive. 
  • Antioxidants: there are all sorts of toxins in the modern world (air pollution, BPA in plastic, etc). Plants, and the antioxidants in them, can help defend against some of these pollutants.[4]

When you start to factor this together, it makes sense to eat a lot of plants.

Yep, eating real food like this banana would be a great addition to a plant-based diet.

It also makes sense that people who eat a lot of plants, like flexitarians, tend to be in good shape.[5]

Whole plants are high in nutrients and low in calories, making them ideal for creating an energy deficiency.[6] Again, this is needed for weight loss.

Here’s where the debate rages on the internet: are people who follow a plant-based diet generally healthier than omnivores because meat is bad for you, or because vegetarians tend to eat more fruits and vegetables and less processed foods?[7]

It’s hard to say.

More studies are rolling in every day, so I’m not going to declare a winner over the other.

I will say that I actually resonate with a “flexitarian” lifestyle, though I just call it “mostly healthy eating” = eat mostly plants, healthy sources of protein, and keeping total calorie intake under control. 

The moral of the story: eat lots of plants…and maybe a little meat. 

Should I Try the Flexitarian Diet? (Next Steps)

o matter what "diet" you pick, eating actual plants is a good idea.

Sure!

Why not?

There are worse ways to eat than tons of plants with a little bit of meat.

Being a flexitarian is actually not too different than following the Mediterranean Diet.

It’s the same way of eating, just with a new name. 

Author Michael Pollan summed it up years ago with “Eat food, not too much, mostly plants.”

Truth be told, healthy eating is more or less the same no matter what you call it.

They just label it with different names to sell books. 

Here’s what every nutrition expert agrees on:

We lay all this out in our Guide to Healthy Eating, which I would encourage you to check out.

If this is the first time you’ve tried to “eat right,” or the 17th, it’ll help you make small lifestyle changes towards a healthy diet.

This is our preferred approach here at Nerd Fitness.

That will bring me to my one concern on adopting The Flexitarian Diet or any other strict form of semi-vegetarianism: if you change too much at once, it might be overly difficult and you’ll grow frustrated.

Frustration can lead to abandoning a new way of eating. 

Yeah, it can be tough going from cookies to raw vegetables...

We see it all the time here: people go Paleo or Keto for 21 days, hate it, then go right back to where they started.

Since they’re now demoralized from the experience, they don’t even try anymore, which is where the real harm comes in.

So try a small step today:

  • Make dinner this week.
  • Try eating one new vegetable.
  • Hell, make it exercise-related and just go for a walk.

This might be better than changing everything at once giving up meat for most of the week.

No matter what you do now, start!

If you wanna win a race, you need to start it!

You can’t create new habits if you never get going, so pick something you’re going to work on and try it for a week. Then look back and review your progress:

  • If you did the thing, keep going!
  • If you didn’t do the thing, no problem! 

Make a smaller change this time and try again.

Want some help along the way? The perfect path on where to go from here and what to change?

You got it!

#1) Our 1-on-1 Online Coaching Program: a coaching program for busy people to help them make better food choices, stay accountable, and get healthier, permanently.

You can schedule a free call with our team so we can get to know you and see if our coaching program is right for you. Just click on the image below for more details:


#2) If you want an exact blueprint leveling up your nutrition, check out Nerd Fitness Journey! Our fun habit-building app helps you exercise more frequently, eat healthier, and level up your life (literally).

If you follow our Nutrition missions, you’ll learn to eat healthier while earning XP! Sah-weeeet.

Try your free trial right here:

#3) Become part of The Rebellion! We have a free email newsletter that we send out twice per week, full of tips and tricks to help you get healthy, get strong, and have fun doing so.

I’ll also send you tons of free guides that you can use to start leveling up your life too:

Alright, I think that about does it for this article.

Now, your turn:

What are your thoughts on the Flexitarian Diet?

If you follow it, when do you eat meat?

Any tips or tricks to make it sustainable?

Let me know in the comments!

-Steve

PS: If you’re just starting to explore vegetarianism, make sure you read our Beginner’s Guide to Plant-Based Diets so you do it safely and effectively!

###

Photo source: Meal prep Sunday, How to turn kids off, LEGO with ham, What’s up doc, Vectored Vegetables, Tomatoes, Stormtrooper with a camera

GIF source: Book

The post The Flexitarian Diet Plan: The Ultimate Beginner’s Guide to Semi-Vegetarianism first appeared on Nerd Fitness.

from Nerd Fitness: Helping You Lose Weight, Get Stronger, Live Better. https://ift.tt/L24F7bv
via IFTTT

Categories
Uncategorized

#getfit #holistic #nutrition Upgrading To A Hybrid Fitness Business Model

Read this post Upgrading To A Hybrid Fitness Business Model on keep it simpElle.

If your goal is to engage more people, then running a fitness business that combines in-person and online can help you reach a wider audience, add resilience to your business, and grow a bigger community. Typically, you’ll be in a…

Read More

Read more on keep it simpElle –

from keep it simpElle https://ift.tt/kKD69WZ
via IFTTT

Categories
Uncategorized

#healthyliving #holistic #nutrition 7 lessons from women in my life

March is Women’s History Month and in honor of that, we will be spending this month focusing on and appreciating the women who move us to move. 

The women in Robin’s family had a very profound influence on her direction and purpose in life. They moved her to move, motivated her to live an active and purposeful life, and helped shape and create the woman she is today.

In today’s episode, Robin shares seven life-changing lessons she learned from the women in her family. She dives into the power of unconditional support. She talks about the power of living an active lifestyle and the value of keeping a sense of humor in tough times. She also discusses the women who paved the way for her generation and explains why we should never take our health for granted or let stigma and shame define us.

Robin hopes that acknowledging and celebrating those women and sharing some of the lessons they taught her helps motivate you to take action toward becoming the woman you would like to be. Stay tuned today as Robin highlights some of the transformative lessons she learned from the women in her family! 

Show highlights: what you can look forward to in this episode!

  • The practical ways in which Robin’s mom showed her what it means to be supported, even when it made her uncomfortable or was something she would not have done herself. 
  • How the unconditional support Robin received from her mom helped her kickstart her Pilates career.
  • The way that Robin’s mom taught her that she could work and follow her dreams and still be an excellent mom.
  • The powerful lesson Robin remembers learning from her late Aunt Judy.
  • How her Aunt Judy modeled what it looked like to live an active lifestyle through all seasons of life.
  • The lessons Robin learned from her remarkable grandma, Linda.
  • How keeping a sense of humor can help you through the most challenging times.
  • How Robin learned never to take her health for granted.
  • Why you should never let stigma and shame define you.
  • The power in bringing issues of mental health or addiction to light.
  • Robin talks about the brave and strong women who paved the way for future generations.

Links in this episode:

Share this podcast episode!

The post 7 lessons from women in my life appeared first on The Balanced Life.

from Blog – The Balanced Life https://ift.tt/DNj4stB
via IFTTT

Categories
Uncategorized

#getfit #holistic #nutrition Quick Upper Body Workout For Cyclists

Read this post Quick Upper Body Workout For Cyclists on keep it simpElle.

Try this short and effective upper body workout for cyclists taken from the Beyond CC strength training programme. It can be completed in as little as 15 minutes – with a short warm up and cool down. When most people…

Read More

Read more on keep it simpElle –

from keep it simpElle https://ift.tt/Lqb5Fk9
via IFTTT

Categories
Uncategorized

#holistic #getfit #nutrition The Batman Workout

Lego Batman on gray baseplate

Today, I’m going to share The Batman Workout!

If you plan on fighting crime in your city, you’ve come to the right place. 

We specialize in creating nerdy-themed exercise routines in our Online Coaching Program, because we like to have FUN with our training!


Here’s what we’ll cover:

Alright, grab your cape, and let’s do this.

How Would Batman Train in Real Life?

As Ryan from GMB mentions in the video above, Batman needs to train for:

  • Strength
  • Power
  • Agility

Now, a gym could be useful here. However, sometimes we don’t always have access to a fitness facility.

Maybe we’ve been thrown into some sketchy prison somewhere (thanks Bane).

BUT, that doesn’t mean we can’t work out. It just means we have to focus on bodyweight exercises:

Bruce Wayne doing push-ups
As we mention in our Guide to Bodyweight Training, you really don’t need any equipment to get a full-body workout in. You just need the right plan.

Let me show you what I mean.

The Batman Workout DAY 1

 The Batman Workout Day 1:

  • Squat Jump
  • Push-Ups
  • Headstand Push-ups
  • Pull-ups
  • Handstand

Depending on your experience level, we can go with a Beginner or Advanced variation.

Day 1 – Beginner:

  • Rolling Squat Tuck-up Jumps
  • Side-to-Side Push-ups
  • Modified Headstand Push-ups
  • Jump Pull-Up with Tuck
  • Handstands Against Wall

Day 1 – Advanced:

  • Rolling Single-Leg Tuck-up Jumps
  • Exploding Push-ups (Standard to Wide to Right Front/Left Back to Left Front/Right Back)
  • Headstand Push-Ups
  • Ice Cream Makers
  • Free Standing Handstands

The Batman Workout DAY 2

The Batman Workout Day 2:

  • 180-Degree Jump
  • Front Lever
  • Back Lever
  • Planche

Again, we can roll with a Beginner or Advanced variation.

Day 2 – Beginner:

  • 180-Degree Jump Turns
  • Front Lever Hold with Tuck
  • Back Lever Hold with Tuck
  • Low Frog Hold

Day 2 – Advanced :

  • Single-Leg Jump 180 Degree Turn
  • Front Lever Hold
  • Back Lever Hold
  • Floating Frog Hold

Exercises Covered in the Batman Workout

Let’s now cover the exercises in the workouts found above.

#1) Squat Jump

Someone doing a squat jump, by rolling forward into a squat then jumping up.

#2) Single Leg Squat Jump

Someone doing a squat jump, by rolling forward into a squat then jumping up on one leg.

#3) Side-to-Side Push-up (Knee)

Doing side-to-side Push-up on knee

#4) Side-to-Side Push-up

side-to-side push ups

#5) Exploding Push-ups

Someone doing a push-up by pushing off of the ground

#6) Modified Handstand Push-up

Doing a push-up from a downward dog like position

#7) Handstand Push-up

Doing a handstand push-up against a wall

#8) Jump-up Pull-up with Tuck

Jumping up to do a Pull-up, then tucking knees

#9) Pull-up with Tuck

A pull-up with knees tucked

#10) Ice Cream Maker – Tucked

Ice Cream Maker with Tuck

#11) Ice Cream Maker – Can Opener

An ice cream maker, can opener variation

#12) Ice Cream Maker – Front Lever

Ice cream maker, front lever variation

#13) Handstand (In)

Handstand facing wall

#14) Handstand (Out)

Handstand facing out

#15) 180-Jump Turn

The 180 degree jump

#16) 180-Jump Turn – Single Leg

180 Jump on a single leg

#17) Front Lever – Tuck

The front level with tuck

#18) Front Lever – Can Opener

The front lever, can opener variation

#19) Back Lever – Tuck

Back lever with tuck

#19) Back Lever

Back lever

#20) Low-Frog Hold

The low-frog hold

#21) Floating Frog

The Floating Frog

FAQ on The Batman Workout

LEGO Batman and Batgirl

Let’s answer some of your questions on the Batman Workout.

#1) When should I advance on with the workout?

Once you get proficient at a level, go up one level for that exercise and work on mastering that within the workout.

Don’t try and jump up to the next progression too quickly. Focus on form and performing each rep as cleanly as you can. That is what will get you strong and help you master the moves. Be sure to:

#2) How many reps should I do? How long should I perform the holds?

  • Perform no more than 5 reps per movement for up to 3 sets.
  • Work on performing holds for 5 to 8 seconds per set.
  • Perform all sets of one exercise before moving on to the next exercise.

#3) How often should I do the Batman Workout?

Give yourself at least a day of rest in between the workouts.

You can even add in sprints or intervals on your off days for extra stamina work if you would like.

#4) What if I don’t have a bar?

In the video below, Coach Jim walks you through what to do if you don’t have a pull-up bar:

For more here, check out How to Do Pull-ups Without a Bar.

#5) Can I wear a cap while doing the Batman Workout?

Yes.

Get strong without picking up a weight

Batman Action Figure

Maybe you hate gyms. Maybe you travel like crazy. Maybe you just enjoy exercising outdoors.

No matter your reason, You CAN build muscle and size or simply lose weight and get in shape with only bodyweight exercises.

Just ask Jimmy here:

Jimmy before and after he did bodyweight training

Jimmy didn’t want to leave his home to train, so we helped him build a plan to do just that.

Want some help from us too?

No problem!

Here’s how Nerd Fitness can get you ready to fight crime:

1) If you want step-by-step guidance, a custom bodyweight training program that levels up as you get stronger, and a coach to keep you accountable, check out our killer 1-on-1 coaching program:


2) If you want an exact blueprint for working out at home, check out NF Journey. Our fun habit-building app helps you exercise more frequently, eat healthier, and level up your life (literally).

Try your free trial right here:

3) Join the Rebellion! We need good people like you in our community, the Nerd Fitness Rebellion. 

Sign up in the box below to enlist and get our guide, Strength Training 101: Everything You Need to Know. It’ll help you start incorporating bodyweight moves into your training.

Alright, that about wraps it up for today.

Tune in for more next time!

Same Bat-Time, same Bat-Channel.

-Steve

###

photo source: ©rosinka79/123RF.COM, batman action figure

The post The Batman Workout first appeared on Nerd Fitness.

from Nerd Fitness: Helping You Lose Weight, Get Stronger, Live Better. https://ift.tt/tCxWKRa
via IFTTT

Categories
Uncategorized

#getfit #holistic #nutrition 5 Exercises To Improve Posture

Read this post 5 Exercises To Improve Posture on keep it simpElle.

Theses exercises are a quick and effective way to improve posture. Minimal or no equipment needed for reduction in back pain & shoulder aches. After spending the last couple of years working from home even more than usual, I’ve found…

Read More

Read more on keep it simpElle –

from keep it simpElle https://ift.tt/XSFTJil
via IFTTT

Categories
Uncategorized

#holistic #getfit #nutrition How to Touch Your Toes (The 4 Best Stretches to Improve Flexibility)

This won't be painful, I promise!

It’s time to learn how to touch your toes!

What makes me so confident you’ll be able to reach your little piggy wiggies?

Because we teach even the most “inflexible” of folks how to touch their toes in our 1-on-1 Online Coaching Program, and we’ll share with you all our secrets below.


Here’s what we’ll cover in our guide, How to Touch Your Toes:

It’s time to become bendy like Gumby! 

Don't worry, we're just getting started with appearances from Gumby.

Awesome.

Let’s do this.

The Benefits of Being Able to Touch Your Toes

I told you Gumby would be back.

If you want to increase your flexibility, you’re gonna need to stretch.[1] It’s how you make your muscles elastic and strong.

Why bother though? What’s the big deal about being able to touch your toes?

The benefits of stretching include:

  • Increase range of motion. If you can move a joint through its full range of motion, you’re gonna have more freedom of movement. Confidently navigating the physical world is a sign of a healthy nerd, which is why flexibility shouldn’t be overlooked. One of the best ways to become more flexible is to stretch.[2] 
  • Improve posture. If you want to stop slouching so much, regularly stretching may help.[3] Stretching works to improve muscle imbalances, which in turn might help your posture.
  • Alleviate back pain. If you suffer from back pain, it might be worth starting a stretching routine .[4] The muscles in your back might be tight, restricting your range of motion, which causes pain. Stretching can help loosen up the area, plus strengthen the muscle. This might help prevent future injury. 

Stretching, and the flexibility that comes with it, should not be overlooked when building a workout routine

While there are many indicators of good flexibility, one of the most popular is undoubtedly being able to touch your toes.

Don't worry buddy, we'll teach you exactly how to reach your feet!

After all, it was so important the President had all American schoolchildren perform the “Sit and Reach” test to see if they could grab their feet.[5]

Touching your toes might have been a struggle for you then. It might still be a struggle for you now.

What’s going on?

Why Can’t I Touch My Toes?

Do otters have toes? Claws?

If you are unable to touch your toes, it’s most likely because of one of these four major reasons:

#1) Shortened/tight posterior chain muscles. Although most people think not being able to touch our toes just means your hamstring muscles are inflexible, in reality our whole system (including the lower back) can play a huge role as well! As Mark Rippetoe explains in this video about the Romanian deadlift, what you may think is a lower back issue is also a hamstring issue (and vice versa):

You see, the posterior chain is an interconnected series of muscles that includes our back muscles, erector spinae (muscles along our spine), lower back muscles, butts, and hamstrings.

The posterior chain is shown here:

As you can see, much of our body is dependent on the posterior chain muscles.

Weak mobility points in one place in the system can become debilitating (and often easy to spot) when we do compound movements like the deadlift.

If you’re somebody who sits at a desk all day and struggles to touch your toes, you probably aren’t strengthening or lengthening these muscles because the chair is doing all of the work for you.

#2) You have relatively long legs compared to your torso and arms. People with long legs and short torsos will have a greater challenge than people who have short legs and long torsos and arms.

Yeah, having long legs might make reaching your toes more difficult.

But fear not, you too can level up and get those toes touched.

#3) You have too much body fat. If you are overweight and happen to have a big stomach, it can certainly make touching one’s toes more challenging. Because you already know that diet is 90% of the battle when it comes to weight loss, focus on nutrition to begin losing weight (here are the 5 rules of weight loss to help you begin). This may be a factor in making it easier to touch your toes.

#4) You’re not warmed up yet. If you JUST woke up or spent all day in a car, you’re familiar with the rigidity that makes you feel like a steel girder. Your muscles act like rubber bands; the more they are used, the more they are warmed-up, and the further they can stretch. This is why we encourage people to go through a mobility warm-up before exercise!

Arm circles like so are a great way to get your heart rate up before doing HIIT.

Let’s put a plan in place to finally touch our toes!

Determining Your Initial Flexibility (We All Start Somewhere)

While we are going to go over many stretches, feel free to make your own!

Before we can implement a strategy to develop more flexibility that allows you to touch your toes, we need to know your starting point.

As Peter Drucker said, “That which gets measured gets managed.” Or in this case, that which gets measured gets more flexible! 

The following comes from our free 5-Day Flexibility Series, which you can sign up for today!

THE “CAN YOU TOUCH YOUR TOES?” TEST:

  1. Stand straight with your legs about hip-width apart. You want your legs to be straight, but don’t aggressively lock out your knees either (this feels like a “microbend” to a lot of people).
  2. Begin by bending and leaning forward towards the ground with your quads (front of your legs).
  3. Let your body rest naturally, as if you were a ragdoll. Keeping your hands relatively close together, straighten your fingers and begin to stretch down slowly to the ground.
  4. Do this 2-3 times to get warmed up. Try to keep your legs straight by flexing or activating your quads; keep your legs straight, without locking your knees.
  5. Other than the microbend, don’t bend your knees to help you get closer to the ground! I’m watching you. If you’re videotaping yourself on these to track your progress, note that depending on your body (and your hamstrings) your legs may not look 100% straight.

When you are ready, reach towards the ground and hold it for a few seconds. Measure the distance in one of the following ways:

  • If you aren’t touching the ground, have a friend measure the distance from the tip of your fingers to the ground. If you don’t have a friend with you, place your hands on your legs and note where the tips of your fingers end up.
  • If you can touch the ground, you’ll want to flatten your hands as much as possible, and record the distance from the top of your head to the ground. As you can stretch further, the top of your head will actually get closer and closer to the ground.
  • If this seems easy, try hugging your calves and pulling your head in towards your body.

Record your measurement in a document or on a piece of paper (if you’re part of the flexibility challenge, we have a document you can print out), and/or save the photo/video to show how far down you are reaching.

The 4 Best Stretches to Touch Your Toes (Improve Your flexibility)

Of course we were going to include this photo.

There are two key factors that will determine whether or not you are successful in gaining the ability to touch your toes as you practice over the next few weeks:

  1. Actively stretching your muscles JUST past the point of comfort. Like strength training by adding 1 rep or a few pounds to an exercise, we want to stretch just beyond the point where we stretched last time so our muscles have to elongate.
  2. Consistent practice and effort! You can’t improve your flexibility by stretching for 5 minutes once a month. You’d be better off stretching for 30 seconds spread out 10 times throughout the month.

That’s right. Studies confirmed that actively focusing on touching your toes for 30 seconds, 3 times per week was enough to lengthen hamstring muscles in 4 weeks. [6]

I‘m sure there’s an inappropriate joke to be made here about 30 seconds of effort, but I’m better than that (I think).

In less time than it takes to update your Facebook status, you could be touching your toes and make Gumby proud.

Is there anything Gumby can't do?

And I know you have time.

HOW TO TOUCH YOUR TOES (CONSISTENT FLEXIBILITY PRACTICE):

All I’m asking for is 2 minutes. 2 minutes! You can even spread these movements out throughout your day – I like to do them after I work out. After a long day at a desk, after driving, or upon waking up are all good times to work on flexibility!

Through each of the movements below, make sure you are breathing slowly and steadily.

You can follow along with all of the movements below that come from our really fun online course, Nerd Fitness Yoga (part of NF Prime). It’s essentially yoga for people that don’t do yoga.

THE 4 BEST STRETCHES TO TOUCH YOUR TOES:

  1. Standing toe touch stretch – 30 seconds
  2. Cat/Camel – 30 seconds (switch positions every 5 seconds)
  3. Star stretch – 30 seconds (as many slow reps as you can)
  4. Moon the sky – 30 seconds (as many slow reps as you can)

1) Standing toe touch stretch: Flex/activate the front of your legs, keep them straight, and bend over at the waist juuuust past the point of discomfort; hold that position for 30 seconds. Repeat this process every other day and hold it for 30 seconds.

Don't push it, but let yourself ragdoll down.

2) We can loosen up a tight lower back by doing 30 seconds of moving back and forth every few seconds by doing a “cat” and then a “cow”:

These yoga poses are a great way to help exercise your back.

3) You can also do what we call a star stretch to help stretch those legs out! Stand with your legs spread wide, and arms extended (hence the term Star!), and then reach down with one hand to your opposite leg; hold for five seconds, back to start, and repeat with the other leg.

The Star Stretch is a great practice to touch your toes.

4) Here’s another favorite movement of mine that helps improve my flexibility and mobility: the “Moon the Sky” stretch!

This stretch is a great way to increase flexibility so you can touch your toes!

This is a great stretch to mix into your pre-workout warmup to get your legs, butt, and back prepared for work:

  • Squat down and put your hands under your feet
  • Slowly move your butt up with your hands remaining under your feet.
  • Raise your butt and try to straighten your legs
  • Go a TEENY bit higher each time until you can fully straighten your legs!

For any of the above moves, a good way to check your form would be to record a video of yourself and match it against the videos and gifs here. If they look close, you’re doing great!

If you want to have an expert review your stretches, our coaches can do just that in our snazzy app!


How to Become More Flexible (Next Steps)

This would be an advanced way to touch your toes.

It’s now time to train to touch your toes!

Test your toe-touching abilities before and after doing the 2-minutes of exercise above, and I bet you’ll notice a difference right away – just wait to see what you can accomplish in a few weeks!

The cool thing about flexibility is that any combination of the stretches above will help you improve your flexibility as long as you consistently work on it a tiny bit every day.

I do mobility work: 

  • When I wake up
  • After I work out
  • Throughout my day (when working at my desk)
  • At the end of my day for a minute or two before bed

All added up, it’s less than 5 minutes of time, but it’s enough to show me some results!

I feel like this is cheating.

If you follow our guide above, you’ll be well on your way to increasing your flexibility and touching your toesie wosies.

You just need to start!

Want some help getting going? A little extra push out the door? 

We built three perfect next steps for increasing your flexibility!

#1) Work with a professional Yoda! If you want confidence that you’re following a program that is tailor-made for your busy life, situation, and goals, check out our popular 1-on-1 Coaching Program.

Many of our clients have “increased flexibility” as one of their fitness goals, and they take comfort knowing a certified NF instructor is guiding them there. 


#2) Exercising at home and need a plan to follow? Check out Nerd Fitness Journey!

Our fun habit-building app helps you exercise more frequently, eat healthier, and level up your life (literally).

Try your free trial right here:

#3) Join our amazing free community, the Nerd Fitness Rebellion! Not only is it free to join, but we’ll provide you with loads of free goodies when you sign-up:

That should just about do it for our guide on How to Touch Your Toes.

Now, your turn:

Can you touch your toes?

Does attempting to “sit and reach” bring back horrors from grade school?

Any other tips or tricks for mobility training?

Let us know in the comments!

-Steve

PS: Make sure you check out the rest of our Mobility Training series:

###

GIF credit: banana, Danny Devito, gumby, patrick.

Photo credit: toe touch, posterior chain, roar, yoga sunset, the adventures of Gumby and R2D2, Stormtroopers and Gumby

The post How to Touch Your Toes (The 4 Best Stretches to Improve Flexibility) first appeared on Nerd Fitness.

from Nerd Fitness: Helping You Lose Weight, Get Stronger, Live Better. https://ift.tt/I6lDgYd
via IFTTT

Categories
Uncategorized

#getfit #holistic #nutrition How To Tackle Hills In Cycling

Read this post How To Tackle Hills In Cycling on keep it simpElle.

I’d like to think I’m like most people, in that I try to avoid things I don’t like. In this case, I’m talking about cycling up hills. I’m not a fan of hills in any scenario to be honest, but…

Read More

Read more on keep it simpElle –

from keep it simpElle https://ift.tt/COYg5r7
via IFTTT

Categories
Uncategorized

#holistic #getfit #nutrition How to Bench Press Safely (5 Mistakes to Avoid)

These LEGOs are working the bench and doing some deadlifts. Nerd Fitness approves.

Let’s get you comfortable using the bench press, starting today!

We specialize in helping people pick up barbells for the first time. So if the bench press makes you worry…DON’T PANIC. We’ll set you up with a plan so you can use it safely and effectively.

Here’s what we’ll cover:

This guide is part of our Strength Training 101 series. I would encourage you to check out the rest of the articles if you’re just starting your weight training. 

If you’re in a rush, you can download the entire guide for free when you enlist in the Rebellion (that’s us!), by joining our free bi-weekly newsletter: 

How Important is the Bench Press?

Make sure you always bench with a spotter. Seriously.

For the last 30-40 years, the bench press has become the universal lift for bros everywhere to determine how strong someone truly is. 

You know, questions like:

  • How much do you bench?
  • Do you even lift?

A clever take on a popular meme.

As popular as it is, the bench press in its current form is less than 100 years old.

Until the 1930’s, people did a movement called the “floor press”, which was similar to a bench press only done from the floor.

If you don't have a bench press, you can 100% try a floor press.

In fact, at first many people did a movement called a “belly toss” – where the bar would come down and bounce off the belly to help the lifter get it back up.

The three movements – bench press, belly toss, and floor press were all popular until the 40’s and 50’s, when the bench press started to become more and more popular, as bodybuilders liked how the bench worked their pecs (better than the other two movements).

Arnold utilized the bench press (amongst other tools and lifts) when competing for his Mr. Universe title.

Arnold benches, for sure. 

As the bench press became more and more popular, powerlifting emerged in the 1970’s and separated itself from weightlifting as a sport of its own.

What Muscles Does the Bench Press Utilize?

I can't even begin to imagine what Superman must be able to bench.

The bench press is a great movement to have as a part of your strength program, and one move we consider to be a part of the “big 4” basic lifts. 

The other three lifts? 

  1. The Squat
  2. The Deadlift
  3. The Overhead Press

Some of the issues coaches have with the bench press (such as a tight chest creating bad posture) don’t come from benching itself, but come from bench being one of the ONLY movements in your program, and can disappear when incorporated as a part of a well-rounded strength program.

In other words, don’t JUST train using the bench press.

Vada is ready to start bulking up!! And torment her Dad's GF.

The bench press is widely known as a “chest” exercise, however, that’s definitely not all it is. 

The bench press trains:

  • Shoulders
  • Triceps
  • Forearms
  • Lats
  • Pecs
  • Traps
  • Rhomboids
  • Plus pretty much every muscle in your upper body

However, the bench press doesn’t JUST use your upper body.

When you bench properly, you use your lower back, hips, and legs as well. Just like our other main lifts (the squat, deadlift, and overhead press), the bench press, while putting an emphasis on specific muscle groups, is a full-body movement.

Think about it – while you’re benching, the rest of your body is not just lying there doing nothing.

As shown, always have a spotter when doing the bench press!

Your entire body should be working your shoulders are pinched together and your lats are engaged, while your back, hips and legs are tight, stabilizing your entire body to create a solid base and help you generate drive from the round.

How to bench press: The Setup

Setup is everything when performing the press, as we will learn.

There are a lot of different ways to perform the bench press.

We’ll start you out with a standard and basic bench press variation, which we believe is the best (and safest) method for general strength.

Remember: just because you see someone benching a ridiculous amount of weight at the gym does not mean they are using proper or safe form.

They could be an advanced athlete who is making compromises to their form (knowingly or unknowingly) in order to bench higher numbers.

Stay consistent like this mouse and you'll bulk up. Maybe eat a little cheese too.

What do you need to perform the bench press?

  1. A weight bench with uprights:We don't need to make this complicated. A simple weight bench like this will be perfect for the press.
  2. Barbell – the standard weight is 45 lbs, but this may be too heavy to start. No matter how strong you are, I recommend starting with a PVC pipe or broomstick to learn proper form.
  3. Spotter – once the weight gets heavy (we will discuss options later in case you just don’t have someone else to spot you)

How to Set Up A Bench Press

There are many different ways to set up for a bench press – as you’ll see by watching any powerlifting competition, or even by spending just 20 minutes in your local gym.

Some people get on the bench and curl themselves under the bar, some enter the bench from the back and slide in under the bar, and others just lie down and then get tight.

Your first step on proper bench press form looks like this.

The key here is to set up in a way that helps you get your body tight and ready for the lift.

Before you begin, it might be a good idea to roll the bar forward on the uprights, as this is where you will be lifting it off from.

Having the bar in the same spot in the uprights will help you with a standard setup that is the same every time.

Here’s how to position yourself during the bench press:

  1. Squeeze your shoulder blades together (as if you were trying to hold a pencil between them), press your lats into the bench, and raise your chest up slightly towards the bar.
  2. While you’re doing this, squeeze your butt and plant your feet into the ground. Your entire foot (heels included) should be on the ground, on either side of the bench.
  3. Keep your entire body tight. The raising of your chest to the bar, squeezing your shoulders together, squeezing your butt, and driving your heels into the ground will create a tight arch in your back. (more on this later).
  4. Imagine you are a superhero and pretend you are sucking all the energy out of the room and absorbing it. As you the bar descends, absorb that energy and get ready to explode upward with the bar.
  5. Your shins should be perpendicular to the ground and directly below your knees. If they are out in front of you, your feet are too far forward and you won’t be able to generate proper drive.

Engage your entire body while performing the bench press.

When you look up, your eyes should be just north of the bottom of the bar – you should see the bar directly above your eyes. Your head, upper back, and butt should never leave the bench.

Note: Some people (including myself) find it easier to get tight in their upper back if they put their feet up on the bench, grab the bar, get tight in their upper back, and then place their feet on either side of the bench one at a time.

Some (like Staci) find it easier to keep form with their feet up. You do you.

This is just another method and something you can try out after you get the hang of the bench!

Next, take your arms and put them straight up, and grab the bar. Your grip should be with your thumbs around the bar:

Make sure your thumb wraps around, we don't want you to lose control of the bar.

A thumbless grip is not to be used on the bench press, as it is unsafe, and often nicknamed the “suicide grip,” as it is far too easy for the bar to fall off of your hands and land on your body (warning: hard to watch).

When you hold the bar, it should be in the heel of the palm (the same spot in your hands as for the overhead press.) Your wrists will not be extended, and your forearms are under your wrists, forming a solid line of support.

If you hold the bar in the upper half of your hand or the fingertips, not only are you not in a strong position, but you could hurt your wrists.

Bench Press Grip:

Staci shows you the correct way to hold a barbell during the bench press.

Bring the bar (or, preferably PVC as we are just learning) down to your chest. At your chest, the width of your grip should make your forearms straight up and down (as perpendicular to the floor as you can).

This is roughly the width of the bench grip you are shooting for.

Get a friend to help you (as you won’t be able to see on your own), or tape yourself so you can see. Don’t stress too much about getting your forearms 100% perfectly vertical.

Once you get comfortable with the movement, you may change the width of your grip, as there is wiggle room for personal preference, but this is a great place to start.

Also, keep in mind that your grip may seem way wider or narrower than your friends based on the width of your shoulders. This is normal!

Try and keep your arms vertical. This will give you a good grip when performing the bench press.

Why would people alter their bench press grip?

  • A wider grip is more pec-focused
  • A narrower grip is more tricep focused

You will see powerlifters use a super-wide grip because it reduces the range of motion and therefore allows them to lift more weight in competition.

However, more weight does not always mean stronger, and our goal today is safety and strength!

This is why we recommend a grip with your forearms in a vertical position, it’s the most well-rounded and safest version for overall strength.

If you’re worried about whether you have the right grip in place, record yourself and match it against the videos in this guide. If it’s close, you’re doing great.

You could also record a video and sent it to your own Nerd Fitness Coach!

Click on the bottom below to learn more:


The Most Important Bench Press Tip (Keep Tight)

Jim and Staci will walk you through the most important tip when using the bench press.

If you’ve set up correctly, your entire body should be tight.

Focus on the following when performing your bench press:

  1. Think of your body as one single unit, not single muscle groups. 
  2. Drive your feet into the ground, tighten your entire lower body and core, squeeze your shoulder blades together, and squeeze the bar. You should feel like one solid, single unit. 
  3. When you tighten your body, your neck, upper back, and butt should be on the bench (and your feet and heels on the ground). 
  4. When you drive your heels through the ground, squeeze your shoulder blades together, and raise your chest to the bar, it will form a small arch in your back – this is natural and what we’re aiming for. 
  5. You don’t want to push your lower back into the bench to create a “flat back,” or try to not create an arch. If you have heard people talking about not using an arch in the bench press, they are most likely referring to the extreme arch used by many powerlifters:Don't start benching like this. This is an advanced move only.
  6. That is not what we are going for here – that is a way to help you lift more weight by reducing the range of motion, and is only safe to look into when you have been benching for a long time and really know what you are doing. For overall strength, we recommend benching with a full range of motion instead of trying to reduce it.

Now, feel how tight your body is? It is very important that you keep this tightness throughout the entire movement.

Proper Bench Press Form

Camp was great, for lots of reasons, but mainly because we benched.

Now that we are set up and have our hands around the bar, we want to think about having our elbows tucked in and not letting them flare out.

One way to do this is that when you grab onto the bar, think about trying to bend it in half upwards towards the sky.

This “upward bending” cue will also help you engage your lats, which doesn’t actually help you with the press, but do help you keep your body tighter.

We review how to bench press with proper form in this video (taken from NF Prime): 

Here’s how to perform the bench press:

#1) Unrack the bar and position the bar directly above your shoulders (without losing tightness – keep squeezing your shoulder blades together!).

#2) Continue to look up at the ceiling, unlock your elbows and lower the bar to your chest. Don’t just drop the bar to your chest – you want to pull it down towards you with control.

#3) At the bottom of the movement, you want the bar to touch a few inches below your clavicles. If it’s up by your throat or on your stomach, it’s in the wrong position.

As shown, we don't want to the bar too high or too low. You want the bar to touch a few inches below your clavicles.

#4) Once the bar touches your chest, press up to put the bar back to its starting position.

Note that unlike the deadlift and squat, the bench press movement will not be in a straight up and down motion.

This picture shows you the bar path of the bench press

Because of our anatomy, the bar will follow a slightly diagonal path down, and then follow the same path back up.

#5) While pressing, remember to keep your elbows tucked in, and don’t let them flare out. 

As Staci shows here, keep your arms vertical (as much as you can).

Think about squeezing so that your biceps touch the side of your chest (though you won’t be close enough to have this happen), or try to get your elbows under the bar.

You don’t want to be too tucked though – the goal is about a 45-degree angle: 

Staci with elbows at about 35 degrees.

#6) As you press, the same parts of your body that were touching the bench before should still be touching the bench, and your feet should still be on the floor. Don’t let any part of you (the most common is your butt) come off the bench.

To help prevent your butt from coming off of the bench, instead of pushing up when you drive with your heels, think of pushing up and back, towards the front of the bench (where your head is).

#7) To re-rack the bar, move the bar backwards to the uprights and touch them with the bar, and then let go of the bar. Don’t look at the racks, you know that they are there! For beginners, it’s great to have a friend help you guide the bar back to the right position in the rack.

What’s a Beginner Bench Press Weight? (Determining Your Starting Weight)

As we will teach, having a spotter can be critical when using the bench press.

Okay okay, you’re wondering how much you should put on the bar as a beginner who is starting out with bench pressing. 

This is a very important question, and for somebody that is trying to level up as quickly as possible, you’ll be tempted to put WAY more weight on the bar than you can probably handle.

In other words, your ego is writing checks your body can’t cash.

So here is what you are going to do.

Check your ego, and start with:

The bar. And ONLY the bar.

Yes, really start with just the bar. No matter how much the dog is benching.

Shocking, I know.

Your ego will survive. I promise.

As we cover in our extensive guide “How Much Weight Should I Be Lifting?“, you should ALWAYS start every session with just the bar.

Hell, even veteran powerlifters who can bench press 500+ pounds will always start out by just bench pressing the bar.

You can too. Nobody in the gym cares. I promise you.

NOTE: The bar STILL weighs 45 pounds, which MIGHT be too heavy for you. That’s okay! You don’t go to show people how strong you are at the gym, you go to the gym to get stronger.

So start by making sure 45 pounds isn’t too heavy for you.

If you are even SLIGHTLY concerned that it might be, consider using dumbbells or finding a smaller/lighter barbell in the gym and using that to build up to the strength with the bar.

dumbbells can help you build strength until you start using a barbell.

HOW TO BENCH PRESS MORE:

  • Now, if you can bench press the bar safely, great.
  • Do 3 sets of 10 on your first day in the gym.
  • When it’s time to bench press again, add 2.5 lbs (1.2KG) to each side of the bar, and repeat.
  • You’ll then be lifting a total of 50 lbs.
  • Each week, add 5 pounds total (2.5 to each side) to the bar. This will be “slow going” at first. However, even at a paltry 5 pounds per week, you’ll rapidly reach a point in the next 6-12 months where you’ll approach a weight you can no longer lift.

“BUT STACI, I CAN LIFT WAY MORE THAN THE BAR, WHY START THERE?”

Because you need to train your body correctly, and we’re looking to build momentum. When you practice perfect form with light weight, your body starts to learn the proper pathway for the bar. Your muscles, tendons, and joints all learn how to bear the load of a weighted bar.

And each week, you get slightly stronger.

Repeat this week after week, combine it with a diet to get stronger, and you will build muscle like a superhero!

I'm not saying DON'T bench press your friends, but ah, yeah...

Maybe one day you’ll be able to bench people.

The entire strategy of our new app, Nerd Fitness Journey, is based off this strategy: slow progress over time. And because we’re nerds, you’ll actually build a superhero along the way (because why not!).

5 Common Bench Press Mistakes

Don't flare out your elbows, instead keep them tucked in during your bench press.

  1. Not keeping body tight – As soon as you lose tightness, you have the potential for missing the rep. Make sure even when you are warming up and the weight is light, that you keep your entire body tight.
  2. Butt coming up – make sure your butt stays on the bench at all times! It’s easy to let it come up off the bench once the weight gets heavy and you really start driving through your heels. Instead of thinking about driving upwards through your heels, think about driving up and backwards. If you’re struggling with your butt coming up, either try putting plates under your feet or re-evaluating your foot position (or lower the weight).
  3. Bouncing off your chest – when you come to the bottom part of the lift, don’t bounce! Lower the bar to slightly graze your shirt, and then press.
  4. Half reps – One of the most common faults I have seen in the gym! Make sure you are hitting full range of motion every single rep (down to chest!).
  5. Wrong starting, middle, and ending positions (pictured below) – we’ve learned in the past that a vertical line is the most efficient way to move a bar, but with the bench press, the safest is to move the bar at a slight curve. The bar will start and end above your shoulders, but the middle point of the bar will be below your clavicles. If your middle position is above your shoulders, in a vertical line, your middle position is too high.

As shown here, the bar actually travels at an angle, not straight up and down.

How to Ask for A Spotter with the Bench Press

Always have a spotter when you bench press, otherwise you'll upset Vader.

Spotting is a very important part of bench pressing – not only having someone spot you, but having you spot other people. It can be extremely dangerous to bench press alone.

We don't have a sword to give you, but we can teach you how to ask for a spotter for when you bench press.

A spotter’s purpose is to ensure the safety of the lifter – not to help the lifter with reps.

The spotter always watches every rep while staying out of the way.

The only thing they may help with is giving you a lift-off, but after that, it is all you!

*A lift-off is when you help the lifter take the bar out of the rack, and then let go of it when it is in the correct starting position.

You don’t need a spotter for your warm-up sets, but everyone should have one for their work sets.

How do you ask someone to spot you? “Hey, will you spot me real quick?” usually works (it’s really that simple!). I’ve never had anyone turn me down.

If you’re always at the gym at the same time as someone else, make friends and spot each other.

New friends are always great, especially if you can bench press together. Even if they might be imaginary rabbits.

That way you’re not always nervous asking someone random to spot you.

If someone asks you to spot them, always ask:

  • How many reps they are going for?
  • Do they want a lift off?
  • How would they like to be spotted?

Some people don’t want you to touch the bar unless they tell you to; others want you to help them guide the bar up if they start to fail, and others want you to take the bar immediately if they fail the rep.

Some want a lift off, and some don’t.

When you ask someone else to spot you, they will probably ask you the same questions!

What if I don’t have a spotter? Can I bench press without a spotter?

We'll discuss some tips if you find yourself alone like LEGO and don't have a spotter for the bench.

If you don’t have a spotter, you can use the power rack to bench.

A power rack would look like so:

If you see this as the gym, you have a great tool for the bench press.

NF Coach Jim demonstrates how to bench press using a power rack here:

Just set the pins at a level just barely below your chest, so if you miss a rep you can get out.

If you don’t have a power rack, and absolutely don’t have a spotter – you can either not put clips on the bar, and then let the weight slide off one side at a time, or do the “Roll of shame,” where you roll the bar down your body, sit up, and pick up the bar.

Our preference would be for you to get a spotter, but this roll can work in a pinch.

However, both of these methods are dangerous and you’re risking injury by doing them. Please do not bench press alone – especially when just starting out. Even if the weight seems light, it’s very possible to injure yourself.

The best thing you can do is to ask someone at the gym to spot you.

There’s nothing weird about it all – in fact, it’s normal and expected!

If that’s not an option, consider dumbbell presses or another chest exercise until you can find a spotter.

If you don't have a spotter, the dumbbell press can be a great chest alternative.

Frequently Asked Questions about The Bench Press (Plus Tips to Get Started)

One of the many things taught at NF camp was the bench press.

1) “I see people with their feet up on the bench – what’s going on?”

Here is Staci showing you a more advanced way to do the bench press.

This isn’t technically correct – but it’s really a completely different movement than your standard bench press. It eliminates the use of the lower body in the movement, and can be good for people with injuries or as an assistance exercise.

I’ve seen it the most in bodybuilding routines. We recommend you stick to the bench press form we presented until you master the movement.

2) “If the bench is one of the ‘big 4’, why do some people not bench press?”

The bench press is a great way to build strength. But out of the big 4, it is the lift that has the most alternatives available.

While it’s hard to replace a heavy deadlift, you can easily replace the bench press with push-up and dip variations and continuously get stronger with just your own bodyweight for a very long time.

Push up:

This gif shows Staci doing a push-up in perfect form.

Dip:

Bodyweight dips are a great exercise to include in an strength training practice.

Here are the best 42 bodyweight exercises if you want to start training that way first!

I personally keep the bench in my program because I enjoy it, but also because it’s a competitive lift in powerlifting.

Steve, however, has chosen to not bench press and replaces it with bodyweight variations of push-ups and a lot of gymnastics ring work.

The muscle-up is one of the most badass exercises you can do!

3) “Okay, I get it! What do I do now?”

I’m glad you asked! I have three great options for you:

Option #1) If you want step-by-step guidance, a custom strength training program that levels up as you get stronger, and a coach to keep you accountable, check out our killer 1-on-1 coaching program:


Option #2) Exercising at home and need a plan to follow? Check out Nerd Fitness Journey!

Our fun habit-building app helps you exercise more frequently, eat healthier, and level up your life (literally).

Try your free trial right here:

Option #3) Join the Rebellion! We need good people like you in our community, the Nerd Fitness Rebellion. 

Sign up in the box below to enlist and get our guide, Strength Training 101: Everything You Need to Know. It’ll help you start incorporating the bench press into your training:

So that’s all there is to it! Next time you are in the gym, give the bench press a shot!

Start with just the bar, and add weight each time when you hit your weights. Just don’t forget to have a spotter!

So, what kind of benching questions do you have for us!?

-Staci

PS: Don’t forget to check out our other articles in the Strength 101 Series!

###

photo source: leg0fenris: legos, Alexander Danling: Benches, Christian Hernandez: Superman , Arch in bench press, LEGO bench press, Beam me up, please.

The post How to Bench Press Safely (5 Mistakes to Avoid) first appeared on Nerd Fitness.

from Nerd Fitness: Helping You Lose Weight, Get Stronger, Live Better. https://ift.tt/xntURLO
via IFTTT

Categories
Uncategorized

#holistic #getfit #nutrition 5 Strategies for Overcoming Imposter Syndrome (to Get in Shape)

A character from Among Us, who probably deals with imposter syndrome.

Maybe you’ve felt this way: it’s only a matter of time before someone bursts through the door shouting “fake!” 

Then, they’ll have you hauled off to jail as a fraud…or ejected into space as an imposter:

A gif from Among Us, where the goal is to deal with imposters.

Well, feeling like a phony is a real thing and we’ve found it to be fairly common amongst our coaching clients.

Luckily, we’ve learned a few strategies for overcoming “imposter syndrome,” especially on how it relates to fitness. Today, we’ll share our tips and tricks with you too.


Here’s what we’ll cover today:

Let’s jump right in!

What is Imposter Syndrome?

Imposter syndrome exists when a person doubts their skills, talents, or accomplishments, despite external evidence of their competence.

(You’d know that if you watched my sweet video above.)

Those who suffer from imposter syndrome feel as though they do not deserve all that they have achieved, and instead incorrectly attribute their success to a combination of luck and deceit.

There is also generally a persistent fear of being seen as a “fraud,” that someone, somewhere, will uncover them for what they truly are. 

A gif of Mr Krabs yelling imposter at Spongebob.

That’s imposter syndrome.

If you’ve ever felt like you don’t deserve your job or accomplishments, you’re not alone. It’s been estimated that 70% of the general population (evenly split between men and women) have felt the effects of imposter syndrome at some point.[1] 

Dr. Valerie Young, an expert on imposter syndrome, states:[2]

Impostor syndrome goes beyond a mere lack of confidence. People who feel like impostors hold themselves to an unrealistic and unsustainable standard of competence. Falling short of this standard then evokes shame.

Yeah, not good. 

A gif of the Up dog saying "I do not like the cone of shame."

How do we get like this?

Well, it differs depending on the person, but there are some similarities to be found. 

Dr. Young identifies five common characteristics of people who generally feel like a phony, despite the evidence to the contrary.

The five types of imposters are:

  • The Perfectionist
  • The Superwoman/Superman
  • The Natural Genius
  • The Soloist
  • The Expert

It’ll be important for us to understand each of these, so we can determine some tools and strategies for overcoming them.

So let’s tackle each of these five types of self-diagnosed “imposters” and how it can relate to your fitness journey.

How to Overcome Imposter Syndrome Part 1: The Perfectionist

A pic of a man cutting grass, who might feel like an imposter if he doesn't.

What’s going on with the Perfectionist?

The Perfectionist feels like the work they do must be 100% perfect, 100% of the time.

They set insanely high goals for themselves, which often prove unattainable.

Even when the Perfectionist HAS clearly succeeded at a task, they often feel that they should have done better. Then self-doubt creeps in. 

There are some pros and cons here:

  • On the one hand, it’s good to have high goals. This shows a lot of internal motivation.
  • On the other hand, if the goals are so high that they mentally cripple you, then they’re not serving you well.

How’s this related to fitness?

The Perfectionist will often have an “all or nothing” approach. If they can’t get an hour workout in, then they’re not going to even bother with it. 

Bart with a cake that says "You Tried"

This isn’t good, because the “perfect” time to workout rarely happens. 

What to do instead?

Change your expectations around fitness.

Yeah, an hour workout would be great. But even just a five-minute workout is better than “no workout.”

As Theodore Roosevelt put it:

Do what you can, with what you have, where you are.

With that in mind, here’s a simple 5-minute routine you can do:

  • Minute #1: 20 seconds of push-ups, 10 seconds of rest, 20 seconds of push-ups, 10 seconds of rest.
  • Minute #2: 20 seconds of squats, 10 seconds of rest, 20 seconds of squats, 10 seconds of rest.
  • Minute #3: Plank for as long as you can, then rest until the end of the minute.
  • Minute #4: 20 seconds of lunges, 10 seconds of rest, 20 seconds of lunges, 10 seconds of rest.
  • Minute #5: 20 seconds of push-ups, 10 seconds of rest, 20 seconds of push-ups, 10 seconds of rest. (unless you have access to pull-up bar or alternative, then do pull-ups)

If that seems too easy, you can also look into doing a Tabata Workout, which will have you doing High-Intensity Interval Training in just a few minutes.

The important thing here is to embrace “good enough.”

How to Overcome Imposter Syndrome Part 2: The Superwoman/Superman

A picture of Superman, who is an imposter, depending on how you look at it.

What’s going on with the Superwoman/Superman?

The Superwoman/Superman feels like they should excel in every role they take.

  • Great spouse? Check.
  • Mother/Father of the year? You bet!
  • Amazing colleague? Guess who’s clocking in overtime!

The Superwoman/Superman is addicted to this validation, thus they are externally motivated.

Again, we have some pros and cons:

  • On the one hand, it’s great they want to contribute to the team.
  • On the other hand, if there’s no one around to praise them, things might not get done.

How’s this related to fitness?

The Superwoman/Superman often needs an outside event to prepare for, like a 5K. Or maybe they want to get in shape for a wedding or a reunion.

The guys from Scrubs eyeing someone

Without such an event, they might not feel validated enough to get to work.

What to do instead?

External motivation is a great kickstart, but look to build internal motivation by doing something even if no one else knows about it. Do the task for its own sake.

To build internal motivation, ask yourself: how do you feel before, during, and after a workout?

By constantly reminding yourself of the positive feelings, you can help build internal motivation. This strategy can help wean you away from exclusively being driven by external forces.

How to Overcome Imposter Syndrome Part 3: The Natural Genius

A mural of Einstein, who probably felt like a fraud from time to time.

What’s going on with the Natural Genius?

The Natural Genius feels that everything in life should come easy to them. They judge their competence based on the ease and speed of their efforts. 

If it takes them a long time to master a task, they just assume they suck. Then they start to feel shame. 

Some pros and cons of the Natural Genius:

  • On the one hand, it’s awesome to have a lot of success in various aspects of life. There’s nothing to feel guilty about!
  • On the other hand, this feeling of shame might stop you from growing in new areas. 

How’s this related to fitness?

If the Natural Genius isn’t instantly good at something, they push it aside:

  • I can’t bend like that, so I’m throwing away the yoga mat.
  • I never catch anything, so I’m quitting Ultimate Frisbee. 
  • Everyone is faster than me, so I’m not showing up to the 5K.

What to do instead?

Remember, being bad at something is the first step to being ok at something.

Or…

Jake saying "Sucking at something is the first step towards being sorta good at something."

To help here, look for evidence of something else in your life that was hard – but you pushed through and accomplished it anyway. 

It could be something big, like graduating from college, or small, like building a birdhouse.

The important thing to ask: How did you feel after that?

Also, understand that the work is necessary. You’re never going to be good at EVERYTHING. Instead, enjoy the process and the learning curve ahead!

How to Overcome Imposter Syndrome Part 4: The Soloist

A pic of a violinist, who'd feel like an imposter if she had teammates.

What’s going on with the Soloist?

The Soloist believes they have to do everything themselves.

If anyone ever gives them any assistance, it’s a fail, because now they can’t take any credit for the success.

Even if the Soloist finds themselves in trouble, they won’t reach out, preferring to struggle alone.

You’ll often hear the Soloist say things like “I don’t need anyone’s help.” 

Like all our “imposters,” there are some pros and cons here:

  • On the one hand, it’s great to want to be self-sufficient
  • On the other hand, this may cause unnecessary stress.

How’s this related to fitness?

If the Soloist runs into any health or fitness struggle, they often shut down communication around the topic. 

Ironically, we see this from time to time in our 1-on-1 Online Coaching Program. A client will be doing great, kicking-ass with their workouts and nutrition, and they’ll communicate daily with their coach. But the second they run into any snags, they disappear, almost as if… 

A gif of a "ghost," which can happen sometimes in those with imposter syndrome.

What to do instead?

Recognize when you feel like going into “hermit mode” and proactively reach out to others!

Truth be told, the best time to do this is actually before you run into trouble.

Look, things will come up:

  • Work will turn insane.
  • A tire will go flat. 
  • Your kid will get sick. 

One of the best things you can do when struggling (in fitness or anywhere) is to reach out to someone. 

  • One, they might have some advice.
  • Two, even just an open ear can be helpful when things aren’t so good. 

That’s why we actually encourage everyone who joins Nerd Fitness Prime to reach out to our private Facebook or Discord group. Everyone in there is on a similar journey, so when things go bad, the community can relate.

Someone there might even know what to do.

Whether through the Nerd Fitness Rebellion, work, or some other group, finding an “accountabuddy” can be really helpful when trying to get in shape. 

Look around and if you see somebody who’s also on a similar path, say “Hey, let’s do this together!!!”


How to Overcome Imposter Syndrome Part 5: The Expert

A picture of the Matrix, where everyone suffers from imposter syndrome if you think about it.

What’s going on with the Expert?

The Expert defines themselves by what or how much they know.

Believing they’ll look foolish if they don’t know something, they’ll seek out more information. And more. The Expert endlessly researches a topic, always needing to absorb more. 

Also, somewhat ironically, the Expert does not view themselves as an “expert,” instead they choose to remind themselves of their ignorance. 

Again, there are strengths and weaknesses here:

  • On the one hand, being curious is awesome.
  • On the other hand, constantly searching for more information can be a form of procrastination.

Or as Morpheus teaches Neo: 

Morpheus saying "there is a difference between knowing the path and walking the path."

How’s this related to fitness?

We actually have a term for this around Nerd Fitness: Underpants Collector.

It’s from a South Park episode, where the Underpants Gnomes steal people’s underwear to gain “profit.”

The trouble is, they don’t know what to actually do with all the underwear they’ve thieved. 

A gif of the Underpants Gnomes outlining their business plan for "profit"

This makes somewhat more sense if you watch the episode. Somewhat. 

The morale of our South Park tangent: be careful of gathering a bunch of information and then not doing anything with it.

Trying and failing and learning from previous mistakes is more valuable than spending additional time researching, then not attempting anything.

What to do instead?

Here’s another term we throw around Nerd Fitness: Use 20 Seconds of Courage.

Rebel One explains it all in this video:

https://www.youtube.com/shorts/G6Gap9WCSYU

It’s tough, but if you can suck it up and pull the trigger to act, the momentum from that initial decision will propel you forward.

Yes, it’s scary to act and less scary to read more. But acting is what will truly make you an expert.

Getting Rid of Imposter Syndrome (Next Steps)

A very pretty scene.

Perhaps you’ve seen yourself in one of these “imposter” subgroups. 

It could be in your fitness and non-fitness related words and actions.

As we covered, each “imposter” comes with certain strengths. But there are also weaknesses.

If you find yourself feeling like a fraud, try one of the strategies we covered today:

  • Reevaluate your expectations around “perfect.” 
  • Search for internal motivation around the work you need to do.
  • Remember that it’s okay to “suck” at things now and then.
  • If you run into trouble, it’s okay to reach out for help.
  • Ask yourself if you really need to read another internet article, or is it time to act.

If you need help acting, I have three next steps for you.

Next Step #1) Our Online Coaching Program: if you find yourself struggling as the Soloist, maybe it’s time to ask for help.

You can schedule a free call with our team so we can get to know you and see if our coaching program is right for you. Just click on the image below for more details:


#2) If you need a “trigger” to act, check out Nerd Fitness Journey! Our fun habit-building app helps you exercise more frequently, eat healthier, and level up your life (literally).

Try your free trial right here:

Next Step Number #3) Join the Rebellion! We need good people like you in our community, the Nerd Fitness Rebellion. It’s the best place to find an accountabuddy.

Sign up in the box below to enlist and get our Rebel Starter Kit, which includes all of our “work out at home” guides, the Nerd Fitness Diet Cheat Sheet, and much more!

Alright, I want to hear from you:

Do you occasionally see yourself as an imposter or fraud?

Which one of the subgroups do you recognize in yourself?

Any tips or tricks for overcoming imposter syndrome?

Let me know in the comments!

-Jim

PS: Props to Dr. Valerie Young for helping people overcome imposter syndrome. Young is doing good things in the world. 

###

Photo source:  Clean Room, Andriy Popov © 123RF.com, Maxim Maksutov © 123RF.com, bennymarty © 123RF.com, sunset, Roosevelt quote

The post 5 Strategies for Overcoming Imposter Syndrome (to Get in Shape) first appeared on Nerd Fitness.

from Nerd Fitness: Helping You Lose Weight, Get Stronger, Live Better. https://ift.tt/4RyFjNI
via IFTTT