Get your heart rate up, build strength, and boost your energy in this full body Pilates workout – with a HIIT style twist!
We’ll flow between HIIT and Pilates exercises for a fun, dynamic, effective workout, and we’ll apply Pilates throughout by focusing on our form, control, posture, alignment, and muscle engagement.
Come back to this Pilates HIIT Style Workout any time you want a quick boost for energy, cardio, and strength!
Welcome back to The Balanced Life podcast! To kick off this new season, we’re focusing on nourishment and our relationship with food. This can be a complex subject for many of us, which is why we’re looking at how to take a well-rounded and less complicated approach to food and nutrition. In this episode, we’re joined by Tamar Samuels of Culina Health, who shares ways to enrich our overall wellness with practical and realistic advice.
Tamar is a dietician, nutritionist, and co-founder of Culina Health who takes a holistic approach to help individuals heal their relationship with food. She discusses what causes inflammation, how to improve your sleep, easy additions to your diet, and so much more. Join Robin in this insightful and enriching conversation with Tamar.
Show highlights: what you can look forward to in this episode!
What is inflammation and how does it affect our bodies?
Foods that cause inflammation + foods that help reduce inflammation
The difference between Omega-3 and Omega-6
How what you eat can impact your sleep and ways to improve it
Adding to your diet instead of restricting
The difference between a dieting mentality and making healthy changes
Also, if you’re in a hurry, we’ve compiled all our strength and weight training content into one handy guide called (appropriately): Strength Training 101: Everything You Need to Know.
Grab it for free when you join the Rebellion (that’s us!) below:
Download our comprehensive guideSTRENGTH TRAINING 101!
Everything you need to know about getting strong.
Workout routines for bodyweight AND weight training.
How to find the right gym and train properly in one.
Alright, cue the music. Let’s do this thang.
What are Compound Exercises?
Let’s compare “compound exercises” to “isolation exercises”:
Compound exercises require more than one muscle group working together to complete the movement. This replicates the way your body naturally moves.
Isolation exercises more or less train one specific muscle group. For example, the leg extension machine focuses on your quads, so it “isolates” training that muscle.
Front squats would be an example of a compound exercise, because it engages your entire lower body and core, and quite a bit of your upper body too, as you perform the movement:
As opposed to biceps curls, which more or less just trains your biceps:
As we explain in our Guide to Functional Fitness, whenever possible you want to focus on compound exercises.
Why?
Because in everyday life, you don’t use your muscles in isolation!
When you’re placing luggage in the overhead bin, hoisting a bag of dog food from the floor, or hauling your kid to bed, you’re using your muscle groups together.
Just like you would with a compound exercise.
Plus, since you’re using multiple muscle groups at once, you’re taxing your body more when training. This can provide more efficient use of your time in the gym.
In other words, why do three different exercises when you can just do one?
Now that we’ve got that out of the way, let’s get to working out.
The squat exercise serves a dual purpose – it is the foundation for building strength AND helps build proper mobility. If you are going to ever do barbell squats, you need to work on hitting proper depth with a bodyweight squat first!
Once you can support your body’s weight above the bar, the world becomes your playground. No strength training routine should be without pull-up or chin-up work! (Can’t do a pull-up yet? We got you.)
Muscles trained with the pull-up:
All of your back muscles (Latissimus dorsi, rhomboids, trapezius)
This exercise is simple: press a barbell above your head.
Muscles trained with the overhead press:
Pectoral
Triceps
Deltoids
Rhomboid (Back muscles)
Abs
All the muscles in your chest, shoulders, and arms are engaged in order for you to lift the weight over your head. As a bonus, you need to really flex and brace your core, which gets those muscles working too.
Here are step-by-step instructions on how to perform the overhead press:
To do a weighted lunge, have the bar across your upper back and step out with your right leg. Lower your hips until your back leg’s knee almost touches the ground. Explode up and back by pushing off with your front leg. Repeat on your other side.
Muscles trained with the barbell lunge:
Quads
Glutes
Hamstrings
Your core (as you stabilize yourself and the weight)
Note: The above might be tough if gyms are closed around you. If that’s so, here’s how to build a gym at home (using household equipment).
Start Performing the Best Compound Exercises (Next Steps)
Your mission, should you choose to accept it: commit to trying ONE of these compound movements in the next week. Use 20 seconds of courage, recruit a friend who has lifted or trained before, and try your best.
We all start somewhere!
Speaking of starting out…
Have you yet to do ANY of these compound exercises?
Always start out with bodyweight moves and make sure your form is correct!
If it’s a barbell movement, use a broomstick (or PVC Pipe).
You can pretend you’re Harry Potter after:
When it comes to movements like squats, deadlifts, pull-ups, bench press, etc. – your form is crucial. Develop good habits with lighter weight and you will save yourself months of frustration later and will protect you from injury.
If you’re struggling with certain elements of a movement, don’t get frustrated! Just understand that you’ll have areas in which you can improve.
When I started, I really liked practicing all of the movements at home because I could watch a video online at the same time as I was watching myself do it in a mirror.
Still uncomfortable with the movements after that? Look around at some local strength and conditioning gyms and see if you could hire a coach (here’s how to find a good trainer) for one or two sessions just to go over the basic movements (or consider working with an online coach).
No matter what path you take, the most important thing you can do: START NOW!
Don’t overthink it. Just pick a compound exercise and learn how to do it. We can add more exercises to your routine down the road.
Want a little help getting going? The perfect next step to start your strength training journey!
You got it.
Here’s how Nerd Fitness can help you:
#1) If you want a coach in your pocket, who can do video form checks, provide feedback, and adjust your workouts based on your progress, check out our 1-on-1 Online Coaching Program!
I’ve had an online coach since 2015 and it’s changed my life. You can learn more by clicking on the box below:
#2) If you want a daily prompt for doing compound exercises at home, check out NF Journey. Our fun habit-building app helps you exercise more frequently, eat healthier, and level up your life (literally).
Plus, you get to build an awesome superhero in the process!
Try your free trial right here:
#3) Join the Rebellion! We need good people like you in our community, the Nerd Fitness Rebellion.
Sign-up below and receive our free guide Strength Training 101: Everything You Need to Know. It includes step-by-step instructions for the Best Compound Exercises covered in today’s guide.
Download our comprehensive guideSTRENGTH TRAINING 101!
Everything you need to know about getting strong.
Workout routines for bodyweight AND weight training.
How to find the right gym and train properly in one.
Alright, enough from me. Your turn:
Do you agree with my list of best compound exercises?
Am I missing any?
Any tips or tricks for a newbie just getting started?
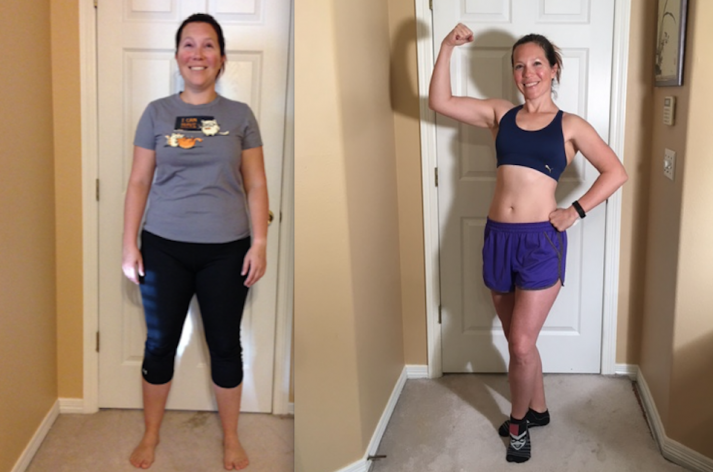
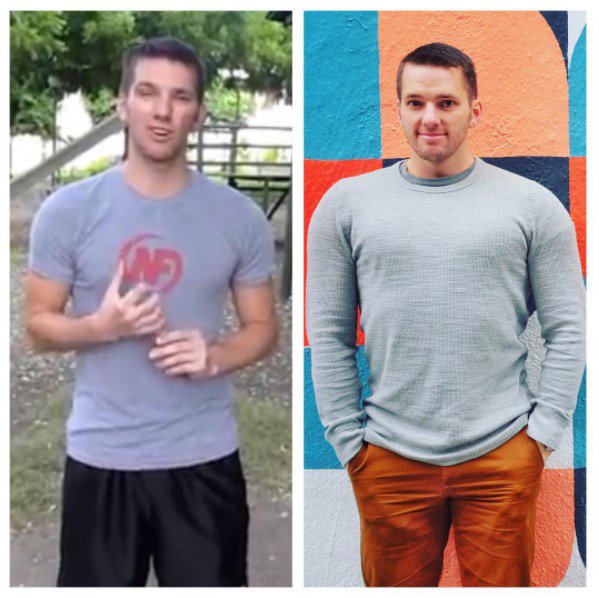
Whether you’re comfortable on a yoga mat or you think a downward dog is just something your puppy does, you’re in the right place.
We teach yoga in our Online Coaching Program where some of our clients have used it to improve their back pain…like Brain here:
He also switched up his diet and lost 75 pounds!
I can’t wait to help you get started.
Today’s yoga poses will be broken out into three levels, for you to progress in difficulty.
What can I say, we love leveling up here at Nerd Fitness. Most of our poses are basic, Level One, in case you are completely new to yoga. However, we’ll include a few more advanced poses so you can take it further.
We’ll start by discussing a little Yoga 101, in case you are totally lost right now and don’t know yoga from yogurt. If you wanna skip to your desired video or pose, just click on it.
Yoga means lots of different things to different people… like Windfarm Yoga apparently, to the woman in the photo above. As one commenter from Cracked pointed out:
“The only thing I know for sure about yoga is that whatever you’re doing when you practice it, you’ll be assured by someone that it isn’t “real yoga.”[1]
I’m not interested in that particular aspect of the yoga debate: people need things to argue about and get offended over…because Internet. What’s important to me is getting more people interested in trying yoga out because it’s damn fun and can really improve your life.
After all, as Vox explains:
“Yoga seems to help alleviate lower back pain, improve strength and flexibility, and reduce inflammation in the body — which, in turn, can help stave off chronic disease and death.
Emerging research suggests yoga can increase body awareness, or attention to the sensations and things going on inside you. That’s no small matter: Researchers think heightened body awareness can improve how well people take care of themselves.”[2]
Science is essentially telling us: Yoga can help you become more flexible like Black Widow, improve your strength like the Hulk, extend your life like the elves of Rivendell, and give you mental awareness like Yoda.
The jury is still out as to whether or not it grants us telekinetic powers.
Please email me if a yoga practice helps you levitate rocks.
When I approached yoga years ago as an attempt to improve my flexibility and to combat poor posture, I was initially worried about looking foolish or finding some aspect of the exercise that didn’t sit right with me.
Instead, I found a complimentary, enjoyable activity that helped improve my flexibility and mobility, alleviated my lower back pain, opened up my hips to combat a lifetime of sitting, and even helped me quiet my overactive mind!
Plus, it was like a power-up for my strength workouts.
It’s now an activity I do with regularity throughout my week, incorporating yoga stretches during the day in between desk sessions, after working out, and attending the occasional class to level up.
WHY SHOULD I CARE ABOUT YOGA?
If you read Nerd Fitness, you’re probably a skeptic. After all, one of the Rules of the Rebellion is to question everything!
So you might be thinking: “Steve, you’re not going to ask me to start speaking in mantras, chanting OMMMMMM, and work on improving my spiritual chi.”
As somebody who started yoga with the exact same reservations, I sit before you a changed man. For starters, if you decide the spiritual aspects of the practice aren’t for you, you’re not alone: research into yoga’s history can lead down an internet rabbit hole of controversy that is bottomless.[3]
So we’re not going to jump in that fight.
Instead, what you will find when it comes to yoga is study after study showing that this form of exercise rocks.
Here’s why yoga is beneficial:
1) A body prepared to handle anything: at Nerd Fitness, we are huge fans of strength training, and yoga is its perfect compliment. It elongates your muscles, improves your flexibility, can release tension in your neck and shoulders, and helps you do things like touch your toes![4] It can help you build stronger muscles, improve balance and stability (especially for our older rebels[5]), and make you more “antifragile” (one of my favorite terms).
Yoga subjects exhibited increased deadlift strength, substantially increased lower back/hamstring flexibility, increased shoulder flexibility, and modestly decreased body fat compared with control group.
2) Yoga is great for lower back pain: If you’re one of the 31+ million people like myself who struggle with lower back pain, yoga can help.[7] Yoga really helps those of us stuck at a computer all day long as well.[8]
3) Yoga can help meet weight loss goals when combined with a healthy diet. Look, we all know our diet is responsible for 80-90% of our success when it comes to weight loss. The other 10-20% of the equation is participating in physical activities that push your body outside its comfort zone.
Yoga is a great way to burn a few extra calories and keep your brain focused on “I am doing healthy things and thus I should be eating healthy foods!” It can help improve our fight against cardiovascular disease, hypertension, and obesity.[9] It’s also a great rest day activity to keep you on track when you’re not doing your other workouts.
4) Speaking of which…yoga can be done every single day, and can be done anywhere. No gym required, no equipment required – no excuses! On top of that, because it’s a low-impact activity and doesn’t overly tax your muscles like a powerlifting session, you can do yoga every single day, anywhere you can find a soft place to sit down: your living room, a park, a beach, your bedroom, on the moon, etc.
5) Yoga can quiet an overactive mind: We live in a world with a distraction around every corner; we read Facebook or our favorite blog while checking email and texts… while trying to work a day job. If you’re anything like me, your mind races a million miles an hour, and trying to develop a sense of control and calm over your mind is like herding cats. We’ve already explained the benefits of Meditation for Nerds; yoga can be tremendously helpful with becoming more aware of our bodies and help with reducing stress and anxiety.[10]
Lastly, if yoga is good enough for badass Dhalsim from Street Fighter II, it’s good enough for me:
Alright, I’m going to assume at this point you are on board with yoga. If being able to completely demolish a car with your bare hands doesn’t convince you, nothing will.[11]
So let’s go over some yoga poses and routines.
A YOGA ROUTINE FOR BEGINNERS YOU CAN DO AT HOME
We’ll start out our explanation of different yoga poses by showing you what the end result can look like.
Here’s a complete routine covering some basic yoga poses:
The above video (Water Series – A) is taken from our course, Nerd Fitness Yoga (a part of Nerd Fitness Prime). If you like it, I’d encourage you to go browse the page and check it out.
Nerd Fitness Yoga is a course you can follow along within the comfort of your own home, and it’s built specifically for members of the Rebellion: easy to follow instructions, an inviting attitude, and as you can tell… some corny jokes from yours truly.
This course will work for men and women of all shapes, ages, and sizes, giving anybody the confidence to get started IMMEDIATELY. Follow it regularly and you can expect the benefits of the dozens of studies I linked above when it comes to yoga practice.
In addition to a HUGE pose library and step-by-step instructions, it also contains all of the following full-length yoga sessions filmed in HD:
Water sessions: Two beginner yoga videos (25 minutes each, first one was above)
Fire sessions: Two intermediate yoga videos (30 minutes each)
Star sessions: Two advanced yoga videos (40 minutes each)
Deep stretching routine (40 minutes)
6 supplemental mobility videos (that will help with lower back mobility, how to finally touch your toes, and so on. Two of which are below.)
All of these videos can be streamed or downloaded to any device as many times as you’d like so you can practice yoga wherever, whenever.
10 BEGINNER YOGA POSES (LEVEL 1)
#1) Seated Cross Legged
One of the most popular yoga poses is simply Seated Cross Legged.
A seated position helps relax, reset, and open your hips up a bit.
Bring yourself down to a seat on the floor, whatever is most comfortable. Cross one ankle of the other in front of you and sit cross-legged.
Take a big breath in and straighten your spine as if there was a string pulling your head and neck up to the ceiling. Breathe out, but keep that upright posture.
Hands can rest on your knees, but shouldn’t push out or pressure your legs.
#2) Table Top Cat-Cow
This is actually a series of a few poses (Table Top, Cat, & Cow) that is used in almost every yoga session to help reset your spines and warm up your back.
Start in Table Top, with your hands under your shoulders and your knees under your hips. Your spine should be parallel with the floor to start.
Exhale and slowly press into your hands as you abs up towards your spine. Round your spine to the ceiling as you bring your chin towards your chest. Gently push out your shoulders.
Inhale and relax your abs while you bring your hips back down. Lengthen your torso as your head comes up and looks towards the ceiling. Your chest should come forward slightly and your lower back should push into your pelvis.
Relax and return back to a neutral Table Top position.
#3) Child’s Pose
Child’s Pose is considered a resting position. This means that any time you feel overwhelmed, overheated, or stressed about a particular pose or variation while doing yoga, STOP what you are doing and come slowly into a Child’s Pose to rest.
This pose helps lower stress, refocus your mind, and lightly stretch primarily your lower back, hips, and thighs.
Start by kneeling on the floor with your toes touching behind you. Widen your knees so they are just a little wider than your hips. Gently lower your body between your knees and hips.
Your arms will stretch out lightly in front of you and you can drop your shoulders to the sides and down.
A variation you can use (which may be easier or harder for you) is to tuck your toes under your feet, instead of having the tops or side of your feet against the ground. Do whichever variation is most comfortable and natural for your body.
#4) Forward Fold
Forward Fold is another one of our most popular yoga poses. It’s primarily focused on stretching the lower back, hips, hamstrings, and calves.
Start standing and gently bend forward as you lengthen your torso and spine. As you fold towards the ground, keep your knees straight (but not locked out). If you can, grab the back of your calves and gently pull yourself deeper into the fold.
As you breathe in, you can lift slightly and extend your torso and spine forwards. As you exhale, you can fold forward again into the stretch.
To scale this down, you may use blocks to help raise the floor. Keep your knees straight and your spine long, and fold as far as you can comfortably go.
#5) Standing
Standing pose is a resting and centering pose in yoga, but don’t take it for granted.
Even when we are standing in between poses, be sure to stay strong, active, and rooted through your feet. Your feet should also be flat and not rolled in or bowed out.
Activate your hips to prevent locking out your knees and keep your posture and spine tall and elevated.
Finally, your shoulder should be open and your chest broad. Neck in line with your spine (not hunched forward). Stretch tall from your hips through your head.
#6) Standing Mountain
Standing Mountain is a great pose to warm up our shoulders and spine.
Start by staying strong and rooted through your feet (which are flat on the ground). Legs active, but not locked out. Shoulders open and neck in line with spine.
As you take a deep breath, bring both arms straight out in front of you and up overhead towards the ceiling. Make sure your shoulders aren’t hunched and close to your ears, but rather relaxed and released down.
Rooting through your shoulder blades, pull your spine and arms towards the ceiling.
#7) Cobra
Cobra is a popular pose that almost always follows Plank as a transitional sequence in many yoga sessions.
This pose primarily stretches the shoulders, chest, spine, and stomach.
Start by laying flat on the ground on your belly, with the tops of your feet on the floor. Your hands should be positioned under your shoulders (much like you would imagine starting a pushup).
Slowly push down through your hands and straighten your arms to lift your chest up off the floor, but unlike a push-up, keep your hips, thighs, and tops of feet rooted and pushing down towards the ground.
Move your shoulder blades back, lift your chest, and look forward and slightly up. Hold for several seconds and then slowly release down.
To scale this pose down, only raise your chest and head to where you are comfortable. Be sure to keep your hips and thighs pushing down to the floor, even if that means you can only raise your chest a little.
#8) Low Lunge
Low Lunge is a variation of Lunge that is a building block for several more advanced poses. It’s most commonly thought of a Lunge with your knee on the ground.
This pose will primarily stretch and strengthen the groin, hamstrings, and hips.
Often, you’ll get into a lunge by starting in a Forward Fold and slowly stepping one of your legs back behind you. If you need to, you can scoot your foot back several times until you are able to have your front knee directly over your front ankle.
As you bring your leg back, drop your back knee to rest on the ground. This will help support some of your weight, but the majority of your weight should stay pushing forward through your front knee and hips.
Bend your torso over your front knee and lengthen your spine forward. Your weight should be pressing down through your heels.
To scale down, you can use blocks on each side to balance yourself more without having to reach all the way down to the floor.
#9) Knee Hug
This pose is used to compress and tighten your body. It’s often used right before Corpse Pose at the end of sessions to reset.
Start this pose by lying on your back with your arms and legs straight out. Take a deep breath and slowly bring your legs together and your knees lifted toward your chest.
As your knee comes up, wrap your arms around them and clasp your hands together. If you can’t quite wrap your arms you can reach down each hand and gently pull in your kneecaps.
Gently squeeze your knees into your chest, keeping your back flat on the ground and dropping your shoulders down. You can focus your eyes down the center of your body.
If for any reason you have trouble doing this, simply raise your knees towards your chest as far as they will go. Hold for a few seconds and release back down.
#10) Corpse Pose
Everyone’s favorite yoga pose, and often a way to end a complete session! And while at first, it can seem like just lying on the ground, there’s more to it than that.
This poses is fantastic for calming the mind, relieving stress, and relaxing the body back into a neutral position.
You’ll have a desire towards the end of a session to skip over Corpse Pose and move on.
Don’t! Spend a few minutes coming back down and resetting your body in each session.
Start by laying on your back. Your arms should stretch down comfortably to each side, slightly away from your body. Both your legs stretched out and with a little space, as well.
Do your best to “release” your shoulders and neck and let them fall neutral as well (even when on our backs we tend to engage our necks).
Focus on your breathing and on relaxing any tight or sore areas of your body.
If you need to, turn onto your side and bend your knees (laying on your side completely). Wiggle your toes, ankles, hands, or wrists as needed.
7 BASIC YOGA POSES (LEVEL 2)
#1) Downward Dog
This pose primarily focuses on stretching the shoulders, hamstrings, and calves.
The first few times you get into Downward Dog, you’ll want to start on your hands and knees (what we call Table Top), but with your arms a little bit forward of your head. Pushing into your hands and toes, slowly lift your knees off the ground.
If you can, slowly straighten your knees (don’t lock them) as you gently stretch your heels down to the ground. Once comfortable, you can work your shoulders back toward your tailbone.
To scale this down, you can lift your heels further off the ground and/or bend your knees for easy modification. You can also use blocks to elevate your arms as another alternative.
#2) Crescent Moon
Crescent Moon is a variation of Low Lunge where we stretch upright towards the ceiling.
This pose primarily stretches and strengthens the groin, hips, chest, spine, and shoulders.
To start this pose, you’ll want to get into a comfortable Low Lunge. Usually, this means stepping one leg forward from Downward Dog or stepping one leg back from Forward Fold, and then dropping your back knee down rooted on the ground.
As you take a deep breath, bring your torso up from lunge to upright and stretch both hands straight up toward the ceiling.
Instead of arching your back, draw your hips down and forward and lean your shoulder back (keeping it straight and engaged).
To scale this pose down, you can just stay in Low Lunge and work on stretching without extending upward.
#3) Bridge
Bridge is a backbend pose that primarily stretches and strengthens the back and spine, but also the chest, shoulders, and neck.
Start by laying flat on your back. Bring your feet flat on the ground as close to your butt as they comfortably sit. Arms should be flat and down to your sides.
Pushing down through your feet and arms, slowly lift your butt off the floor and into Low Bridge (around when your spine is straight with your legs).
If you are comfortable, you can bring your hands together under yourself. Continue to slowly push your hips and butt towards the ceiling, making sure to keep your knees over top of your ankles. Work towards parallel with the ground for the full Bridge pose.
To scale this down, stop in Low Bridge if going further is uncomfortable. If Low Bridge is difficult, just practice moving your hips slightly off the ground from the starting position. As you gain more flexibility, you’ll work to hold in Low Bridge.
#4) Half Splits
This pose primarily stretches your hamstrings, hips, and lower back.
To start this pose, get into a Low Lunge. Your back knee should be firmly rooted on the ground.
Slowly shift your weight as you move your hips and torso over your back knee. As you do this your front leg will go from bent at the knee to fully extended straight in a line.
If you need them, you can use blocks or a supporting prop on each side now to support your weight (if you can’t reach the ground here).
Slowly fold forward over the top of your extended front leg, with your hips staying rooted back and over top of your knee that’s on the floor.
To scale this down, use blocks on each side as suggested above. You can also stay upright (instead of folding towards the end). Stop in the progression whenever you lose comfort.
#5) Lunge
The Lunge is a major building block for all sorts of yoga poses. Many poses are variations of or come in and out of the Lunge.
This pose will primarily stretch and strengthen the groin, hamstrings, hips, and knees.
Often you will get into lunges starting in a Forward Fold and slowly stepping one of your legs back behind you. If you need to, you can scoot your foot back several times until you are able to have your knee directly over your front ankle.
Bend your torso over your front knee and lengthen your spine forward. Your weight should be pressing down through your heels and your back knee should be active with your knee straight throughout.
To scale down, you can use blocks on each side to balance yourself more without having to reach all the way down to the floor. At any time, you can also drop the back knee down to the ground coming into Low Lunge instead.
#6) Ninja
One of the most fun poses to make sound effects while doing, Ninja is actually a series of movements rather than a single pose. You might also have heard it called a Side Lunge, but this is Nerd Fitness, so we’re going with Ninja.
This pose helps strengthen the entire lower body and stretch out the hamstrings.
Start by lowering yourself into a half squat (Frog Prep).
Choose a foot and turn your toes out a little wider. Walk your hands over to your foot. Bend deep into that side’s knee as you lift up onto the heel of your opposite foot. Point or flex that foot up towards the ceiling.
Bring your hands to prayer in front of your chest. Extend both arms out in an upward-facing arc and look towards your extended leg. Hold the pose and keep your leg muscles engaged.
Slowly come back up to Frog Prep (body in the middle) and slide over to the other side repeating the steps above.
#7) Seated Side Fold
Seated Side Fold is a good, simple combination of a fold and a side stretch in one pose. Sometimes referred to this as “Half Dragonfly” as a nickname.
This pose primarily stretches your spine, lower back, hamstrings, and groin.
Start in a seated position, with your legs outspread wide in a V shape in front of you. About a 90-degree angle between your legs.
Bring one of your feet over to your other thigh, so that the bottom of your foot rests tucked in and touching your thing just above the knee.
Keeping your hips rooted down and your spine extended tall and towards the ceiling, you can gently fold over and use your arms to walk down your chest towards the ground next to the thigh and knee of your fully extended leg.
You should be slightly off-center, in line with your straightened leg (rather than a traditional fold which would come straight to the center).
To scale down this pose, you can stay in the original seated position with both legs out in front of you in a V. Gently fold forward a little to each side and you warm up.
4 INTERMEDIATE YOGA POSES (LEVEL 3)
#1) Chair Pose
Chair pose is the basis for many of the more advanced moves found in yoga. It primarily stretches the chest and shoulders, while helping to strengthen your core and legs.
Start in Standing with your arms out in front of you. Slowly bend your knees, moving them gradually more forward away from your toes. At the same time, drop your hips and butt back as you try to achieve a 90-degree angle with your thighs and calves.
As you sit down, your arms will come straight above your head (next to your ears), pointing up with palms facing in.
To scale this down, you’ll find it a little easier to keep your arms out in front of you – or coming towards your chest forming a “ball of energy.” Like in Dragonball. Drop your hips only as low as you can comfortably maintain for a stable hold.
#2) Warrior 2
This pose primarily strengthens your shoulders, arm, thighs and opens up your chest and shoulders.
Starting in Standing, exhale as you step one foot back. Align your back heel behind the other heel and then turn your back foot out 90 degrees.
Turn your hips out and align your forward thigh with your forward knee. Slowly raise your arm, one forward and one back, both parallel to the ground.
As you exhale, bend the right knee forward until it lines up straight over your right heel. Press your heels into the floor.
To scale this pose down, you can bring your legs slightly in closer together. You also have the option to bend forward a little less or bring your hands back down onto your hips.
#3) Extended Side Angle
Extended Side Angle is one of our broader Warrior-sequence poses, often done together in pairs or sets with other poses from the same group.
This primarily stretches your groin, back, and torso. It also strengthens your thighs, hips, and legs.
Starting in Standing, spread your legs slightly apart with hips facing forward. Choose one side and rotate that foot outward about 45 degrees.
Bend the knee over the rotated foot and shift your weight to that side. Keep your stretched-out back leg in place and keep pushing down through that foot.
Bring your elbow (same chosen side as the bent knee), down to rest on your bent knee. Your hand and arm coming out in front of you. Your opposite arm now extends high into the air straight overhead.
To scale this pose down, you can narrow your stance a little bit more and bring your hips a little higher in the air. Move deeper down as you get more comfortable.
If you are comfortable enough here to scale up, you can switch your eyes to look at your arm overhead and gently stretch that arm to the side (so it falls in line with your torso and spine).
This will deepen the stretch even further.
#4) Rebel Warrior
Rebel Warrior is another pose in our Warrior-sequences that are often used in pairs or sets as transitions to one another. You’ll sometimes hear it referred to as “Peaceful Warrior,” but, you know…
This pose primarily stretches the groin, hips, and shoulders.
Start in Warrior 2. Bring the rear hand down to the back leg, palm facing down. Turn the front palm facing upwards towards the sky.
On an inhale, extend the front arm up towards the sky, palm facing towards the back of the room. Keep your hips open, but reach your heart up towards the sky. Keep the back of your neck long and your eye gaze pointing in the same direction as your heart.
Keep bending deeply into your front knee; try to keep the weight evenly distributed on your front foot.
To scale this pose, bring your legs in a little closer together to shorten the depth of the stretch. As you get comfortable you can ease back down into the full pose.
YOGA STRETCHES FOR DESK WORKERS
Work a desk job? Consider these two additional videos:
#1) Yoga for Wrist Mobility
Wrists are an often overlooked area of stiffness and soreness for many people. Whether you type on a keyboard daily or are looking to improve front squats and handstands you’ll benefit from this 6-minute yoga session:
#2) Yoga for Proper Posture
Hours hunched over a computer, stuffed into a car, or playing various games can cause some pretty awkward posture habits. This 6-minute yoga session will help you reset and improve your posture as you go through your day:
When you’re able to escape from your desk for a few, these short sequences are perfect to help stretch out your body and help prevent injury.
If you do find yourself stuck at a computer for most of the day, with seemingly no time to work out, we can help! We offer a 1-on-1 private coaching program to help busy people just like you level up their lives.
We will get to know you, your goals, and your lifestyle, and develop a workout plan that’s specific to not only your body, but also to your schedule and life. We can design workouts for at your desk, or a quick session before dinnertime. If you want to learn more about the program, click on the big image below:
TRY A YOGA POSE TODAY
If this kid can do Yoga, so can you!
I don’t care if you’re at home, in a cubicle, or an office, I want you to use 3 minutes of courage to hold a few of the poses above!
Even if you’re not interested in checking out NF Yoga and never attend a yoga class, try these four movements right now. Like, this very moment.
A big reason Nerd Fitness and the Rebellion are successful in getting people healthy is that we encourage people to take action immediately. Not tomorrow, not after breakfast, RIGHT NOW!
Try to hold each of the following positions for 30 seconds. Yes, even if you’ve never done yoga before and have no intention of doing it again… I’m challenging you to give this a shot right now!
I personally get up every 15-20 minutes and go through a few movements (Downward Dog is my favorite) to stay limber.
Crushed those four poses? Take it to the next level and run through our full sequence from the Water Series. It’ll take you a little over 20 minutes.
Want a little more help getting going?
You got it!
I have three great options on how you can continue your journey with us:
Option #1) Liked the yoga videos contained in today’s guide? Want to follow them in an app that also allows you to build your own superhero?
Then check out Nerd Fitness Journey!
Our fun habit-building app helps you exercise more frequently, eat healthier, and level up your life (literally).
Plus, you can join our Yoga Adventure so you can learn poses and grow strong while battling wiley supervillians!
Try your free trial right here:
Option #2) If you want a professional coach in your pocket, who can do video form checks, provide feedback, and adjust your workouts based on your experience level, check out our 1-on-1 Online Coaching Program!
For example, let’s say you have an old injury and couldn’t perform one of our flexibility exercises. A Nerd Fitness Coach can work with you to create a customized routine for your exact situation.
Personally, I’ve been working with the same online coach since 2015 and it’s changed my life. You can learn more by clicking on the box below:
Option #3) Become part of the Rebellion! We need good people like you in our community, the Nerd Fitness Rebellion.
Sign up in the box below to enlist and get our Rebel Starter Kit, which includes all of our “work out from home” guides.
Get your Nerd Fitness Starter Kit
The 15 mistakes you don’t want to make.
Full guide to the most effective diet and why it works.
Complete and track your first workout today, no gym required.
Alright, your turn:
I’d love to hear from you: did you REALLY complete the 4-movement yoga routine above? And where did you do it? An office? In your cubicle?
Remember, who cares if your coworkers think you’re weird – getting judged for doing something healthy is a badge of honor you should be proud of!
If you’ve been a dedicated reader of keep it simpElle over the years, you might remember the days when I used to share my favourite coffee shops on rides. Well, the pandemic meant I had to figure out hot to…
A New Year brings with it the whole New You trope, but there’s one element of fitness that really isn’t just for a New Year, and that’s strength. Incase you missed my announcement on social media, I officially joined the…
As you might know from our “How to lose weight” guide, the key to sustainable weight loss is getting ourselves to consume fewer calories in a way that doesn’t make us miserable.
Because our brains and bodies are complicated emotional disasters, there are some tips and tricks we can implement to protect us from…ourselves.
4 Strategies for Portion Control:
Use smaller plates. Folks will often eat what’s placed in front of them, so using smaller dinnerware has been shown to help people eat less.[1]
Drink a glass of water before your meal. If you chug a glass of water 30 minutes before you plan on eating, the H20 will take up some room in your stomach. This might help you eat less.[2]
Take it slow. It can take about 20 minutes for your body to come around to the fact that it’s full, so slowing down your meals can help you eat less.[3]
Use a food journal. Recording everything you eat and drink is a great way to become aware of portions, which can help you control them.[4] In fact, one of the first missions we have Nerd Fitness Prime members complete is creating a food journal.
All of these methods will work to some extent, and they’re good to keep in mind and also practice.
However, nothing will get more consistent results than actually learning the number of calories in the food you eat (Portion Control Tip #5)!
Study[4] after study[5] after study[6] shows that our bodies obey the laws of thermodynamics and that in order to lose weight, we need to burn more calories than we consume regularly.
When you consume more calories than you burn, your body tends to store those extra calories as fat (weight gain).
When you burn more calories than you consume, your body will pull from fat stores for energy (weight loss).
However, as we point out in our Calories In, Calories Out guide, determining your exact “calories in” can be a real pain. Not only that, but many people with certain personality traits can become neurotic about tracking every single calorie. They worry if they go 1 calorie over their daily allotment.
So, what’s a nerd to do?
Unless you’re going to weigh out all your food (something I’ve done before) and be militant about tracking, is it possible to “track” your food with a high level of accuracy without having it take over your life?
The answer: yes, by getting darn good at estimating!
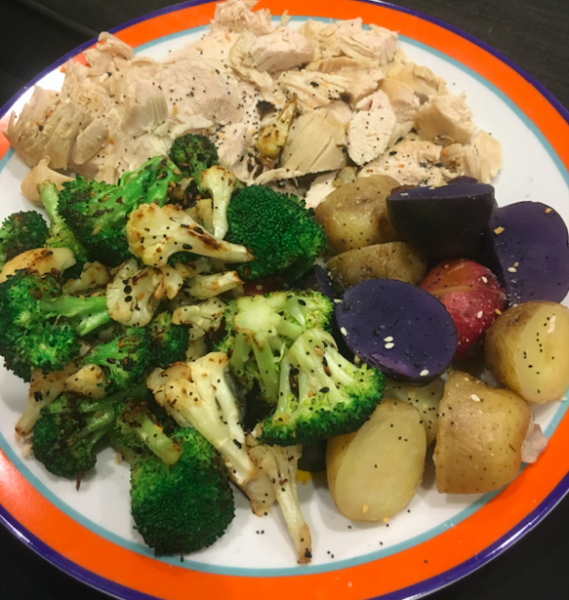
Portion Sizes: How to Portion Control (The Best Method)
You already carry with you the best method for portion control.
Your hands!
Even if you have robot hands.
We’re going to use them to build a healthy plate, as shown above.
However, using your hands as a tool for portion control provides a “good enough” strategy that can help your food intake:
As you can see, we’re going to focus our portion control strategy on:
Protein
Vegetables (technically carbs, but important enough to deserve their own category)
Carbohydrates (think starches and fruit)
Fat
Each macronutrient will correspond to an area of your hand, to give you a sense of what a proper portion size should be.
We’ve learned that using your hand as a guide is the most helpful strategy for portion control:
You might not always have access to small plates.
You might forget to drink water before each meal.
You might have a short lunch break without the luxury of eating slowly.
You might grow tired of logging all your food intake.
However, having an intuitive sense of what foods should be eaten in what portions will help you level up your healthy eating.
When in doubt, match the food in front of you to your hand and carry on.
Let’s break this down a little by talking about protein and veggies.
What is the Correct Portion Size Part 1: Protein and Vegetables
The above video is taken from Nerd Fitness Prime, as part of our NF Kitchen series.
In it, Coach Lauren and Justin discuss the two most important parts of every meal:
Protein
Vegetables
Here’s something that might seem counterintuitive: our #1 recommendation for portion control isn’t about limiting food. Instead, make sure you get a proper serving of protein and vegetables every time you sit down to eat.
In other words, when you begin your healthy eating journey, don’t even worry about nixing any specific food. Just make sure you are leaving plenty of room for protein and vegetables.
A serving of protein is about the size and thickness of your palm:
Protein can come from any number of sources, including:
A serving of veggies is about the size of your fist:
Here’s a quick, non-complete list of veggies that can fill half your plate:
Broccoli
Broccolini
Cauliflower
Spinach
Kale
Spaghetti squash
Brussels sprouts
Zucchini
Cucumber
Carrots
Onion
Asparagus
When it comes to learning portion control, start by making sure you eat enough protein and vegetables.
How much?
As we discuss in our protein guide, when building a plate aim for the following amount of protein:
Dudes: 1-2 servings (6-8 oz or about 170-228 g): two palms
Dudettes: 1 serving (3-4 oz or about 85-114 g): 1 palm.
For vegetables, in practice you can probably eat as much as you can stomach (the fiber will likely slow you down), but aim for about 2 fist fulls at most meals, or about half your plate.[9]
Here’s why you should prioritize protein and vegetables if you’re struggling with portion control:
Protein. Eating enough protein will assist your health as you age.[10]Plenty of protein will also help you retain and grow muscle.[11] Plus, prioritizing protein will help you stay full and satiated between meals.[12]
Vegetables. Veggies are both high in nutrients and low in calories, which makes them ideal for a healthy plate. Plus, the fiber will not only help your health, it’ll also keep your indoor plumbing in proper order.[13]
In the video that kicks off this section, Coach Justin makes a great point: aim for a little better than you are today.
Meaning if you don’t really plan your meals at all, start by having ONE meal include a good protein source and some veggies.
You also want to make sure you’re including healthy fat in your diet too.
Fat is actually the most calorically dense macronutrient, so comparatively it’ll take up less room on your hand.
Here is a serving of fat, roughly the size of your thumb!
Healthy fat can be found in foods like:
Avocado
Almonds
Walnuts
Macadamia nuts
Olive oil
Almond butter
Peanut butter
The reason people call it “healthy” is because the fat is unsaturated, although science has recently come around on saturated fat too in the correct amounts.[14]
When it comes to portion control, we need to pay close attention to carbohydrates and fats, because this is where people have the tendency to overeat.
However, that doesn’t mean we want to completely ditch both food groups either.
Here’s why you need to eat these two macronutrients:
Carbohydrates. Did you know fiber is a type of carbohydrate? Yep. As we mentioned earlier, you need plenty of fiber for good health.[15] Carbs are also a great source of quick energy, especially fruit.[16]
Fats. Some nutrients like Vitamin A are fat-soluble, meaning they are best absorbed alongside some fat.[17]Fat will also help you feel full, which can help with overall portion control for the day.[18] While a little goes a long way, you wouldn’t want a “zero fat” diet.[19]
An area of concern when attempting to portion control is dining out.
It seems like restaurants serve you twice the amount of food that you need.
Here’s what Coach Justin does in the situation: ask for a to-go box as soon as you place your order.
Yeah, it’s a little weird, but as soon as you get your food, place half of it in the container.
Boom! An extra meal for later.
Another thing to consider: restaurants want you to leave feeling full.
They often do this by piling on the carbs. Think extra bread, lots of rice, plenty of pasta, etc.
So it might make sense to split these portions in two, and you’re set for lunch the next day.
Also, if you get hungry after eating only half your meal, no problem. Just eat the other half. Even if you’re still at the restaurant.
The point is to consciously think about how much you’re eating. A break halfway through can be used as a decision tree:
Should I keep eating?
This question alone can help with portion control.
One last thing: we know eating out at restaurants is often a family or friend bonding experience, so we’d prefer you ENJOY the night. Food is more than just calories.
Just plan for it! If you eat a really large dinner for a celebration, eat slightly smaller portions for the next day or so and your body will be right back on track.
How to Portion Control for Weight Loss (Next Steps)
In the video above, Coach Lauren and Justin walk you through eating a Nerd Fitness Healthy Plate IRL (In Real Life).
It’s all well and good to build a healthy plate at home, but…
What if you’re at a restaurant?
What if you need to order a sandwich?
How about pizza?
Here are some tips from the Coaches for portion control IRL:
#1) How to Portion Control a Sandwich
The trick here is to pack in as many vegetables as you can. Yeah, you’re probably not going to get two fist fulls in, but you can squeeze in a lot of spinach, onion, sauerkraut, and tomato (yeah, it’s technically a fruit, whatevs) on your sandwich.
Your carbs can be some type of whole grain bread (you can do an open face sandwich if you want to limit this).
Your protein can come from some turkey.
Your fat can be a little avocado.
Boom.
You now have a turkey sandwich that matches our healthy plate strategy.
#2) How to Portion Control Chili or Soup
This can be a little tougher when everything is mixed together.
If you’re making it yourself, perhaps you measure out your hand portions as you cook.
Put a palm-size portion of ground beef in.
Your vegetables can be onion, garlic, and tomatoes (again a fruit, but who cares).
Your carbs can be pinto and/or kidney beans.
Your fat can be a little bit of cheese sprinkled on top.
Sure, maybe you’re doing less than two fistfuls of vegetables, and more than a cupped hand of carbs (beans).
It doesn’t matter. Again, the point is you’re putting a little thought into proper portions.
If you’re eating out and ordering soup or chili, maybe just think of the end product in mind:
“After portioning everything out, it should be about two fistfuls of food. So that’s what I’ll eat. Everything else I’ll take home.”
#3) How to Portion Control Pizza
This is a little trickier because pizza is mostly bread (carbs).
But Coach Justin has a solution for this.
First, he eats something he’s proud of, like a salad.
Then he portions out his pizza, which if he uses his hand strategy, would be about two slices:
Is it perfect?
Nope.
Does it help Coach Justin reach his goals and allow him to still enjoy life?
Yep!
So experiment a little by creating some rough guidelines, see how you feel, and course-correct as you go.
Remember, any step you take on leveling up your nutrition is great.
If you don’t know where to start, I actually recommend you begin by not worrying about what to take OFF your plate, but instead what to add!
Make sure every meal you eat has a healthy protein source and a vegetable. Once you have that dialed in, THEN you can worry about portion controlling your carbs and fat.
If you need help along the way, we got you.
Here are three ways to continue your journey with Nerd Fitness.
#1) Our Online Coaching program: a coaching program for busy people to help them make better food choices, stay accountable, and get healthier, permanently.
As I said before, we teach portion control to our clients who struggle with overeating, so we’ll provide a non-judgmental expert to help you reach your goals.
You can schedule a free call with our team so we can get to know you and see if our coaching program is right for you:
#2) If you want an exact blueprint leveling up your nutrition, check out Nerd Fitness Journey! Our fun habit-building app helps you exercise more frequently, eat healthier, and level up your life (literally).
If you follow our Nutrition missions, you’ll learn to portion control while earning XP! Sah-weeeet.
Try your free trial right here:
#3) Join the Rebellion! We need good people like you in our community, the Nerd Fitness Rebellion.
Sign up in the box below to enlist and get our Rebel Starter Kit, which includes all of our “work out at home” guides, the Nerd Fitness Diet Cheat Sheet, and much more!
Get your Nerd Fitness Starter Kit
The 15 mistakes you don’t want to make.
Full guide to the most effective diet and why it works.
Complete and track your first workout today, no gym required.
Alright, I want to hear from you:
Do you have any tips or tricks for portion control?
Do you use the hand strategy that we covered today?
What’s your biggest challenge with portion sizes?
Let us know in the comments!
-Steve
PS: If you’re just starting your weight loss journey, make sure you check out:
If the sight of a plate of broccoli makes you gag, this post is for you!
We’ll turn any “Veggie Hater” into a “Vegetable Lover” by showing you how to make a plate full of greens not taste like a wet gym sock [1].
If you’ve been a picky eater your whole life (I didn’t eat veggies until 22!), our guide today will help level up your taste buds!
We work closely with our Online Coaching Clients to help them find their gateway vegetables, and I even picked our coaches’ brains to get their favorite tactics in this guide too.
By the end of this guide, I’m going to have you excited to eat vegetables, and ready to take the “NF Veggie Challenge”:
As Coach Staci mentions above, eating a vegetable once a day is something we recommend all our coaching clients do.
Yeah, I know…you’ve probably been told since you were a toddler to “Eat your vegetables! They’re good for you.”
But do you really know WHY veggies are good for you?
Let me jump into a few reasons why they kick ass.
Here’s why you prioritize eating vegetables:
1) Vegetables are nutrient-dense. It should be no surprise that Popeye turned to a vegetable when he needed a power-up.
Think of vegetables as one of our body’s most efficient fuel sources: they are packed full of vital macro and micronutrients.
Just take a look at our article on how to eat healthy – it should be no surprise that vegetables take up half the plate in our “healthy plate” strategy.
Simply put: vegetables are the backbone of any solid diet.
2) They fill you up, without “filling you up.”
Ever seen what 200 calories worth of broccoli looks like (courtesy of WiseGeek)?
It’s the size of a grocery bag compared to 200 calories of a Snickers:
If you are feeling hungry but don’t want to overeat, choose a vegetable.
Kind of hard to overeat when you’re eating carrots or celery!
3) Veggies keep your body operating at max efficiency. Vegetables are a great way to keep your…um…indoor plumbing…functioning properly.
Adding a vegetable or two to each meal (or blending them up in a smoothie) is a great way to keep things working right.
Seriously: you will notice a considerable difference after adding veggies to your diet regularly.
4) They CAN be delicious! It’s all in how they are prepared. As a former veggie hater, I am now firmly on “Team Vegetable.”
A plate full of veggies used to make me want to gag, and now I’m thrilled at the idea of a plate covered in a cornucopia (what a great word, right?) of multicolored fruits and veggies.
“Ok, Steve, I know vegetables are good for me, but I just don’t like them. HALP!”
Here’s how you can get over your vegetable-aversion and get started.
How to Start Eating Vegetables: Finding Your Gateway Veggie
When I was 22 I proudly proclaimed that I was mostly “carnivore” and boycotted veggies.
Essentially, I ate things like chicken, hamburgers, pizza, pasta, french fries, rice, and not much else.
In my mind, all vegetables were disgusting, but the reality was that I hadn’t really tried many.
Don’t be like me.
We’re going to stop saying “I don’t like vegetables!”
Instead, we’ll say: “I haven’t found a vegetable that I LIKE…yet.”
HOW I FOUND MY GATEWAY VEGETABLE: I started using “20 Seconds of Courage” to try a new vegetable whenever the stakes were low, even if it was a TINY amount:
I went into any new vegetable experience with an open mind and positive mindset.
Trying any vegetable was considered a victory, even if it was a tiny amount and I hated it.
If I went out to dinner with friends, I would ask to try a veggie from their plates. Restaurant prepared veggies were my best chance to find one I liked!
MISSION #1: Commit to try and find your gateway vegetable.
Before any new vegetable experience, clear your mind, Neo.
Instead of ALREADY expecting to hate it, change your mindset.
Instead of “This is gonna be gross,” I said, “Let’s see!”
If you’re out to dinner with family and you see a veggie you want to try on your significant other’s plate, ask and try a small bite!
Want to try and prepare a new vegetable at home? See the next section.
What if you try a vegetable and it makes you gag? Who cares! You found a veggie you don’t like. I’m proud of you for TRYING it. On to the next one!
My gateway vegetable: Asparagus.
After trying some bacon-wrapped asparagus while out at a fancy steak dinner, I realized “hey, this is one vegetable that actually doesn’t taste terrible!”
Of course, it didn’t hurt that it was literally WRAPPED IN BACON!
Next, I tried crunchy asparagus without the bacon wrapping, and it was STILL delicious to me.
And thus, I had found my gateway vegetable.
For my first year as an omnivore, asparagus was the only vegetable I ate.
Once I had gotten over the mental block that “all vegetables are gross,” it was time to branch out and repeat the process with other vegetables.
Let’s do the same for you.
How to BUY Vegetables. How to Discover New Vegetables.
First and foremost, buying vegetables can be daunting:
How can I tell if a vegetable is fresh or not?
How long can I leave the vegetable in my fridge before it goes bad?
Which ones should I buy?
For starters, here are just some of the vegetables that are Nerd Fitness approved.
MISSION #2: Pick ONE of these 25 vegetables and bring it home with you.
Who cares if you don’t know how to cook it yet. Pick one, and bring it home. Baby steps!
broccoli
collard greens
kale
romaine lettuce
spinach
artichokes
asparagus
beets
brussels sprouts
cabbage
cauliflower
celery
cucumbers
eggplant
green peppers
mushrooms
okra
onions
zucchini
acorn squash
butternut squash
carrots
red peppers
green peppers
bok choy
NOTE: we’re not counting tubers (potatoes and sweet potatoes), legumes (beans), or corn.
Those foods do have a place on our healthy plate (shown below), but today is all bout finding low-calorie, high-energy leafy vegetables.
1) PICK A FRESH VEGETABLE: Use this wonderful guide on how to select fresh and tasty veggies at the grocery store.
Don’t overthink this or panic: you’re more likely than not going to pick out good veggies (provided you’re going to a reputable grocery store), but having a bit of confidence in what you’re doing can help too.
Here are a few examples of what to look for:
Asparagus: Choose firm, smooth, and brightly-colored stalks with compact tips. Avoid limp stalks. Choose stalks of equal thickness to ensure even cooking times.
Broccoli: Choose broccoli with firm stalks, tight florets, and crisp green leaves. Avoid yellowed or flowering florets.
Brussels Sprouts: Choose firm, compact, bright green heads. Avoid sprouts with wilted or loose outer leaves.
Noticing a trend? You want FIRM vegetables, not soggy or squishy ones. Just start there, and look for the veggies that seem healthy to you. You can always get better at judging vegetable quality later.
2) CONSIDER PRE-CUT VEGGIES:If you’re worried about picking out fresh vegetables – I know this can be intimidating – look into buying pre-cut bags of vegetables! I personally love buying pre-cut broccoli and cauliflower, and bags of Brussels sprouts.
These are generally on the wall next to the fresh veggies, and might cost slightly more than the produce you bag up yourself.
That’s because a lot of the work is DONE FOR YOU!
I’m all for anything that reduces the number of steps between you and “veggies in your tummy:”
3) LEARN HOW LONG YOU HAVE TO EAT THE VEGGIE:
Once you’ve bought your veggies, use StillTasty.com, to figure out how long you can leave them in your fridge:
Generally speaking, you’ll be good if you cook a vegetable within 3 days of bringing it home: you can batch cook large quantities and then you’ll have MANY more days before the food goes bad.
If you’re NOT sure if you can still cook a veggie, or if it’s gone bad…give it a smell. If it smells funky, or you’re not quite sure…
Here’s a sentence my mom taught me when I started cooking for myself: “When in doubt, throw it out.”
Next time, just cook it sooner!
I can tell you eating rotten vegetables is NOT the path to liking them more.
4) CONSIDER FROZEN VEGETABLES: I always have multiple bags of frozen spinach on hand in my freezer, but it’s not because I prepare spinach regularly – I hide frozen spinach in my daily smoothies and I can’t even taste it!
In addition to frozen spinach, I also keep a few bags of microwaveable frozen veggies on hand too in case I need to quickly add a veggie to my healthy plate but don’t want to actually cook a vegetable.
I’m a huge fan of “steamfresh” bags or similar because preparing them is easy as hell:Most of these only require you throwing the bag into the microwave, opening it, and putting it on your plate.
5) CHECK OUT CANNED VEGETABLES!
They might not be as fresh as regular veggies, and there might be preservatives added to keep them from going bad, but I’d prefer you trying out canned vegetables to no vegetables at all!
Popeye eats canned spinach and he turned out okay.
Honestly, I don’t care WHICH path you pick, or which vegetable you pick…as long you commit to picking one and bringing it home with you from the grocery store.
10 Ways to Make Vegetables Taste Good
Even if you’re committed to trying more veggies (and I’m proud of you for that), it still might not solve the problem that you dislike the taste or texture.
This is the problem we encounter with many of our Online Coaching Clients: they are committed to eating vegetables, but they’re struggling with taste and texture.
Fortunately, we have a TEAM of Coaches with dozens of success stories from their clients who have learned to like vegetables with some clever tactics:
Essentially, it comes down to “hide them, blend them, pair them, or cover them!”
Here are our Coaching Staff’s 8 Favorite Ways to Make Vegetables Taste Good:
1) Change their state! I don’t enjoy raw broccoli nearly as much as I do steamed broccoli.
And that’s not even it’s final form! Give me a plate full of roasted broccoli covered in “Everything but the Bagel” seasoning from Trader Joes, and it’s Veggie Valhalla.
If you don’t like a particular vegetable yet, try preparing it a different way! From raw to steamed to baked to grilled to sautéed in bacon grease (see #4) to blended, you have so many options!
2) Blend them up! Add frozen spinach or kale to your protein shake smoothies. This is my personal favorite, and is part of the reason I get so many servings of vegetables every day.
Here’s my post-strength training workout smoothie:
12 oz of water.
2 scoops of whey protein.
1/2 cup of Quaker Oats.
1 cup of frozen mixed berries.
1 cup of frozen spinach.
Believe it or not, adding frozen spinach (or kale) doesn’t really change the taste AND you can get an extra serving of vegetables without trying.
That’s one extra daily serving of a super veggie!
3) Make a combo bite with a food you like: If you can learn to cook something like chicken stir fry, you can make sure that every vegetable bite also has plenty of rice and chicken.
You can do the same if you make mini potatoes, chicken, and broccoli. Get some of each on the fork with each bite for a really healthy plate!
Then, over time you can reduce the amounts of the other foods and increase the amount of the vegetable until you actually enjoy the taste of JUST the vegetable!
Here are some ideas to try to squeeze in some extra veggies with every mouthful of food:
a single broccoli crown and a big chunk of chicken.
Want to learn to like asparagus? Wrap it in bacon (see #5)!
Here’s another great way to eat some veggies add bacon (courtesy of Team NF Coach Staci):
6) Spice it up! You don’t need to just eat plain boring broccoli and steamed asparagus. Try adding some spices or hot sauce to your foods to change the taste.
Here are some of our favorites:
Steamed cauliflower covered in Old Bay seasoning, dipped in cocktail sauce.
Northwoods seasoning by Penzeys on baked or grilled vegetables.
“Everything but the bagel” seasoning on baked or grilled vegetables.
Olive oil, salt and pepper. A classic that never fails.
Make carrot “fries.”Cut some carrots into fry shapes, toss them in olive oil, put them on a baking sheet, sprinkle with salt and pepper, and roast them in the oven at 450 degrees F (230 degrees C) for 10 minutes. Tada!
Buy “cauliflower rice” or “mashed cauliflower.” With butter and salt, and on a plate with the right foods, cauliflower can taste like rice or mashed potatoes.
8) Dunk them! Who needs chips? Pssh. You can dunk broccoli florets, cauliflower florets, or carrot sticks in hummus or guacamole.
Think of the vegetable as the delivery vehicle for your favorite dunking food!
9) Add small amounts of spinach, chard, or kale to your homemade chili or guacamole. You won’t notice the difference in the taste, and you’re sneaking extra vegetables into your meals.
I know a coaching client who got started with vegetables by adding them to low carb soups and his homemade chili.
10) Douse them in something you do love. Whether it’s ranch dressing, blue cheese, buffalo sauce, or any other sauce or condiment you enjoy, dunk those veggies and get those greens in your system!
Sure, If the sauce you’re using is really high calorie then this isn’t a long-term strategy, but we can work on that.
For now, we’re building the habit of eating vegetables. Use less sauce each week moving forward.
You can also consider lower-calorie dressings, sauces, and dips to spice things up. And you can never go wrong with hot sauce.
All of the above examples accomplish the same goal:
Getting more vegetables into your system.
This makes your stomach happy, your mother happy, and Popeye happy.
Want to work hand-in-hand (virtually) with a coach that will actually get you to eat your vegetables?
Need a brainstorm partner to find clever ways to “Trojan Horse” some veggies into your stomach?
How to Start Liking Vegetables (It’s All in the Preparation)
“Okay Steve, just give me some options and tell me what to do!”
FINE!
Here are some easy and delicious options for getting started with your first vegetable:
#1) Steamed broccoli
Level 1: Steamfresh bag in the microwave: Steamfresh veggies come in a package that you can throw in the microwave for five minutes, add seasoning, and that’s it.
Add butter or any seasoning like salt and pepper, and eat it with a protein for a healthy meal!
Level 2: Steam broccoli yourself in the microwave:
Plop those florets (the “tree” minus the “trunk”) in a microwave-safe bowl with a few tablespoons of water
Cover with a microwave-safe lid or dish
Cook for 3-4 minutes. If the broccoli isn’t soft and warm, put it back in for a minute or two
Level 3: Steam broccoli on the stove:
Plop about a 1/2 cup of water in the bottom of a pot
Separating the broccoli florets from the stem
Plop them in the water and cook over medium heat for 10-15 minutes
2) Roasted vegetables. Works with bell peppers, asparagus, carrots, onions, broccoli, cauliflower, zucchini, Brussels sprouts, etc:
Roasted veggies can taste very different from steamed and raw veggies (they get crispier and a little sweeter because they caramelize in the oven).
Take your pick of vegetable:
And make roasted veggies:
Cut them up literally however you want (bite-sized pieces work best).
Drizzle/toss them toss in olive oil, sprinkle salt and pepper.
Put them on a foil-lined pan in the oven at 400 degrees F (200 degrees C) for 20-30 minutes.
Once they look like they’re cooked (a deeper color and slightly brownish edges), take them out of the oven.
Write down how long they were in for, and eat them!
Don’t overthink this: You can use more olive oil or use less. You can use more salt or use less. You can leave them in there a few minutes longer. Just cut them up, drizzle, and plop them in!
Here’s my recipe for stupidly simple roasted asparagus:
Put them on a cookie sheet lined with aluminum foil.
Drizzle each asparagus stalk in olive oil.
Sprinkle salt and pepper on them.
Stick them in the oven at 375 degrees F for 12 minutes.
DONE. Crunchy, delicious, and nutritious.
Plus, I felt like a 5-star chef!
#3) Sautéed Vegetables: Cooked on the stovetop! Simple, delicious.
Zucchini and squash both taste great with just a little oil and salt, and are super easy to prepare.
Throw the slices into a pan with some olive oil on medium-high heat for about five minutes until they become soft and lighter in color.
All of these options can be paired with basically any protein for a delicious and healthy meal (or eaten as a healthy, stand-alone snack!).
If you attempt to cook a vegetable and burn them to a crisp and “fail,” I’ll still be proud of you. We all suck at stuff the first time, so the sooner we get those first few attempts out the way, we can get to “not sucky,” and then…
One day…
We’ll actually get pretty good at preparing vegetables!
What are the Best Tasting Vegetables? (The NF Veggie Challenge)
“Steve! What are the best-tasting vegetables!?”
Great question.
You’re a unique snowflake, and so are your tastebuds.
They will evolve and change as you evolve and change.
So the best advice I can give you is to try lots of veggies, prepared lots of different ways.
Microwaved Brussels sprouts might be soggy and unappetizing, but take the same veggie, cooked in bacon fat and roasted in the oven?
MMMMMM!
So try multiple veggies, in multiple ways, as part of multiple meals. Keep trying until you find a variation you like!
A final note: the point of eating more vegetables is to fill your plate with low-calorie but nutrient-dense food. It’ll make you a healthier nerd, I promise.
If you’re still overwhelmed at the thought of eating veggies, or you’ve always struggled to stick to a diet for any meaningful amount of time, you are NOT alone.
It’s why we’ve created three key services that help people lose weight, get stronger, and live better:
#1) Our 1-on-1 Online Coaching Program: Get personalized nutrition advice that won’t scare you and handcrafted workouts from a coach that gets to know you. We’ve heard “this program is the first time I’ve ever been 100% honest with another human being about my struggles with food.”
#2) If you want an exact blueprint for eating more vegetables and upgrading your nutrition, check out Nerd Fitness Journey! Our fun habit-building app helps you exercise more frequently, eat healthier, and level up your life (literally).
If you follow our Nutrition missions, you’ll learn to eat more greens while earning XP! Sah-weeeet.
Try your free trial right here:
#3) Join the Nerd Fitness Rebellion!
We have a free email newsletter that we send out twice per week, full of tips and tricks to help you get healthy, get strong, and have fun doing so.
I’ll also send you tons of free guides that you can use to start leveling up your life too:
Download our free weight loss guide
THE NERD FITNESS DIET: 10 Levels to Change Your Life
Follow our 10-level nutrition system at your own pace
What you need to know about weight loss and healthy eating
3 Simple rules we follow every day to stay on target
NOW, Are you up for the Nerd Fitness Veggie Challenge?
For the next four weeks, I want you to try ONE new vegetable each week:
Use 20 seconds of courage to try a new vegetable as a side when you go out to dinner.
Buy a new vegetable at the grocery store and learn to prepare it.
Add vegetables discreetly to your favorite meals (mix in with your smoothies, add to your omelets, etc.).
Learn to prepare a vegetable in a new way. Whether it’s roasting them in the oven or grilling them on the bbq, try a different way to prepare a vegetable and level up your cooking skills.
Leave a comment and let us know!
We’d love to hear from you:
If you hate vegetables, what are you taking away from today’s post?
Do you have a clever way to get more vegetables into your diet? Share please!
What’s keeping you from starting to eat vegetables, and how can we help?
-Steve
PS: Make sure you read the rest of our healthy eating content!
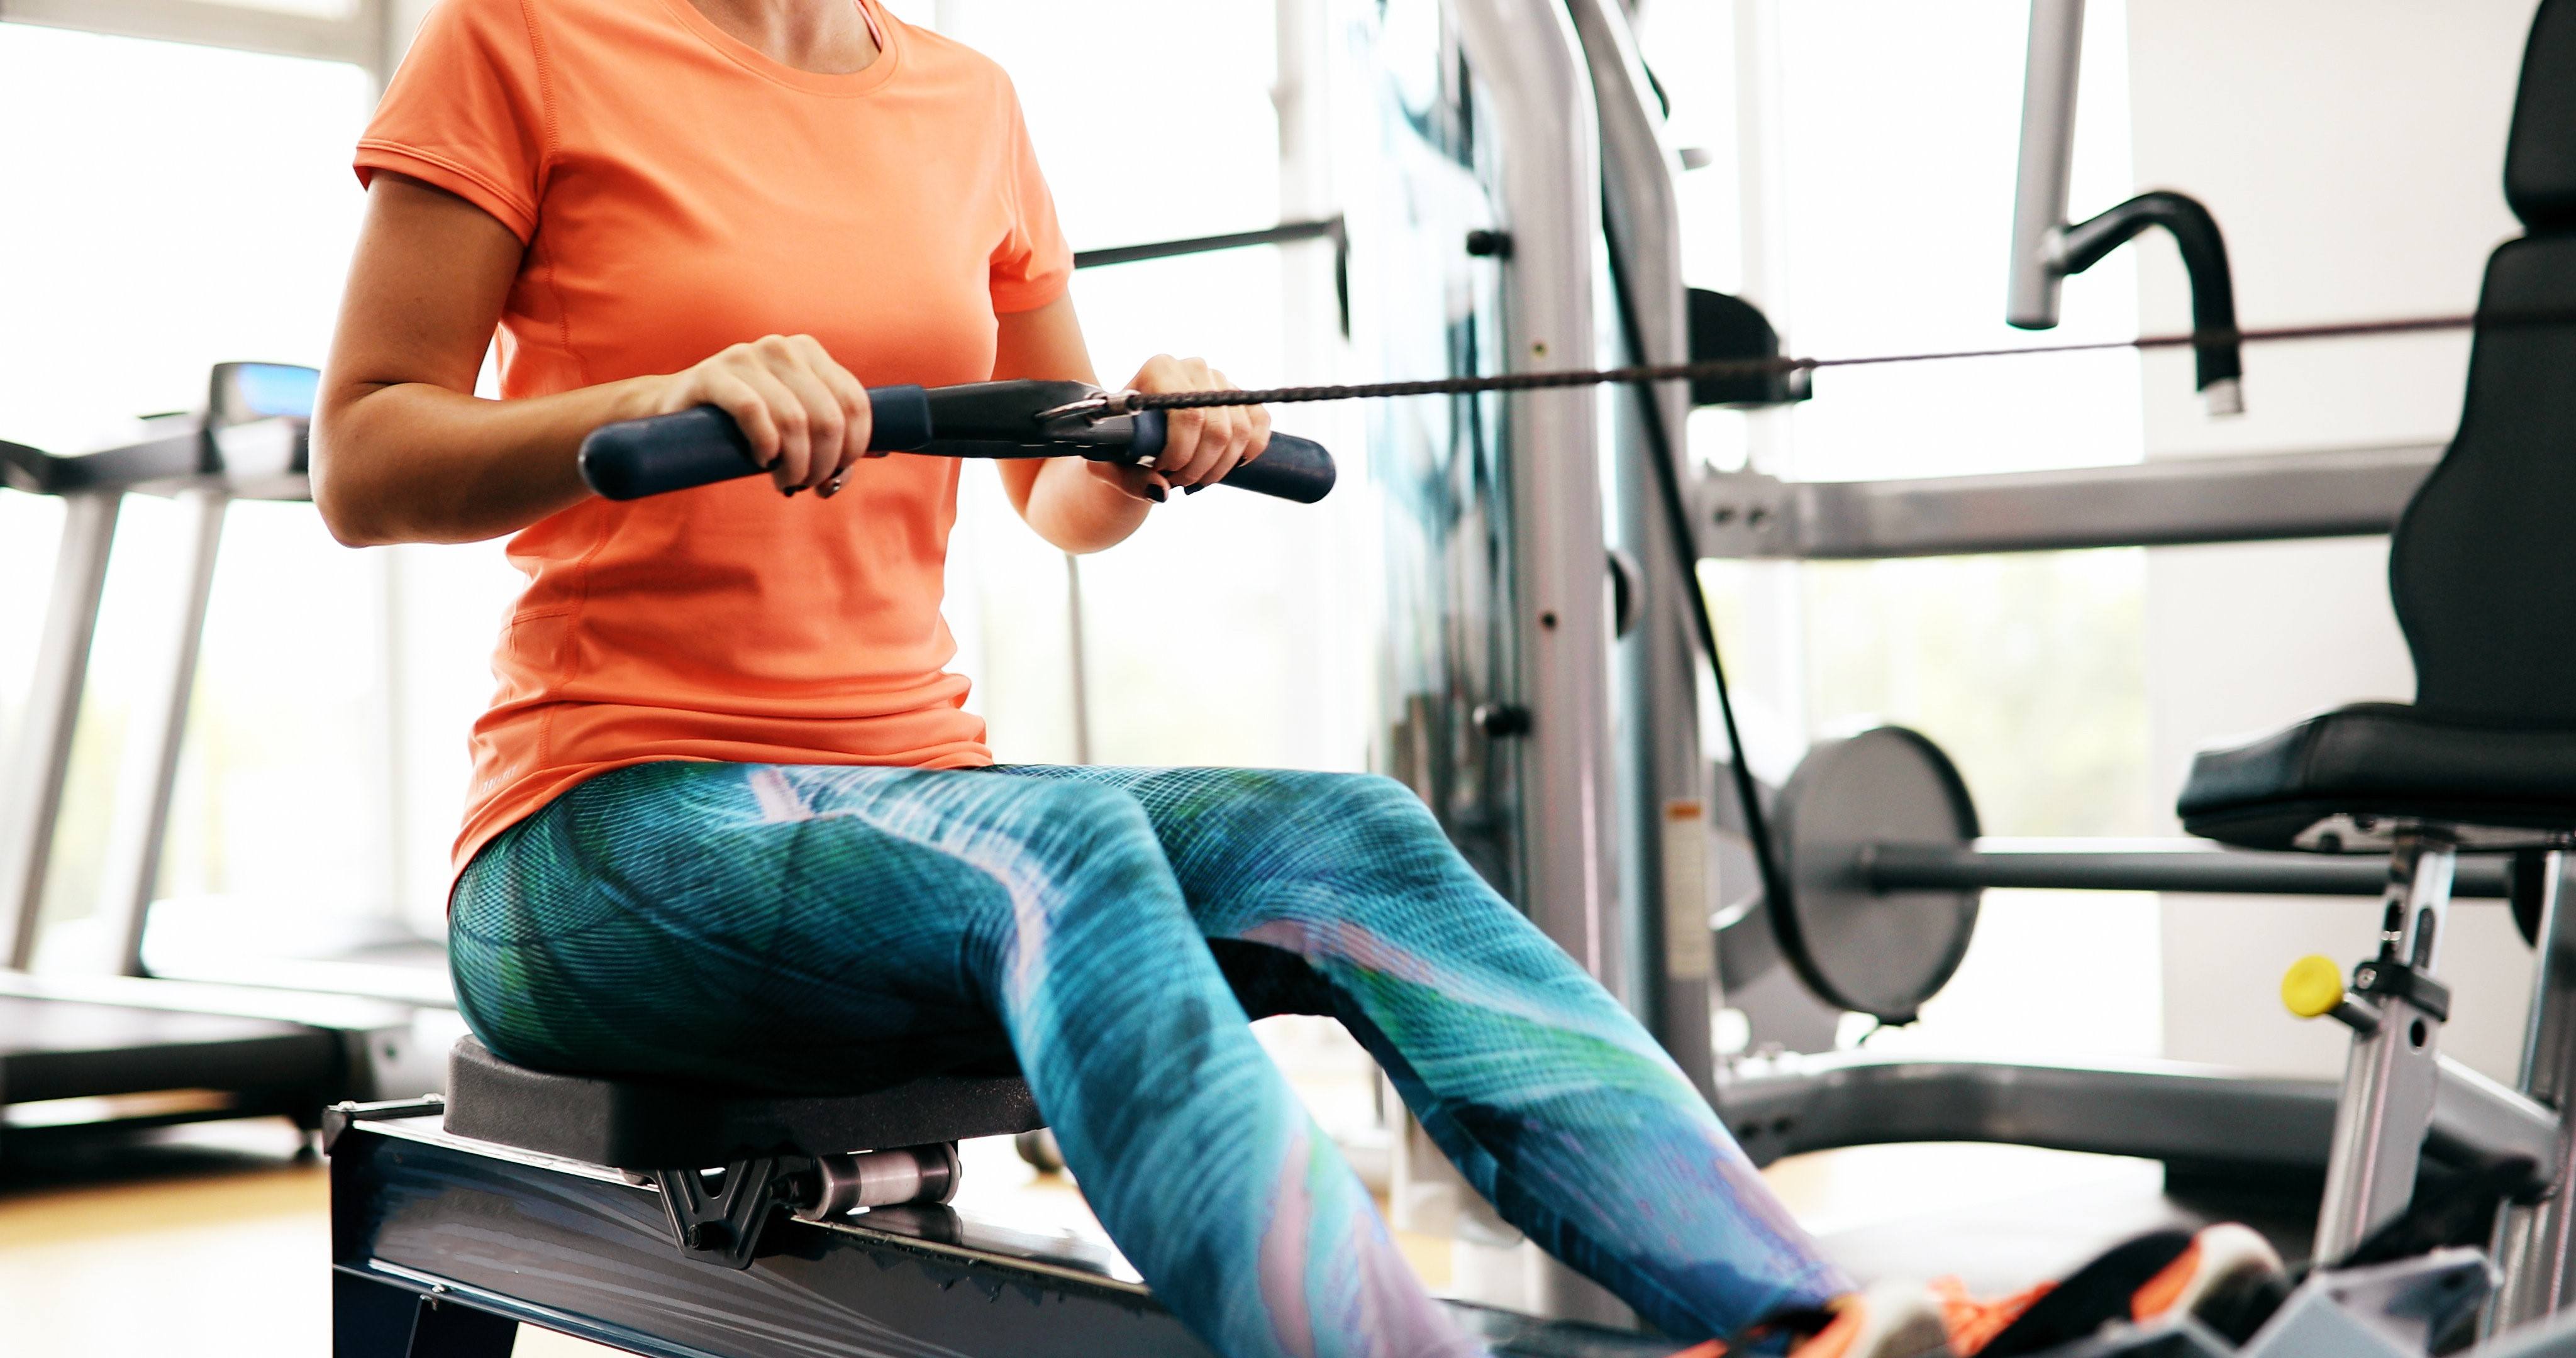
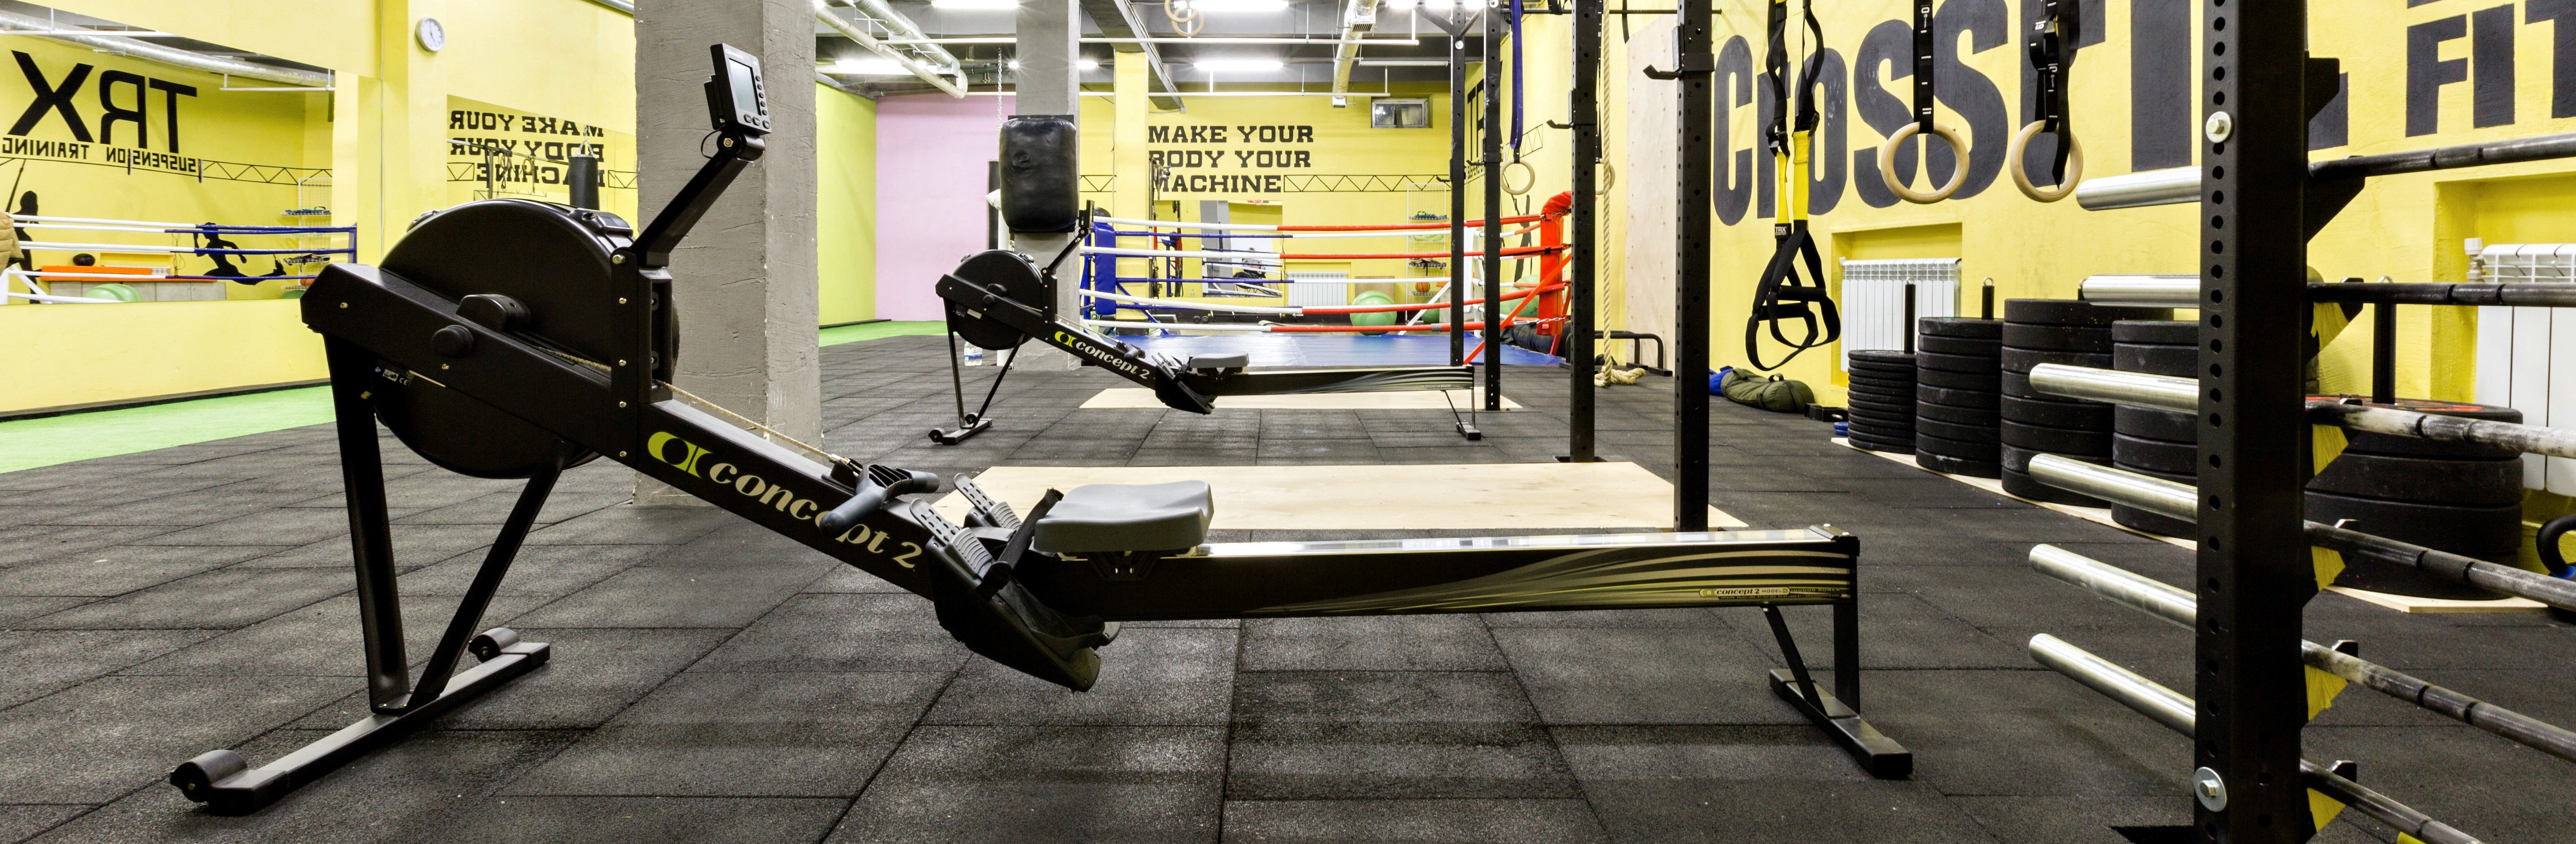
Rowing classes are everywhere. It’s easy to find professional and Olympic athletes hyping up the machine’s ability to provide a full-body workout.
All well and good…but how do you actually use the thing?
Well my friend, you’ve come to the right place to find out.
Many clients in our Online Coaching Program tell us they want to start rowing, but they don’t know how. Today, we’ll explain how we get them going with row machine workouts.
She also knows a thing or two about using a rowing machine, since she’s gotten several CrossFit certs (they love the rowing machine at CrossFit).
If you’re going to learn about using a rowing machine, she’s not a bad person to talk to.
But first, let’s back up here a bit…
What Are the Benefits of Using a Rowing Machine?
The rowing machine was originally invented for water rowers to train offseason.
You might hear the indoor rowing machine called an ergometer, or “erg” or “ergo.” They get this name since rowing machines often measure the energy produced from the workout in units of ergs.
They’ve grown in popularity, because of the many benefits offered by this one stationary machine.
For example, the rowing machine offers:
A Full-Body Workout. If we use proper rowing technique, we’ll hit every major muscle group in our body. Upper, lower, core, we’ll work it all. This is one of the main reasons they’ve become so popular.
Low-Impact. While a workout from a rowing machine can get intense, it’s considered to be little to no impact. That’s why it’s sometimes recommended to patients with osteoarthritis.[1]
Versatility. We can do a lot with an ergometer. We can train for duration and/or intensity. We even do a HIIT workout. Or we can combine it with bodyweight movements in a circuit. Plus, since some of them fold up, they’re perfect for those who need to train in small spaces.
Alright, let’s now go over some terminology so you know what’s what with the ergometer.
Rowing Machine 101: Terms to Know
When it comes to the rowing machine, there’s some vocabulary that would be worth discussing quickly.
First, let’s chat about the rower itself.
Here Are the Parts of the Rowing Machine:
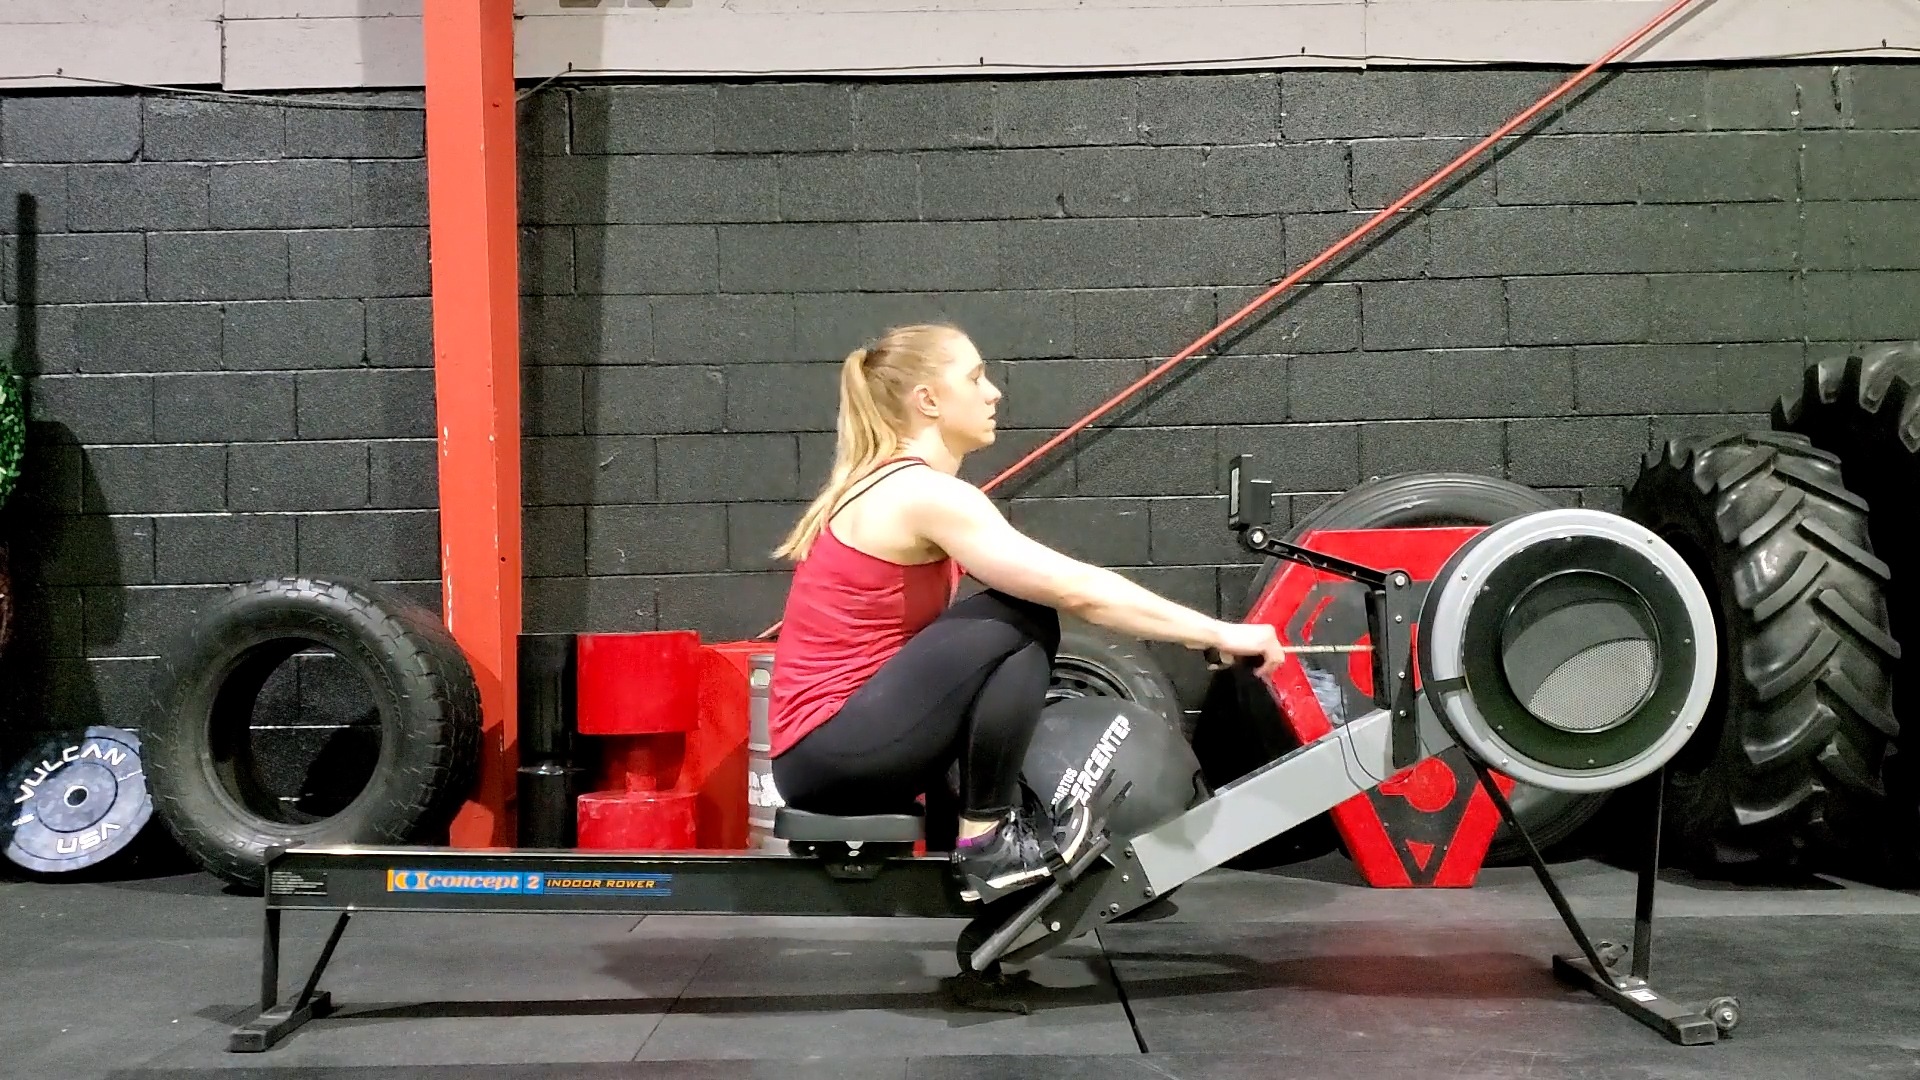
#1) Foot Plate – no matter the rower, there will be a place for you to strap your feet in.
You’ll want to set your feet so that the strap goes over the ball of your foot. This will allow you to have the most powerful stroke.
You should be able to lift your heel in this position.
#2) Handle – also called “the bar.” This replicates the handles of an oar.
Your hands should be approximately shoulder-width apart.
#3) Rail – the central beam of the rower, which allows the seat to roll forward and back.
#4) Display Monitor – while these will differ from model to model, the rower will normally have a screen to show some basic info:
Strokes per minute (Stroke Rate)
Split Time (more on this momentarily)
Duration of workout
Etc.
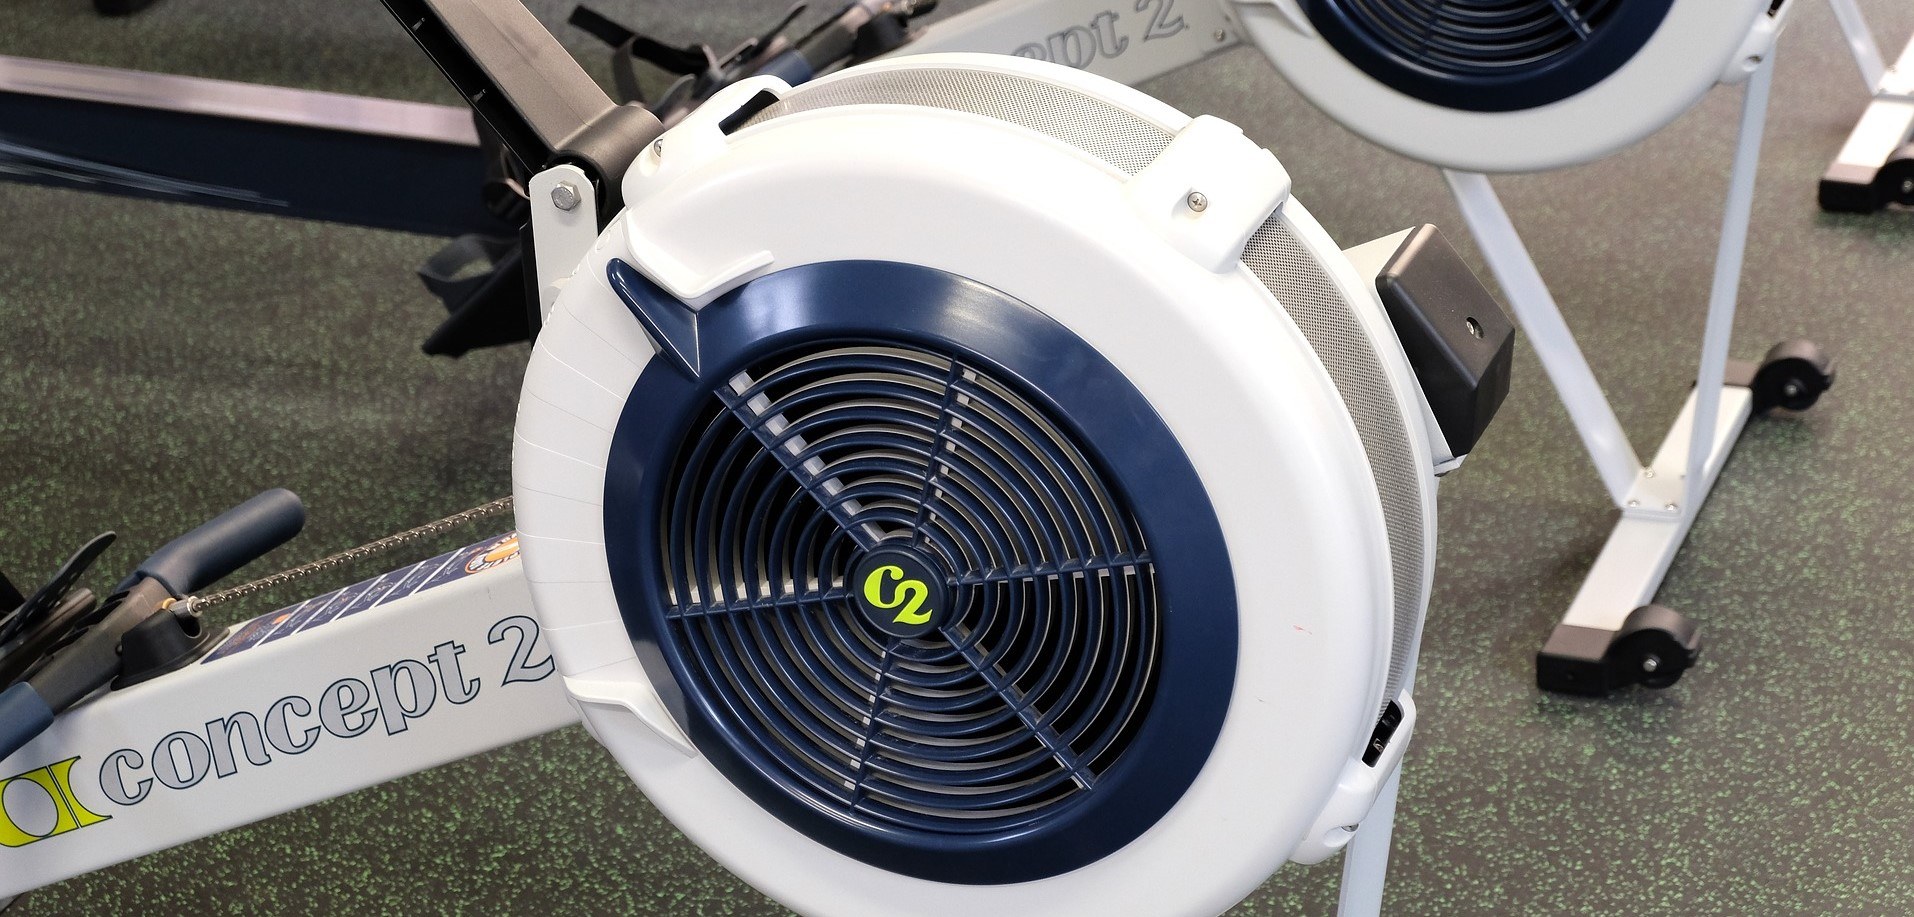
For the Concept2 model – the rower Coach Staci demonstrates above – you can hit any button and select “Just Row.”
This will be the easiest way to get going.
#5) The Damper – The lever on the side of the flywheel housing (or fan cage) that controls airflow.
The difference in Damper settings:
The higher the setting, the more air is allowed to flow. This requires more work to spin the flywheel.
The lower the setting, the less air is allowed to flow. This requires less work to spin the flywheel.
Think of this sort of like bicycle gears – it affects how the rowing feels but does not necessarily reflect the resistance:
A setting of one will feel fast and easier to pull, but you’ll need to move quickly to generate power.
That said, cranking the damper up to ten doesn’t mean a better workout either. It just means a tougher pull – like trying to move a rowboat.
We recommended you aim for a Damper setting between 3 and 5 (which is also where most competitive rowers have it).
Note: some indoor rowers use a water tank to create resistance, so any similar Damper setting controls the amount of water moving through the system. You can still use the same recommendations for damper numbers.
More on that here:
Next, let’s talk about some terminology for the sport of rowing itself.
Rowing has been around for centuries and a lot of the vocabulary has carried over to the indoor sport.
Rowing Terms to Know:
#1) Split
Split time refers to the time it takes to row 500 meters, also known as the “split per 500.” This will likely be shown prominently on your Display Monitor.
If the number goes down, it means you’re going faster! Woot.
#2) Strokes Per Minute (SPM)
This is also called Stroke Rating and it’s exactly what it sounds like: the number of strokes you take per minute.
A higher SPM doesn’t necessarily mean you’re going faster – you can also go faster by putting more power into each stroke.
#3) Paddle (or Rest)
Normally in the sport of rowing, you never stop completely. You just row or “paddle” a little bit easier.
However, if you need to stop completely in your workout, don’t stress it. It’s fine to even get off the rower from time to time…it’s not actually a boat.
You do you.
Next, we need to discuss the four parts of the rowing stroke, but we’ll jump to a new section for that.
The Four Parts of the Rowing Stroke
The rowing stroke is broken out into four parts:
The Catch
The Drive
The Finish
The Recovery
It’ll look like this:
Let’s cover each.
#1) The Catch
This is the start of the stroke:
Our knees are bent and our shins are roughly vertical.
Our body leans forward slightly to about a 1 o’clock position and our arms are straight.
Like so:
This puts us in the ideal position to generate power.
#2) The Drive
As the name would suggest, this is where we’ll be driving and generating power for the stroke.
The order in which we generate power is key:
It should go legs first
Then lean back with the body
Then pull with the arms
It’ll look like this:
They should blend smoothly right into each other, so a good reminder is:
Legs
Body
Arms
A great drill to practice the Drive:
Start with JUST the legs:
THEN the legs and a slight backward lean with the body:
FINALLY, the legs, body, and arm pull together:
This can be done with or without the rowing handle.
Common mistakes with the Drive:
A) Pulling hard with the arms first. We’ll see the elbows bend early. This greatly decreases the amount of power we can put into the stroke.
We want to keep the arms straight and wait until the handle passes the knees BEFORE we first bend the arms.
B) Letting the body pull forward while we’re driving with the legs.
Instead, we want to keep a strong and stable midsection so that we can go smoothly from the leg drive to the body lean.
#3) The Finish
This will be our position after the Drive:
Our legs are extended and our body is leaning back slightly.
The handle is about at our solar plexus.
Our shoulders are down and our wrists are straight.
It’ll look like this:
A great drill to practice the Finish: just work on the arm motion.
Keep the legs extended and lean back slightly. Then pull with just the arms.
Common mistakes with the Finish:
A) Shrug the shoulders up by the ears.
This is often accompanied by bent wrists and chicken wing arms.
Instead, we want the shoulders down and the elbows closer to the sides, with enough space between the arms and body for a grapefruit to fit.
B) Pulling the handle too high – to the neck or face.
We want the handle down at the solar plexus, not up orbiting in the solar system!
C) Leaning back too far – we’re not trying to perform the one-person luge here!
We only need to lean back slightly, at about an 11 o’clock position.
#4) The Recovery
This is how we return back to the starting position.
Just as we had a proper order for the Drive – legs, body, arms – we’ll have a proper order for the recovery by reversing it – arms, body, legs.
Straighten the arms, then lean the body forward slightly, and finally bend the legs to head back to the Catch.
Common mistakes with the Recovery: Bending the legs too early when recovering from the stroke. You’ll know you’re doing this when you have to lift the handle up and over the knees.
Instead, wait for the handle to PASS the knees before fully bending the legs.
There you have it, the four parts of the rowing stroke.
You’ll get better at this as you go, I promise.
Rowing is like golf: the relentless pursuit of the perfect stroke.
One way to check your form would be to record yourself doing a rowing stroke.
If it looks close to the gifs and videos found in this guide, you’re doing great!
Oh, and if you want an expert to review your form, you can do so in our snazzy Coaching app.
You can learn more here:
When to Add the Rowing Machine to Your Workout
A rowing machine can fit into our workout in all sorts of ways.
If you want to give the rowing machine a whirl, including it as part of your warm-up wouldn’t be a bad idea. Since it’s a full-body exercise, it’s a great way to prep our body for the workout ahead.
To warm up with the rower, aim for about 5-10 minutes at a steady pace.
Once you get the hang of the rower, you can look to incorporate it with some of these ideas:
#1) Interval Training
Interval training or HIIT is all about flipping between intensity.
Going hard one moment, then resting another.
So after your warm-up, you could row intensely for two minutes, rest or “paddle” for a minute or two, then back to intensity.
A fun way to do this is to build up the duration and then pull it back with a “Meter Pyramid.”
To Row a Meter Pyramid:
One minute of intensity, followed by one minute of paddle.
Two minutes of intensity, followed by two minutes of paddle.
Three minutes of intensity, followed by three minutes of paddle.
Four minutes of intensity, followed by four minutes of paddle.
Three minutes of intensity, followed by three minutes of paddle.
Two minutes of intensity, followed by two minutes of paddle.
One minute of intensity, followed by one minute of paddle.
If you start this off with a 5-minute warm-up, it’ll take about 37 minutes.
We could aim for 3-4 circuits here, but even 1-2 is a great start.
#3) Steady State
This is exactly what it sounds like: rowing at a constant pace.
After a warm-up, find a pace that you can stay with. Then stay with it.
A good frame of mind here would be about 50% of your effort, but don’t overthink this.
Put on a good podcast or your favorite playlist, find a Stroke Rate you can maintain for 10-30 minutes, and get rowing.
You can pretend you’re in a competition if it helps!
Also, mix and match! The important thing is that you’re doing some type of workout. Don’t fret if it doesn’t fit into the exact format you find here or on other websites.
Should a Beginner Use a Rowing Machine? (Next Steps)
There you have it, my friend.
You now have everything you need to get started rowing.
Don’t overstress if you’re not doing anything 100% right as you start.
Like anything, you’ll get better at it as you go.
Plus, it’s not like you’ll be ejected into the water from an indoor rower.
But, if down the road you do want to take it outside, there are all sorts of leagues and clubs you can join.
It could be a great way to get out and make friends!
Granted, you’ll need SOME type of body of water around you, but if you live next to a lake or large river, there’s likely a team out there that would love to meet you.
Practice indoors for a bit, then take 20 seconds of courage to put yourself out there.
What’s 20 seconds of courage?
We explain it all to you in this video:
Oh, and if you want to continue having Nerd Fitness propel your journey, here are three ways we can help:
#1) Our Online Coaching Program: a coaching program for busy people to help them make better food choices, stay accountable, and get healthier, permanently.
If ever you come across a snazzy piece of equipment and what to learn how to use it, your very own coach can help you!
Plus, they can guide your nutrition and help you level up all areas of your life.
You can schedule a free call with our team so we can get to know you and see if our coaching program is right for you. Just click on the image below for more details:
#2) If you want an exact roadmap for building a full-body workout, check out NF Journey. Our fun habit-building app tells you exactly what days to exercise, what days to rest, and helps you track it all so you know if it’s working for you.
Interested?
Try your free trial right here:
#3) Join the Rebellion! We need good people like you in our community, the Nerd Fitness Rebellion.
Sign up in the box below to enlist and get our Rebel Starter Kit, which includes all of our “work out at home” guides, our Strength Training 101 eBook, and much more!
Get your Nerd Fitness Starter Kit
The 15 mistakes you don’t want to make.
Full guide to the most effective diet and why it works.
Complete and track your first workout today, no gym required.
If you want to lose weight, gain muscle, and/or just look and feel better, strength training will do just that.[1]
In this comprehensive series, we’re going to cover EVERYTHING you need to know about getting strong.
By the way, hi. I’m Staci Ardison,Senior Coach for Team NF, with a 455 pound deadlift, and strength training has changed my life.
Here’s that deadlift by the way (at a bodyweight of 150 lbs):
I help men and women get strong with our 1-on-1 Online Coaching Program, and in addition to this strength series, I’d love for our team to help you get strong too:
In this introduction to Strength and Resistance Training, we’ll cover:
This is also quite a lot to absorb, so we’ve combined this article along with the rest of our strength articles into a “Strength Training 101: Everything You Need to Know” guide.
Grab it free when you join the Rebellion by putting your email in the box below.
Download our comprehensive guideSTRENGTH TRAINING 101!
Everything you need to know about getting strong.
Workout routines for bodyweight AND weight training.
How to find the right gym and train properly in one.
#1) Halt and even reverse sarcopenia: As we age our skeletal muscle deteriorates, which is a condition known as sarcopenia. Strength training has been found to reduce the negative effects of sarcopenia allowing us to maintain an independent lifestyle (and out of a nursing home) and live longer.[3]
#2) Prevent disease and degenerative conditions:[4a] Heart disease is the leading cause of death for both men and women.
Strength training helps correct issues relating to cholesterol, high blood pressure, obesity, diabetes, and inactivity – all factors for heart disease.
Cardiologists are even starting to recommend strength training for people who have suffered a heart attack as little as three weeks after the attack.[4b]
#3) Improve the quality of life for people with: arthritis,[5] osteoporosis,[6]Parkinson’s Disease,[7]Down Syndrome,[8] lymphedema,[9]fibromyalgia,[10]who have recently had a stroke,[11]have had a spinal cord injury,[12]cancer survivors[13] and clinical depression.[14] Clinical exercise physiologists working with these special populations listed above strongly recommend incorporating strength training to slow down the progression of their disease or disorder, decrease their risk for other comorbidities, and decrease their risk for premature mortality.[15]
Now, in addition to making life easier LATER, strength training has a lot of great benefits right now.
How Strength Training Will Help You Today:
#1) Lose weight, look good naked: You can find study[16] after study[17] after study[18] that shows you the benefits of strength training for weight management when combined with “calorie restriction.”(eating fewer calories than you burn every day), such as greater fat loss and improvements in muscle mass. Additionally, the combination of these two behaviors also decreases one’s risk for the development of chronic diseases (e.g., CVD) and premature mortality.[19]
#2) Strength training can help increase your metabolism by speeding up your Resting Metabolic Rate (RMR).[20] It takes your body more calories to maintain muscle than it does to maintain fat!
#3) Strength training has a much greater level of excess post-exercise oxygen consumption than aerobic exercise.[21]
What does this mean?
When you finish a workout, your body needs to do a lot of work to replenish itself in order to bring itself back to a normal state (the way it was before you worked out). This takes a lot of energy, and some studies have shown that it can boost your metabolism for up to 38 hours after you finish your workout. If you do your resistance training quickly, minimizing rest intervals in-between sets, you can actually increase this effect.[22]
This is why it’s important to stay off of the phone in-between sets!
In addition to physical improvements, strength training will improve your next doctor’s visit.
How Strength Training Can Make You Healthier:
#1) Strength training increases bone density, builds a stronger heart, reduces your resting blood pressure, improves blood flow, halts muscle loss, helps control blood sugar, improves cholesterol levels, and improves your balance and coordination.[23] This is all great news because this will decrease your risk of developing conditions such as osteoporosis, hypertension, and type 2 diabetes.
#2) Strength training will make you FEEL better: Not only will you find yourself with more energy and confidence, less stress and anxiety,[24] and a better overall mood,[25] but you’ll actually begin to think better (resistance training has been proven to help increase cognitive function[26]).
You may be asking how this is possible?
Strength training allows for neurogenesis and neuroplasticity to take place, which is the process of creating new neural pathways in the brain.
Plus, strength training also allows for certain neurotransmitters (e.g., dopamine) to be released that plays a role in brain health.[27]
And while training too close to bedtime can be a bad idea, exercising earlier in the day has been proven to help prevent sleep apnea and insomnia.[28]
But wait, there’s more!
I even improved my posture from strength training – when I started lifting, I was 5’4”. Now I’m 5’5.5”.[29]
This is also a major concern for today because of prolonged cell phone use, which finds people constantly tilting their head forward and down resulting in neck pain and faulty posture.[30]
#3) Last but not least, strength training is fun! Whether you are looking for the most effective 20-30 minute workout (to stay fit and look great naked), or are looking for a competitive sport that you can really get into, strength training can help you meet your goals.[31]
It’s easy and fun to see progress as you strength train, almost like leveling up (“You gained 100xp and +1 STR with your deadlift today”).
If you’re looking to improve in other areas (a sport, traditional cardio, or an activity like rock climbing), strength training is an easy choice! Strength training will help keep you injury free too.[32]
We have coaching clients from 18 to 80+, and we work on strength training with practically every single one of them due to just how many benefits it provides! We’d love to work with you too:
Who SHOULDN’T strength train?
Trying to be balanced, I wanted to find studies of a single group of people who should not strength train.
But it didn’t go so well…
I found studies on how strength training can be beneficial for paraplegics.[33]
There are also studies that show the benefits for children and adolescents.[34]
You can also find plenty of studies that explain the benefits of strength training for pregnant women.[35]
And thus I’ve decided, not knowing you, you should probably strength train.
IMPORTANT CAVEAT: if you do fall into any of these special populations (e.g., paraplegics, children, pregnant women, etc.) it is imperative that you work with a qualified professional (e.g., clinical exercise physiologist, strength and conditioning coach, etc.).
These qualified professionals will perform a risk stratification and pre-assessments so they can start you off with the perfect training program that will improve your physical and mental health, and will decrease your risk for injury and prevent your condition from progressing to a more severe state.
Oh, and if you are already injured, you should check with a doctor[36]or physical therapist before strength training.
Long story short: EVERYBODY should strength train.
Robots too…probably.
It’s what we’re genetically designed to do: move around, push, pull, jump, and carry things.
What Is Strength Training? The Basics You Need to Know.
“Strength training” of any kind can be explained by two things:
Movement of any weight (including your body weight) – Doing ANY exercise that pushes your muscles outside of their comfort zone, forcing them to rebuild stronger to prepare for the next challenge.
Progressive overload: exerting slightly more effort than last time (lift heavier weight or do 1 more rep) consistently. Your muscles will constantly have to adapt and will constantly be rebuilding themselves to get stronger.[37]
That’s strength training!
If you want 7 different ways to achieve progressive overload, watch this video:
All this means if you do 10 squats and 10 knee push-ups right now, you have completed a strength training workout.
Feel free to do this right now to give yourself a quick win.
And we’re back!
So what’s actually happening to our bodies when we strength train?
Let’s get on our magic school bus and learn about the wonders of muscles!
Here’s what you need to know your muscles and strength training:
We’ve got 642 muscles in our bodies (but who’s counting), and they all work together to help our bodies move, stand, and exist.
When you bend your arm, your biceps contract and your triceps do the opposite (elongate) in order to let your elbow bend.
Every muscle in your body works alongside other muscles to let you move and do things. In this particular example, the biceps is known as the agonist muscle and the triceps is the antagonist.
Strength training starts when you move your bodyweight (doing 10 push-ups), or pick up a weight (a 100 pound deadlift) that is beyond what your body is normally used to.
In other words:
Strength training finds you pushing your muscles outside of their comfort zone.
They “break down” and tear slightly during this workout, and then over the next 24-48 hours they rebuild themselves stronger and more resilient.[38]
This is the foundation of strength training, and it’s called hypertrophy, in which the individual muscle fibers packed into your muscles are growing larger in size.[39]
There are a few types of hypertrophy,[40] which you can nerd out about here (don’t worry, this won’t be on the quiz):
Sarcoplasmic hypertrophy focuses on increasing the amount of sarcoplasm, the non-contractile fluid found in your muscle. This type of hypertrophy helps build overall size.
Myofibril hypertrophy focuses on strengthening the myofibril, the contractile part of the muscle. You are strengthening the actual muscle fiber so it helps you build super dense, strong muscles.
Transient hypertrophy is the temporary increase in muscle size that happens during and immediately after weight training due to fluid accumulation in the intracellular space, that you might know as “the pump”.
“Staci, what does this mean for me?” You might be wondering.
We cover exact strategies in our “How many sets and reps?” guide, but here’s what you need to know:
If you want dense muscle and strength (myofibrillar hypertrophy), keep the reps low and the weight heavy (in the 1 to 5 rep range).
If you’re looking to build muscle size, (sarcoplasmic hypertrophy), do more reps with a lighter weight (in the 8-12 range).
If you’re looking to build cardiovascular health and muscular endurance, hang out in the 12-20 reps per set range.
Please note: each of these rep ranges are NOT exclusive – when you train in a higher rep range you’re not JUST getting size, you’re also getting strength.
And if you get really strong, it can also help you with size and endurance.
#2)Recovery: The general rule is to wait 48 hours before working the same muscle group again. For example, if you trained your biceps and triceps today, then you should wait 48 hours before hitting them again. However, recovery is different for everyone depending on many different factors such as what the actual workout is, how old you are, your sleep quality, diet, and other recovery elements (such as massage, including the popular massage guns, foam rolling, and stretching).[42]
#3) Soreness after a workout: The day after an intense strength training workout – or 2 days after – you’re going to be VERY sore. This is called “Delayed Onset Muscle Soreness(DOMS)”. It’s a normal part of the process of repairing your muscles from the damage to the fibers you created while exercising. More recently, research evidence has found that the eccentric part of a lift, or the part of the lift in which the muscles are lengthening and stretching, produces the greatest degree of soreness.[43]
Expect to be more sore after doing an exercise for the first few workouts. As your muscles get used to that movement (and adapt to being put under stress), they will get less and less sore every time.
If you are sore, don’t skip the next workout!
That’s because:
The best way to alleviate soreness is to continue exercising.
This increases blood flow to the muscles and helps them heal.[44]
Already overwhelmed and just want to be told what to do? I hear you. It’s why we created our coaching program:
Can I strength train to lose weight?
We get questions relating to weight loss and strength training all the time, and it’s a BIG part of this entire Strength 101 series.
Let me quickly address it here:
Fat and muscle are two different things – one can’t transform into the other.
We all have plenty of muscle right now (otherwise we wouldn’t be able to move, walk, sit up, etc.), the muscle is just hiding underneath a layer of body fat.
In order for us to lose weight and look better, we want to do two things:
Build our muscles stronger and tighter.
Burn the fat on top of it!
And luckily, both of those things happen simultaneously through strength training!
So NO, you don’t need to lose weight first before you start strength training.
You will lose weight BY strength training (and keep the muscle you have).
You do NOT need to do hours of cardio for weight loss – weight loss is 90% a result of your nutrition. So honestly, you don’t need to ever set foot on a treadmill again (unless you WANT to).
Strength training will help you lose weight and look better IF you do two key things for effective weight loss:
As we cover in our “Why can’t I lose weight” article (full of fun Harry Potter references), combining a caloric deficit and strength training is magic:[45]
You’re not consuming enough calories to carry out your body’s daily functions. Our bodies require enough calories to support normal physiological functions such as heart rate and breathing. Additionally, enough calories are needed to help maintain our blood glucose, which is the major energy source for our brains.[46]
Your body needs to use lots of calories to rebuild the muscle that was broken down during the strength training workouts. Our bodies use calories to facilitate a process known as protein synthesis, which is the process of muscle hypertrophy.[47]
Your body has no choice BUT to pull from fat stores to get stuff done! As mentioned earlier, higher-intensity strength training results in a greater post-exercise oxygen consumption, resulting in greater caloric expenditure post-exercise.[48]
Just by doing those two things (get strong, reduce calories), all sorts of wizardry and witchcraft takes place in your body:
Get stronger and keep the muscle you have.
Build tight dense muscle.
A revved up metabolism while rebuilding muscle.
Burning of body fat to get things done.
Yeah, you’re hearing me correctly.
Lose the body fat that sits on top of your muscles and you’ll make your muscles tighter and denser = look better without clothes on.
Oh, what’s that? You just want somebody to tell you exactly how to train for your body, and how to eat for your goals?
Fine!
Check out our 1-on-1 Coaching Program– it’s helped thousands of people lose weight through strength training – and proper nutrition. We work with you on habit building and lifestyle design to actually get stuff done!
I cited dozens of studies above that show strength training is beneficial for people of all ages. And even for the frail elderly, studies have shown that drastic resultsare possible in just 10 weeks of weightlifting (for both men and women in their 70s through their 90s).[49]
In fact, weight training has also been shown to delay Alzheimer’s and stave off dementia.[50] As mentioned earlier, strength training allows for neurogenesis and neuroplasticity to take place, which is the process of creating new neural pathways in the brian. And, strength training also allows for the dopamine (i.e., neurotransmitter) to be released that plays a role in brain health.[51]
Research has also shown that older adults can safely engage in higher-intensity strength training resulting in improvements in strength, body composition, disease status, and independent lifestyle.[52]
So, if you think you might be “too old,” you’re probably the exact type of person that SHOULD be strength training!
Team NF’s Steve’s gramma is 89 and she strength trains. You are not too old!
We have plenty of coaching clients who are retired and just STARTING to strength train now in their 50s or 60s+. In fact one of our coaches, Kerry, is certified as a Functioning Aging Specialist, and you better believe she has her clients strength training!
By the way, if you are 90+ and reading Nerd Fitness, please email us at contact@nerdfitness.com – I’d love to hear from you 🙂
Will Lifting Weights Make Me Bulky?
No (unless you are TRYING to get bulky).
Let me first address this from a women’s point of view, then I’ll get to the men.
Or Christina, who got strong as hell, lost 31 total inches, and now crushes sets of pull-ups!
That “bulky” look in women does not happen by mistake or overnight – we simply do not have the hormones necessary to get there on our own.
To achieve this look, women have to eat incredible amounts of food and consume incredible amounts of drugs.
When we strength train normally, without these supplements, we end up looking like athletes.
And for the men: if your fear is getting too bulky, you can rest easy. Steve, creator of Nerd Fitness, has spent his entire life trying to get “too bulky.” It was only after fixing his diet (and hiring an online coach) that he went from Steve Rogers to Captain America.
That’s right, strength training is only 10% of the “slim down or bulk up” equation. The other 90% is nutrition and total calories consumed.
Want to lose weight? Strength train + caloric restriction. It is recommended that you seek a calorie deficit by consuming 250-500 less calories per day below your typical calorie intake. This will result in a realistic weight loss goal of 1-2 pounds per week.[53]
Want to get bigger? Strength train + caloric surplus. It is recommended that you seek a calorie surplus by consuming 250-500 additional calories above your typical calorie intake. This will result in a realistic gain in lean muscle mass of about 0.5 pounds per week.[54]
“My focus is on running/basketball/quidditch and I need to stay slim! How do I strength train for this scenario?”
Studies have shown that strength training increases the endurance of your muscles.[55]
In fact, resistance training and weight training not only help to tune up an out of shape nervous system and increase the activation of motor units within your muscles, but also helps increase their overall endurance. More specifically, strength training can result in improvements in how much force muscles can generate and also how much fatigue they can resist leading to better exercise economy.[56]
You just have to keep challenging your muscles and get strong as heck.
Look at any gymnast, male or female – those physiques are built through bodyweight training!
To progress in bodyweight exercises, you need to start, so you have something to advance from. You can begin by trying our beginner bodyweight routine RIGHT NOW:
It’s super fun building your own program, but many people just want to follow a plan that they know is aligned with their goals. If you hate gyms and still want to get strong, let us help!
How to Start Strength Training Today: Next Steps
If you’re ready to start, fantastic.
We’d recommend a simple program to get your feet wet.[57] You know, to learn the movements, build some confidence and prove to yourself that you can DO this!
If you want to take the Next Step, here’s how Team Nerd Fitness (that’s us!) can help you:
1) Work with a professional Yoda! If you want confidence that you’re following a program that is tailor-made for your busy life, situation, and goals, check out our popular 1-on-1 Coaching Program.
You’ll work with a certified NF instructor who will get to know you better than you know yourself, keep you accountable, and help you reach your goals.
2) Join our amazing free community, the Nerd Fitness Rebellion! It’s free to join, and we provide you with free goodies like our Strength Training 101 ebook when you sign up:
Download our comprehensive guideSTRENGTH TRAINING 101!
Everything you need to know about getting strong.
Workout routines for bodyweight AND weight training.
How to find the right gym and train properly in one.
3) Read ALL of the other amazing resources on Nerd Fitness. We’ve published millions of words over 800+ articles at Nerd Fitness that you can read, but these are the guides that will be the most helpful to you on your journey:
Portugal EM, Vasconcelos PG, Souza R, Lattari E, Monteiro-Junior RS, Machado S, Deslandes AC. Aging process, cognitive decline and Alzheimer`s disease: can strength training modulate these responses? CNS Neurol Disord Drug Targets. 2015;14(9):1209-13. doi: 10.2174/1871527315666151111121749. PMID: 26556087
A look at strength training and sleep apnea is right here.
For more on strength training and posture, read “Effects of a Resistance and Stretching Training Program on Forward Head and Protracted Shoulder Posture in Adolescents.” Source, PubMed.
Al-Hadidi F, Bsisu I, AlRyalat SA, Al-Zu’bi B, Bsisu R, Hamdan M, Kanaan T, Yasin M, Samarah O. Association between mobile phone use and neck pain in university students: A cross-sectional study using numeric rating scale for evaluation of neck pain. PLoS One. 2019 May 20;14(5):e0217231. doi: 10.1371/journal.pone.0217231. PMID: 31107910; PMCID: PMC6527223
The important thing to keep in mind is that you have to find the exercises that are most enjoyable to you. Research has found that when you find something to be more enjoyable you are likely to adhere to it.
Zwolski C, Quatman-Yates C, Paterno MV. Resistance Training in Youth: Laying the Foundation for Injury Prevention and Physical Literacy. Sports Health. 2017 Sep/Oct;9(5):436-443. doi: 10.1177/1941738117704153. Epub 2017 Apr 27. PMID: 28447880; PMCID: PMC5582694
A look at strength training during pregnancy is right here.
“I went to the doctor. All he did was suck blood from my neck. Do not go see Dr. Acula” – RIP Mitch Hedberg. ”
In other words, in order to achieve your training goals or to see improvements, your training must gradually and constantly increase. Keep in mind that if the overload increases too quickly, poor technique and injury may result. And if the overload progresses too slowly, improvements will be minimal or non-existent. Rest and recovery must also be included in the progression, as training hard all the time could result in chronic fatigue, a decrease in performance, and eventually injury. Soucre: Haff G, Triplett NT. (2016). Essentials of strength training and conditioning. Fourth edition. Champaign, IL: Human Kinetics
Don’t worry though, this “break down” and tearing does not hurt and the only thing you may experience is muscle soreness.
This totally sounds like something you’d win in Super Smash Bros.
Powers SK, Howley ET. (2011). Exercise physiology: Theory and application to fitness and performance. New York: McGraw-Hill Humanities/Social Sciences/Languages
Powers SK, Howley ET. (2011). Exercise physiology: Theory and application to fitness and performance. New York: McGraw-Hill Humanities/Social Sciences/Languages
Powers SK, Howley ET. (2011). Exercise physiology: Theory and application to fitness and performance. New York: McGraw-Hill Humanities/Social Sciences/Languages
Remember what we said earlier, incorporating both strength training and calorie restriction (i.e., eating less) has been found to result in greater fat loss and improvements in muscle mass. Additionally, the combination of these two behaviors also decreases one’s risk for the development of chronic diseases (e.g., CVD) and premature mortality. For more, read “A carbohydrate-restricted diet during resistance training promotes more favorable changes in body composition and markers of health in obese women with and without insulin resistance.” Source, PubMed.
Spano MA, Kruskall LJ, Thomas DT. (2018). Nutrition for Sport, Exercise, and Health
Spano MA, Kruskall LJ, Thomas DT. (2018). Nutrition for Sport, Exercise, and Health
It should also be noted that when our bodies pull from fat stores to get things done, a few things happen that results in less caloric expenditure: first, we are forced to exercise at a lower-intensity resulting in a lower caloric expenditure, and second, we have a lower post-exercise oxygen consumption resulting in less caloric expenditure post-exercise. So, we need to consume enough calories so we can engage in higher-intensity exercise and have a greater caloric expenditure.
Moro T, Tinsley G, Bianco A, Gottardi A, Gottardi GB, Faggian D, Plebani M, Marcolin G, Paoli A. High intensity interval resistance training (HIIRT) in older adults: Effects on body composition, strength, anabolic hormones and blood lipids. Exp Gerontol. 2017 Nov;98:91-98. doi: 10.1016/j.exger.2017.08.015. Epub 2017 Aug 15. PMID: 28821429
Spano MA, Kruskall LJ, Thomas DT. (2018). Nutrition for Sport, Exercise, and Health
Spano MA, Kruskall LJ, Thomas DT. (2018). Nutrition for Sport, Exercise, and Health
One such study on strength training and endurance is right here.


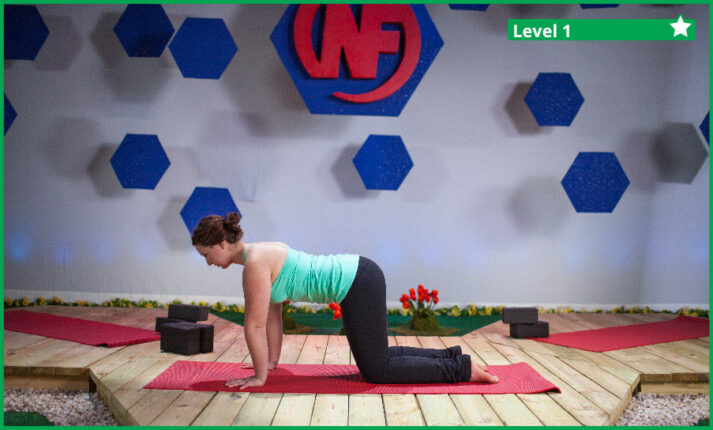
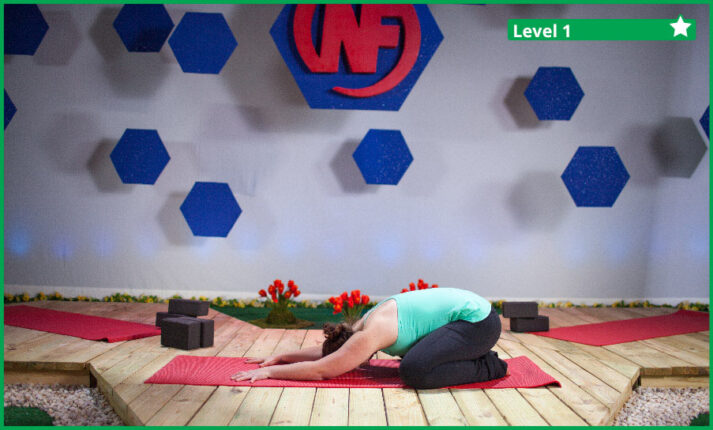
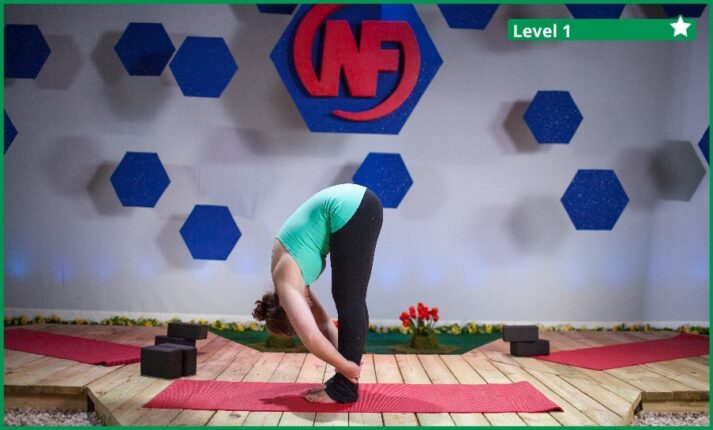
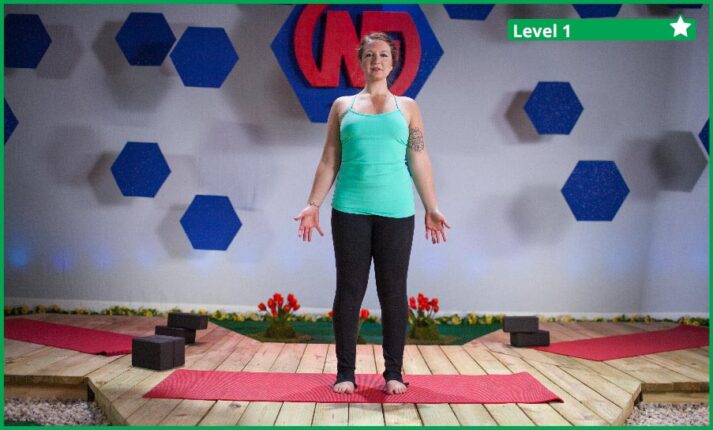
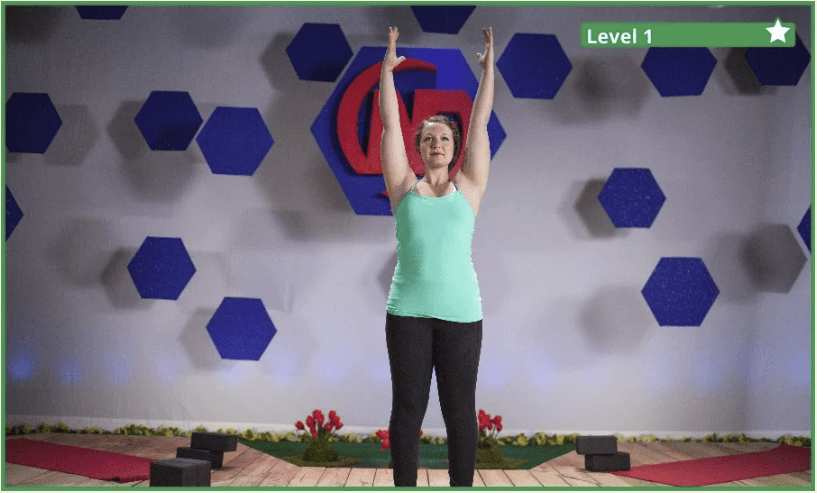
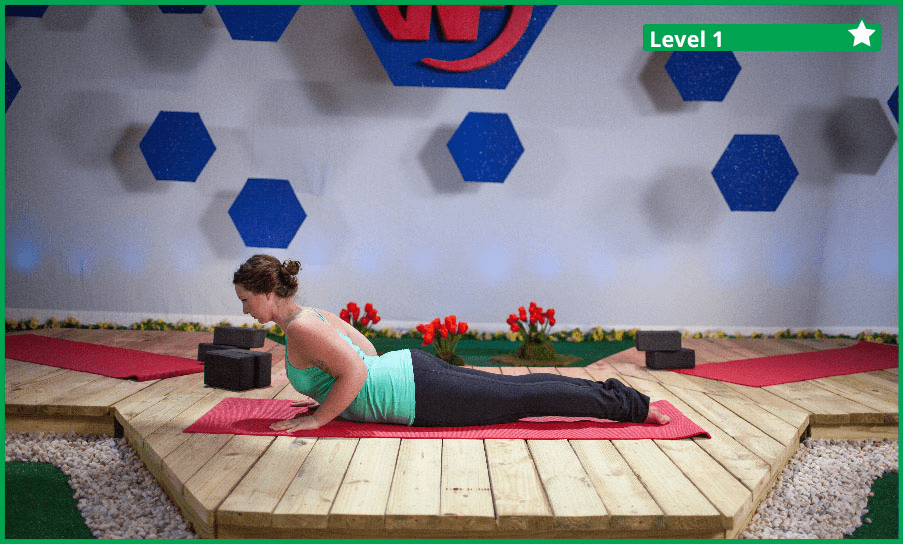
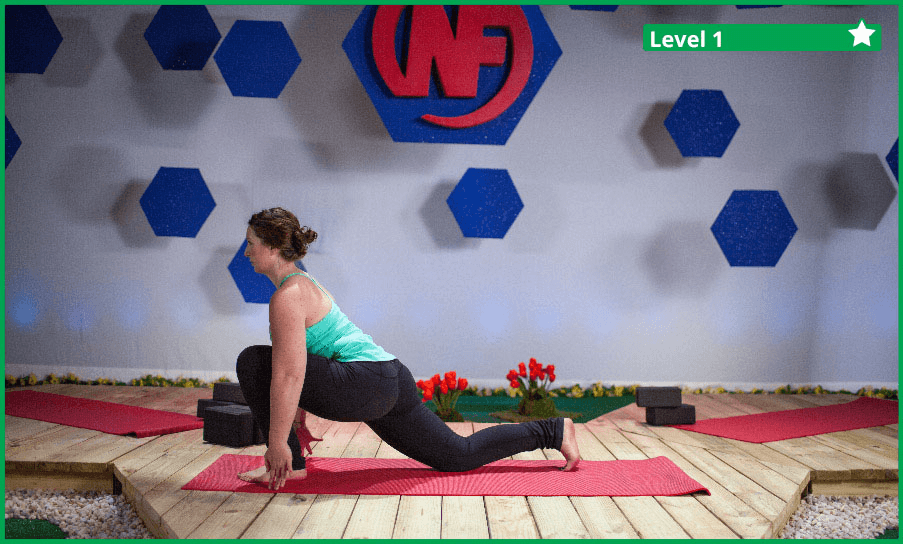

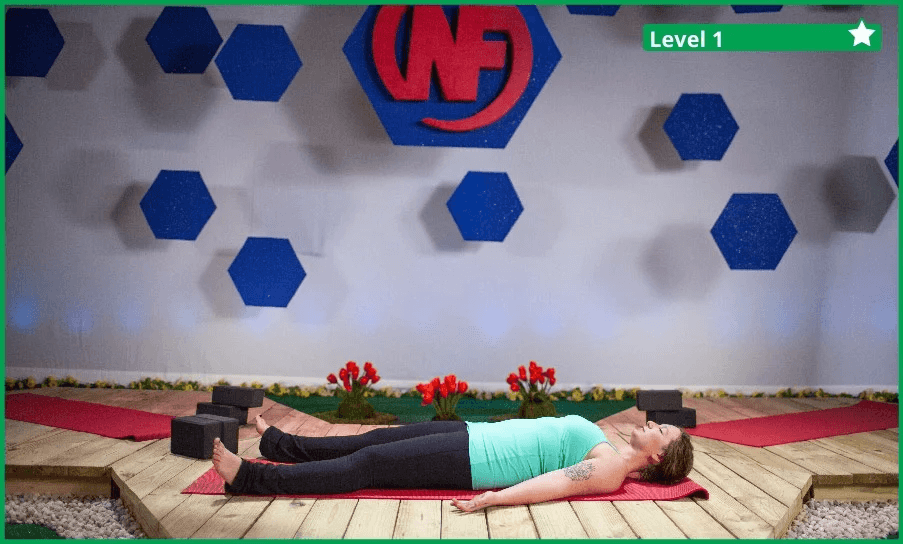
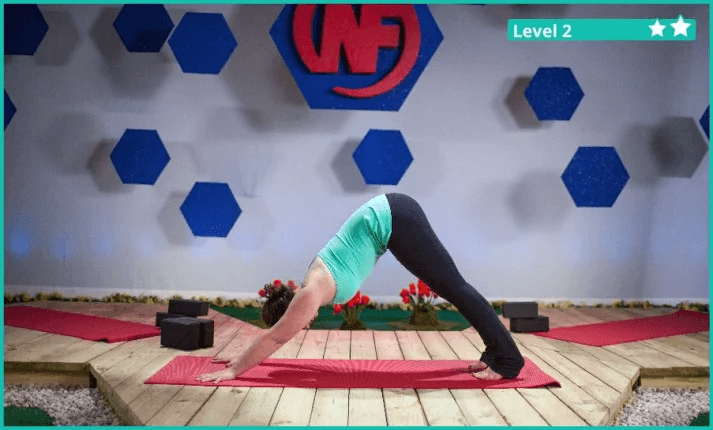
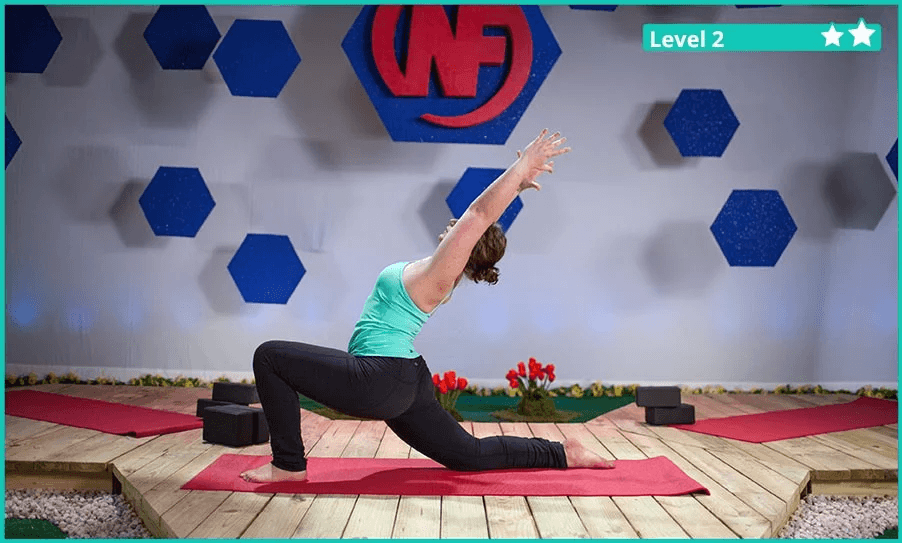
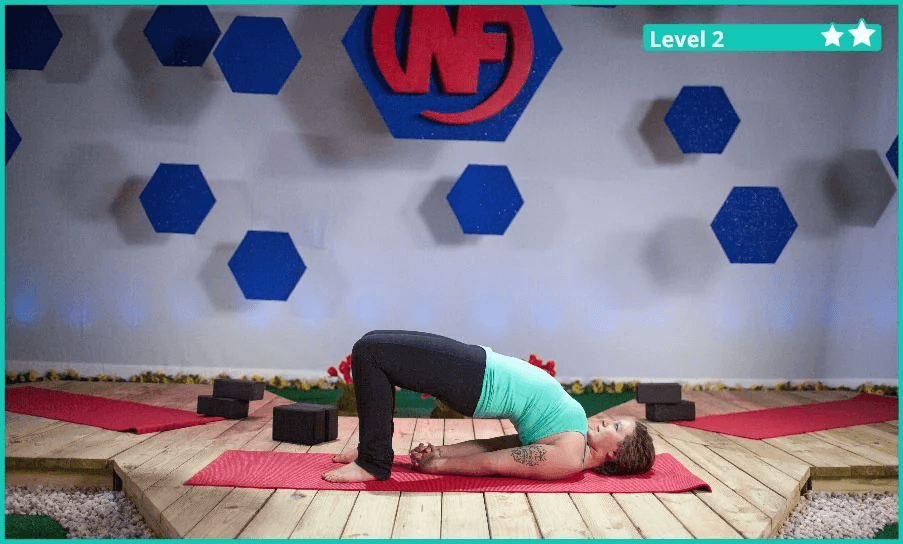
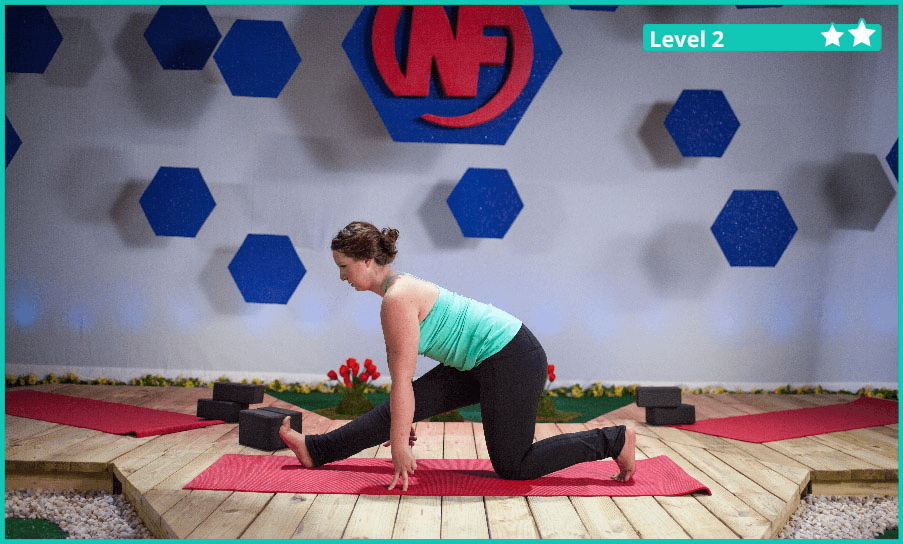

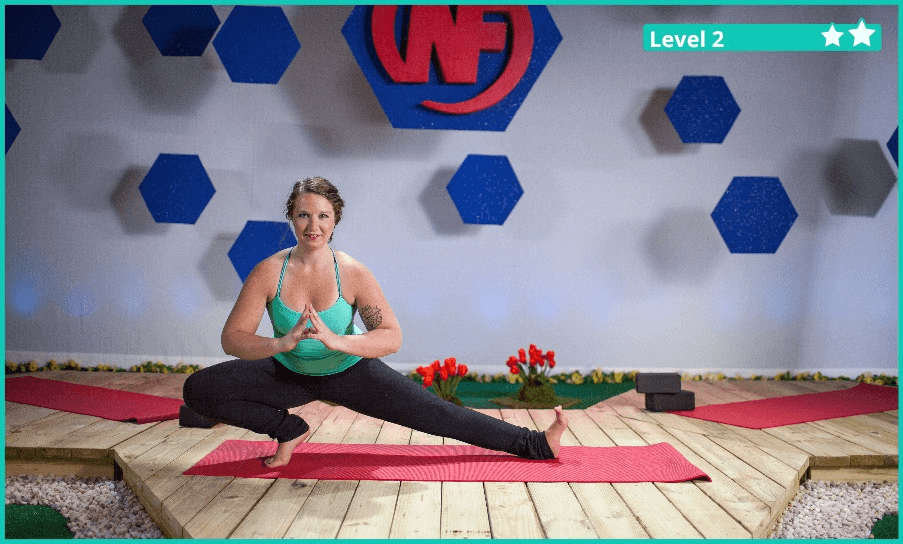
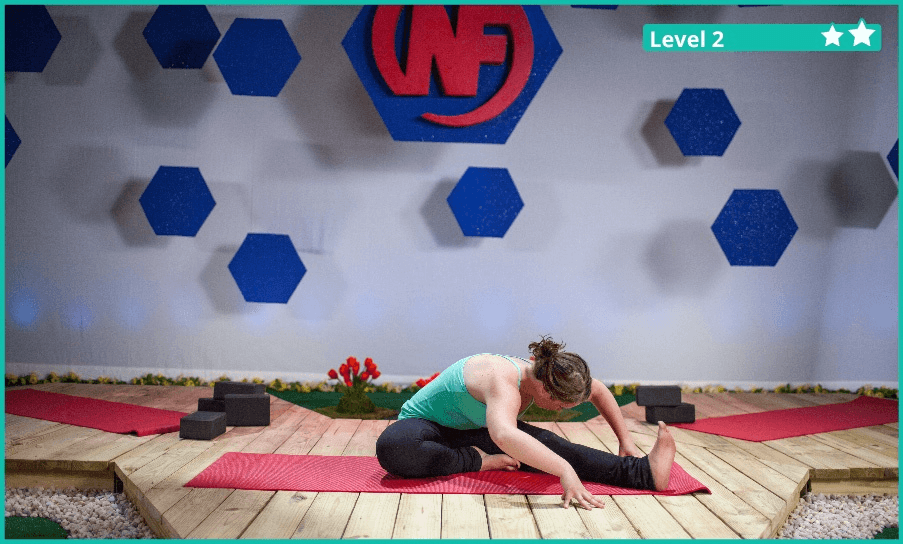
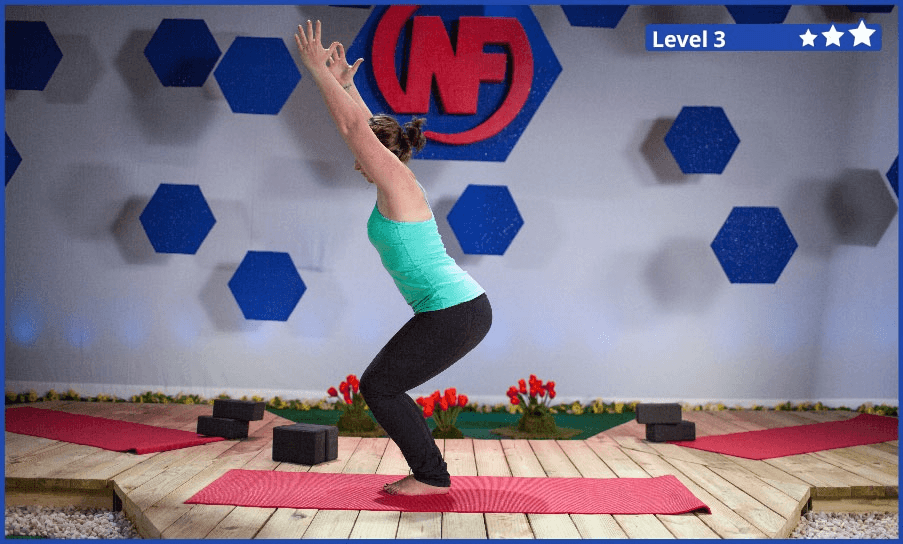

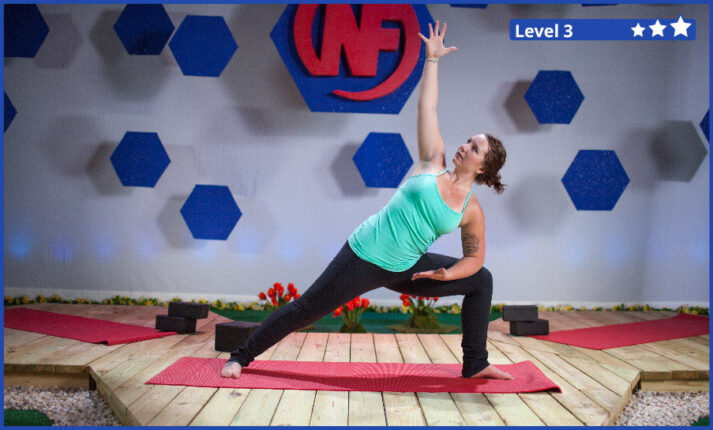
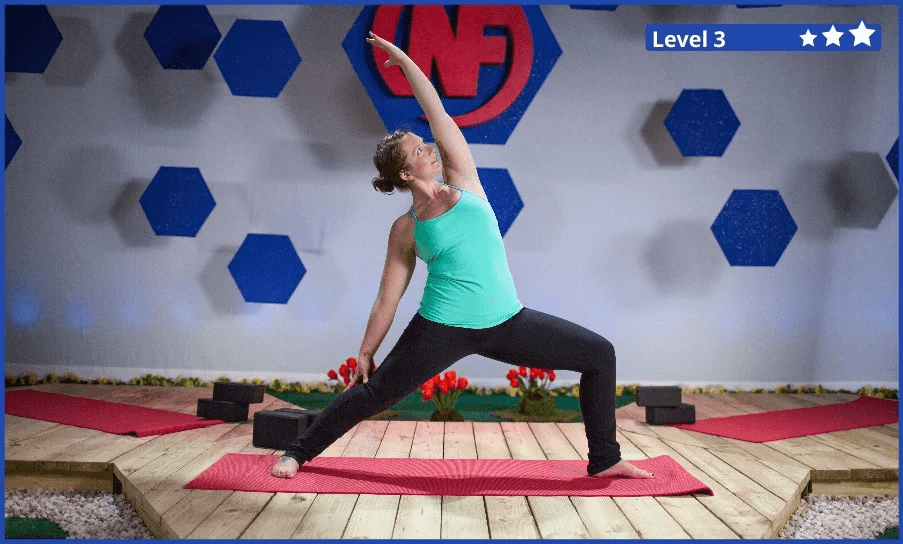


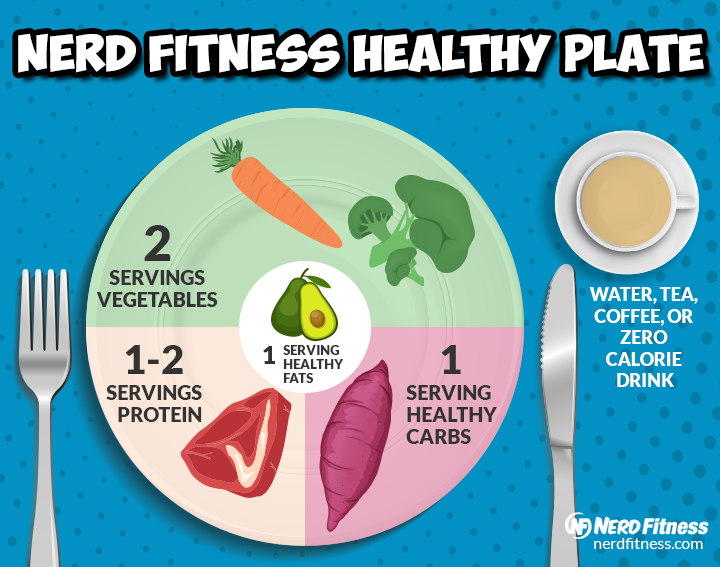

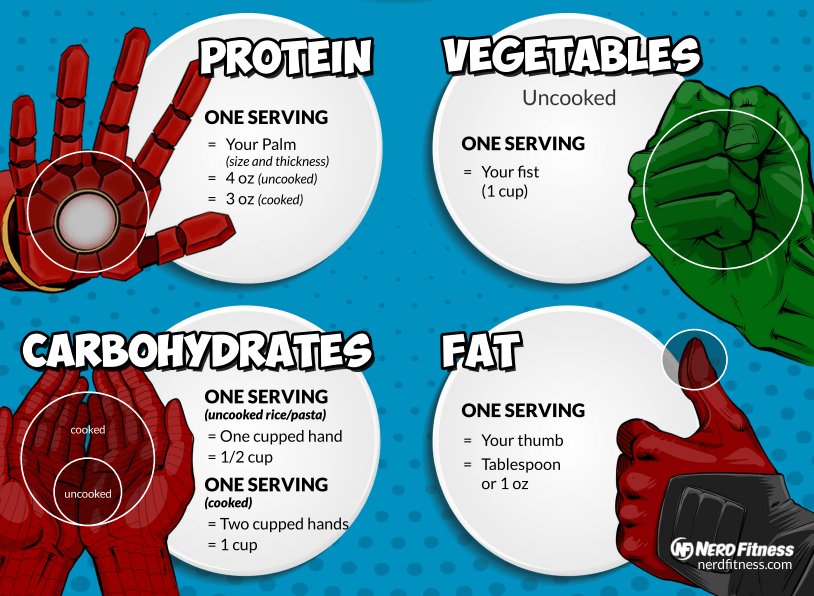
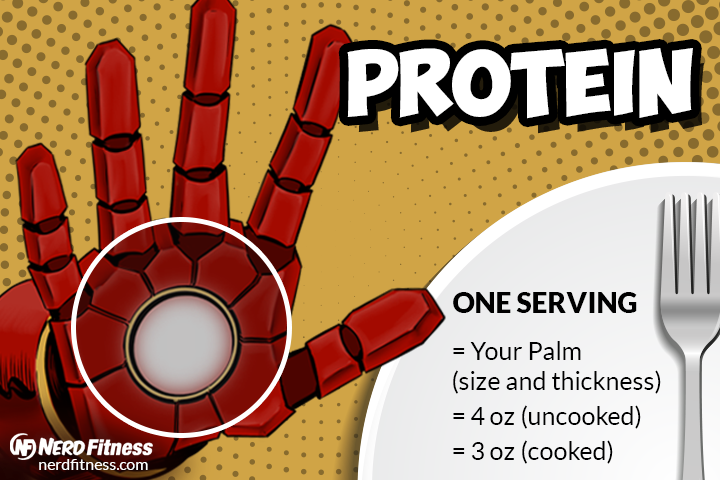
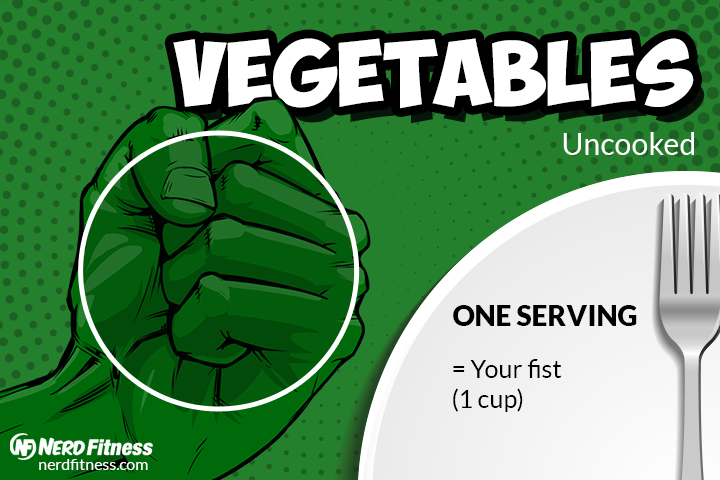

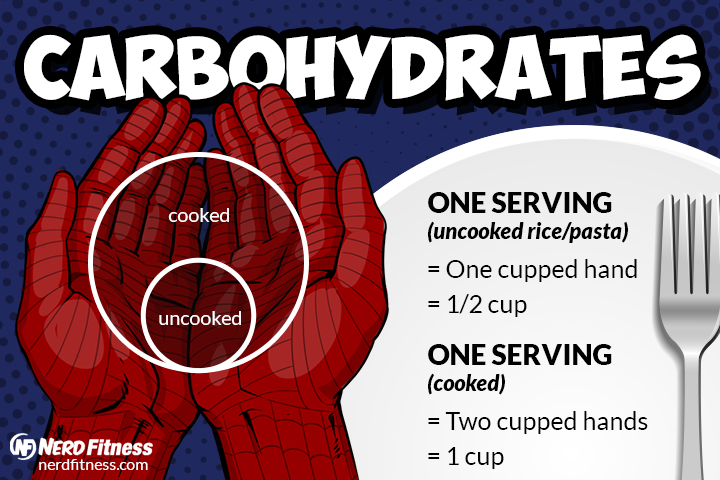
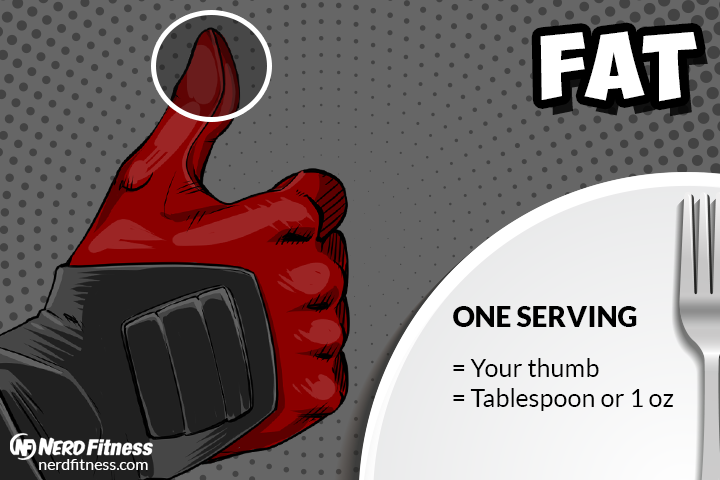


 Most of these only require you throwing the bag into the microwave, opening it, and putting it on your plate.