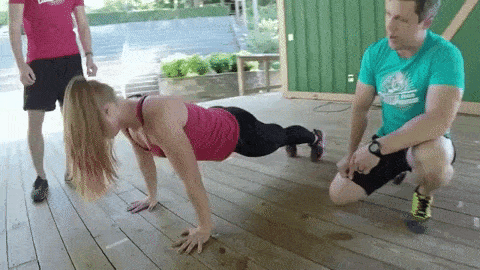
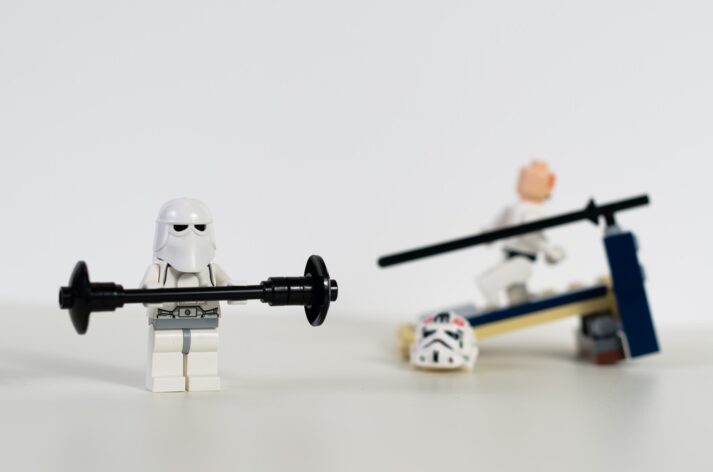
As we mention in our Guide to Bodyweight Training, you really don’t need any equipment to get a full-body workout in. You just need the right plan.
Let me show you what I mean.
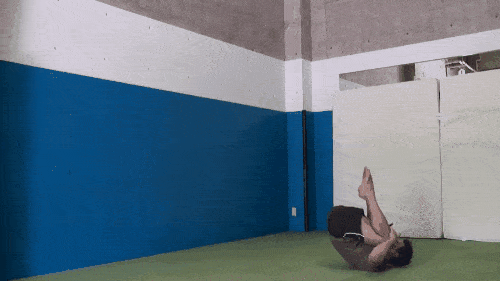
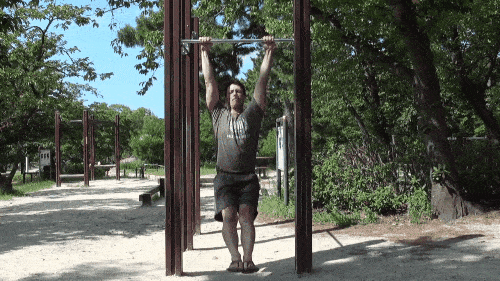
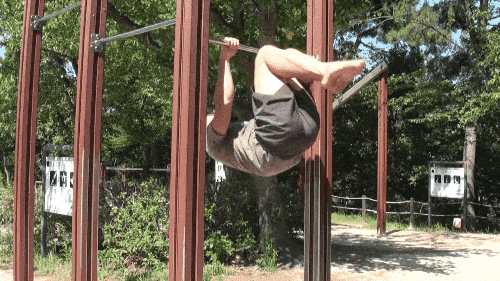
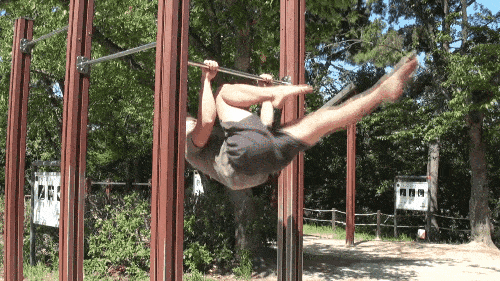
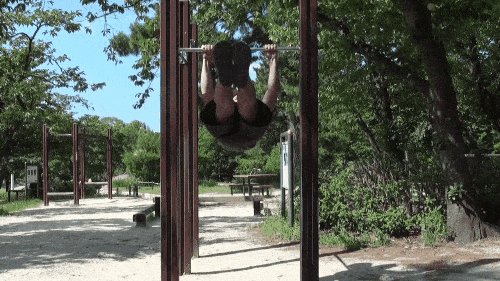
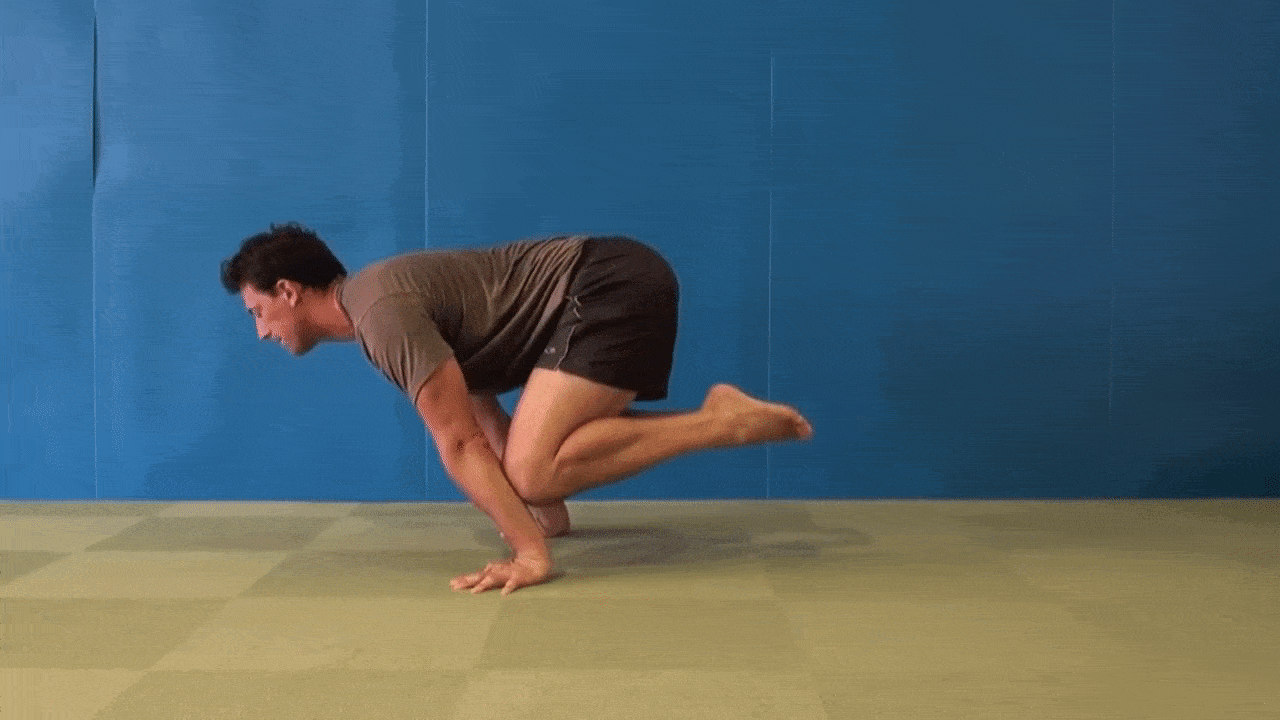
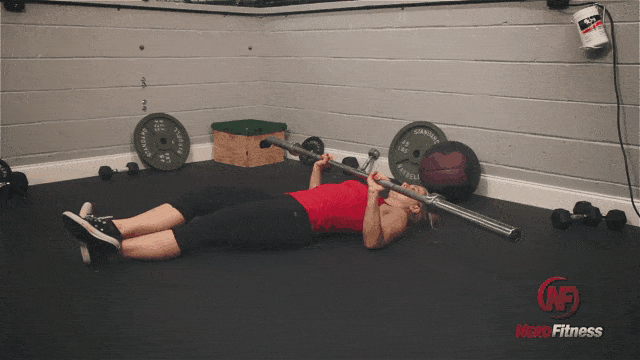
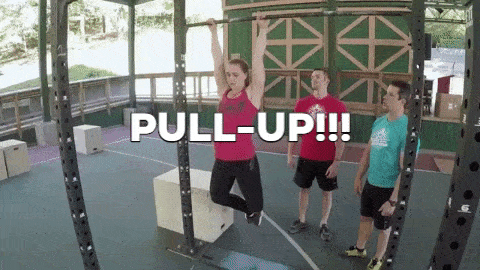
The Batman Workout DAY 1
The Batman Workout Day 1:
Squat Jump
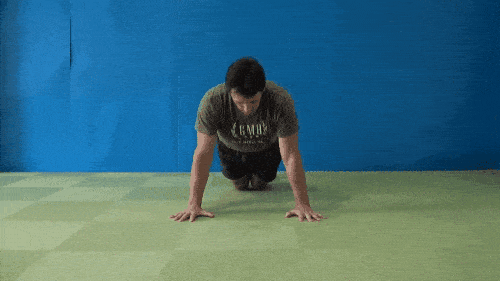
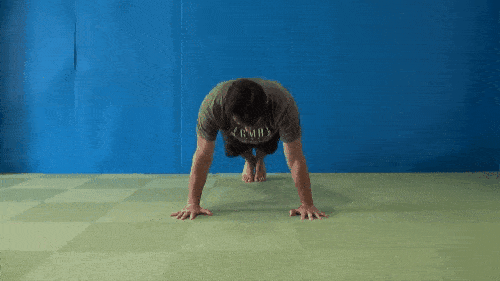
Push-Ups
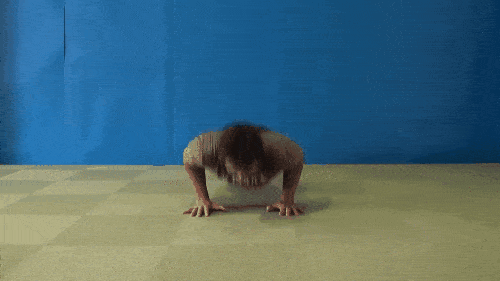
Headstand Push-ups
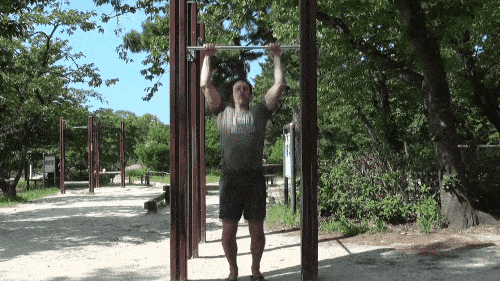
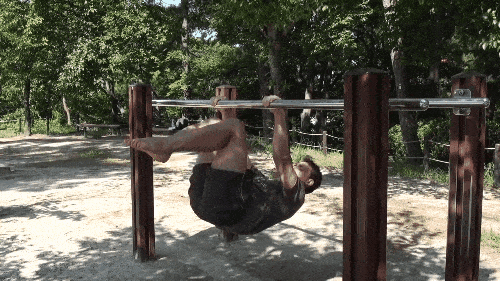
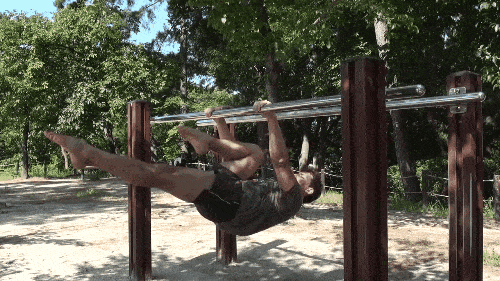
Pull-ups
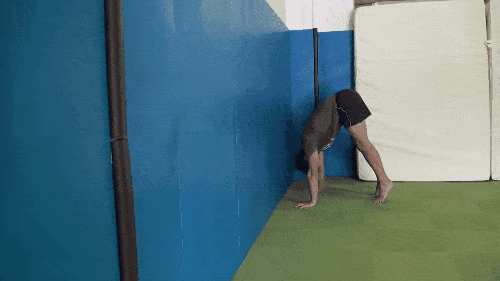
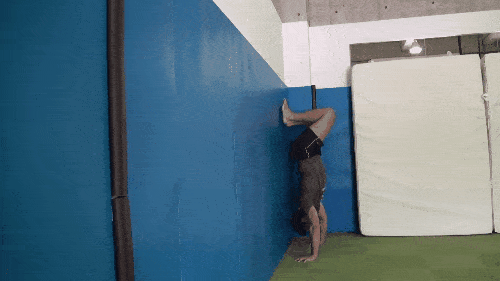
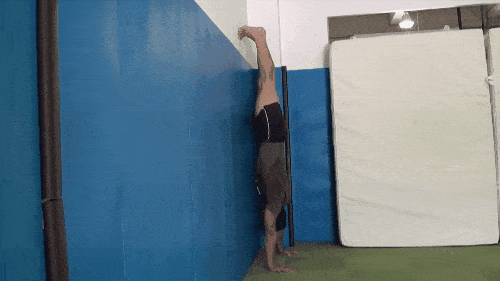
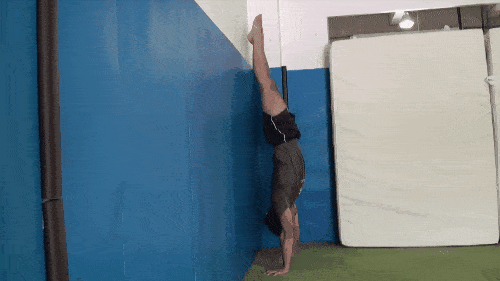
Handstand
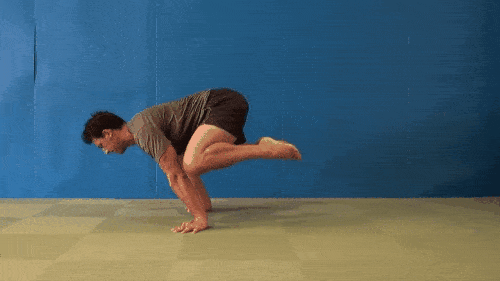
Depending on your experience level, we can go with a Beginner or Advanced variation.
Day 1 – Beginner:
Rolling Squat Tuck-up Jumps
Side-to-Side Push-ups
Modified Headstand Push-ups
Jump Pull-Up with Tuck
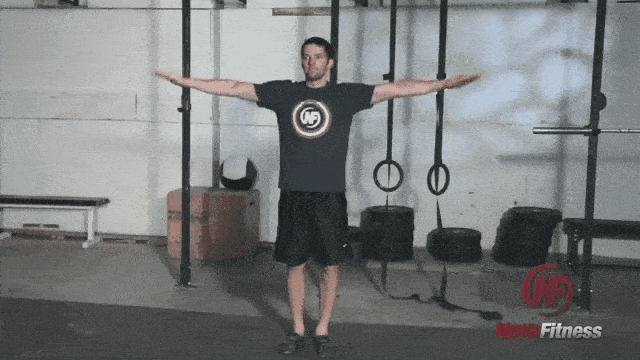
Handstands Against Wall
Day 1 – Advanced:
Rolling Single-Leg Tuck-up Jumps
Exploding Push-ups (Standard to Wide to Right Front/Left Back to Left Front/Right Back)
Headstand Push-Ups
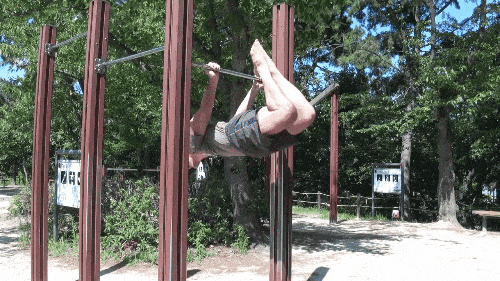
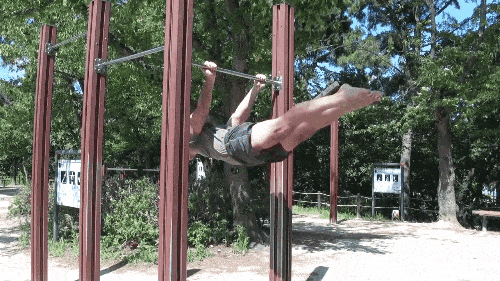
Ice Cream Makers
Free Standing Handstands
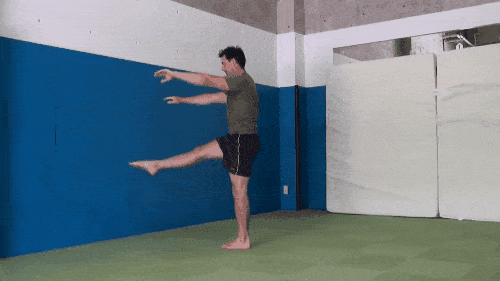
The Batman Workout DAY 2
The Batman Workout Day 2:
180-Degree Jump
Front Lever
Back Lever
Planche
Again, we can roll with a Beginner or Advanced variation.
Day 2 – Beginner:
180-Degree Jump Turns
Front Lever Hold with Tuck
Back Lever Hold with Tuck
Low Frog Hold
Day 2 – Advanced :
Single-Leg Jump 180 Degree Turn
Front Lever Hold
Back Lever Hold
Floating Frog Hold
Exercises Covered in the Batman Workout
Let’s now cover the exercises in the workouts found above.
#1) Squat Jump
#2) Single Leg Squat Jump
#3) Side-to-Side Push-up (Knee)
#4) Side-to-Side Push-up
#5) Exploding Push-ups
#6) Modified Handstand Push-up
#7) Handstand Push-up
#8) Jump-up Pull-up with Tuck
#9) Pull-up with Tuck
#10) Ice Cream Maker – Tucked
#11) Ice Cream Maker – Can Opener
#12) Ice Cream Maker – Front Lever
#13) Handstand (In)
#14) Handstand (Out)
#15) 180-Jump Turn
#16) 180-Jump Turn – Single Leg
#17) Front Lever – Tuck
#18) Front Lever – Can Opener
#19) Back Lever – Tuck
#19) Back Lever
#20) Low-Frog Hold
#21) Floating Frog
FAQ on The Batman Workout
Let’s answer some of your questions on the Batman Workout.
#1) When should I advance on with the workout?
Once you get proficient at a level, go up one level for that exercise and work on mastering that within the workout.
Don’t try and jump up to the next progression too quickly. Focus on form and performing each rep as cleanly as you can. That is what will get you strong and help you master the moves. Be sure to:
#2) How many reps should I do? How long should I perform the holds?
Perform no more than 5 reps per movement for up to 3 sets.
Work on performing holds for 5 to 8 seconds per set.
Perform all sets of one exercise before moving on to the next exercise.
#3) How often should I do the Batman Workout?
Give yourself at least a day of rest in between the workouts.
You can even add in sprints or intervals on your off days for extra stamina work if you would like.
#4) What if I don’t have a bar?
In the video below, Coach Jim walks you through what to do if you don’t have a pull-up bar:
#5) Can I wear a cap while doing the Batman Workout?
Yes.
Get strong without picking up a weight
Maybe you hate gyms. Maybe you travel like crazy. Maybe you just enjoy exercising outdoors.
No matter your reason, You CAN build muscle and size or simply lose weight and get in shape with only bodyweight exercises.
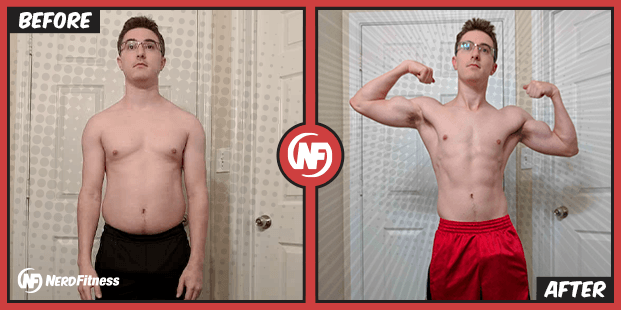
Just ask Jimmy here:
Jimmy didn’t want to leave his home to train, so we helped him build a plan to do just that.
Want some help from us too?
No problem!
Here’s how Nerd Fitness can get you ready to fight crime:
1) If you want step-by-step guidance, a custom bodyweight training program that levels up as you get stronger, and a coach to keep you accountable, check out our killer 1-on-1 coaching program:
2) If you want an exact blueprint for working out at home, check out NF Journey. Our fun habit-building app helps you exercise more frequently, eat healthier, and level up your life (literally).
Try your free trial right here:
3) Join the Rebellion! We need good people like you in our community, the Nerd Fitness Rebellion.
Sign up in the box below to enlist and get our guide, Strength Training 101: Everything You Need to Know. It’ll help you start incorporating bodyweight moves into your training.
Download our comprehensive guideSTRENGTH TRAINING 101!
Everything you need to know about getting strong.
Workout routines for bodyweight AND weight training.
How to find the right gym and train properly in one.
Theses exercises are a quick and effective way to improve posture. Minimal or no equipment needed for reduction in back pain & shoulder aches. After spending the last couple of years working from home even more than usual, I’ve found…
What makes me so confident you’ll be able to reach your little piggy wiggies?
Because we teach even the most “inflexible” of folks how to touch their toes in our 1-on-1 Online Coaching Program, and we’ll share with you all our secrets below.
Here’s what we’ll cover in our guide, How to Touch Your Toes:
If you want to increase your flexibility, you’re gonna need to stretch.[1] It’s how you make your muscles elastic and strong.
Why bother though? What’s the big deal about being able to touch your toes?
The benefits of stretching include:
Increase range of motion. If you can move a joint through its full range of motion, you’re gonna have more freedom of movement. Confidently navigating the physical world is a sign of a healthy nerd, which is why flexibility shouldn’t be overlooked. One of the best ways to become more flexible is to stretch.[2]
Improve posture.If you want to stop slouching so much, regularly stretching may help.[3] Stretching works to improve muscle imbalances, which in turn might help your posture.
Alleviate back pain.If you suffer from back pain, it might be worth starting a stretching routine .[4] The muscles in your back might be tight, restricting your range of motion, which causes pain. Stretching can help loosen up the area, plus strengthen the muscle. This might help prevent future injury.
Stretching, and the flexibility that comes with it, should not be overlooked when building a workout routine.
While there are many indicators of good flexibility, one of the most popular is undoubtedly being able to touch your toes.
After all, it was so important the President had all American schoolchildren perform the “Sit and Reach” test to see if they could grab their feet.[5]
Touching your toes might have been a struggle for you then. It might still be a struggle for you now.
What’s going on?
Why Can’t I Touch My Toes?
If you are unable to touch your toes, it’s most likely because of one of these four major reasons:
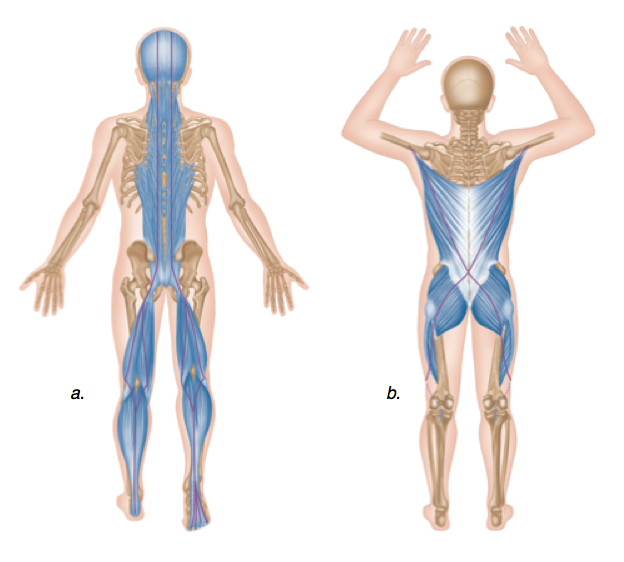
#1) Shortened/tight posterior chain muscles. Although most people think not being able to touch our toes just means your hamstring muscles are inflexible, in reality our whole system (including the lower back) can play a huge role as well! As Mark Rippetoe explains in this video about the Romanian deadlift, what you may think is a lower back issue is also a hamstring issue (and vice versa):
You see, the posterior chain is an interconnected series of muscles that includes our back muscles, erector spinae (muscles along our spine), lower back muscles, butts, and hamstrings.
The posterior chain is shown here:
Weak mobility points in one place in the system can become debilitating (and often easy to spot) when we do compound movements like the deadlift.
If you’re somebody who sits at a desk all day and struggles to touch your toes, you probably aren’t strengthening or lengthening these muscles because the chair is doing all of the work for you.
#2) You have relatively long legs compared to your torso and arms. People with long legs and short torsos will have a greater challenge than people who have short legs and long torsos and arms.
But fear not, you too can level up and get those toes touched.
#3) You have too much body fat. If you are overweight and happen to have a big stomach, it can certainly make touching one’s toes more challenging. Because you already know that diet is 90% of the battle when it comes to weight loss, focus on nutrition to begin losing weight (here are the 5 rules of weight loss to help you begin). This may be a factor in making it easier to touch your toes.
#4) You’re not warmed up yet. If you JUST woke up or spent all day in a car, you’re familiar with the rigidity that makes you feel like a steel girder. Your muscles act like rubber bands; the more they are used, the more they are warmed-up, and the further they can stretch. This is why we encourage people to go through a mobility warm-up before exercise!
Let’s put a plan in place to finally touch our toes!
Determining Your Initial Flexibility (We All Start Somewhere)
Before we can implement a strategy to develop more flexibility that allows you to touch your toes, we need to know your starting point.
As Peter Drucker said, “That which gets measured gets managed.” Or in this case, that which gets measured gets more flexible!
Stand straight with your legs about hip-width apart. You want your legs to be straight, but don’t aggressively lock out your knees either (this feels like a “microbend” to a lot of people).
Begin by bending and leaning forward towards the ground with your quads (front of your legs).
Let your body rest naturally, as if you were a ragdoll. Keeping your hands relatively close together, straighten your fingers and begin to stretch down slowly to the ground.
Do this 2-3 times to get warmed up. Try to keep your legs straight by flexing or activating your quads; keep your legs straight, without locking your knees.
Other than the microbend, don’t bend your knees to help you get closer to the ground! I’m watching you. If you’re videotaping yourself on these to track your progress, note that depending on your body (and your hamstrings) your legs may not look 100% straight.
When you are ready, reach towards the ground and hold it for a few seconds. Measure the distance in one of the following ways:
If you aren’t touching the ground, have a friend measure the distance from the tip of your fingers to the ground. If you don’t have a friend with you, place your hands on your legs and note where the tips of your fingers end up.
If you can touch the ground, you’ll want to flatten your hands as much as possible, and record the distance from the top of your head to the ground. As you can stretch further, the top of your head will actually get closer and closer to the ground.
If this seems easy, try hugging your calves and pulling your head in towards your body.
Record your measurement in a document or on a piece of paper (if you’re part of the flexibility challenge, we have a document you can print out), and/or save the photo/video to show how far down you are reaching.
The 4 Best Stretches to Touch Your Toes (Improve Your flexibility)
There are two key factors that will determine whether or not you are successful in gaining the ability to touch your toes as you practice over the next few weeks:
Actively stretching your muscles JUST past the point of comfort. Like strength training by adding 1 rep or a few pounds to an exercise, we want to stretch just beyond the point where we stretched last time so our muscles have to elongate.
Consistent practice and effort! You can’t improve your flexibility by stretching for 5 minutes once a month. You’d be better off stretching for 30 seconds spread out 10 times throughout the month.
That’s right. Studies confirmed that actively focusing on touching your toes for 30 seconds, 3 times per week was enough to lengthen hamstring muscles in 4 weeks. [6]
I‘m sure there’s an inappropriate joke to be made here about 30 seconds of effort, but I’m better than that (I think).
In less time than it takes to update your Facebook status, you could be touching your toes and make Gumby proud.
HOW TO TOUCH YOUR TOES (CONSISTENT FLEXIBILITY PRACTICE):
All I’m asking for is 2 minutes. 2 minutes! You can even spread these movements out throughout your day – I like to do them after I work out. After a long day at a desk, after driving, or upon waking up are all good times to work on flexibility!
Through each of the movements below, make sure you are breathing slowly and steadily.
You can follow along with all of the movements below that come from our really fun online course, Nerd Fitness Yoga (part of NF Prime). It’s essentially yoga for people that don’t do yoga.
THE 4 BEST STRETCHES TO TOUCH YOUR TOES:
Standing toe touch stretch – 30 seconds
Cat/Camel – 30 seconds (switch positions every 5 seconds)
Star stretch – 30 seconds (as many slow reps as you can)
Moon the sky – 30 seconds (as many slow reps as you can)
1) Standing toe touch stretch: Flex/activate the front of your legs, keep them straight, and bend over at the waist juuuust past the point of discomfort; hold that position for 30 seconds. Repeat this process every other day and hold it for 30 seconds.
2) We can loosen up a tight lower back by doing 30 seconds of moving back and forth every few seconds by doing a “cat” and then a “cow”:
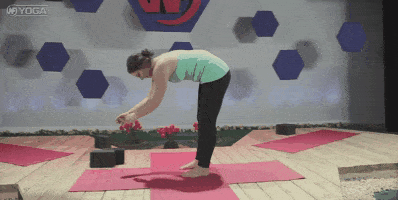
3) You can also do what we call a star stretch to help stretch those legs out! Stand with your legs spread wide, and arms extended (hence the term Star!), and then reach down with one hand to your opposite leg; hold for five seconds, back to start, and repeat with the other leg.
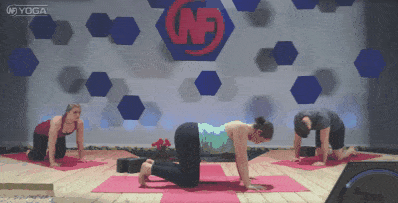
4) Here’s another favorite movement of mine that helps improve my flexibility and mobility: the “Moon the Sky” stretch!
This is a great stretch to mix into your pre-workout warmup to get your legs, butt, and back prepared for work:
Squat down and put your hands under your feet
Slowly move your butt up with your hands remaining under your feet.
Raise your butt and try to straighten your legs
Go a TEENY bit higher each time until you can fully straighten your legs!
For any of the above moves, a good way to check your form would be to record a video of yourself and match it against the videos and gifs here. If they look close, you’re doing great!
If you want to have an expert review your stretches, our coaches can do just that in our snazzy app!
How to Become More Flexible (Next Steps)
It’s now time to train to touch your toes!
Test your toe-touching abilities before and after doing the 2-minutes of exercise above, and I bet you’ll notice a difference right away – just wait to see what you can accomplish in a few weeks!
The cool thing about flexibility is that any combination of the stretches above will help you improve your flexibility as long as you consistently work on it a tiny bit every day.
At the end of my day for a minute or two before bed
All added up, it’s less than 5 minutes of time, but it’s enough to show me some results!
If you follow our guide above, you’ll be well on your way to increasing your flexibility and touching your toesie wosies.
You just need to start!
Want some help getting going? A little extra push out the door?
We built three perfect next steps for increasing your flexibility!
#1) Work with a professional Yoda! If you want confidence that you’re following a program that is tailor-made for your busy life, situation, and goals, check out our popular 1-on-1 Coaching Program.
Many of our clients have “increased flexibility” as one of their fitness goals, and they take comfort knowing a certified NF instructor is guiding them there.
#2) Exercising at home and need a plan to follow? Check out Nerd Fitness Journey!
Our fun habit-building app helps you exercise more frequently, eat healthier, and level up your life (literally).
Try your free trial right here:
#3) Join our amazing free community, the Nerd Fitness Rebellion! Not only is it free to join, but we’ll provide you with loads of free goodies when you sign-up:
Get your Nerd Fitness Starter Kit
The 15 mistakes you don’t want to make.
Full guide to the most effective diet and why it works.
Complete and track your first workout today, no gym required.
That should just about do it for our guide on How to Touch Your Toes.
Now, your turn:
Can you touch your toes?
Does attempting to “sit and reach” bring back horrors from grade school?
Any other tips or tricks for mobility training?
Let us know in the comments!
-Steve
PS: Make sure you check out the rest of our Mobility Training series:
Read, “Effect of an exercise program for posture correction on musculoskeletal pain.” Source, PubMed.
Read, “Stretching and strengthening are key to healing and preventing back pain.” Source, Harvard Health Publishing.
A practice that has now been discontinued.
Read,“The effectiveness of 3 stretching techniques on hamstring flexibility using consistent stretching parameters.” Source, PubMed. Here’s another study that shows 30 seconds of effort results in a more flexible frame!
I’d like to think I’m like most people, in that I try to avoid things I don’t like. In this case, I’m talking about cycling up hills. I’m not a fan of hills in any scenario to be honest, but…
Let’s get you comfortable using the bench press, starting today!
We specialize in helping people pick up barbells for the first time. So if the bench press makes you worry…DON’T PANIC. We’ll set you up with a plan so you can use it safely and effectively.
This guide is part of our Strength Training 101 series. I would encourage you to check out the rest of the articles if you’re just starting your weight training.
If you’re in a rush, you can download the entire guide for free when you enlist in the Rebellion (that’s us!), by joining our free bi-weekly newsletter:
Download our comprehensive guideSTRENGTH TRAINING 101!
Everything you need to know about getting strong.
Workout routines for bodyweight AND weight training.
How to find the right gym and train properly in one.
How Important is the Bench Press?
For the last 30-40 years, the bench press has become the universal lift for bros everywhere to determine how strong someone truly is.
You know, questions like:
How much do you bench?
Do you even lift?
As popular as it is, the bench press in its current form is less than 100 years old.
Until the 1930’s, people did a movement called the “floor press”, which was similar to a bench press only done from the floor.
In fact, at first many people did a movement called a “belly toss” – where the bar would come down and bounce off the belly to help the lifter get it back up.
The three movements – bench press, belly toss, and floor press were all popular until the 40’s and 50’s, when the bench press started to become more and more popular, as bodybuilders liked how the bench worked their pecs (better than the other two movements).
Arnold benches, for sure.
As the bench press became more and more popular, powerlifting emerged in the 1970’s and separated itself from weightlifting as a sport of its own.
What Muscles Does the Bench Press Utilize?
The bench press is a great movement to have as a part of your strength program, and one move we consider to be a part of the “big 4” basic lifts.
Some of the issues coaches have with the bench press (such as a tight chest creating bad posture) don’t come from benching itself, but come from bench being one of the ONLY movements in your program, and can disappear when incorporated as a part of a well-rounded strength program.
In other words, don’t JUST train using the bench press.
The bench press is widely known as a “chest” exercise, however, that’s definitely not all it is.
The bench press trains:
Shoulders
Triceps
Forearms
Lats
Pecs
Traps
Rhomboids
Plus pretty much every muscle in your upper body
However, the bench press doesn’t JUST use your upper body.
When you bench properly, you use your lower back, hips, and legs as well. Just like our other main lifts (the squat, deadlift, and overhead press), the bench press, while putting an emphasis on specific muscle groups, is a full-body movement.
Think about it – while you’re benching, the rest of your body is not just lying there doing nothing.
Your entire body should be working – your shoulders are pinched together and your lats are engaged, while your back, hips and legs are tight, stabilizing your entire body to create a solid base and help you generate drive from the round.
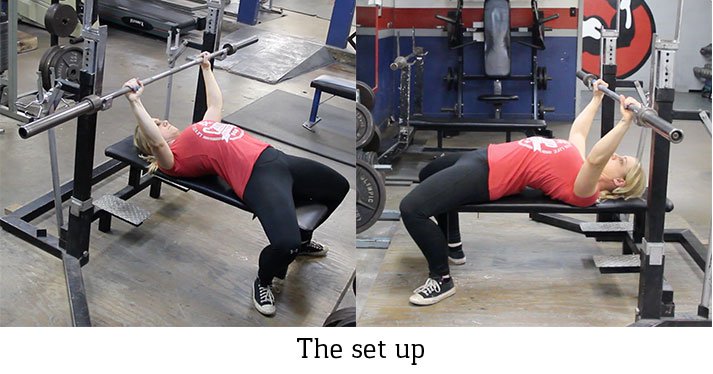
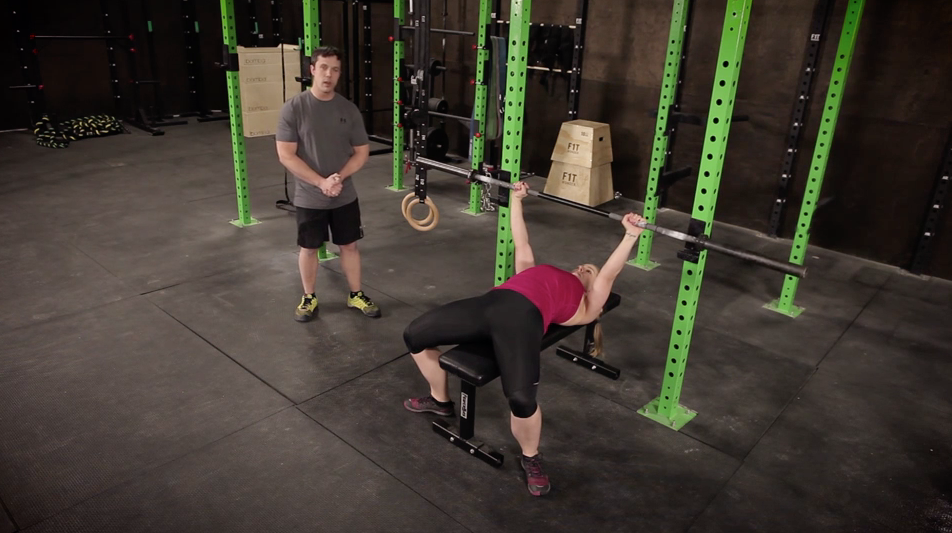
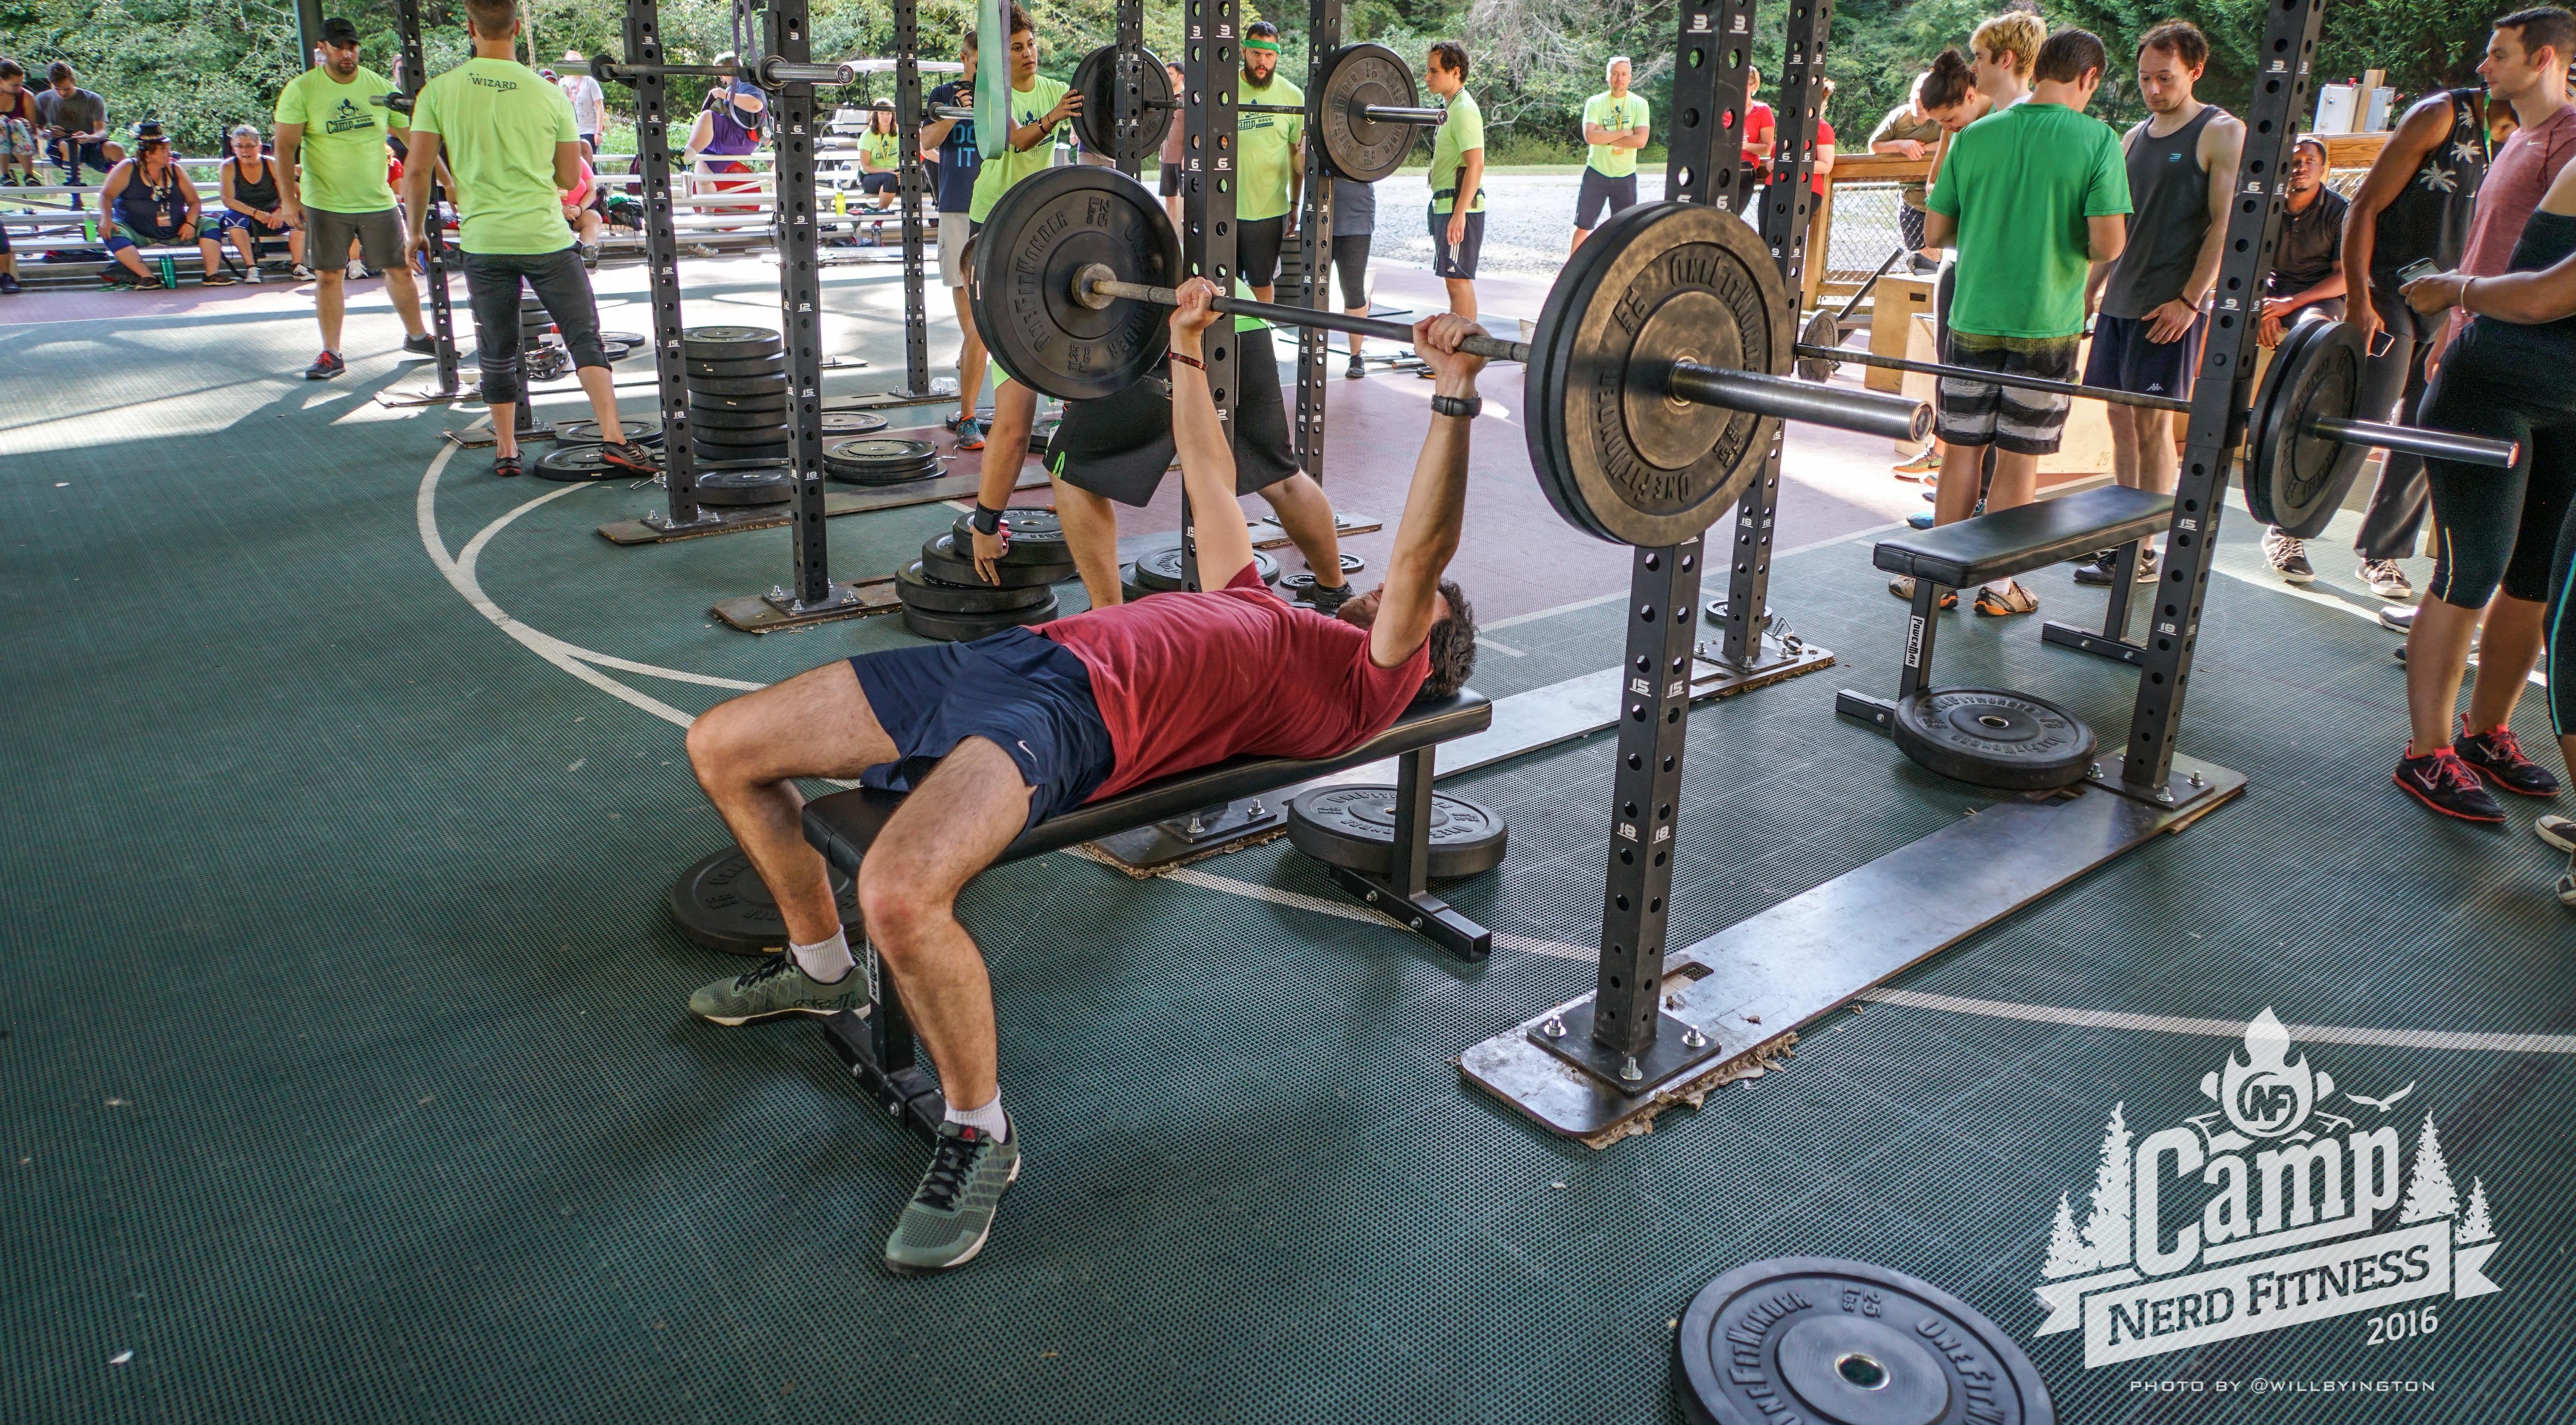
How to bench press: The Setup
There are a lot of different ways to perform the bench press.
We’ll start you out with a standard and basic bench press variation, which we believe is the best (and safest) method for general strength.
Remember: just because you see someone benching a ridiculous amount of weight at the gym does not mean they are using proper or safe form.
They could be an advanced athlete who is making compromises to their form (knowingly or unknowingly) in order to bench higher numbers.
What do you need to perform the bench press?
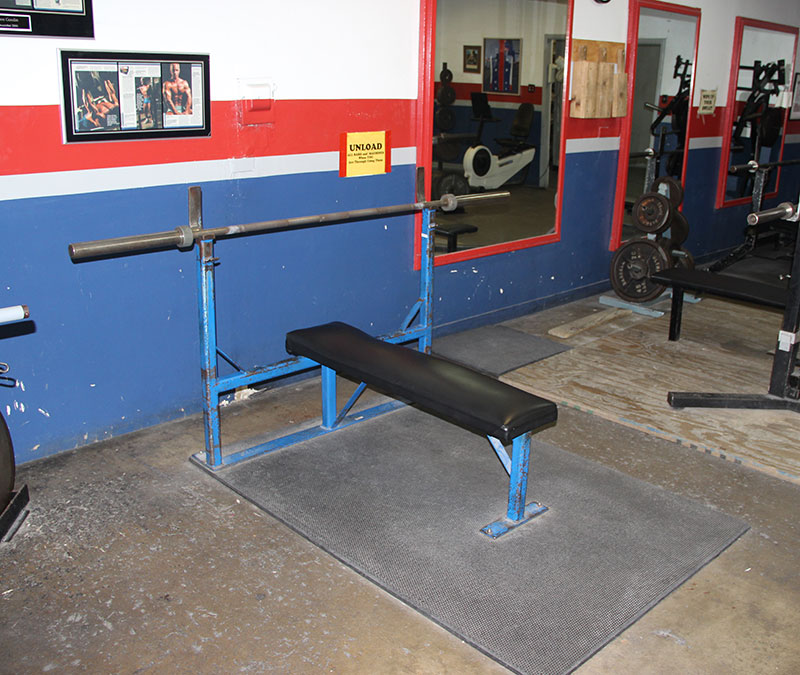
A weight bench with uprights:
Barbell – the standard weight is 45 lbs, but this may be too heavy to start. No matter how strong you are, I recommend starting with a PVC pipe or broomstick to learn proper form.
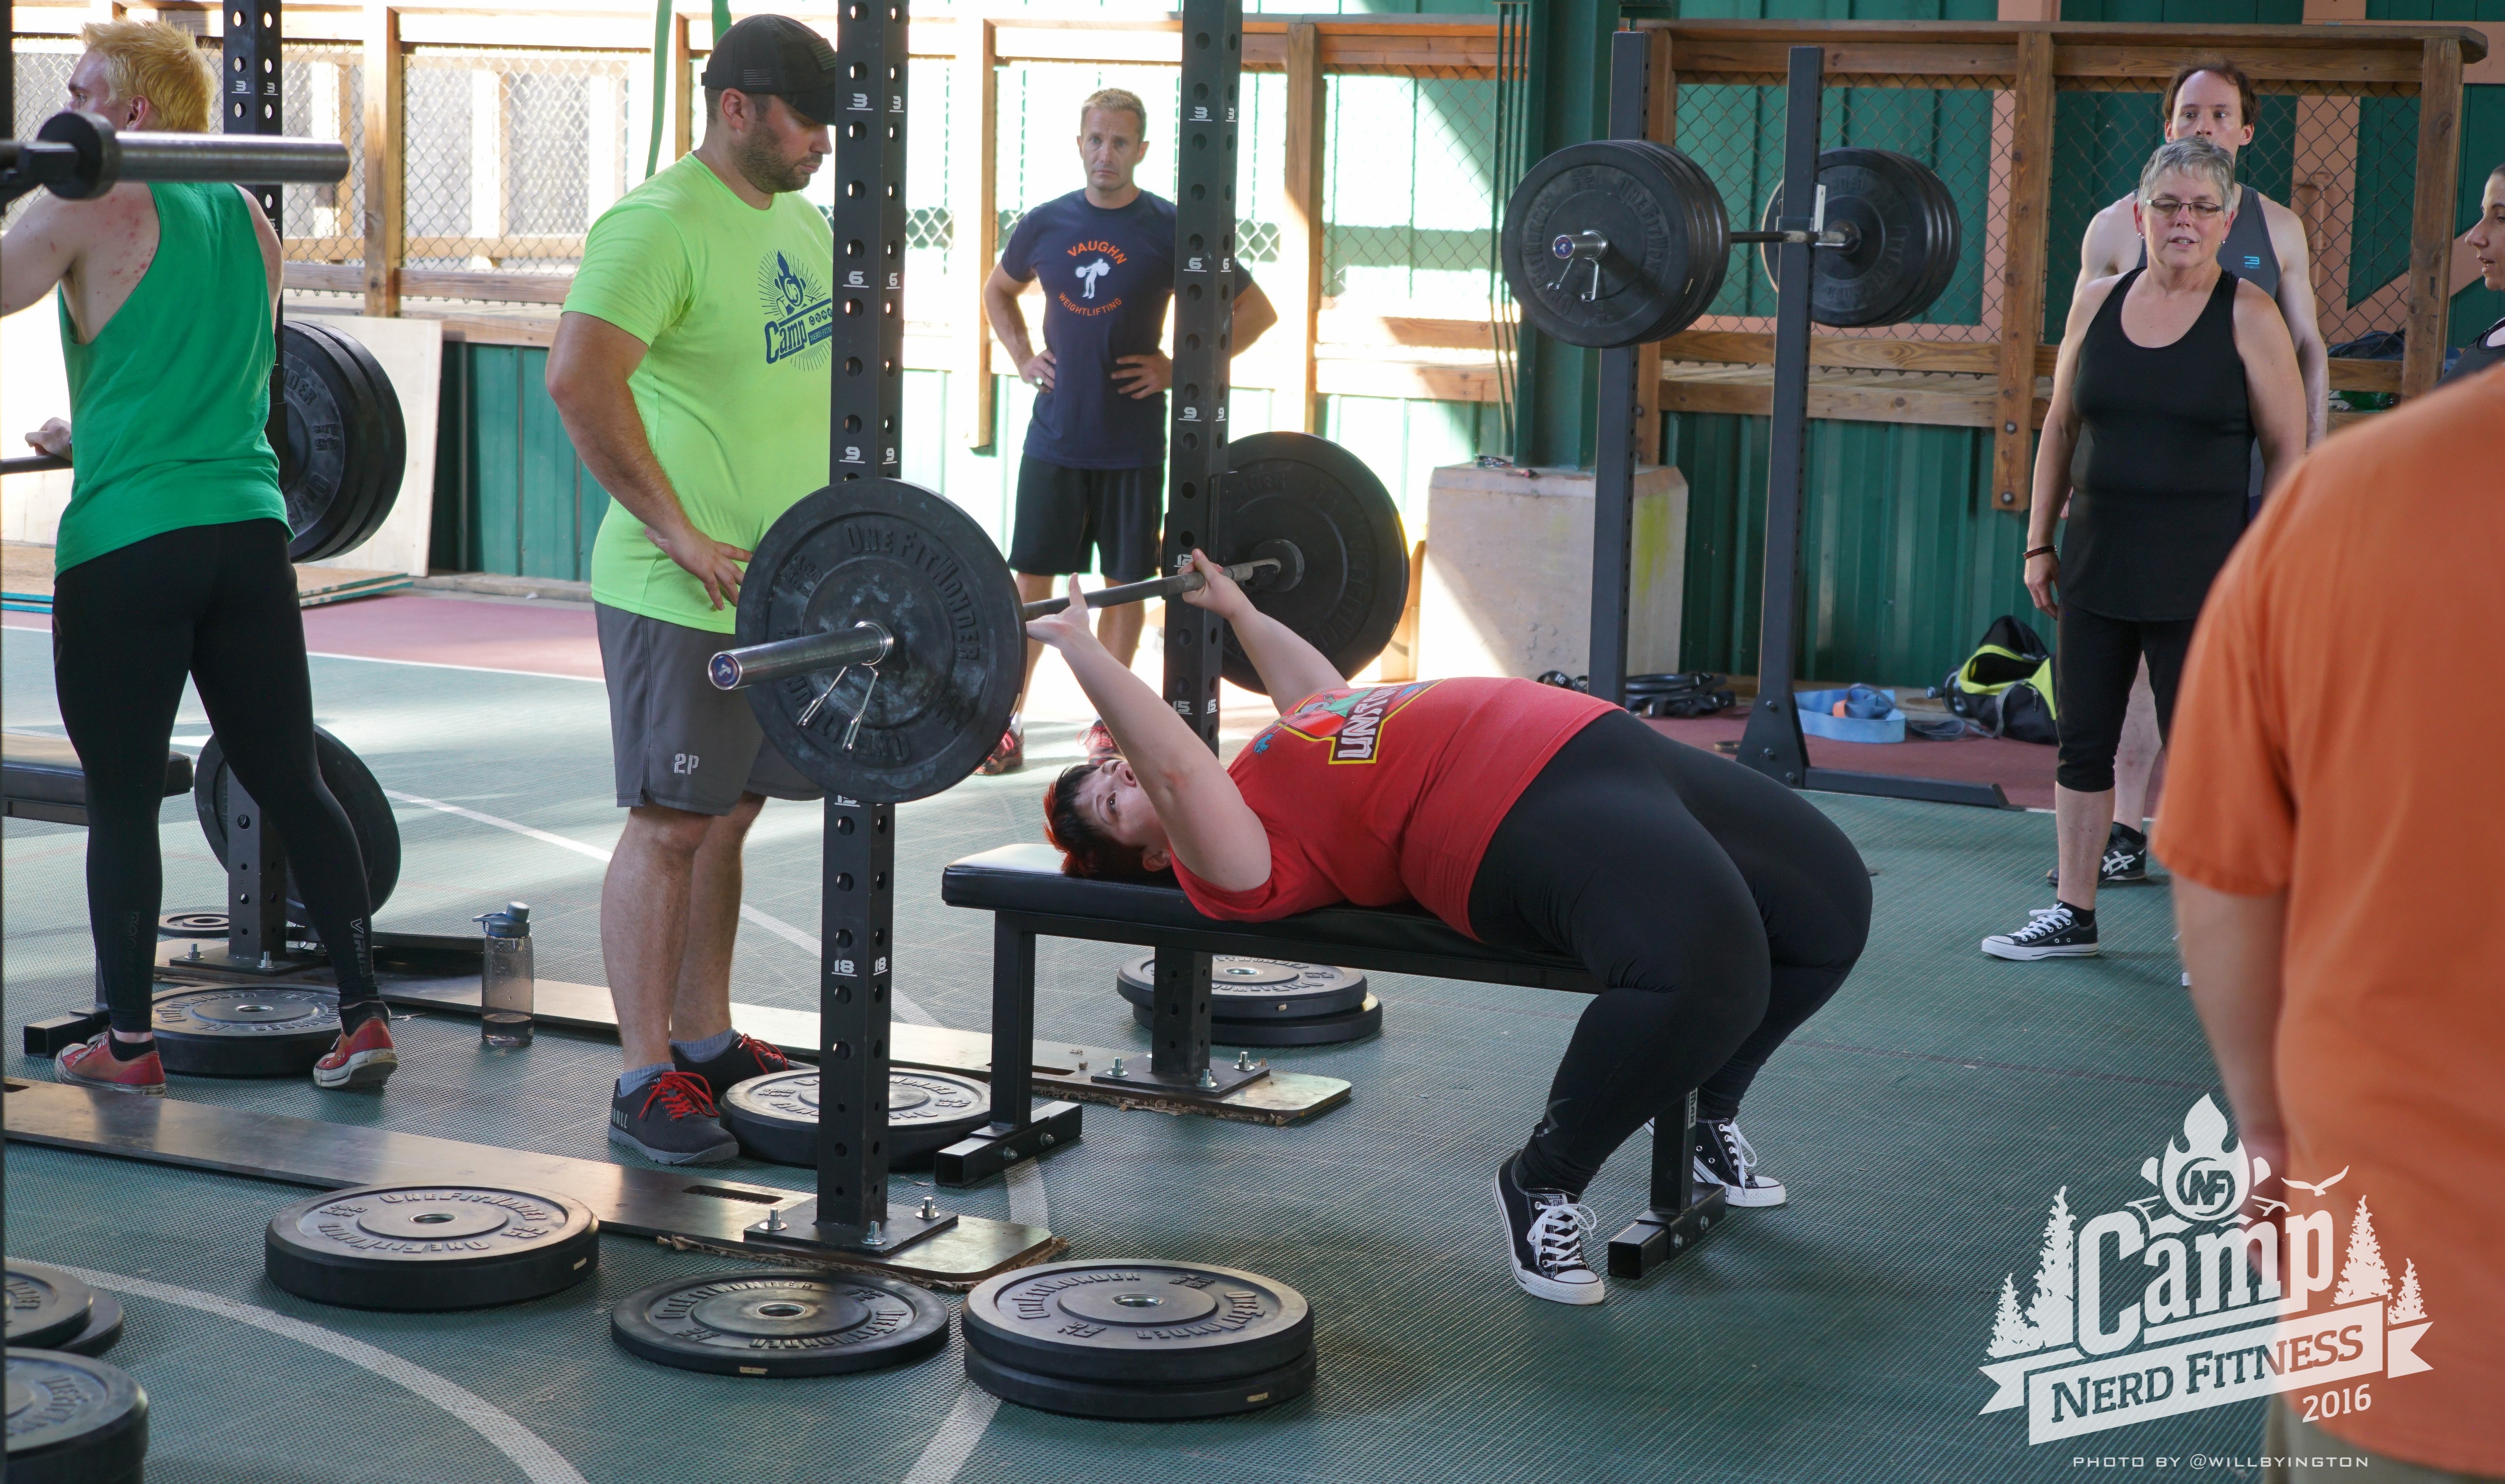
There are many different ways to set up for a bench press – as you’ll see by watching any powerlifting competition, or even by spending just 20 minutes in your local gym.
Some people get on the bench and curl themselves under the bar, some enter the bench from the back and slide in under the bar, and others just lie down and then get tight.
The key here is to set up in a way that helps you get your body tight and ready for the lift.
Before you begin, it might be a good idea to roll the bar forward on the uprights, as this is where you will be lifting it off from.
Having the bar in the same spot in the uprights will help you with a standard setup that is the same every time.
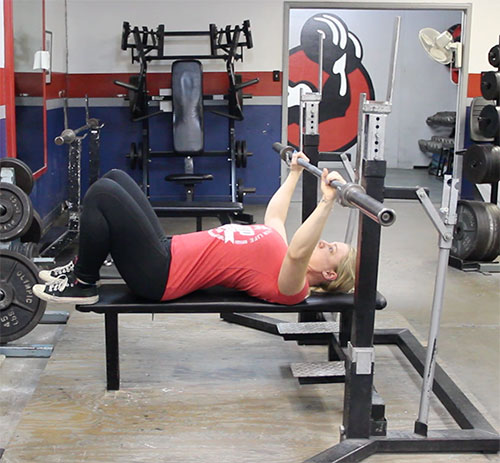
Here’s how to position yourself during the bench press:
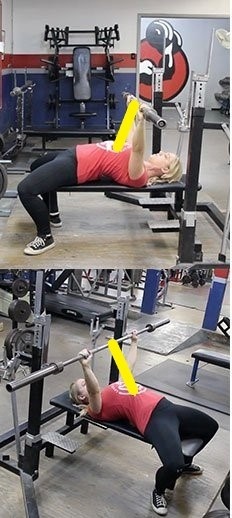
Squeeze your shoulder blades together (as if you were trying to hold a pencil between them), press your lats into the bench, and raise your chest up slightly towards the bar.
While you’re doing this, squeeze your butt and plant your feet into the ground. Your entire foot (heels included) should be on the ground, on either side of the bench.
Keep your entire body tight. The raising of your chest to the bar, squeezing your shoulders together, squeezing your butt, and driving your heels into the ground will create a tight arch in your back. (more on this later).
Imagine you are a superhero and pretend you are sucking all the energy out of the room and absorbing it. As you the bar descends, absorb that energy and get ready to explode upward with the bar.
Your shins should be perpendicular to the ground and directly below your knees. If they are out in front of you, your feet are too far forward and you won’t be able to generate proper drive.
When you look up, your eyes should be just north of the bottom of the bar – you should see the bar directly above your eyes. Your head, upper back, and butt should never leave the bench.
Note: Some people (including myself) find it easier to get tight in their upper back if they put their feet up on the bench, grab the bar, get tight in their upper back, and then place their feet on either side of the bench one at a time.
This is just another method and something you can try out after you get the hang of the bench!
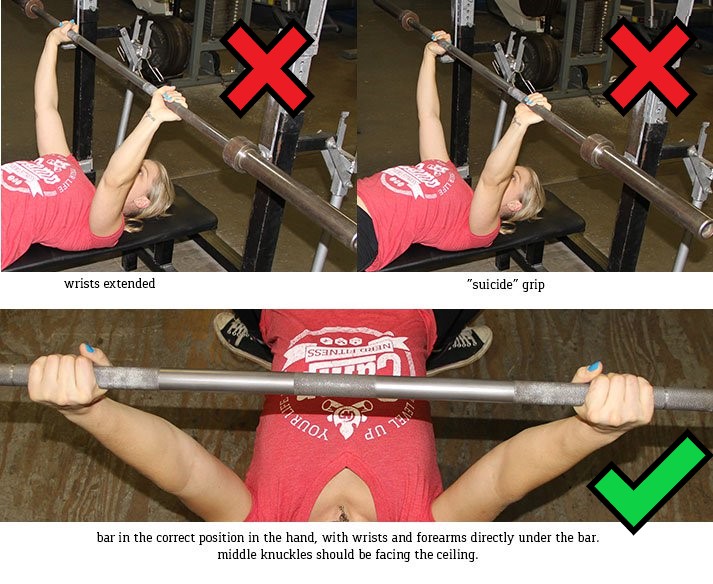
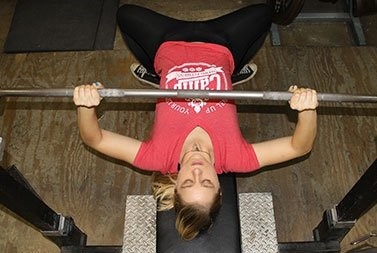
Next, take your arms and put them straight up, and grab the bar. Your grip should be with your thumbs around the bar:
A thumbless grip is not to be used on the bench press, as it is unsafe, and often nicknamed the “suicide grip,” as it is far too easy for the bar to fall off of your hands and land on your body (warning: hard to watch).
When you hold the bar, it should be in the heel of the palm (the same spot in your hands as for the overhead press.) Your wrists will not be extended, and your forearms are under your wrists, forming a solid line of support.
If you hold the bar in the upper half of your hand or the fingertips, not only are you not in a strong position, but you could hurt your wrists.
Bench Press Grip:
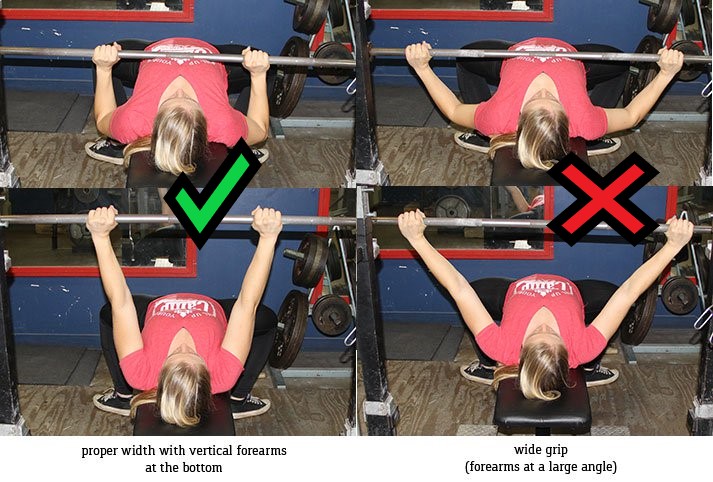
Bring the bar (or, preferably PVC as we are just learning) down to your chest. At your chest, the width of your grip should make your forearms straight up and down (as perpendicular to the floor as you can).
Get a friend to help you (as you won’t be able to see on your own), or tape yourself so you can see. Don’t stress too much about getting your forearms 100% perfectly vertical.
Once you get comfortable with the movement, you may change the width of your grip, as there is wiggle room for personal preference, but this is a great place to start.
Also, keep in mind that your grip may seem way wider or narrower than your friends based on the width of your shoulders. This is normal!
Why would people alter their bench press grip?
A wider grip is more pec-focused
A narrower grip is more tricep focused
You will see powerlifters use a super-wide grip because it reduces the range of motion and therefore allows them to lift more weight in competition.
However, more weight does not always mean stronger, and our goal today is safety and strength!
This is why we recommend a grip with your forearms in a vertical position, it’s the most well-rounded and safest version for overall strength.
If you’re worried about whether you have the right grip in place, record yourself and match it against the videos in this guide. If it’s close, you’re doing great.
You could also record a video and sent it to your own Nerd Fitness Coach!
Click on the bottom below to learn more:
The Most Important Bench Press Tip (Keep Tight)
If you’ve set up correctly, your entire body should be tight.
Focus on the following when performing your bench press:
Think of your body as one single unit, not single muscle groups.
Drive your feet into the ground, tighten your entire lower body and core, squeeze your shoulder blades together, and squeeze the bar. You should feel like one solid, single unit.
When you tighten your body, your neck, upper back, and butt should be on the bench (and your feet and heels on the ground).
When you drive your heels through the ground, squeeze your shoulder blades together, and raise your chest to the bar, it will form a small arch in your back – this is natural and what we’re aiming for.
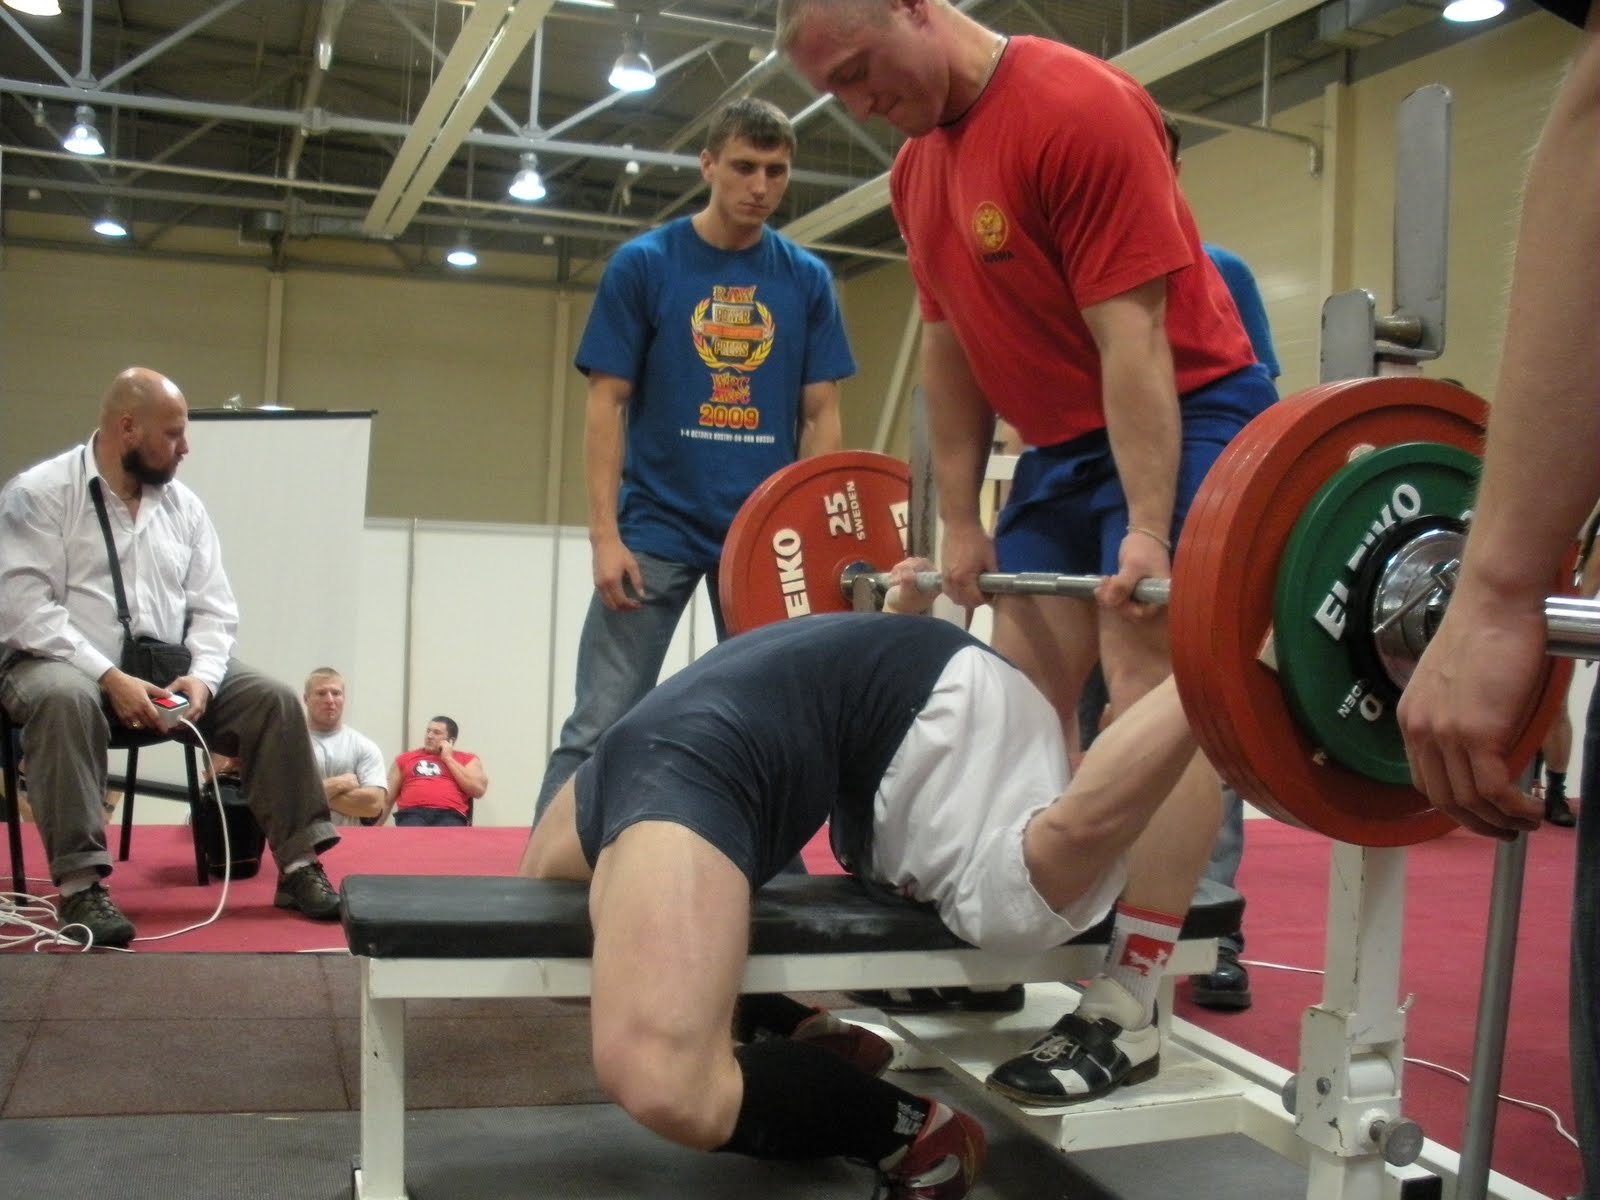
You don’t want to push your lower back into the bench to create a “flat back,” or try to not create an arch. If you have heard people talking about not using an arch in the bench press, they are most likely referring to the extreme arch used by many powerlifters:
That is not what we are going for here – that is a way to help you lift more weight by reducing the range of motion, and is only safe to look into when you have been benching for a long time and really know what you are doing. For overall strength, we recommend benching with a full range of motion instead of trying to reduce it.
Now, feel how tight your body is? It is very important that you keep this tightness throughout the entire movement.
Proper Bench Press Form
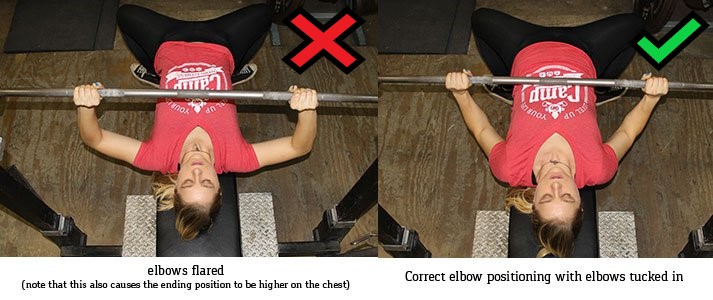
Now that we are set up and have our hands around the bar, we want to think about having our elbows tucked in and not letting them flare out.
One way to do this is that when you grab onto the bar, think about trying to bend it in half upwards towards the sky.
This “upward bending” cue will also help you engage your lats, which doesn’t actually help you with the press, but do help you keep your body tighter.
We review how to bench press with proper form in this video (taken from NF Prime):
Here’s how to perform the bench press:
#1) Unrack the bar and position the bar directly above your shoulders (without losing tightness – keep squeezing your shoulder blades together!).
#2) Continue to look up at the ceiling, unlock your elbows and lower the bar to your chest. Don’t just drop the bar to your chest – you want to pull it down towards you with control.
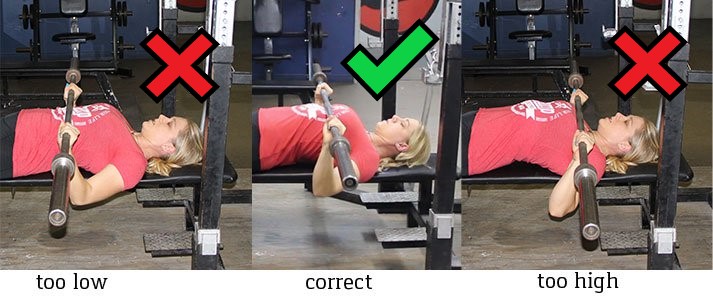
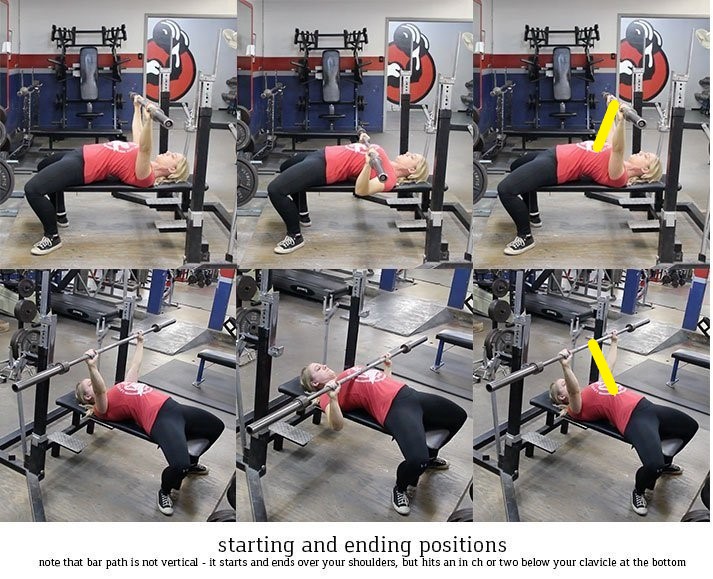
#3) At the bottom of the movement, you want the bar to touch a few inches below your clavicles. If it’s up by your throat or on your stomach, it’s in the wrong position.
#4)Once the bar touches your chest, press up to put the bar back to its starting position.
Note that unlike the deadlift and squat, the bench press movement will not be in a straight up and down motion.
Because of our anatomy, the bar will follow a slightly diagonal path down, and then follow the same path back up.
#5) While pressing, remember to keep your elbows tucked in, and don’t let them flare out.
Think about squeezing so that your biceps touch the side of your chest (though you won’t be close enough to have this happen), or try to get your elbows under the bar.
You don’t want to be too tucked though – the goal is about a 45-degree angle:
#6) As you press, the same parts of your body that were touching the bench before should still be touching the bench, and your feet should still be on the floor. Don’t let any part of you (the most common is your butt) come off the bench.
To help prevent your butt from coming off of the bench, instead of pushing up when you drive with your heels, think of pushing up and back, towards the front of the bench (where your head is).
#7) To re-rack the bar, move the bar backwards to the uprights and touch them with the bar, and then let go of the bar. Don’t look at the racks, you know that they are there! For beginners, it’s great to have a friend help you guide the bar back to the right position in the rack.
What’s a Beginner Bench Press Weight? (Determining Your Starting Weight)
Okay okay, you’re wondering how much you should put on the bar as a beginner who is starting out with bench pressing.
This is a very important question, and for somebody that is trying to level up as quickly as possible, you’ll be tempted to put WAY more weight on the bar than you can probably handle.
In other words, your ego is writing checks your body can’t cash.
Hell, even veteran powerlifters who can bench press 500+ pounds will always start out by just bench pressing the bar.
You can too. Nobody in the gym cares. I promise you.
NOTE: The bar STILL weighs 45 pounds, which MIGHT be too heavy for you. That’s okay! You don’t go to show people how strong you are at the gym, you go to the gym to get stronger.
So start by making sure 45 pounds isn’t too heavy for you.
If you are even SLIGHTLY concerned that it might be, consider using dumbbells or finding a smaller/lighter barbell in the gym and using that to build up to the strength with the bar.
HOW TO BENCH PRESS MORE:
Now, if you can bench press the bar safely, great.
Do 3 sets of 10 on your first day in the gym.
When it’s time to bench press again, add 2.5 lbs (1.2KG) to each side of the bar, and repeat.
You’ll then be lifting a total of 50 lbs.
Each week, add 5 pounds total (2.5 to each side) to the bar. This will be “slow going” at first. However, even at a paltry 5 pounds per week, you’ll rapidly reach a point in the next 6-12 months where you’ll approach a weight you can no longer lift.
“BUT STACI, I CAN LIFT WAY MORE THAN THE BAR, WHY START THERE?”
Because you need to train your body correctly, and we’re looking to build momentum. When you practice perfect form with light weight, your body starts to learn the proper pathway for the bar. Your muscles, tendons, and joints all learn how to bear the load of a weighted bar.
The entire strategy of our new app, Nerd Fitness Journey, is based off this strategy: slow progress over time. And because we’re nerds, you’ll actually build a superhero along the way (because why not!).
5 Common Bench Press Mistakes
Not keeping body tight – As soon as you lose tightness, you have the potential for missing the rep. Make sure even when you are warming up and the weight is light, that you keep your entire body tight.
Butt coming up – make sure your butt stays on the bench at all times! It’s easy to let it come up off the bench once the weight gets heavy and you really start driving through your heels. Instead of thinking about driving upwards through your heels, think about driving up and backwards. If you’re struggling with your butt coming up, either try putting plates under your feet or re-evaluating your foot position (or lower the weight).
Bouncing off your chest – when you come to the bottom part of the lift, don’t bounce! Lower the bar to slightly graze your shirt, and then press.
Half reps – One of the most common faults I have seen in the gym! Make sure you are hitting full range of motion every single rep (down to chest!).
Wrong starting, middle, and ending positions (pictured below) – we’ve learned in the past that a vertical line is the most efficient way to move a bar, but with the bench press, the safest is to move the bar at a slight curve. The bar will start and end above your shoulders, but the middle point of the bar will be below your clavicles. If your middle position is above your shoulders, in a vertical line, your middle position is too high.
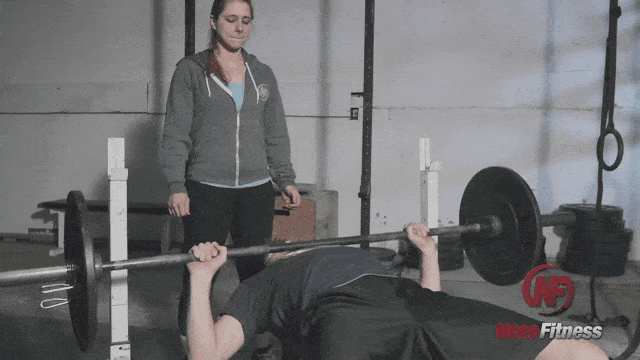
How to Ask for A Spotter with the Bench Press
Spotting is a very important part of bench pressing – not only having someone spot you, but having you spot other people. It can be extremely dangerous to bench press alone.
A spotter’s purpose is to ensure the safety of the lifter – not to help the lifter with reps.
The spotter always watches every rep while staying out of the way.
The only thing they may help with is giving you a lift-off, but after that, it is all you!
*A lift-off is when you help the lifter take the bar out of the rack, and then let go of it when it is in the correct starting position.
You don’t need a spotter for your warm-up sets, but everyone should have one for their work sets.
How do you ask someone to spot you? “Hey, will you spot me real quick?” usually works (it’s really that simple!). I’ve never had anyone turn me down.
If you’re always at the gym at the same time as someone else, make friends and spot each other.
That way you’re not always nervous asking someone random to spot you.
If someone asks you to spot them, always ask:
How many reps they are going for?
Do they want a lift off?
How would they like to be spotted?
Some people don’t want you to touch the bar unless they tell you to; others want you to help them guide the bar up if they start to fail, and others want you to take the bar immediately if they fail the rep.
Some want a lift off, and some don’t.
When you ask someone else to spot you, they will probably ask you the same questions!
What if I don’t have a spotter? Can I bench press without a spotter?
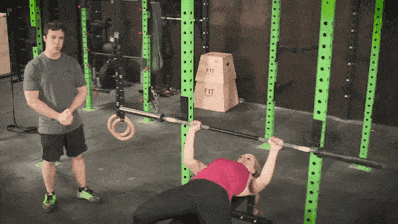
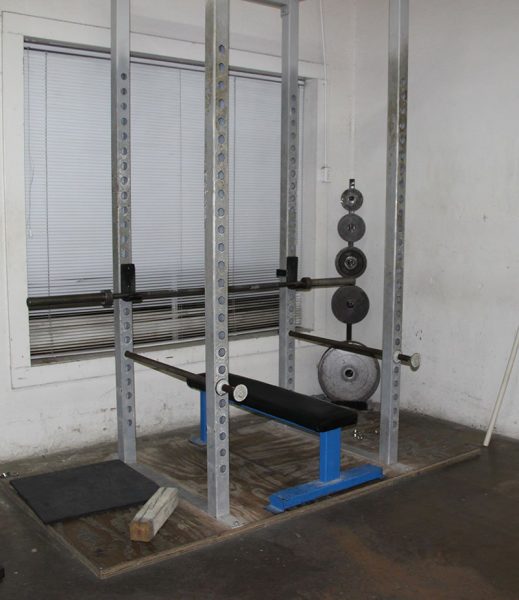
If you don’t have a spotter, you can use the power rack to bench.
A power rack would look like so:
NF Coach Jim demonstrates how to bench press using a power rack here:
Just set the pins at a level just barely below your chest, so if you miss a rep you can get out.
If you don’t have a power rack, and absolutely don’t have a spotter – you can either not put clips on the bar, and then let the weight slide off one side at a time, or do the “Roll of shame,” where you roll the bar down your body, sit up, and pick up the bar.
However, both of these methods are dangerous and you’re risking injury by doing them. Please do not bench press alone – especially when just starting out. Even if the weight seems light, it’s very possible to injure yourself.
The best thing you can do is to ask someone at the gym to spot you.
There’s nothing weird about it all – in fact, it’s normal and expected!
If that’s not an option, consider dumbbell presses or another chest exercise until you can find a spotter.
Frequently Asked Questions about The Bench Press (Plus Tips to Get Started)
1) “I see people with their feet up on the bench – what’s going on?”
This isn’t technically correct – but it’s really a completely different movement than your standard bench press. It eliminates the use of the lower body in the movement, and can be good for people with injuries or as an assistance exercise.
I’ve seen it the most in bodybuilding routines. We recommend you stick to the bench press form we presented until you master the movement.
2) “If the bench is one of the ‘big 4’, why do some people not bench press?”
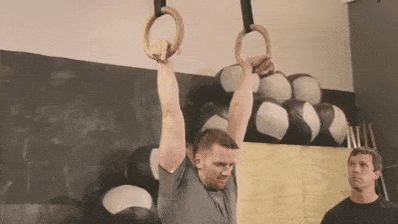
The bench press is a great way to build strength. But out of the big 4, it is the lift that has the most alternatives available.
While it’s hard to replace a heavy deadlift, you can easily replace the bench press with push-up and dip variations and continuously get stronger with just your own bodyweight for a very long time.
I personally keep the bench in my program because I enjoy it, but also because it’s a competitive lift in powerlifting.
Steve, however, has chosen to not bench press and replaces it with bodyweight variations of push-ups and a lot of gymnastics ring work.
3) “Okay, I get it! What do I do now?”
I’m glad you asked! I have three great options for you:
Option #1) If you want step-by-step guidance, a custom strength training program that levels up as you get stronger, and a coach to keep you accountable, check out our killer 1-on-1 coaching program:
Option #2) Exercising at home and need a plan to follow? Check out Nerd Fitness Journey!
Our fun habit-building app helps you exercise more frequently, eat healthier, and level up your life (literally).
Try your free trial right here:
Option #3) Join the Rebellion! We need good people like you in our community, the Nerd Fitness Rebellion.
Sign up in the box below to enlist and get our guide, Strength Training 101: Everything You Need to Know. It’ll help you start incorporating the bench press into your training:
Download our comprehensive guideSTRENGTH TRAINING 101!
Everything you need to know about getting strong.
Workout routines for bodyweight AND weight training.
How to find the right gym and train properly in one.
So that’s all there is to it! Next time you are in the gym, give the bench press a shot!
Start with just the bar, and add weight each time when you hit your weights. Just don’t forget to have a spotter!
So, what kind of benching questions do you have for us!?
-Staci
PS: Don’t forget to check out our other articles in the Strength 101 Series!
Maybe you’ve felt this way: it’s only a matter of time before someone bursts through the door shouting “fake!”
Then, they’ll have you hauled off to jail as a fraud…or ejected into space as an imposter:
Well, feeling like a phony is a real thing and we’ve found it to be fairly common amongst our coaching clients.
Luckily, we’ve learned a few strategies for overcoming “imposter syndrome,” especially on how it relates to fitness. Today, we’ll share our tips and tricks with you too.
Imposter syndrome exists when a person doubts their skills, talents, or accomplishments, despite external evidence of their competence.
(You’d know that if you watched my sweet video above.)
Those who suffer from imposter syndrome feel as though they do not deserve all that they have achieved, and instead incorrectly attribute their success to a combination of luck and deceit.
There is also generally a persistent fear of being seen as a “fraud,” that someone, somewhere, will uncover them for what they truly are.
That’s imposter syndrome.
If you’ve ever felt like you don’t deserve your job or accomplishments, you’re not alone. It’s been estimated that 70% of the general population (evenly split between men and women) have felt the effects of imposter syndrome at some point.[1]
Dr. Valerie Young, an expert on imposter syndrome, states:[2]
Impostor syndrome goes beyond a mere lack of confidence. People who feel like impostors hold themselves to an unrealistic and unsustainable standard of competence. Falling short of this standard then evokes shame.
Yeah, not good.
How do we get like this?
Well, it differs depending on the person, but there are some similarities to be found.
Dr. Young identifies five common characteristics of people who generally feel like a phony, despite the evidence to the contrary.
The five types of imposters are:
The Perfectionist
The Superwoman/Superman
The Natural Genius
The Soloist
The Expert
It’ll be important for us to understand each of these, so we can determine some tools and strategies for overcoming them.
So let’s tackle each of these five types of self-diagnosed “imposters” and how it can relate to your fitness journey.
How to Overcome Imposter Syndrome Part 1: The Perfectionist
What’s going on with the Perfectionist?
The Perfectionist feels like the work they do must be 100% perfect, 100% of the time.
They set insanely high goals for themselves, which often prove unattainable.
Even when the Perfectionist HAS clearly succeeded at a task, they often feel that they should have done better. Then self-doubt creeps in.
There are some pros and cons here:
On the one hand, it’s good to have high goals. This shows a lot of internal motivation.
On the other hand, if the goals are so high that they mentally cripple you, then they’re not serving you well.
How’s this related to fitness?
The Perfectionist will often have an “all or nothing” approach. If they can’t get an hour workout in, then they’re not going to even bother with it.
This isn’t good, because the “perfect” time to workout rarely happens.
What to do instead?
Change your expectations around fitness.
Yeah, an hour workout would be great. But even just a five-minute workout is better than “no workout.”
As Theodore Roosevelt put it:
Do what you can, with what you have, where you are.
With that in mind, here’s a simple 5-minute routine you can do:
Minute #1: 20 seconds of push-ups, 10 seconds of rest, 20 seconds of push-ups, 10 seconds of rest.
Minute #2: 20 seconds of squats, 10 seconds of rest, 20 seconds of squats, 10 seconds of rest.
Minute #3: Plank for as long as you can, then rest until the end of the minute.
Minute #4: 20 seconds of lunges, 10 seconds of rest, 20 seconds of lunges, 10 seconds of rest.
Minute #5: 20 seconds of push-ups, 10 seconds of rest, 20 seconds of push-ups, 10 seconds of rest. (unless you have access to pull-up bar or alternative, then do pull-ups)
The important thing here is to embrace “good enough.”
How to Overcome Imposter Syndrome Part 2: The Superwoman/Superman
What’s going on with the Superwoman/Superman?
The Superwoman/Superman feels like they should excel in every role they take.
Great spouse? Check.
Mother/Father of the year? You bet!
Amazing colleague? Guess who’s clocking in overtime!
The Superwoman/Superman is addicted to this validation, thus they are externally motivated.
Again, we have some pros and cons:
On the one hand, it’s great they want to contribute to the team.
On the other hand, if there’s no one around to praise them, things might not get done.
How’s this related to fitness?
The Superwoman/Superman often needs an outside event to prepare for, like a 5K. Or maybe they want to get in shape for a wedding or a reunion.
Without such an event, they might not feel validated enough to get to work.
What to do instead?
External motivation is a great kickstart, but look to build internal motivation by doing something even if no one else knows about it. Do the task for its own sake.
To build internal motivation, ask yourself: how do you feel before, during, and after a workout?
By constantly reminding yourself of the positive feelings, you can help build internal motivation. This strategy can help wean you away from exclusively being driven by external forces.
How to Overcome Imposter Syndrome Part 3: The Natural Genius
What’s going on with the Natural Genius?
The Natural Genius feels that everything in life should come easy to them. They judge their competence based on the ease and speed of their efforts.
If it takes them a long time to master a task, they just assume they suck. Then they start to feel shame.
Some pros and cons of the Natural Genius:
On the one hand, it’s awesome to have a lot of success in various aspects of life. There’s nothing to feel guilty about!
On the other hand, this feeling of shame might stop you from growing in new areas.
How’s this related to fitness?
If the Natural Genius isn’t instantly good at something, they push it aside:
I can’t bend like that, so I’m throwing away the yoga mat.
I never catch anything, so I’m quitting Ultimate Frisbee.
Everyone is faster than me, so I’m not showing up to the 5K.
What to do instead?
Remember, being bad at something is the first step to being ok at something.
Or…
To help here, look for evidence of something else in your life that was hard – but you pushed through and accomplished it anyway.
It could be something big, like graduating from college, or small, like building a birdhouse.
The important thing to ask: How did you feel after that?
Also, understand that the work is necessary. You’re never going to be good at EVERYTHING. Instead, enjoy the process and the learning curve ahead!
How to Overcome Imposter Syndrome Part 4: The Soloist
What’s going on with the Soloist?
The Soloist believes they have to do everything themselves.
If anyone ever gives them any assistance, it’s a fail, because now they can’t take any credit for the success.
Even if the Soloist finds themselves in trouble, they won’t reach out, preferring to struggle alone.
You’ll often hear the Soloist say things like “I don’t need anyone’s help.”
Like all our “imposters,” there are some pros and cons here:
On the one hand, it’s great to want to be self-sufficient
On the other hand, this may cause unnecessary stress.
How’s this related to fitness?
If the Soloist runs into any health or fitness struggle, they often shut down communication around the topic.
Ironically, we see this from time to time in our 1-on-1 Online Coaching Program. A client will be doing great, kicking-ass with their workouts and nutrition, and they’ll communicate daily with their coach. But the second they run into any snags, they disappear, almost as if…
What to do instead?
Recognize when you feel like going into “hermit mode” and proactively reach out to others!
Truth be told, the best time to do this is actually before you run into trouble.
Look, things will come up:
Work will turn insane.
A tire will go flat.
Your kid will get sick.
One of the best things you can do when struggling (in fitness or anywhere) is to reach out to someone.
One, they might have some advice.
Two, even just an open ear can be helpful when things aren’t so good.
That’s why we actually encourage everyone who joins Nerd Fitness Prime to reach out to our private Facebook or Discord group. Everyone in there is on a similar journey, so when things go bad, the community can relate.
Someone there might even know what to do.
Whether through the Nerd Fitness Rebellion, work, or some other group, finding an “accountabuddy” can be really helpful when trying to get in shape.
Look around and if you see somebody who’s also on a similar path, say “Hey, let’s do this together!!!”
How to Overcome Imposter Syndrome Part 5: The Expert
What’s going on with the Expert?
The Expert defines themselves by what or how much they know.
Believing they’ll look foolish if they don’t know something, they’ll seek out more information. And more. The Expert endlessly researches a topic, always needing to absorb more.
Also, somewhat ironically, the Expert does not view themselves as an “expert,” instead they choose to remind themselves of their ignorance.
Again, there are strengths and weaknesses here:
On the one hand, being curious is awesome.
On the other hand, constantly searching for more information can be a form of procrastination.
It’s tough, but if you can suck it up and pull the trigger to act, the momentum from that initial decision will propel you forward.
Yes, it’s scary to act and less scary to read more. But acting is what will truly make you an expert.
Getting Rid of Imposter Syndrome (Next Steps)
Perhaps you’ve seen yourself in one of these “imposter” subgroups.
It could be in your fitness and non-fitness related words and actions.
As we covered, each “imposter” comes with certain strengths. But there are also weaknesses.
If you find yourself feeling like a fraud, try one of the strategies we covered today:
Reevaluate your expectations around “perfect.”
Search for internal motivation around the work you need to do.
Remember that it’s okay to “suck” at things now and then.
If you run into trouble, it’s okay to reach out for help.
Ask yourself if you really need to read another internet article, or is it time to act.
If you need help acting, I have three next steps for you.
Next Step #1) Our Online Coaching Program: if you find yourself struggling as the Soloist, maybe it’s time to ask for help.
You can schedule a free call with our team so we can get to know you and see if our coaching program is right for you. Just click on the image below for more details:
#2) If you need a “trigger” to act, check out Nerd Fitness Journey! Our fun habit-building app helps you exercise more frequently, eat healthier, and level up your life (literally).
Try your free trial right here:
Next Step Number #3) Join the Rebellion! We need good people like you in our community, the Nerd Fitness Rebellion. It’s the best place to find an accountabuddy.
Sign up in the box below to enlist and get our Rebel Starter Kit, which includes all of our “work out at home” guides, the Nerd Fitness Diet Cheat Sheet, and much more!
Get your Nerd Fitness Starter Kit
The 15 mistakes you don’t want to make.
Full guide to the most effective diet and why it works.
Complete and track your first workout today, no gym required.
Alright, I want to hear from you:
Do you occasionally see yourself as an imposter or fraud?
Which one of the subgroups do you recognize in yourself?
Any tips or tricks for overcoming imposter syndrome?
Let me know in the comments!
-Jim
PS: Props to Dr. Valerie Young for helping people overcome imposter syndrome. Young is doing good things in the world.
And if you’re joining a gym for strength training purposes, make sure you download our massive guide: “Strength Training 101: Everything You Need to Know.” Get yours free when you sign up in the box below:
Download our comprehensive guideSTRENGTH TRAINING 101!
Everything you need to know about getting strong.
Workout routines for bodyweight AND weight training.
How to find the right gym and train properly in one.
HOW DO I FIND THE RIGHT GYM?
As part of our Strength Training 101 series, we dedicate an entire article to picking the correct gym. Let’s recap some of it right here for you.
Here’s How to Find the Right Gym:
#1) WHAT ARE YOU LOOKING FOR? Picking a gym isn’t as easy as running to the closest one and signing up. There are a lot of things you need to take into consideration. There’s equipment to contemplate, classes offered to compare, and distance from your home to calculate.
It can be a good idea to create a list of things you are after, to make sure the gyms you research have what you need. Want such a list? You got it.
There are also types of gyms to think about. You’ll mockingly hear big-name-chain gyms referred to as “Globo Gyms,” taken from the critically acclaimed masterpiece, Dodgeball.
You can think of Globo Gyms as your standard large franchise like 24 Hour Fitness, LA Fitness, Gold’s Gym, etc. You know, the big commercial gyms.
Oftentimes their price and location make for a convenient membership. I am a member of a Globo Gym. It’s conveniently located and fits my budget.
On the flip side would be a locally owned gym. Something where the owner hangs out and greets everyone. You’ll often find more free weights at such a gym, which is awesome, but it might come at the expense of other amenities like childcare.
These are some pros and cons to weigh.
The other thing to consider would be a CrossFit gym. More expensive, but arguably more of a community setting than you’ll get at a “Globo Gym.” Although they tend to be a little pricer.
Bringing us to…
#2) WHAT IS YOUR BUDGET? How much are you willing to spring for your membership? You might get away with as little as $10 a month. Conversely, a $400 monthly membership is not unheard of.
Although typically a gym membership will run you $30-$50.
To put the cost in context, it can be important to consider the gym’s amenities offered. Do they hold free classes like yoga? A single class can cost $10-$15, so if you plan on attending a few, this can quickly equal the price of your gym membership.
Do they offer childcare? If you need someone to watch your offspring, this alone might be worth the membership. Refer to our list above for some ideas.
#3) HOW IMPORTANT IS LOCATION? Don’t set yourself up for failure here. If your gym is all the way across town, you may end up less likely to use it.
Consider a location on the way to or from work.
If you have to pass by the gym twice a day, you’re much more likely to stop in.
Might be worth springing more for a convenient location for your day-to-day.
As I mentioned, this entire section on “Finding the Right Gym” was taken from our Strength Training 101: Everything You Need to Know ebook.
It walks you through every aspect of starting a strength training practice, from equipment, specific workouts, and how to know when you should progress to lifting more weight. You can grab it for free when you join the Rebellion below!
Download our comprehensive guideSTRENGTH TRAINING 101!
Everything you need to know about getting strong.
Workout routines for bodyweight AND weight training.
How to find the right gym and train properly in one.
WHAT SHOULD I DO BEFORE I PURCHASE MY GYM MEMBERSHIP?
So you’ve narrowed down the type of gym membership you want to purchase.
Before you pull the trigger, do the following:
Get a guest pass.
Some gyms give out free passes for a week or two, some you have to pay for (e.g. $20 for 20 days). Even if you have to pay for it, this is probably the best money you can spend.
After all, you don’t buy a car without test driving it, right?
Make sure you head to the gym at different times of day that align with when you plan on going regularly.
There’s nothing worse than finding a perfect gym, signing a big contract, and then discovering that the gym is so swamped with people after your workday that you can’t even get to the equipment you’d like to use.
During your guest visits there are lots of things to look for.
Questions to Ask When Checking Out a New Gym:
Is the equipment in good working order?
Is there enough equipment for everyone or are you fighting for a bench?
What’s the general vibe of the gym? Does it seem clean?
If you’re going before work, are there enough showers available?
Did you have to wait to use one?
It’s also never a bad idea to talk to the other members and ask them what they like and dislike about the gym.
You can also read reviews online on sites like Yelp or Google, but remember that people are more likely to complain than compliment, so take all online reviews with a grain of salt.
At this point, you’ve decided to pull the trigger.
Want some potential money-saving tips? I got you.
To Save Money When Buying a Gym Membership:
#1) Join with a friend or family member. Gyms can be sales-driven, so bringing in someone else can make for an enticing offer. They likely have a quota to make, so the more the merrier. It’s worth asking every gym about a family plan.
#2) Join in January (or keep an eye out for specials during the slow months). The start of the new year brings a fitness craze, and many gyms capitalize on this by waiving fees or offering discounts. If it’s near, it might be worth signing up during this rush.
January won’t be the only time gyms offer specials. Google “name of gym deals” and similar items to see if any recent ads show up, as well as check on sites like Groupon and LivingSocial. If you just missed a deal, bring it up to them. They very well may still offer it.
If not…
#3) Haggle. While this can be uncomfortable for some, asking for a discount won’t hurt. The worst thing they’ll tell you is “no.” The best thing that could happen is they’ll give you a free membership.[1]
While I’m joking on that last part, many people do have success with negotiating gym membership fees, especially at locally owned stores which don’t have corporate oversight.
It doesn’t hurt to ask.
Once you settle on a price, the next step is contract time.
Keep an eye out for the following in your contract:
An out clause, in case you move, lose your job, etc. Often you can get out of a contract if you move a certain number of miles from the club without a fee, but usually, any other item requires an “early termination fee” to get out of your contract.
Can you freeze your contract if you go out of town or are on vacation?
What happens if the club goes out of business?
Does the membership renew automatically?
Always get everything the salesperson promises you in writing (and remember that most of the time they are working on commission). I’d also suggest that you get a copy of the contract and take it home with you to read before you sign it.
If they won’t let you do that, that’s a bad sign.
Remember, if the salesperson is overly pushy, or you don’t feel comfortable for any reason, walk away. There are a lot of gyms out there that would be happy for your business.
Got your membership? Perfect. Now the fun starts!
HOW DO I TRAIN AT THE GYM?
If you’re worried about what to do at the gym, you’ve come to the right place.
We have an entire guide on “How to Train in a Commercial Gym,” which you should check out. If you’ve never worked out in a commercial facility, it’s a great place to start.
I personally train in such a facility and I wrote about being the only Rebel in a big box store right here. Read it for my personal tips on how to get in, take care of business, and get put.
Both should help for the first time you step foot in the gym to train.
What’s that? You have absolutely NO idea what you’re doing in a gym and you wander around like a lost sheep without a shepherd?
You’re not alone! There’s nothing worse than feeling foolish or worrying so much about doing something wrong that you never try in the first place.
Our advice would be to consider enlisting the help of a trainer – if you can afford it – for a few sessions to help you get started.
If you want full accountability, expert guidance, and consistent instruction, we have you covered there too. Check out our online Coaching program that might help you too! If you’re just starting out, and have no clue where to begin, we got you covered! We can build you custom workouts, provide accountability so you can follow through and crush them, or help you change your nutrition strategy if you’re trying to lose weight. We work with busy people just like you, helping many of them step foot in the gym for the first time.
Wanna see if we are a good fit for each other? Click on the big image below to schedule a free call with our team:
WHAT IF I’M SCARED OF THE GYM?
If you’re nervous about even stepping foot inside a gym, you’re not alone.
We get tons of emails from Rebels anxious about walking in the door of their local fitness facility.
This is understandable, because stepping foot into a commercial gym to train can be intimidating. The people there all seem to know what they’re doing, making you a potential outsider.
I’ll tell you what I tell all Rebels nervous about walking into a gym:
Everybody around you is just as self-conscious as you are. Yes, that super jacked dude. Or that thin (or jacked), fit woman on the elliptical. They aren’t focused on you, because they’re too busy living inside their own head wondering if everybody is thinking about them.
Everybody starts somewhere. You don’t have to be strong and fit to train in a gym. You go to the gym to get stronger, more confident, and then you’ll become fit.
MOST will applaud you for trying. When I see somebody who is severely overweight at the gym, it makes me happy – they’re trying to better themselves. This is the mentality 95%+ of the people will have.
MANY will be too self-focused to even notice you. These are the dudes lifting up their shirt in the mirror to check their abs, doing bicep curls in the squat rack, and/or making sure they take photos to post on Instagram to prove they did, in fact, go to the gym.
A RARE few will judge. Though they’re not just judging you, I promise. They’re judging EVERYBODY around you because they can’t help but compare themselves to others. This is no different than in real life. Screw these people, haters gonna hate, Slaters gonna slate.
After explaining these points to a worried Rebel, I then bring up the idea of “20 Seconds of Courage.”
It’s something Coach Matt brings up in the video “How Not to Be Scared at the Gym!”
Our lives are a series of decisions.
And each individual choice really doesn’t take that long to make – less than 20 seconds. Once you make that decision, you set yourself on a course with no way off, until you make another decision.
You don’t have to be courageous for a full hour. 20 seconds will be enough to walk into a gym.
I want you to use 20 seconds of courage to enter any local fitness facility. From there, you can start thinking about actually purchasing a membership.
Welp, these are the tools we’ve created to help you CRUSH the gym:
1) Our popular 1-on-1 coaching program. No more guesswork, no wondering if you’re doing the right program, no shame or guilt. Just results that don’t suck, and a plan that doesn’t make you miserable.
We keep you accountable to make sure you actually do your workout, we answer any questions you have, and we cheer you on every step of the way:
2) If you want a daily prompt for doing workouts at the gym (or at home), check out NF Journey. Our fun habit-building app helps you exercise more frequently, eat healthier, and level up your life (literally).
Try your free trial right here:
3) Join the Rebellion! Our free community numbers in the hundreds of thousands scattered throughout the globe, and we need good people like you!
You can join by signing up in the awesome yellow box below, and I’ll send you a bunch of free guides and printable workouts, including our Strength 101 guide!
Download our comprehensive guideSTRENGTH TRAINING 101!
Everything you need to know about getting strong.
Workout routines for bodyweight AND weight training.
How to find the right gym and train properly in one.
Alright, I think that about does it for this article on buying and using a gym membership.
Did I miss anything?
Do you have any advice for someone just stepping foot in the gym?
By the end of today’s article, your friends will need a muzzle to shut you up.
Believe it or not, we actually often work on “social skills” with our 1-on-1 NF Coaching clients.
Many clients are bettering themselves to start dating again, so we work hard to help them level up all areas of their lives.
Okie dokie, without further ado, let’s jump in.
Step 1: How to Make Small Talk – and Not Suck at It. (Human Interaction)
The main reason we human folk seek to connect with one another is that it scratches a social itch.
Our social needs are just like hunger and thirst—we eat, drink, and talk to people because there’s a gap between our actual state (hungry/thirsty/lonely) and our ideal state (satiated/quenched/connected).
Your brain is saying, “Dude, mind helping me out a little? I’m not where I want to be.”
The whole idea here is to feel better after than we did before.
You ever talk to people who are in a super sour mood?
It’s kind of contagious, isn’t it?
Unless you happen to be friends with people who can make crankiness charming (such as professional comedians), it’s usually a bit of a bummer.
Let’s not be bummers!
Let’s be those other kinds of people, the ones who leave our conversational partners in good moods after they talk to us.
Engaging in happy small talk isn’t just good for the people we talk to, by the way—it helps us as well. “Fake it ‘til you make it” is more than just a catchy rhyme.
The idea that acting a certain way encourages us to be that way has been around since Aristotle’s time. Take a look at his quote (from over 2,300 years ago!):
“Men acquire a particular quality by constantly acting a particular way.
We become just by performing just actions, temperate by performing temperate actions, brave by performing brave actions.”
Turns out the man knew what he was talking about.
A team led by Fritz Strack showed in 1988 showed[1] that simply holding a pen in your mouth in a way that simulates the muscle movements of smiling makes cartoons seem funnier than when you hold it between your lips like a straw; other studies have shown[2] that merely crossing your arms can make you more persistent!
So the next time you’re feeling surly and looking for a change, challenge yourself to talk to someone in a more upbeat way and see if that helps shake it off.
I’m not suggesting you bop around like sunshine and fairy dust, but isn’t it powerful to realize that by simply chatting with another person in a positive way, you can walk away from the conversation with both you and them feeling better off?
(Feel free to give a little mental fist bump to Aristotle when you see how well this works.)
Step 2: How Do You Talk to Random People? (Thoughtful Small Talk)
Good small talk adapts in real-time, thoughtfully and attentively applying to whatever is happening in the moment.
This may sound overwhelming at first, especially if you like to plan things to say out in advance. The trick is to take a step back and pick one thing, anything, on which to focus your attention.
There’s a finite list of what this thing will be:
Whether it’s sunny, rainy, or snowy, that’s weather.
Whether it’s a street parade, an art exhibit, or a hot tub limousine driving by, that’s scenery.
Whether it’s someone with crazy shoes, a guy doing back handsprings, or a woman swinging from a chandelier, that’s people.
Whether it’s a cute baby, a fluffy puppy, or a cool book, that’s belongings.
See how all of a sudden you can imagine having one or two prepared responses that can still perfectly apply to even the most novel of situations?
Now, this may only get you as far as your first or second line within a conversation, after which you may need to start coming up with stuff in the moment.
But the same logic of “step back/pick one thing” applies here too, and will help you keep from getting overwhelmed or panicking about what to say.
Here’s an example of small talk:
You: “I think I literally saw a cat and a dog raining down from the sky today.”
Them: “Ha! I know, right? I thought it was supposed to be spring.”
You: “It must be really tough to be a weatherman. You’re either stating the obvious or you’re a liar.”
Them: “My cousin is a weatherman.”
Curveball! You haven’t prepared anything about weatherman cousins! But this is interesting and novel enough to justify a conversational tangent all its own (and could fall under the category of jobs, if you wanted to add it to your earlier list). Try a simple question.
You: “Oh, interesting. How’d he or she get into that?”
Before you know it, you’re having a unique conversation, not banal “small talk”.
You’re also learning things about your conversational partner (and they about you), which will help you build from one-off conversations with strangers to consistent friendships and relationships with people.
Challenge yourself to identify these “one things” (weather, books, back handsprings) as you’re out interacting with people.
Use the comfort of a prepared line to open with if you like, but with the goal of finding something interesting that’s happening in that moment to comment on. Your conversations will instantly be more thoughtful, and the people you’re talking to will feel it, too.
Step 3: How Can I Be Good at Talking? (Be Quirky)
My cousin Kim met my fiancé for the first time a few months ago.
As soon as we all sat down, she said to him, “Tell me every single thing about yourself, starting from birth, and ending with right now.”
I thought it was just about the greatest thing I’ve ever heard.
If my friend Jess is at someone’s house for the first time, she’ll say, “If I were the bathroom, where would I be?”
She gets the answer– and a chuckle.
My friend David struck up a conversation with a cute girl in Jiffy Lube by asking her if she thought the guy in the waiting room looked like a beagle.
He called me to thank me for introducing him to his girlfriend.
These examples all have in common the theme of turning awkwardness into awesomeness. They’re about being confident, not being smooth.
Sometimes dialing up the awkward dial can be just what everyone needs to loosen up a little, like when my friend Mike starts his presentations at work by saying, “If I seem incredibly nervous, it’s because I am indeed incredibly nervous.” It’s a bold strategy, to be sure, but it can be incredibly refreshing.
There’s something undeniably fun about someone who says, “I’m hugely overcaffeinated right now, so I may pass out at some point. How was your weekend?”
In short, don’t feel pressure to rigidly adhere to some abstract notion of what small talk should be, losing all of your own delightful personality in the process. You’re a member of the Rebellion, after all!
Step 4: How Can I Be Fun to Talk To? (In Defense of Being Imprecise)
Remembering the little things? Sweet. Remembering every little thing? Creepy.
I happen to be in possession of a frighteningly good memory; I remember specific conversations (as well as where they took place, and what we were wearing) with people who couldn’t pick me out of a lineup.
I’m absolutely the person who goes up to people and says, “You’re a chiropractor? We sat next to each other on a plane from L.A. to San Francisco about a year ago, right?” Yes, right… but it didn’t matter. The dude was thoroughly creeped out, and I couldn’t blame him!
I’ve had to learn to hold back a little (okay, a lot) and not spew forth with every single thing I remember about my last conversation with someone the next time I see them.
Instead of: “how was that conference you went to in Phoenix?” go with, “You were going out of town when I saw you last, right?
Instead of: “Is your upper left molar feeling any better?” go with, “Hey, how’s it going?”
Like a good hairdo or pocket square, it sometimes takes a bit of effort in conversation to make it seem effortless, but it’s far preferable to freaking people out.
Take your time.
With each conversation, you’re watering a healthy plant, not dousing a fire.
In fact, leaving a bit unsaid is probably the best way to ensure future conversations, and give you something to talk about next time!
Besides, when you’re imprecise, you allow the other person to narrow in on a topic that they are comfortable with, rather than forcing them to talk about their upper left molar!
How Do You Interact with Others? (Start Talkin’)
With these four keys in mind, you’re ready to start small talkin’.
Challenge yourself to approach one person a day and strike up a conversation, even if it’s brief.
Like everything else we do in life, good social skills can be learned, developed, honed, and improved.
Though, it’s really tough to practice unless you commit to TRYING it out.
Odds are you will NEVER see that person again in your life, and your life is no different now than it was 5 minutes before the conversation.
Of course, the opposite could be true: you could meet somebody awesome.
And there’s only one way to find out which outcome you’re gonna get.
If you’re feeling really rusty, give it a shot with a friend or family member and ask for a little feedback afterward.
If you’re feeling bold, approach someone you wouldn’t normally talk to. If you draw a blank, ask a question.
Breathe, smile, listen.
Most of all, remember why you’re doing this, and remind yourself that you’re not imposing on someone by having a pleasant conversation with them—you’re making their day a bit brighter, and you should never be made to feel bad about that.
As always, I’m very interested to hear what you think, and how these lessons feel when you take them out for a spin.
We all crave regular social interaction; you might be surprised by how easy being good at small talk really is!
What are your major hangups with small talk?
Where do you plan to give these tricks a try?
-Lindsay Miller (good friend of Steve, and the Relationship & Social Skills expert of Nerd Fitness!)
PS: Like developing your social skills, getting healthy can be really intimidating, which is why we’ve built services and products to help you overcome the chaos and feel confident in the actions you’re taking every day:
#1) 1-on-1 Online Coaching: A coach from Team NF gets to know you better than you know yourself and builds a workout program and nutritional strategy that fits your busy life, your body type, and your goals.
#2) If you want an exact blueprint for learning new skills, check out Nerd Fitness Journey! Our fun habit-building app helps you exercise more frequently, eat healthier, and level up your life (literally).
You can even join our private community of nerds, many of whom are also trying to improve their social skills!
Try your free trial right here:
#3) Just want to learn more about what we do? That’s great too! Grab your free Nerd Fitness Starter Kit by clicking in the box below and I’ll send it right over!
Get your Nerd Fitness Starter Kit
The 15 mistakes you don’t want to make.
Full guide to the most effective diet and why it works.
Complete and track your first workout today, no gym required.
Pilates offers an array of unique opportunities to grow in your physical, mental, and spiritual journey. Unlike other workouts, it’s a form of mindful movement. In today’s episode, Lindy Royer, Physical Therapist, Pilates Instructor, and Robin’s mentor and friend, shares her journey of coming to know and practice Pilates.
Robin and Lindy discuss the power of the brain, rewiring our brains through mindfulness, creating a positive space in Pilates, and the mechanics of pain. Join Robin and Lindy for unique insight into Lindy’s work and her experience as a mindful teacher and physical therapist.
Show highlights: what you can look forward to in this episode!
Lindy shares her backstory
Lindy discusses how she changed her life after her divorce and years of alcohol abuse
Pilates was reintroduced to Lindy during her rehabilitation and she’s never looked back
Robin and Lindy discuss the internal journey of Pilates
Lindy shares the benefits of incorporating Pilates into your daily routine
We have the power to rewire our brains
What is pain and what causes it
The importance of learning It’s important to learn to listen to your body.
So you’ve hit a workout or weight loss plateau the size of a…well, an actual plateau, eh?
Have no fear, our step-by-step guide will get you back on track! (Plus, the most badass Bruce Lee quote you’ll ever read).
Whether you’ve stalled in your weight loss journey, strength training, or some other fitness benchmark, today we’ll tell you exactly how to keep progressing by sharing with you the exact tools we use with our coaching clients.
When we work hard for something and don’t see progress, we get unhappy.
How Do I Know If I’ve Hit a Plateau?
I get a lot of emails from people who tell me they’re stuck on a plateau.
They talk about how they’ve been eating right, exercising, and getting enough rest and they can’t seem to make progress!
They throw their hands in the air, freak out, get discouraged, and give up or quickly move on to the next plan that they hope will work.
When somebody comes to me saying they’ve plateaued, my first response is always:
“Have you REALLLLLLLLY plateaued? REALLY?”
In a strong majority of the cases, plateaus are really just issues with concentration, tracking, and discipline in disguise. Before you think you have plateaued, consider the following:
1) HOW IS YOUR NUTRITION…REALLY? Oftentimes we think we are being diligent, until we realize that after a few weeks of eating great we’ve started slacking. “Oh I’ve been good, just this one time…” and “Hmmm, sure why not” become more commonplace as we start to fall back into old habits. Track your calories for the next week and check your numbers.
There’s simply LESS of you that your body needs to maintain.
Here is the estimated daily resting calorie burn (“sit on your ass all day”) of a 35-year old male nerd at 3 very different weights:
300 lbs: 2,600 calories.
250 lbs: 2,300 calories.
200 lbs: 2,000 calories.
You might have hit a plateau simply because you’ve reached an equilibrium of calories consumed to calories burned! This means you need to adjust your calorie intake to continue losing weight.
If you are trying to bulk up, are you eating ENOUGH calories to promote muscle growth? Rededicate yourself for two weeks, track your meals, and see if progress picks back up!
2) HOW ARE YOUR WORKOUTS…REALLY?If you are weeks or months into a workout plan, I bet the initial luster of “NEW! PROGRESS! WINNING!” has worn off.
Have you been skipping that last rep, cutting out an exercise here or there, or getting bored and wanting to go home?
I know when I hit a plateau at the gym, it’s generally because I haven’t been pushing myself as hard as I had been previously. Track your workouts diligently for two weeks and see if these changes kick you back on track.
If you need a tool to track your workouts, check out Nerd Fitness Journey. It’s designed so when you wake up in the morning, you know the exact next step to help you reach your goals.
You can try it for free right here:
3) HOW iS YOUR SLEEP?…REALLY? This is one that most people skip out on. They are exercising, eating right, but for whatever reason, they’ve been slacking on their sleep.
It’s might be too much television…
We all know sleep is important– lack of sleep leads to increased levels of stress, less time for our bodies to rebuild muscle, to recover from strenuous activity, and more.
I know that if I didn’t get a good night’s sleep, then my performance in the gym the next day will suffer.
Can you honestly say you’ve spent two weeks with quality sleep, nutrition, and exercise?
In many cases, we think we’re stuck, and in need of some sort of drastic change or adjustment to kickstart progress again. Now, there are definitely instances where we ARE stuck or stalled, and that’s when things need to change.
However, before we cover the dreaded plateau, let’s get a few things clear.
Why Am I Plateauing?
To start, linear progress cannot continue indefinitely:
If you are learning to squat and you start with just the bar, adding 5 lbs a week (which is how you should learn to squat!), you will eventually reach a point where your body cannot build the strength/muscle fast enough to continually add 5 lbs a week. If it DID work that way, in three years everybody would be squatting 1,000 pounds.
You will run into the same issues with weight loss. For example, it’s easier for you to lose 3 pounds a week when you are at 300 lbs than it is to lose 3 pounds a week when you are 150 pounds….there’s more of you to “lose” when you’re bigger and thus progress will be easier. If you could lose 2-3 pounds a week every week forever, at some point you’d disappear, and we don’t want that. Weight loss might slow to 1 pound every other week.
Your margin for error gets smaller. When you are at a higher body fat percentage, or just getting starting with training, you can make a lot of progress quickly due to there being MORE of you to lose, or MORE gains to make quickly. As you start to make progress, you can’t keep making big progress without making more and more effort.
Adaptive thermogensis. Our bodies WANT to maintain the extra body fat we have (“I don’t know when I’ll need this, better save”), and are actively working in unison to preserve it – so even after a few pounds, it’s going to be a persistent challenge to keep progressing. It’s a subject a dive in deep in the article “Why can’t I lose weight?” If you’ve stalled on your weight loss journey, this might be the problem, as your body is adapting to the body fat being lost.
Your progress at a consistent pace will definitely slow down, which can FEEL like a plateau.
If you’ve been training for more than a few months, you might need to slightly adjust your expectations. Maybe this week you can only add 2.5 lbs to the bar. Or 1lb. Maybe your muscle-building will crawl to 1 lb gained a month.
It happens to all of us. Even Batman.
Now, if your progress stalls out COMPLETELY or you actually regress, AND you are doing all of the right things, then congrats!
You MAY have plateaued.
Like in games like World of Warcraft, at some point you will stop gaining experience from killing rats – you could spend all day doing so but because you’ve hit a certain level they no longer provide you with value.
It’s time to move on to attacking spiders, then orcs, then dragons.
When you started out, just doing 5 push-ups might have felt like a full workout. Now you can do 50 push-ups for a warm-up and not break a sweat.
Our bodies are constantly adapting and learning to manage the stresses we put on it, seeking the path of least resistance.
Back to our gaming analogy:
If it’s something worth doing, there will most likely be grinding involved, and that’s why I need to talk to you about The Dip.
No not a strength training type of ‘dip’, though those are good to help bust through a plateau too!
You can learn more about how we help build plateau-less workouts at Nerd Fitness by downloading our free Strength Training 101 eBook when you sign up in the box below:
Download our comprehensive guideSTRENGTH TRAINING 101!
Everything you need to know about getting strong.
Workout routines for bodyweight AND weight training.
How to find the right gym and train properly in one.
Is a Plateau Normal? (The Dip)
I want to introduce you to Seth Godin, author of The Dip.
We all hit plateaus in our lives and quests for health and happiness. In order to be successful at the task at hand, we need to grind our way through that low point (or flat point) until we can climb out and continue progress.
Here’s a visualization of the dip:
When you first start something new, you can make quick progress, and everything rocks because you see big changes.
However, after a few months, the reward you get from your effort decreases and it seems like you’re rapidly slowing down:
In the first few weeks of weight loss, everything is GREAT! The scale is moving, your clothes are getting looser, progress is exciting because it’s coming so quickly. Then, you might have a few weeks where you’re really trying hard and yet…the scale stalls or increases.
When building a new running habit, each new run is exhilarating – you rapidly progress from wheezing and coughing after two blocks to now being able to run a whole mile! A few months later, that progress slows, and you find yourself struggling with the same distances and speeds even though you’re doing all of the right things.
When lifting weights, the first few months can be life-changing.Squats, deadlifts, pull-ups,push-ups. Every session in the gym is an opportunity to see massive progress compared to the time before, except for that week or two when you walk in and you have to lift less than before! What gives!?
When we hit that dip/plateau where our hard work seems like it goes unrewarded, it’s easy to give up and say, “I’m a failure.”
Not true.
We will all experience a dip when it comes to progress on things that are important to us.
If we want to TRULY be successful, we need to anticipate the dip’s arrival and plan for it so that it doesn’t completely derail us.
Much like grinding out experience points in an RPG, sometimes we need to grind out practice in life, workouts, nutrition, and more…until we can hit that sweet spot for progress again.
So, how do we stay dedicated, focused, and motivated through the dip?
How do we progress during the plateau when we feel like our hard work is a waste of time?
We focus on small wins, and find a way to get a teeny tiny bit better.
What Should I Do When I Hit a Plateau? (Setting Personal Records)
In order for us to crawl out of a dip or off a plateau, we need to find a way to make a small win every day.
Think of these small wins like “a light to you in dark places, when all other lights go out.”
The longer we’ve been training, the older we get, and/or the more advanced we get in our training, the more likely we’ll be to hit plateaus and the more necessary it will be to grind out small victories, prepare for dips, and power through them.
Here’s how you can grind out your own small wins and prove to yourself that you are still progressing when you are in the dip:
1) TRACK EVERY SET, REP, AND WORKOUT. Find a way to be better today in SOME WAY than you were yesterday, and prove to yourself that you are still making progress – even if it’s progress in a different way than you were progressing before.
If you are stuck at 3 sets of 5 reps of 150 pounds on the bench press and haven’t been able to go up to 155 lbs for a few weeks, try 3 sets of 6 reps of 150 pounds.
Or 4 sets of 5 reps of 150 pounds.
Then come back to 3 sets of 5 reps of 155 a few weeks from now, and see if you can do that.
If you wait 60 seconds between sets, try waiting 90 seconds instead and lift a different amount
As long as SOMETHING has progressed in some way – your total amount of weight lifted, decreased time between sets, one extra rep, or one more pound lifted – it proves to yourself that you made progress. Remember, progress makes us happy.
We are transformers (Joe especially), and our small changes add up too.
It’s these tiny, small victories that can push us over the edge. Enough small victories and we can reach that tipping point, that end of the dip where progress continues again.
Find a way to set a tiny win in SOME WAY each day that shows you that you are getting better/faster/stronger.
Here’s an example: I have been working on handstand balancing. For the past few months, my progress has stagnated and even gone in reverse on some days (helloooo Dip!).
I continued to work on building the habit of handstands for five minutes a day (Hard Hat challenge for the win!). Progress felt nonexistent, but I knew that my continued dedicated practice was adding up in ways that didn’t make themselves readily apparent.
I had “stalled,” so I focused on getting tiny wins: increasing flexibility in my wrists, staying against the wall as long as I could, practicing my kick-ups, tightening my core, etc.
Despite not being able to balance for longer than 10 seconds at any point in the past, I kicked up into a handstand, without even touching the wall (something else that had never happened before), and I held my handstand for 24 seconds!
I still have a ways to go before I’m holding perfectly vertical handstands for 60+ seconds, but months spent grinding out practice in the dip have paid off.
I made it through the plateau, and my progress has continued rapidly after struggling for months. Those months of struggle were teeny tiny wins in different ways that added up until I hit that tipping point where progress exploded.
3) TRACK OTHER METRICS OTHER THAN THE SCALE. The scale can lie. The scale will DEFINITELY slow down even if you are making progress in healthier ways, simply due to the fact that you have less weight to lose than you did before! You might also be dealing with extra water weight, or bloat, or menstruation, or anything in between.
So, track other things! Here’s what you can track to help keep you motivated while plateauing:
Take biweekly photos. Who cares if the scale isn’t moving. Are you looking better? Are you FEELING better? Do your clothes fit better? That is progress.
Take measurements. Spend 5 bucks on a cloth tape measure (or one of these), and measure the important parts of your body. Maybe the scale isn’t moving, but you took half an inch off of your waist. Or maybe you added a quarter of an inch to your arms.
Track your body fat percentage.A simple caliper is enough to show trends. Remember Saint? His weight went UP but his body fat percentage dropped. Had he only been tracking the scale, he might have panicked during his ‘dip.’ Fortunately, he was tracking more metrics and used that momentum to catapult himself to victory.
The goal is to consistently prove to ourselves that we are moving one step closer to our goal.
This is exactly the system we used when we built Nerd Fitness Journey.
When you’re working through the app, not only are you doing fun missions, but you’ll see how tasks build up to your larger goal. There’s no getting stuck or frustrated, just log in and work on the next adventure.
If you want, you can sign-up for a free trial right here:
5 Tips and Tricks for Overcoming a Plateau
The above is just the beginning. This will also help you make progress and get out of that dip:
1) Shock your workout. Our bodies crave efficiency, and love to be as lazy as possible, but we truly thrive on chaos. So introduce some chaos into your system!
Note: This is NOT the same as “muscle confusion” (which is a made-up marketing term to sell DVDs). We’re still progressing, lifting more, and doing the same exercises – we’re just throwing in some variation occasionally to help stimulate progress.
If you do the exact same thing over and over and over, your body becomes more efficient at that activity.
In fact, your body can learn and adapt after doing the same thing enough times so that it burns fewer calories to carry out the process. So mix it up!
Trying to increase your deadlift? Rather than just doing a 1-rep max, do a day of higher volume, or train the deadlift twice a week.
Want to squat better? Squat with higher frequency. NF Senior Coach Staci followed an advanced Smolov Squat program for 13 weeks (Warning: not for beginners). Your body can adapt and overcompensate by getting stronger.
Want to improve your upper body strength/size? Try doing a PLP program along with your regular workouts. Starting with 10 total reps of Pull-ups, Lunges, and Push-ups, and every day add a rep, for 50 days.
2) Adjust your diet. Your body can also become quite efficient with calories (not to mention the oft-mentioned but controversial “starvation mode” theory), and can sometimes struggle to progress.
As we lay out in “Why can’t I lose weight?,” if you’ve lost a decent amount of weight, your body now burns significantly fewer calories each day (there’s less of you to manage!) This means you need to adjust your calorie intake!
ONLY after that doesn’t work would I recommend the following:
Consider throwing in one day a week of OVER eating, along with days where you are intermittent fasting. Keep your body guessing and see if that shocks your system back into weight loss mode.
Consider adjusting your macronutrient breakdown. Keep your protein intake high, and adjust your carbs and fats. Some people feel better or worse with high fat or low fat, high carb or low carb.
3) REST! I’ve heard it said “there’s no such thing as “overtraining, just under-recovering.” Are you getting enough sleep?
Maybe you’re a new parent and trying to maintain your old workout routine on 2 hours of sleep a night.
Or work has you stressed like crazy and it’s causing you to eat like crap.
Rest is such an important part of a healthy lifestyle that it needs to be prioritized too. In the book Essentialism, this is referred to as “Protecting the Asset.”
You are the asset.
If you are trying to do too much, or you’re caught in a plateau, consider a week off, refocusing on sleep and recovery, and come back refreshed.
Again, nature loves chaos. If you are focused solely on weight loss, you might feel like you have stalled out. So shift your focus. Work on handstands. Or running faster.
Try something different. Give your body a chance to recover and then come back to it.
If you’re solely focused on the scale and it stalls out, it can be depressing. So put the scale away for a month, and instead focus on the process of getting stronger and eating better. Stop stressing and remember to enjoy the game you’re playing.
5) Accept that we have bad weeks. We are complex pieces of machinery.
We just have bad weeks and can’t lift enough or we GAIN weight when we expected to lose weight. It doesn’t make you a bad person, it doesn’t make you a failure, it makes you human.
So on days when you feel great, PUSH yourself harder. On days when you feel like crap, scale back the heavy lifting and focus on more reps or better technique.
The greatest predictor of success in our lives is grit (which can be developed). Grit is what you need to slog through these slow weeks. These dips are where we find out who’s truly dedicated. I know you are, and you know you are.
Remember, look for any sign of progress in any way to reveal that “light” at the end of the tunnel.
If you are stuck on a plateau when it comes to strength training, consider working with one of our Yodas in the 1-on-1 Online Training Program at Nerd Fitness! No guilt, no shame. Just somebody to keep you accountable, expert guidance from somebody that knows you, and peace of mind knowing you’re doing the right thing!
How did you break through your plateau?
Here’s that dope Bruce Less quote I mentioned earlier:
“If you always put limits on everything you do, physical or anything else, it will spread into your work and into your life. There are no limits. There are only plateaus, and you must not stay there. You must go beyond them.”
-Bruce Lee
Hopefully, I’ve covered everything you need to know about plateaus. What’s that? You were expecting some lame joke about plateaus somewhere?
You know me too well. Okay, how bout this one:
Did you know that a plateau is the highest form of flattery?
Get it?
Thank you, I’ll be here all week.
I want to hear your story:
Have you successfully busted through a plateau? Leave a comment with how you got out of it.
Are you currently stuck? If so, what’s ONE SPECIFIC piece of advice you’re taking from today’s article to apply to what you’re going to do this afternoon?
Let’s hear it! I’m excited to hear how I can help.
-Steve
PS: We know starting with this stuff can be intimidating. If you’re looking to take it to the next level:
1-on-1 Online Coaching: A coach from Team NF gets to know you better than you know yourself and builds a workout program and nutritional strategy that fits your busy life, your body type, and your goals.
Nerd Fitness Journey: a fun app that will show you the path for overcoming any plateau. Sign up for a free trial below: