With 4 little ones in the house our home is anything but calm and serene. We are a loud bunch (sorry neighbors!) Someone is always running or jumping off of the furniture, someone is usually crying, someone is always singing, and on top of that, there’s usually some bickering/laughing/fighting mixed in there too.
As someone who prefers calm, quiet and peaceful environments, I’ve had to get creative with ways to bring more peace and calm into our home.
One of the ways I do that is by trying to keep our toys and kids stuff as simple as possible. I’m not an extreme minimalist by any means, but I read a book called Simplicity Parenting after having my first child 7 years ago and it had a huge impact on the way I think about toys and what choose to keep in our home.
I strive to take a “less is more” approach and honestly, it can be hard! Toys and things just seem to fill up the house no matter what I do, which is why this month we’re focusing on simplifying and decluttering as our off-the-mat mission in The Balanced Life Sisterhood.
A few things I do to keep the kids clutter at bay:
Toy rotation: we have 3 big plastic bins in the garage that we use to store toys that don’t fit in our toy basket in the living room. We rotate these out on occasion which not only helps to reduce clutter in the house but it also keeps the kids interested in their toys because when something new comes out of the bin it feels new and inspires them to play!
Regular toy clean outs: before birthdays and holidays we do family toy clean outs. The kids (who are older than 2) get to decide what they keep and what they give away to a family in need as they make space for the new gifts that will be arriving soon.
Crafts and items that come home from school have a special spot on a shelf and we keep them there long enough to be enjoyed. And then once the kids forget about them or lose interest – out they go! (I do keep the sweet & special art work in a plastic storage bin in our closet, but I try to be very selective in what I keep and upload the rest to artkive)
If you’re a parent, you know that the more toys around the house, the more we have to pick up. I’d rather use that time relaxing, doing Pilates, reading a book so I’ve found that keeping toys simple not only encourages more creativity and outdoor play for my kids, but it also makes it easier for all of us to keep the home feeling somewhat organized and clutter-free.
I also hosted a live chat with my friend, Allie Casazza, where we talked ALL about practical tips to de-clutter and de-stress. You can watch the replay here!
xo,
PS – Full disclosure: My daughter LOVES to play and will spend entire days in imaginative play. In those times I fully let her make a mess with her pretend world because that’s exactly the kind of play I hope to foster in our home. I let her run wild, as long as she helps to clean it up
With 4 little ones in the house our home is anything but calm and serene. We are a loud bunch (sorry neighbors!) Someone is always running or jumping off of the furniture, someone is usually crying, someone is always singing, and on top of that, there’s usually some bickering/laughing/fighting mixed in there too.
As someone who prefers calm, quiet and peaceful environments, I’ve had to get creative with ways to bring more peace and calm into our home.
One of the ways I do that is by trying to keep our toys and kids stuff as simple as possible. I’m not an extreme minimalist by any means, but I read a book called Simplicity Parenting after having my first child 7 years ago and it had a huge impact on the way I think about toys and what choose to keep in our home.
I strive to take a “less is more” approach and honestly, it can be hard! Toys and things just seem to fill up the house no matter what I do, which is why this month we’re focusing on simplifying and decluttering as our off-the-mat mission in The Balanced Life Sisterhood.
A few things I do to keep the kids clutter at bay:
Toy rotation: we have 3 big plastic bins in the garage that we use to store toys that don’t fit in our toy basket in the living room. We rotate these out on occasion which not only helps to reduce clutter in the house but it also keeps the kids interested in their toys because when something new comes out of the bin it feels new and inspires them to play!
Regular toy clean outs: before birthdays and holidays we do family toy clean outs. The kids (who are older than 2) get to decide what they keep and what they give away to a family in need as they make space for the new gifts that will be arriving soon.
Crafts and items that come home from school have a special spot on a shelf and we keep them there long enough to be enjoyed. And then once the kids forget about them or lose interest – out they go! (I do keep the sweet & special art work in a plastic storage bin in our closet, but I try to be very selective in what I keep and upload the rest to artkive)
If you’re a parent, you know that the more toys around the house, the more we have to pick up. I’d rather use that time relaxing, doing Pilates, reading a book so I’ve found that keeping toys simple not only encourages more creativity and outdoor play for my kids, but it also makes it easier for all of us to keep the home feeling somewhat organized and clutter-free.
I also hosted a live chat with my friend, Allie Casazza, where we talked ALL about practical tips to de-clutter and de-stress. You can watch the replay here!
xo,
PS – Full disclosure: My daughter LOVES to play and will spend entire days in imaginative play. In those times I fully let her make a mess with her pretend world because that’s exactly the kind of play I hope to foster in our home. I let her run wild, as long as she helps to clean it up
There’s no gentle way to say this – training with injuries SUCKS!
The most important thing you can do now is to let yourself heal.
However, depending on your injury, there might be quite a few ways to stay active while also recovering.
We do this all the time in our Online Coaching Program. We’ll build workouts for clients who are dealing with pre-existing injuries, so they can make the most of their recovery time.
REAL QUICK: If you’re worried about hurting yourself while lifting, I would encourage you to check out our guide, Strength Training 101: Everything You Need to Know. We cover all you need to begin a strength training practice, from equipment, starting weight recommendations, and proper form techniques to prevent injuries. You can grab it for free when you join the Rebellion below!
Download our comprehensive guideSTRENGTH TRAINING 101!
Everything you need to know about getting strong.
Workout routines for bodyweight AND weight training.
How to find the right gym and train properly in one.
NOTE: I am not a doctor (in fact, I’m not even wearing pants right now). You should really seek medical attention for any injury you receive.
Step 1: Preventing Injuries in the First Place (Warming-Up)
Now, it should go without saying: the best way to handle an injury is to prevent it in the first place.
Studies have shown that a brief warm-up before your workout can help prevent injuries.[1]
Here’s why:
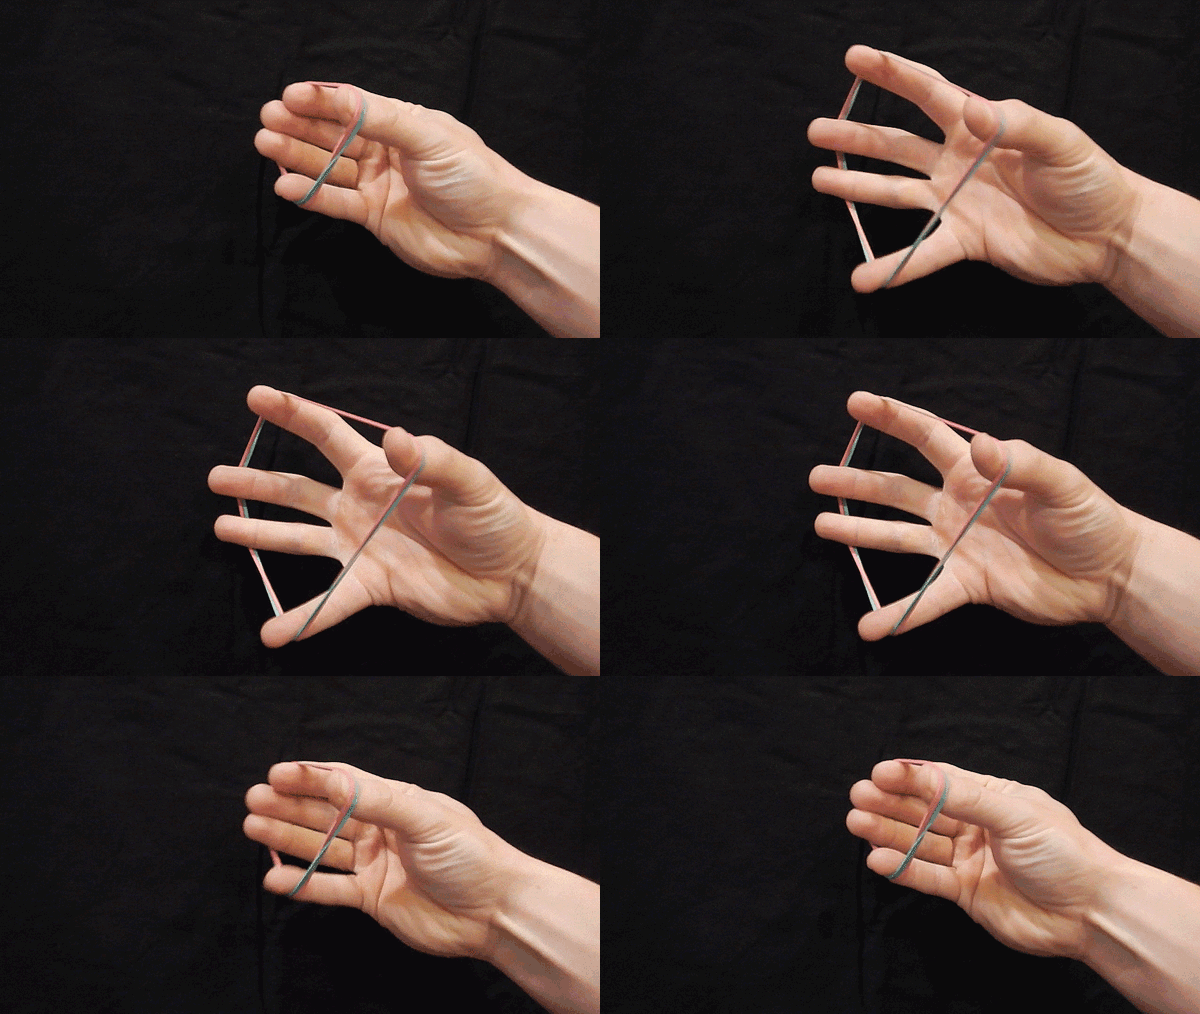
You can think of your muscles like rubber bands:
Should you start your workout by immediately lifting heavy weights or sprinting really fast, those cold, unstretched rubber bands can get pulled apart very quickly. They can then get snapped or pulled out of shape.
Ouch.
That’s why every workout should start with a warm-up.
We are such big believers of this, that when we program workouts through our Online Coaching Program, we ALWAYS kick it off with a warm-up. It’s one of the tools in our kit to help clients stay injury-free.
Step 2: When Should I See a Doctor After an Injury?
As Coach Jim mentions in the video above, the FIRST thing to do after an injury is to seek a professional.
All the internet advice in the world won’t take the place of a single session with a doctor or physical therapist.
After you get hurt, really the best thing you can do is have the injury examined by someone who knows what they’re doing.
I will say, that not all doctors are created equal…
…but that’s not another article.
Next, we need to get your headspace in proper order (even if you don’t have a head injury)
Step 3: How to Mentally Deal With Injuries
The SECOND thing to do right after an injury: realize it’s going to affect you mentally…just as much, if not more than physically.
So be prepared!
There are numerous studies showing the different negative emotional reactions that people have when injured.[2]
But just from the School of the Obvious – if you’ve ever had an injury – you know how it puts you in a bad mood.
What may help, is recognizing and reframing negative thoughts, like with some quiet meditation or journaling. Or even seeing a therapist or sports psychologist
Just make sure you don’t overlook the mental aspects of recovery.
Step 4: Testing Movement Around the Injury
After you’ve seen a doctor and prepared for the mental battle ahead, I want you to test all movements.
And by test, I mean work through as much of the range of motion of an exercise as possible with zero additional resistance and without feeling any pain.
That means if your shoulder bothers you, just see if you can extend your arms all the way above your head. Do this before you even consider doing a push press or shoulder press.
After that, make sure to test movements that you don’t suspect will be a problem.
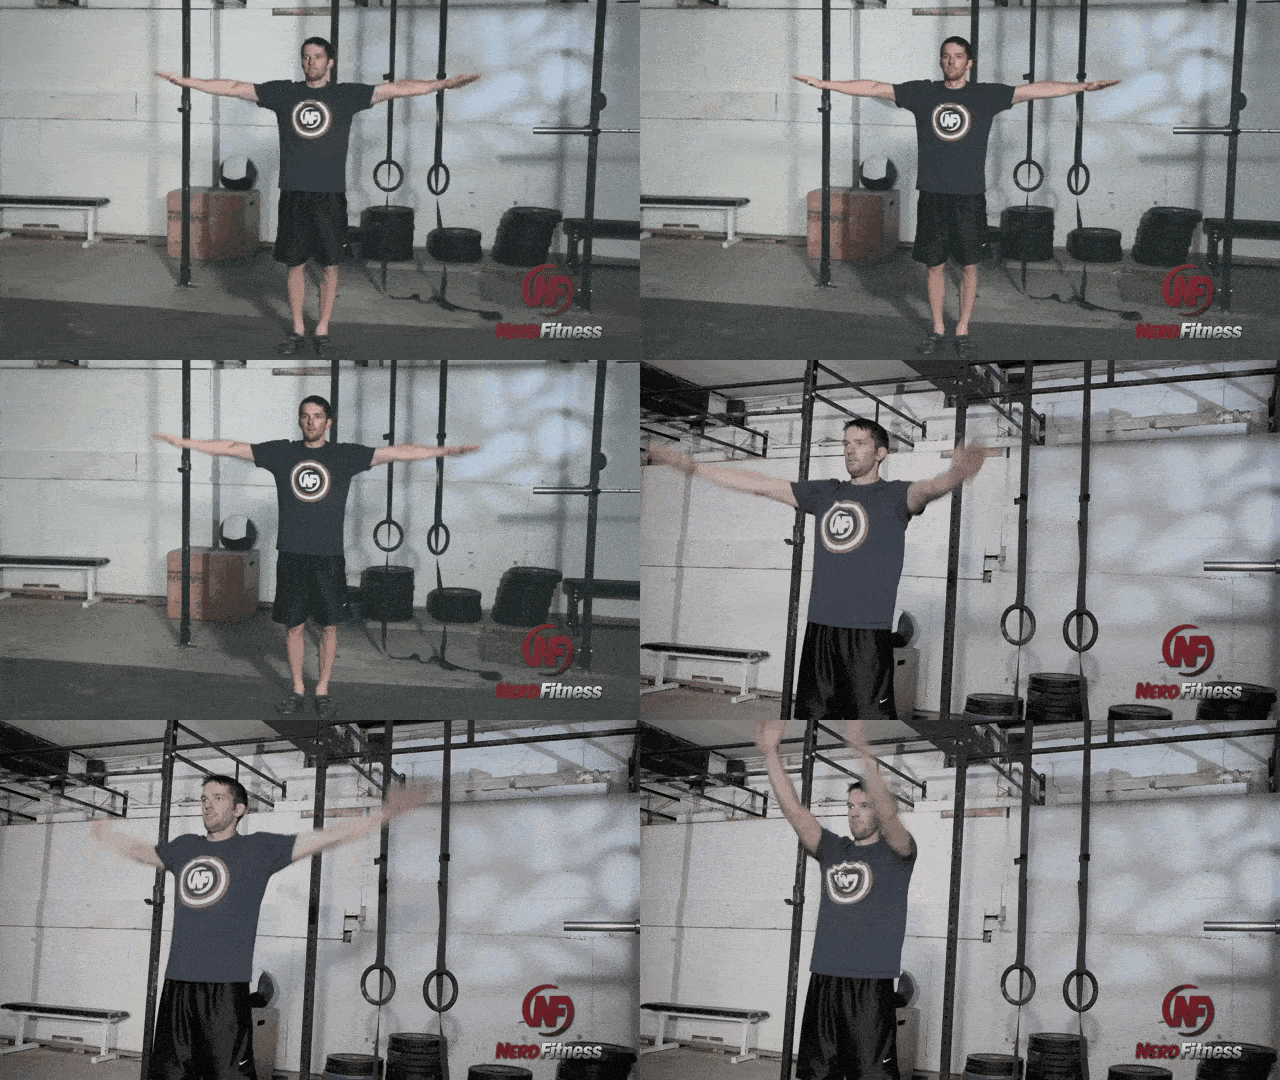
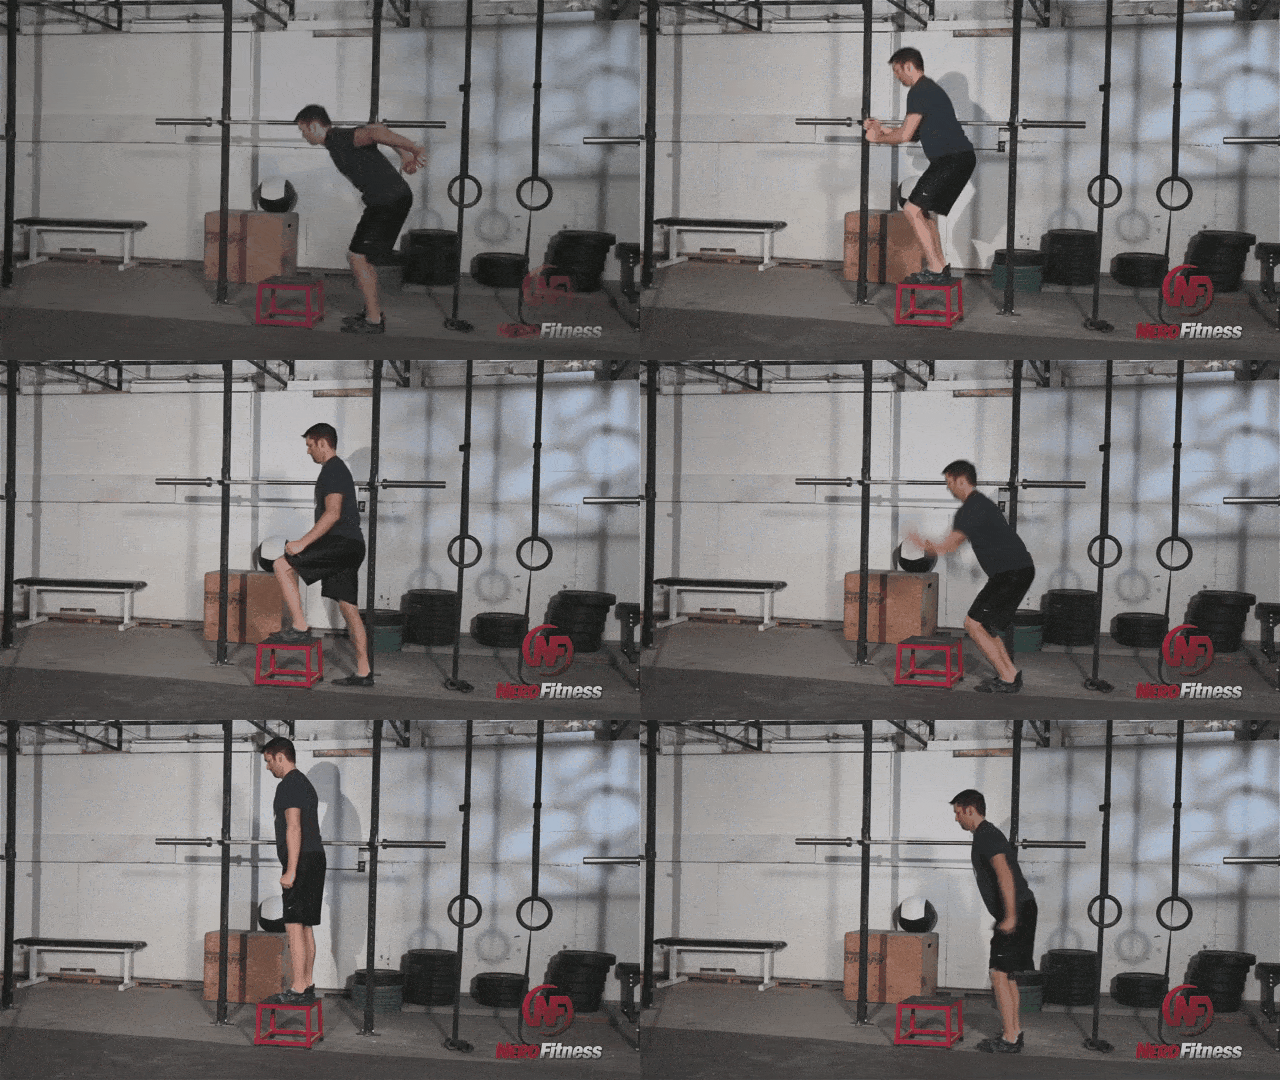
A shoulder injury could very well make box jump sessions impossible, due to the arm swing involved in the movement.
Try out each movement cautiously!
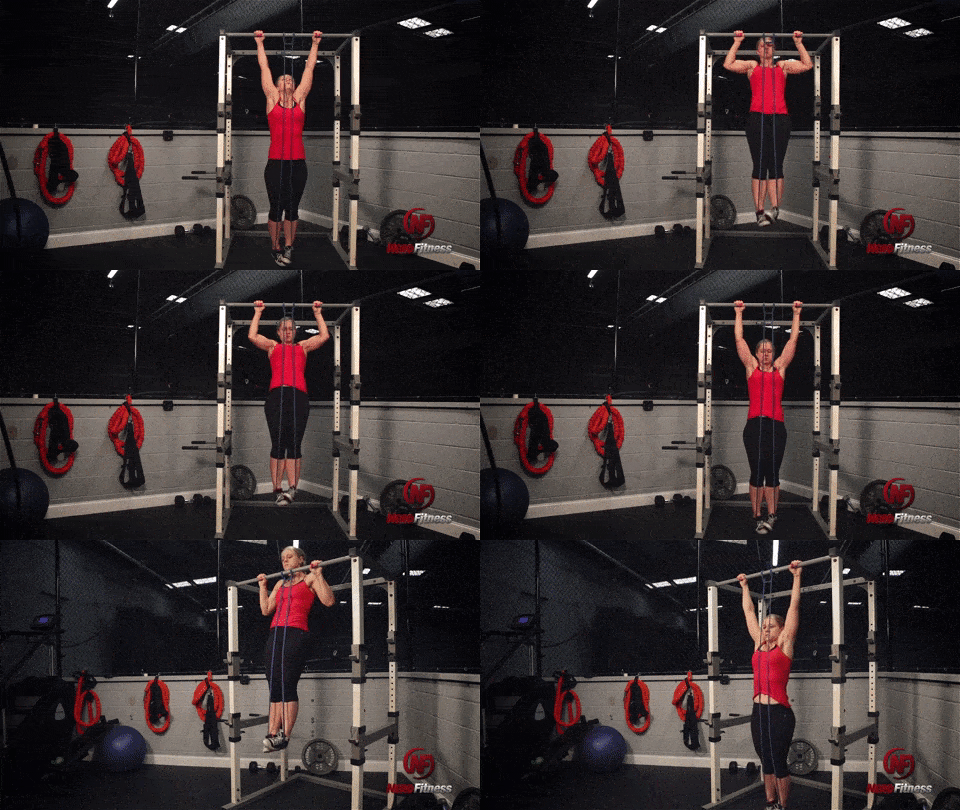
Something to keep in mind: just because you have pain with a push movement, does not necessarily mean you will have pain with a pull movement.
I have had a shoulder injury where dips and push-ups were out of the question…but pull-ups were fine.
And that is why you should test all movements – you may have more training options than you expect. Then again, your injury may limit movement more than you realize.
Last time I’m going to say it – test.
Step 5: How to Make the Most Of Your Recovery (Sleep and Nutrition)
Next, rest.
And by rest, I mean completely stop doing movements that cause you pain until you are healed.
If you feel any pain during your test (especially joint pain), then you should abandon that movement until the injury heals.
You cannot “suck it up” and just grind through joint pain without hindering healing at best…
…and causing further damage at worst.
Along with rest, a recovery regimen to accelerate healing should be considered. Ideally, this would be done under the care of a physician. I have been to the doc for injuries in the past and have found that those that use “Sports” in the title of their practice (Sports Medicine, Sports Therapy) do their damnedest to keep you active.
Here are two often overlooked components of recovery:
Sleep and nutrition are always important when it comes to fitness. But for the swiftest recovery from an injury, you need to get your food intake and sleep schedule dialed in extra tight.
To prioritize sleep, sign off of Fortnite an hour earlier and get to bed (Life is cruel).
If you want to do everything within your control to sway the healing forces in your favor, be extra diligent with your sleep and eats.
Step 6: Staying Active While Injured
If your doctor has okayed it, stay active any way you can.
This is often the opposite of what many people will do – which is to completely stop using the injured area.
We want to move pain-free, of course, but any light movement is often going to be more beneficial than just stopping movement altogether – as it gets the blood flowing through the area and helps recovery.[3]
This might mean lowering the weights used, doing an assisted or even unweighted variation of an exercise.
But if you can still safely move the injured area without causing added pain or setbacks – then it’s often a good idea to do so.
If that’s not an option, consider different ways to move while injured:
If you can’t run, how about an elliptical or stationary bike?
If you can’t use one leg or the other, can you work out your upper body?
If you can’t use one arm/shoulder, can you still do lower body exercises like lunges/squats/step-ups?
If you can’t do any resistance training, can you still go for walks?
Let’s dive into this point a little more.
Step 7: Getting Creative While Working Out With an Injury
My dear friend, it’s time to get creative.
When you get injured, start thinking outside of the box to find the opportunity in the obstacle.
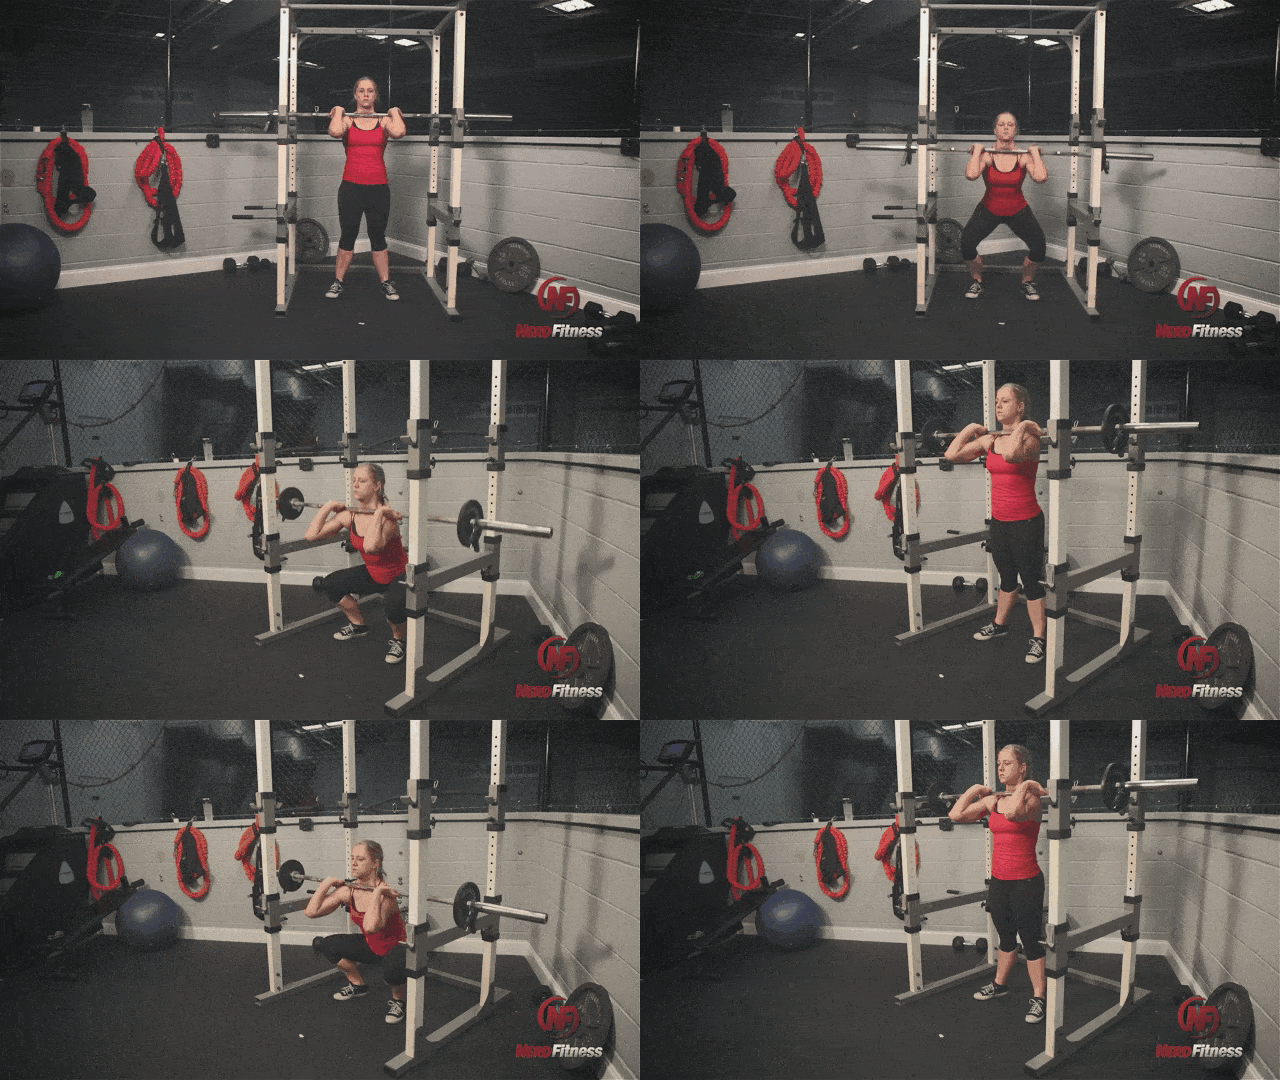
A shoulder injury may make back squats incredibly painful. But holding the bar for a front squat instead could feel fine…
…and perhaps it just so happens that you have neglected the front squat lately.
So instead, try to look at an injury as an opportunity for you to focus on a weakness. Strengthen your weaknesses, become more well-rounded, and better equipped to deal with rigorous activity.
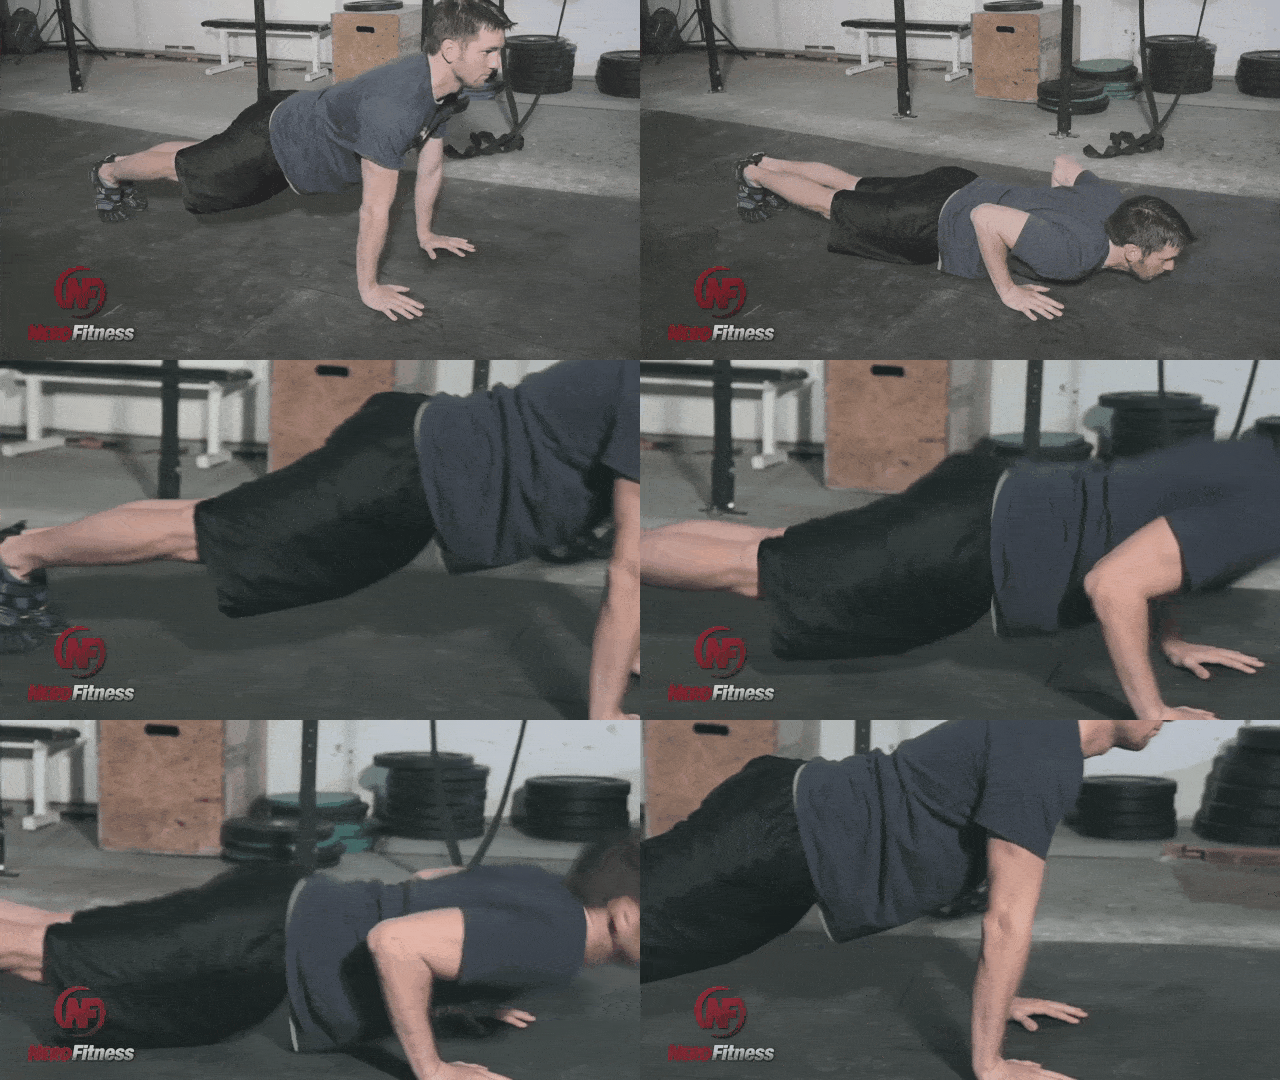
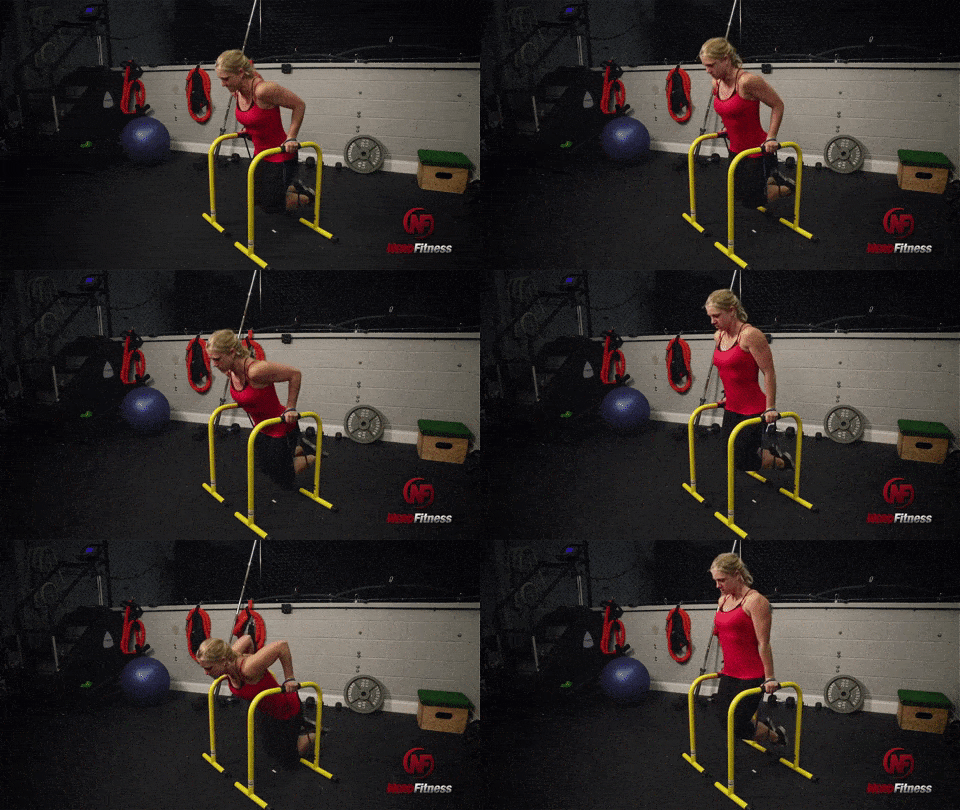
Wrist pain is most commonly complained about when doing the traditional push-up:
You might be able to alleviate this pain by using push-up bars and even (believe it or not) knuckle push-ups.
This is because you might be dealing with a flexibility issue and not an actual injury.
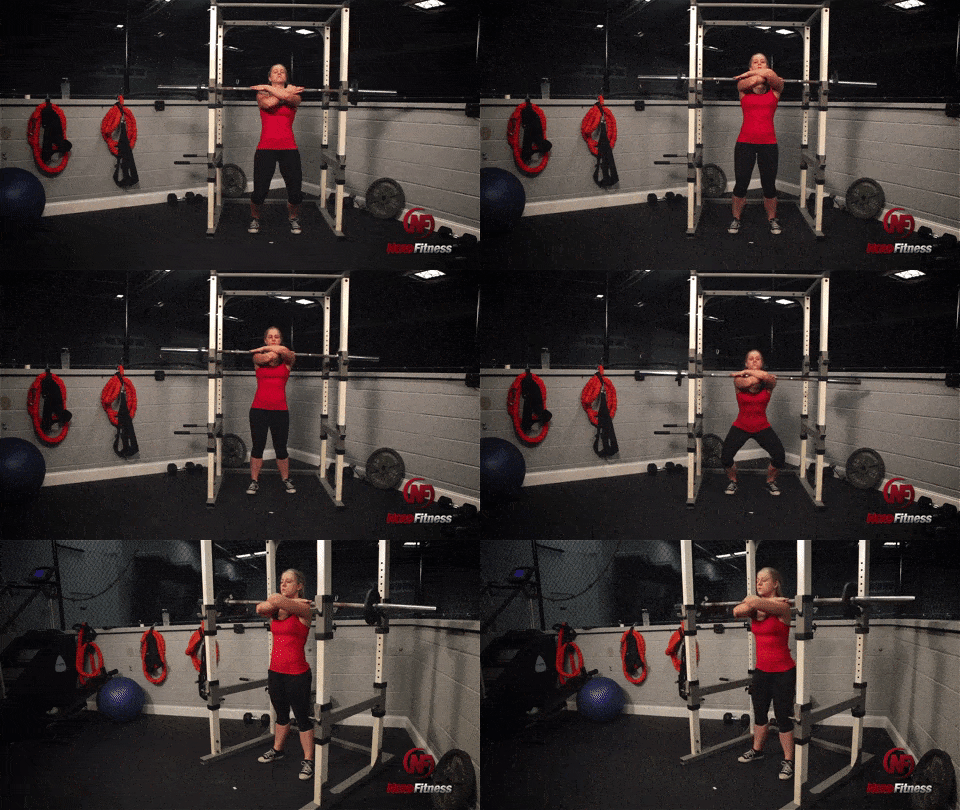
Front squats and power cleans done with the Olympic rack position may also lead to complaints of wrist pain.
To eliminate wrist pain in the front squat, try the more common crossed-arm rack position:
For the power clean, concentrate on getting the bar on top of the front of your front deltoids (shoulders) – if the bar is touching your throat, you are getting there.
Impact that corresponds with landing from jumping.
Lateral (side to side) movement, especially for participants of sports like soccer, rugby, basketball, and other “man to man” athletics.
Knee issues can be especially frustrating for those trying to lose weight because exercises involving squatting, lunging, and jumping are ideal for accelerating fat loss.
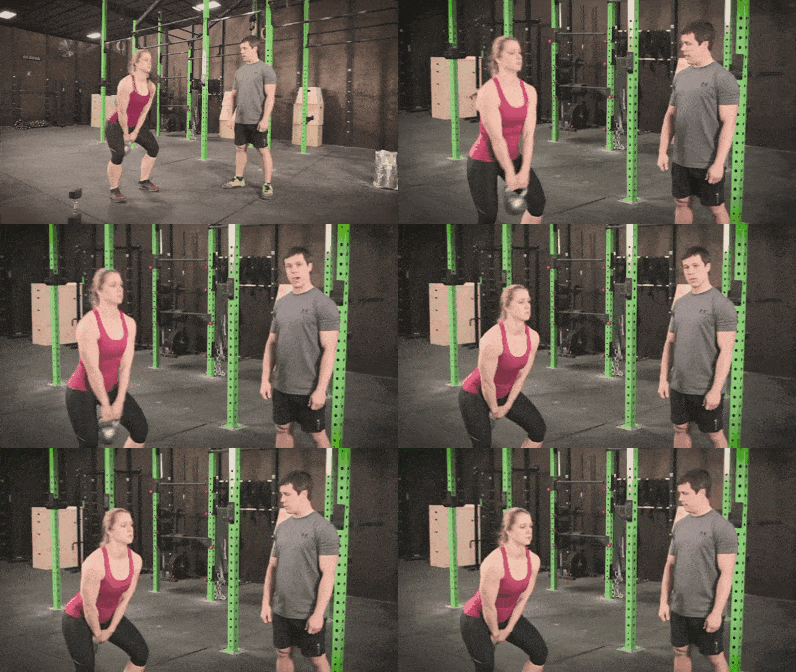
In this situation, I typically recommend a kettlebell swing as my first alternative option.
A properly executed swing does not involve much bending of the knee. In my experience, most people who cannot squat can handle swings without screwing up any preexisting knee conditions.
However, it is important to work slowly at first to be sure that the twisting necessary for generating punching power from the hips does not aggravate the knee condition.
#4) Can I Lift with a Hurt Elbow?
You’re out of luck on this one, unfortunately. Sorry.
Nearly any upper body exercise, push or pull, will hinder your recovery time.
Avoid any high-impact movements with a hurt ankle.
And all that means is do not jump.
But other movements that involve more subtle ankle movement such as squats may also have to be put on the back burner as you heal. It is possible (likely?) that you may have to focus on upper body movements and use seated versions of movements such as rows and overhead presses instead of standing.
This will help let your ankle heal.
#6) What Should I Do With Shoulder and/or Hip Pain?
Test, test, test.
These ball and socket joints can be the most unpredictable when it comes to training options.
Start slow, start light, and back off the second you feel any pain.
Be aware of training opportunities that you would not have considered without the injury
If you want any more help along your journey, you know we’re here for you.
Here are three ways that Nerd Fitness can help you level up.
#1) Our Online Coaching Program: a coaching program for busy people to help them make better food choices, stay accountable, and get healthier, permanently.
They can build you a custom program so you can grow strong, to hopefully prevent you from getting injured in the first place. Plus, they can do form checks to help make sure you’re doing all your training correctly.
You can schedule a free call with our team so we can get to know you and see if our coaching program is right for you. Just click on the image below for more details:
#2) If you want a roadmap for getting in shape, check out NF Journey. Our fun habit-building app will help you exercise and eat better, all while you build your very own superhero.
Interested?
Try your free trial right here:
#3) Join the Rebellion! We need good people like you in our community, the Nerd Fitness Rebellion.
Sign up in the box below to enlist and get our Rebel Starter Kit, which includes all of our “work out at home” guides, our Strength Training 101 eBook, and much more!
Get your Nerd Fitness Starter Kit
The 15 mistakes you don’t want to make.
Full guide to the most effective diet and why it works.
Complete and track your first workout today, no gym required.
Alright, I think that about does it for today’s articles.
Now, I want to hear from you!
Do you have an injury that is preventing you from training?
Do you have any tips and tricks to keep moving while still recovering?
Did you seek advice from a doctor who gave you good information?
Whether you got exercise bands in the mail from Amazon during quarantine, or they’ve been sitting in your closet since the 80s, you’ve finally decided it’s time to learn how to use the darn things.
Either way, you’re in the right place!
That’s because we specialize in home workouts. Our Coaches build custom training programs for whatever equipment you might have available (or even “no equipment”).
If you have a set of resistance bands, today we’ll show you how to put them to good use.
The Nerd Fitness Resistance Band Workout (With Video Tutorial)
After you watch the video above (featuring Matt Shortis, a lead trainer in our 1-on-1 Online Coaching Program), here’s a quick recap with the repetitions of the workout here:
That’s just a fancy term for doing a workout like so:
1 set of exercise A, go immediately to
1 set of exercise B, go immediately to
1 set of exercise C, and so on…
Repeat from the top!
Your long-term goal should be to do 3 full circuits back to back for a complete workout.
If you can only go through it once or twice, that’s okay too!
And if you need to take a break at any time between sets or after a circuit, do it! You do you.
Whatever you do, don’t skip your warm-up. Even if you don’t do the sequence above, make sure you get your heart rate up a little before jumping in.
Here’s another short sequence you can do to warm up:
Next, let’s go over each move covered in our resistance band workout (and warm-up) in detail.
The 10 Best Resistance Band Exercises
Here’s each exercise covered in the Beginner Resistance Band Workout:
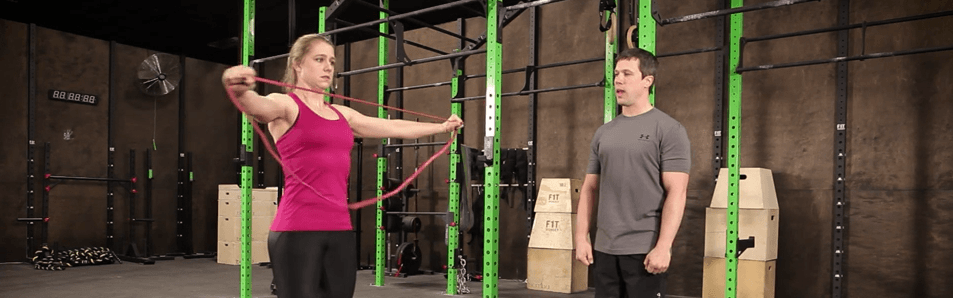
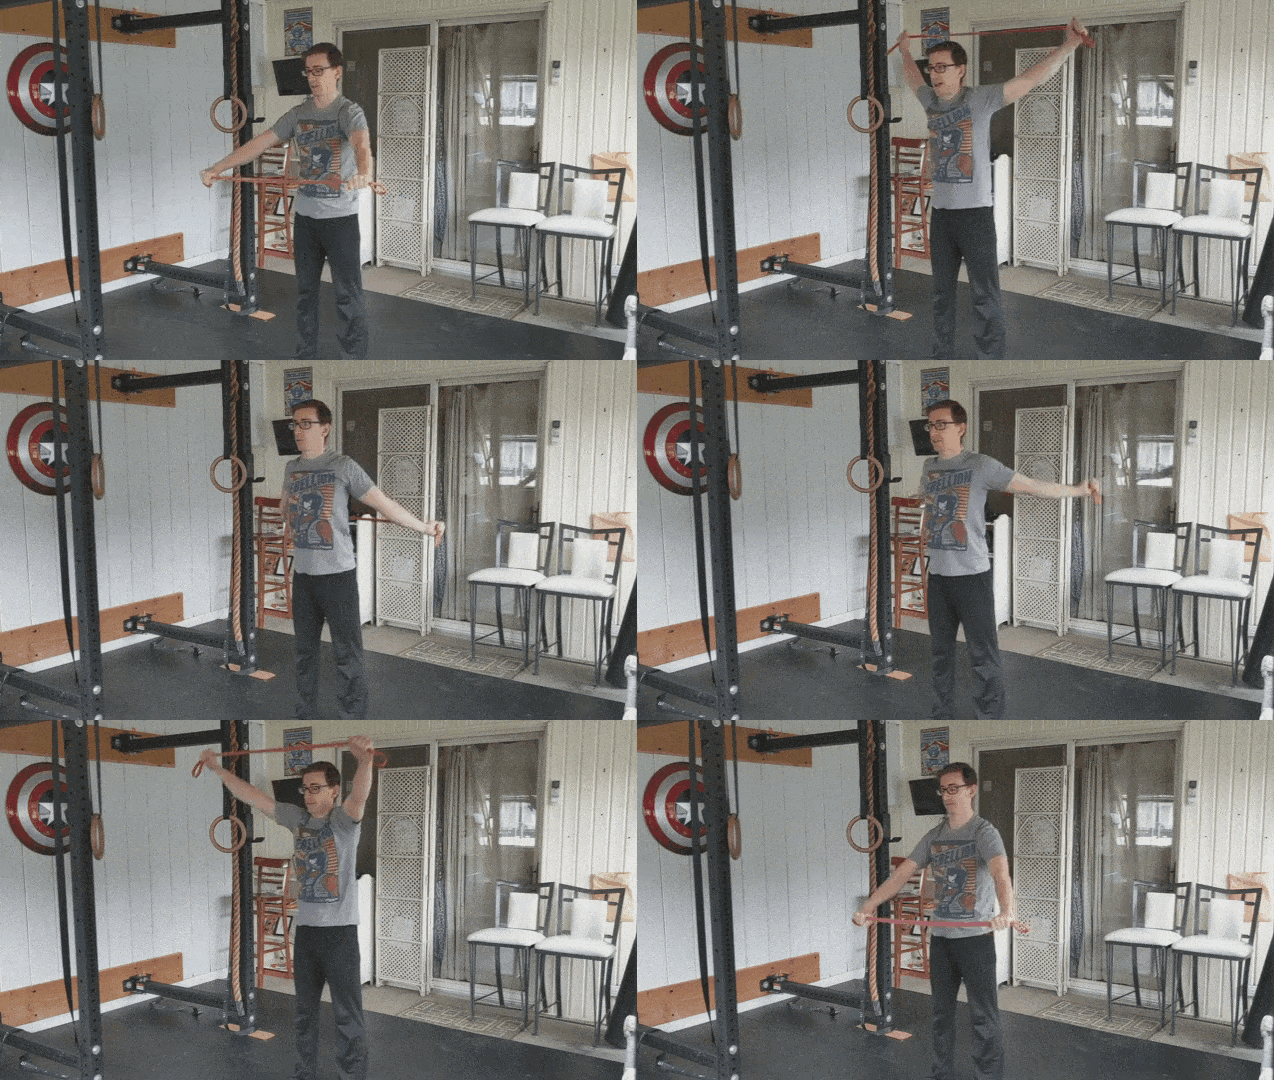
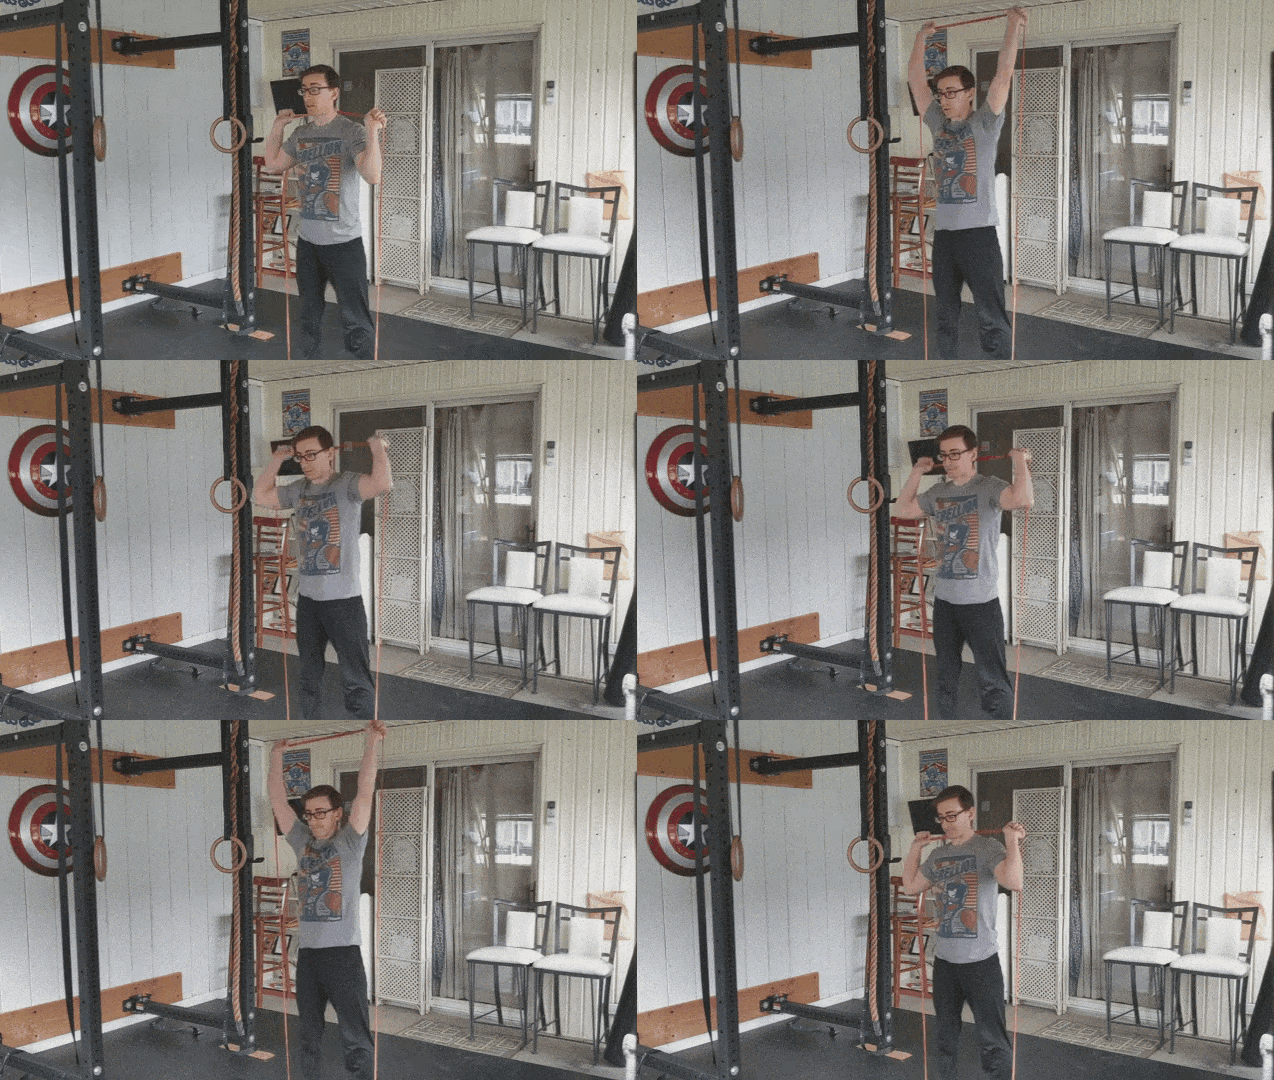
#1) BAND OVER AND BACK
Grab the band in front of you, with both hands, about shoulder-width apart. Start at about waist height.
Pull the bands apart.
While keeping your arms and elbows straight, lift upward, eventually reaching above and over your head.
Continue this motion down your back, keeping your arms as straight as you can.
When your shoulders won’t let you come down any further, reverse the movement and come all the way back to your starting position.
Repeat.
Tip from Coach Matt: If it’s too difficult to keep your arms straight, loosen and widen your grip on the band so it becomes less taut.
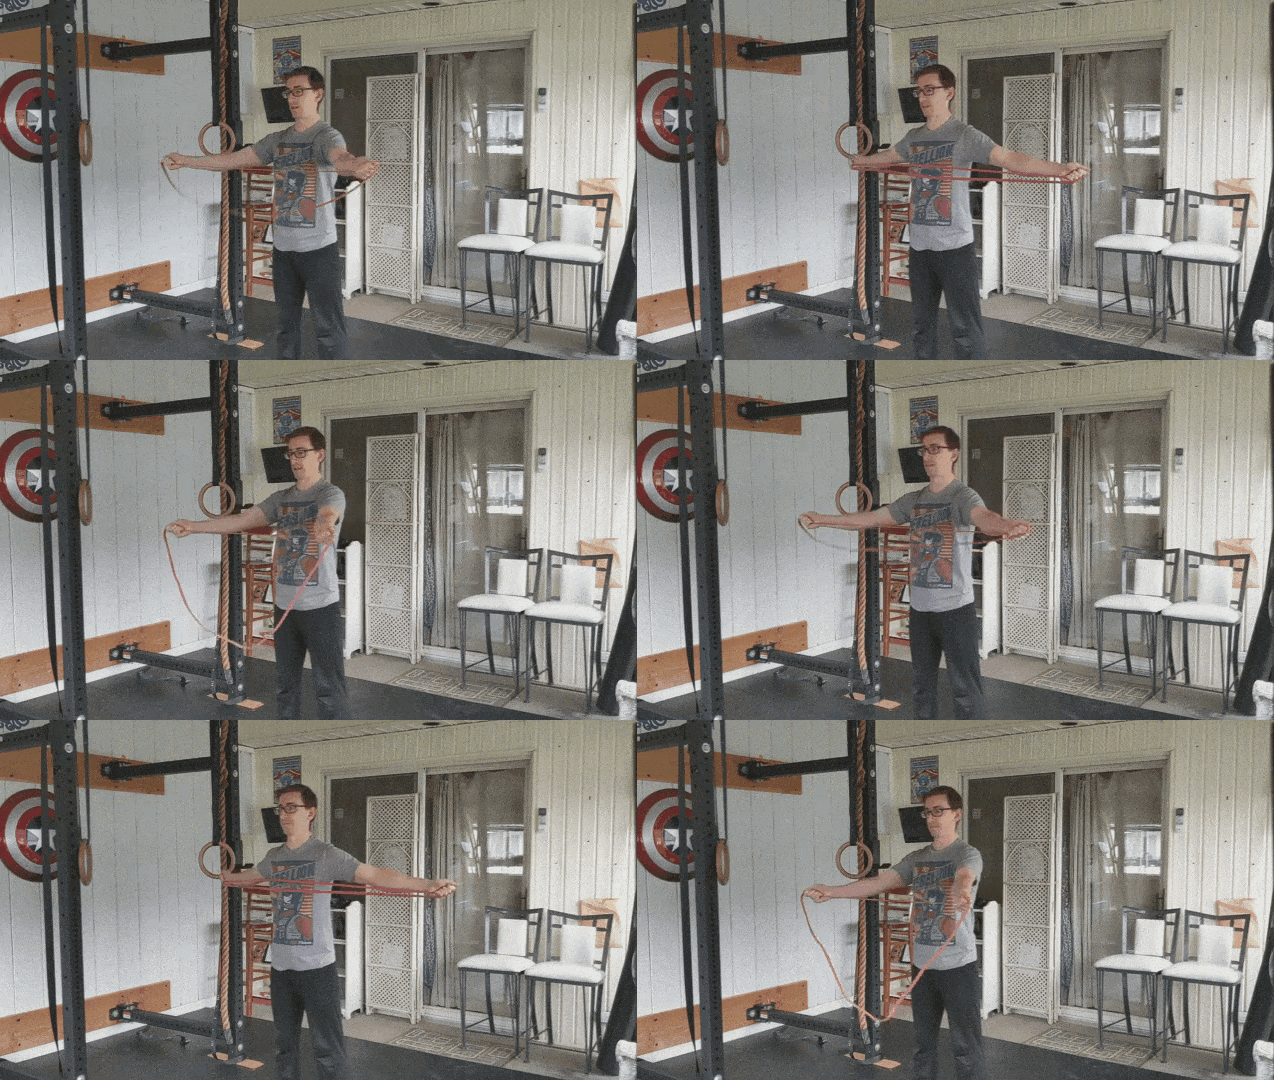
#2) OVERHEAD BAND PULL-APART
Start with the band overhead, gripping a little wider than shoulder-width apart.
Bring the band down by slowly pulling apart, pinching the shoulder blades as you go.
The arms will sink until about shoulder height.
Pause, then slowly rise back up.
Repeat.
Tip from Coach Matt: Resist the urge to have the resistance band “snap” you back up. Do this by slowly controlling the movement.
#3) HORIZONTAL BAND PULL APART
Grab the resistance band about shoulder-width apart and place it right in front of you, about chest height.
Pull the band apart, pinching your shoulder blades back as you go.
Slowly reverse to your starting position.
Repeat.
Tip from Coach Matt: Make sure you stand up straight during this movement. Over time this exercise will help improve your posture.
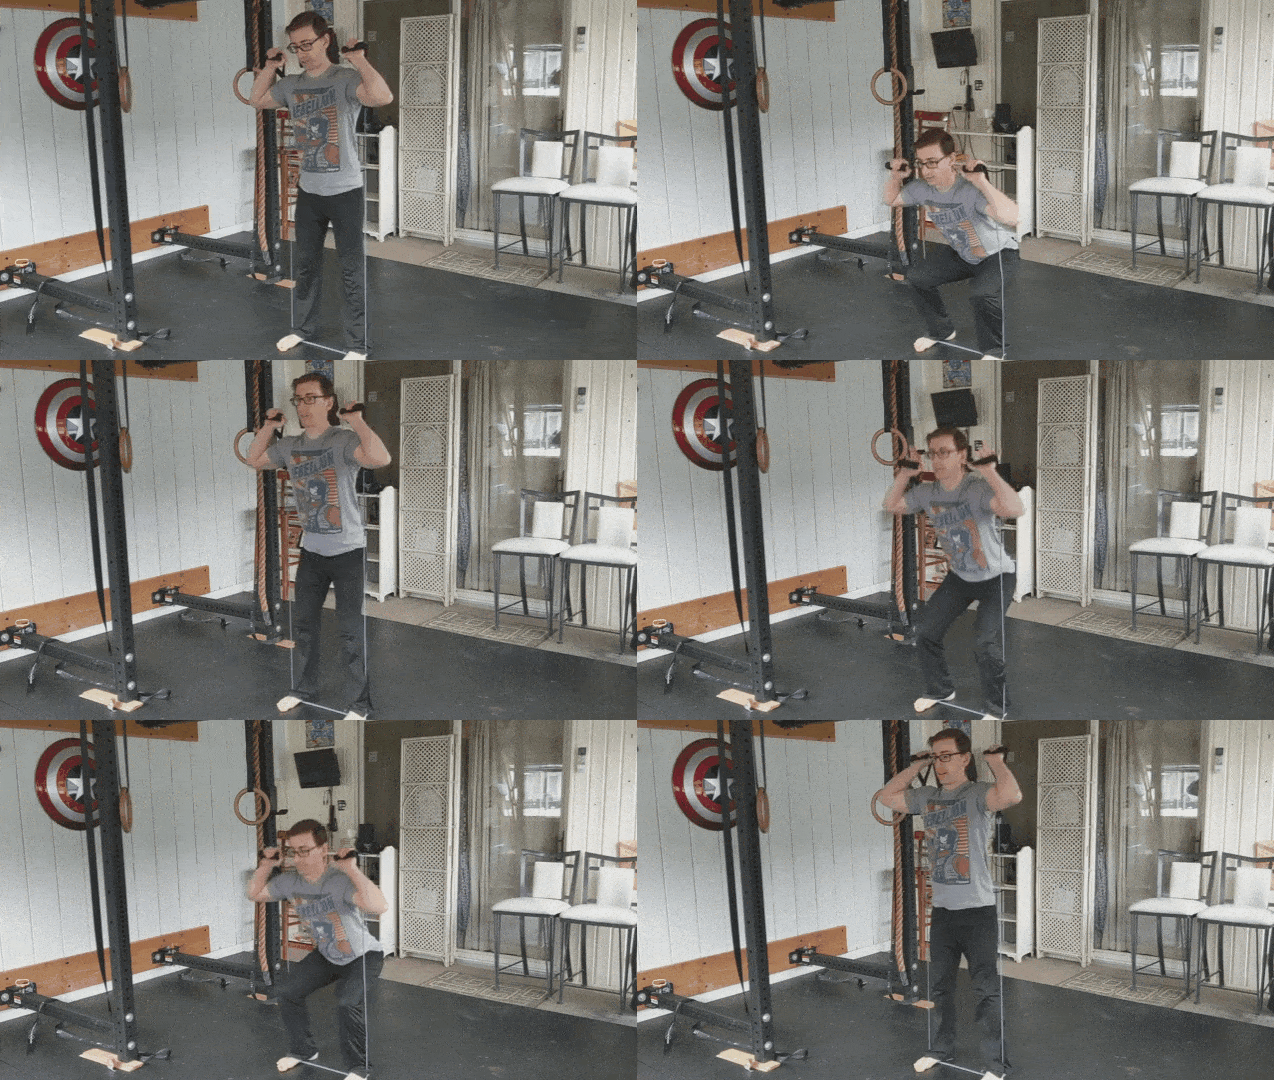
#4) BAND SQUATS
Step on the band, about shoulder-width apart.
Pull the resistance band up so the top reaches above your shoulder, with the band resting on the back of your arm.
Complete a squat, by having your hips push back while your chest stays up.
Reverse the movement to come back down, making sure to keep your heels down.
Repeat.
Tip from Coach Matt: If this seems too easy, you could use two exercise bands, increasing the resistance.
#5) BAND OVERHEAD PRESS
Step on the band, about shoulder-width apart.
Pull the resistance band up so the top reaches above your shoulder, with the band resting on the back of your arm (just like in your band squat).
While holding the band with palms faced forward, press your arms upward as you would in a normal overhead press. Keep your vision forward during the press.
Reverse to bring the band back down.
Repeat.
Tip from Coach Matt: Stand up straight and push up as tall as you can. Reach high during the movement and try to take up space.
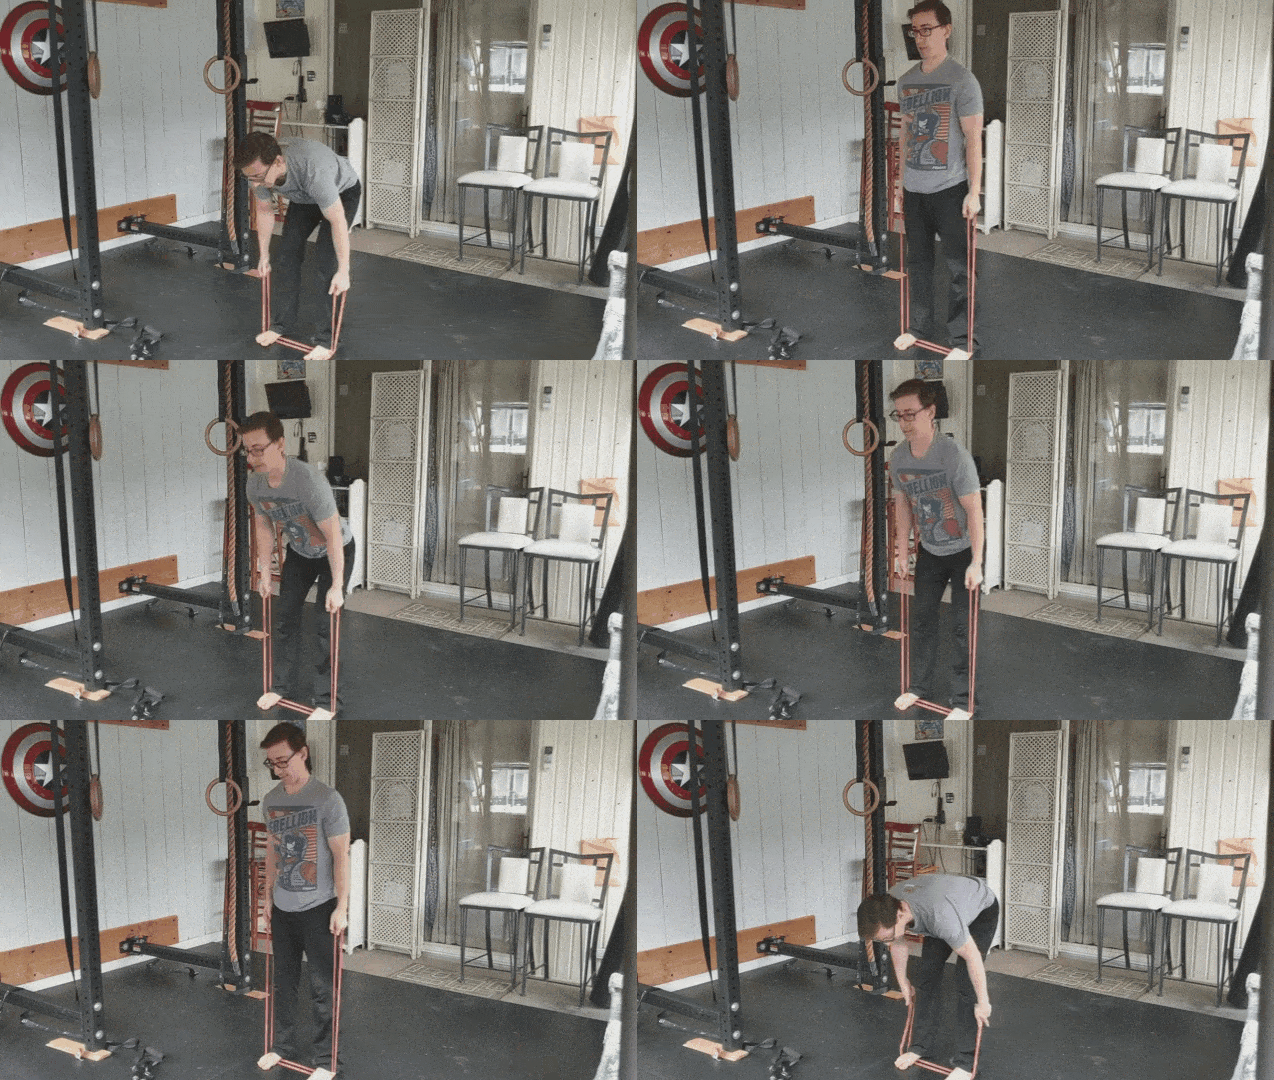
#6) BAND DEADLIFT
Step on the band, about shoulder-width apart.
Push your hips back to lower and grab the band. Your palms should be facing each other and your shins should be mostly vertical.
While holding the band, hinge your hips forward like you would in a normal deadlift to stand up.
When standing, push your hips back, lowering back down.
Repeat.
Tip from Coach Matt: Make sure you pull with your arms during the movement, which will engage your back.
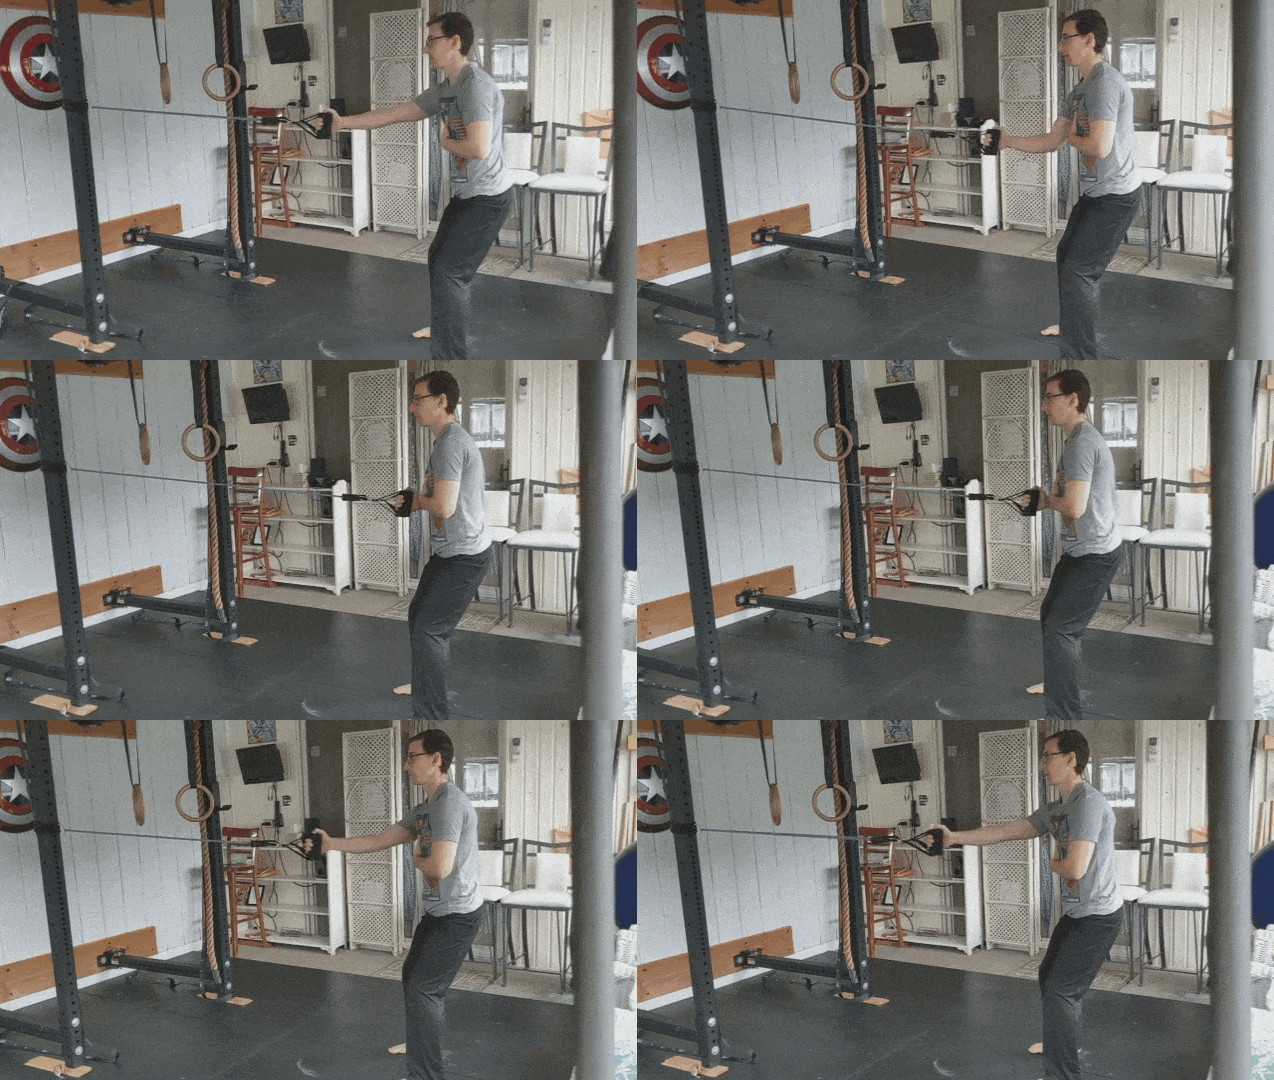
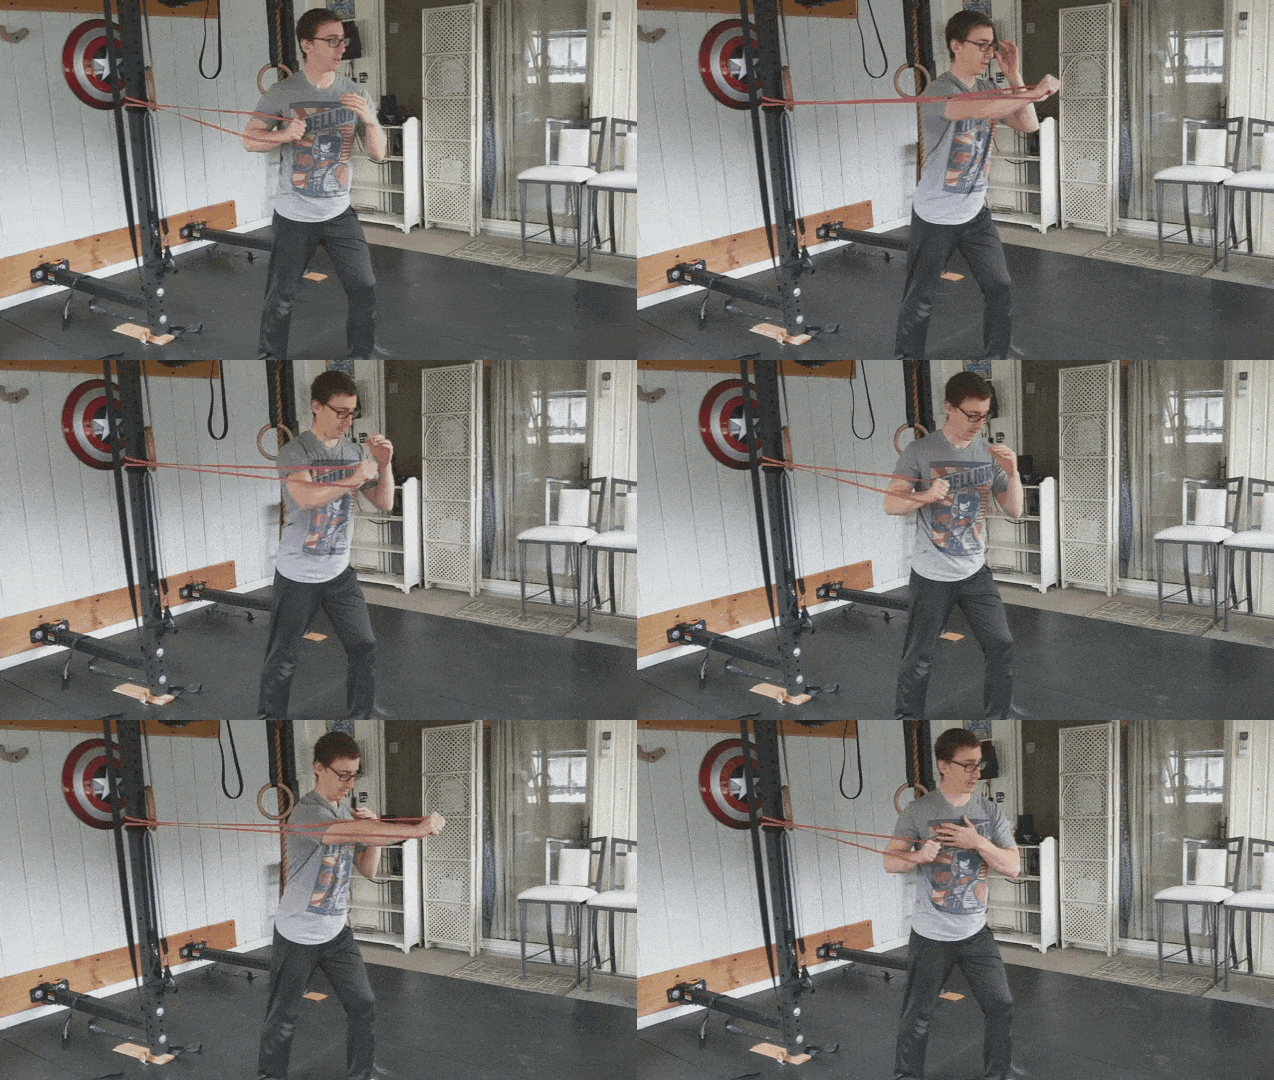
#7) BAND ONE-ARM ROW
Anchor your band on a sturdy door or pole.
Stand in a quarter squat position and place the non-pulling arm across your lower chest for support.
With the other arm, pull the band back until your elbow reaches the side of your torso. Don’t flare out your arm during the movement, instead, keep it tucked along your obliques.
Slowly release the band back to your starting position.
Repeat.
Tip from Coach Matt: Keep your chest up and tall. You want the band to pull with your arm, not your entire body (resist the urge to rotate your torso).
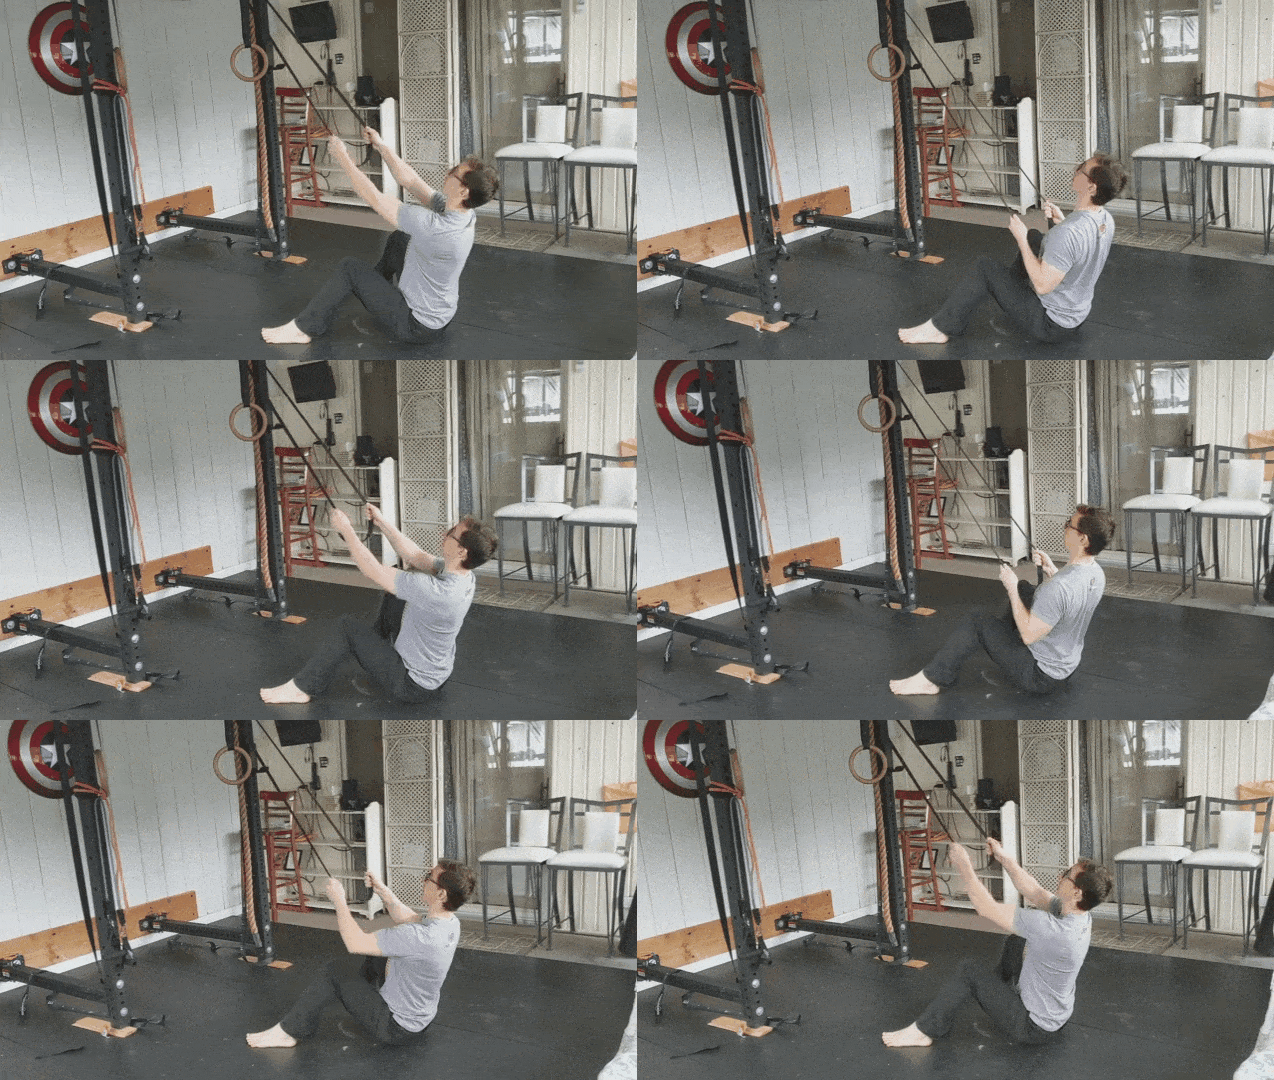
#8) HIGH TO LOW BAND ROW
Anchor your band to a pull-up bar or the top of a sturdy door.
Sit on the floor, with your legs flared out. Lean back ever so slightly and grab the resistance band with both hands (it should have a little bit of tension at the top of the movement).
To pull the band down, drive both elbows back towards your torso.
Reverse the movement to release tension in the band.
Repeat.
Tip from Coach Matt: Keep your chest up, towards the anchor point of the resistance band.
#9) SINGLE-ARM BAND CHEST PRESS
Anchor your band to a sturdy door or a structurally sound pole.
Begin with one leg in front (the opposite of the side you’re pushing with), then grab the band with one arm.
Start with your elbow close to your torso and push your arm forward. You’ll rotate your torso a little to complete the movement.
To reverse, slowly pull your elbow back to its starting position.
Repeat.
Tip from Coach Matt: Make sure the band has some tension in it during the start. You want resistance from the band during the entire movement.
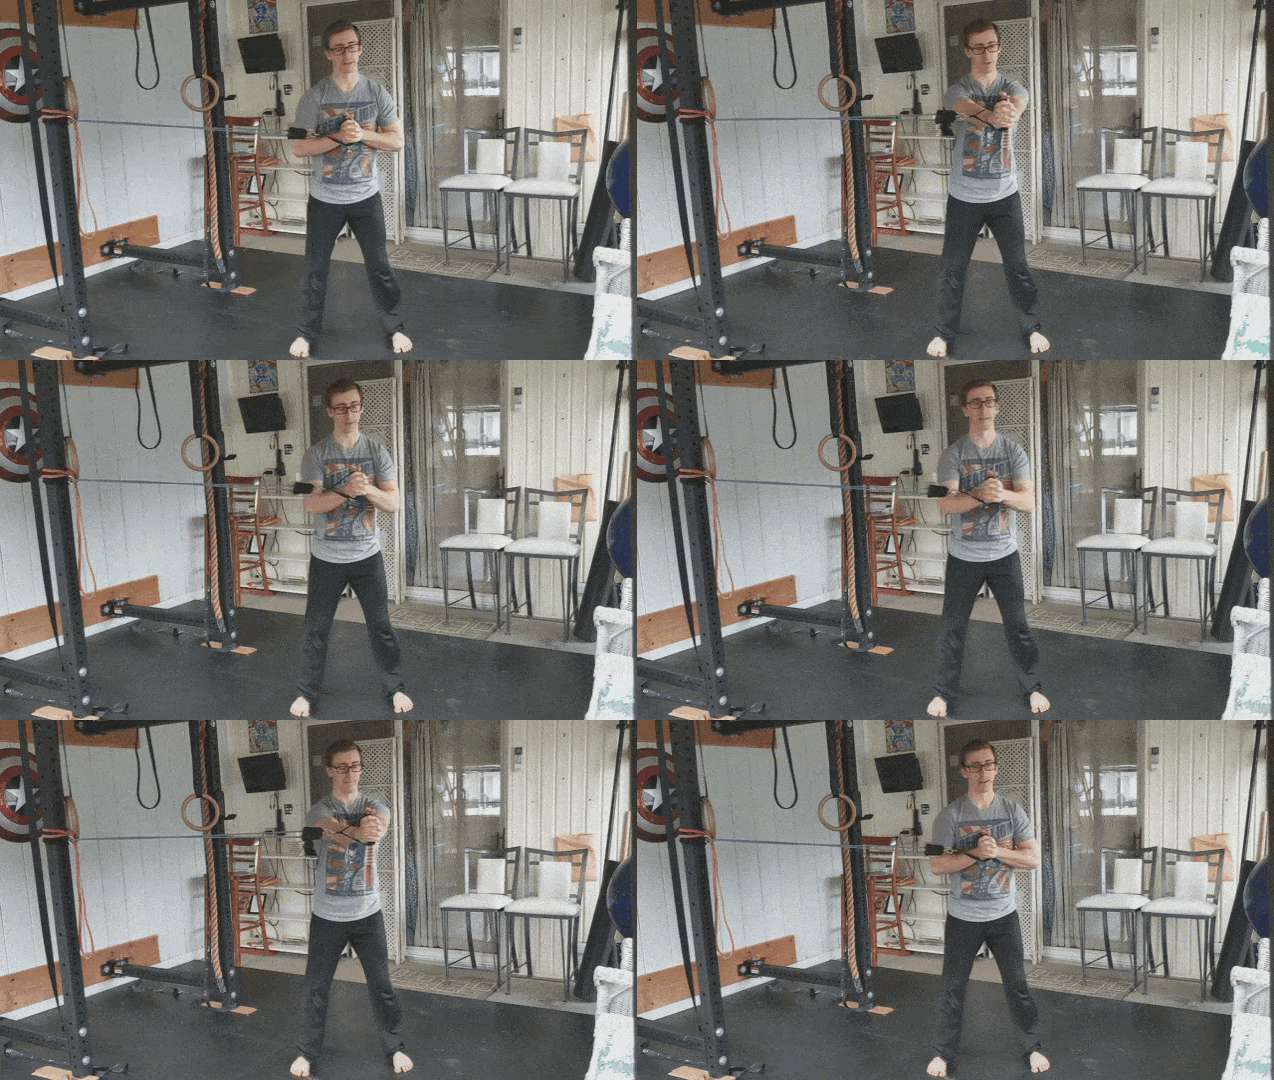
#10) PALLOF PRESS
Anchor your band to a sturdy door or a structurally sound pole.
Have the side of your body face your anchor, then pull the band in front of you until you have some tension.
Holding the band with both hands from the center of your chest, push straight out. Pretend there’s an arrow coming directly from your chest, like the Care-Bear Stare.
When returning, keep your elbows down and to your side.
Repeat.
Tip from Coach Matt: The point of this exercise is to feel it along the obliques (side torso), so make sure there’s enough tension in the band during the entire movement.
What Are the Best Resistance Bands? (Types and Product Recommendation)
In the Resistance Band Workout above, Coach Matt showed you how to handle two types of resistance bands: loop bands and tube bands.
Let’s go over these and other resistance bands you may come across.
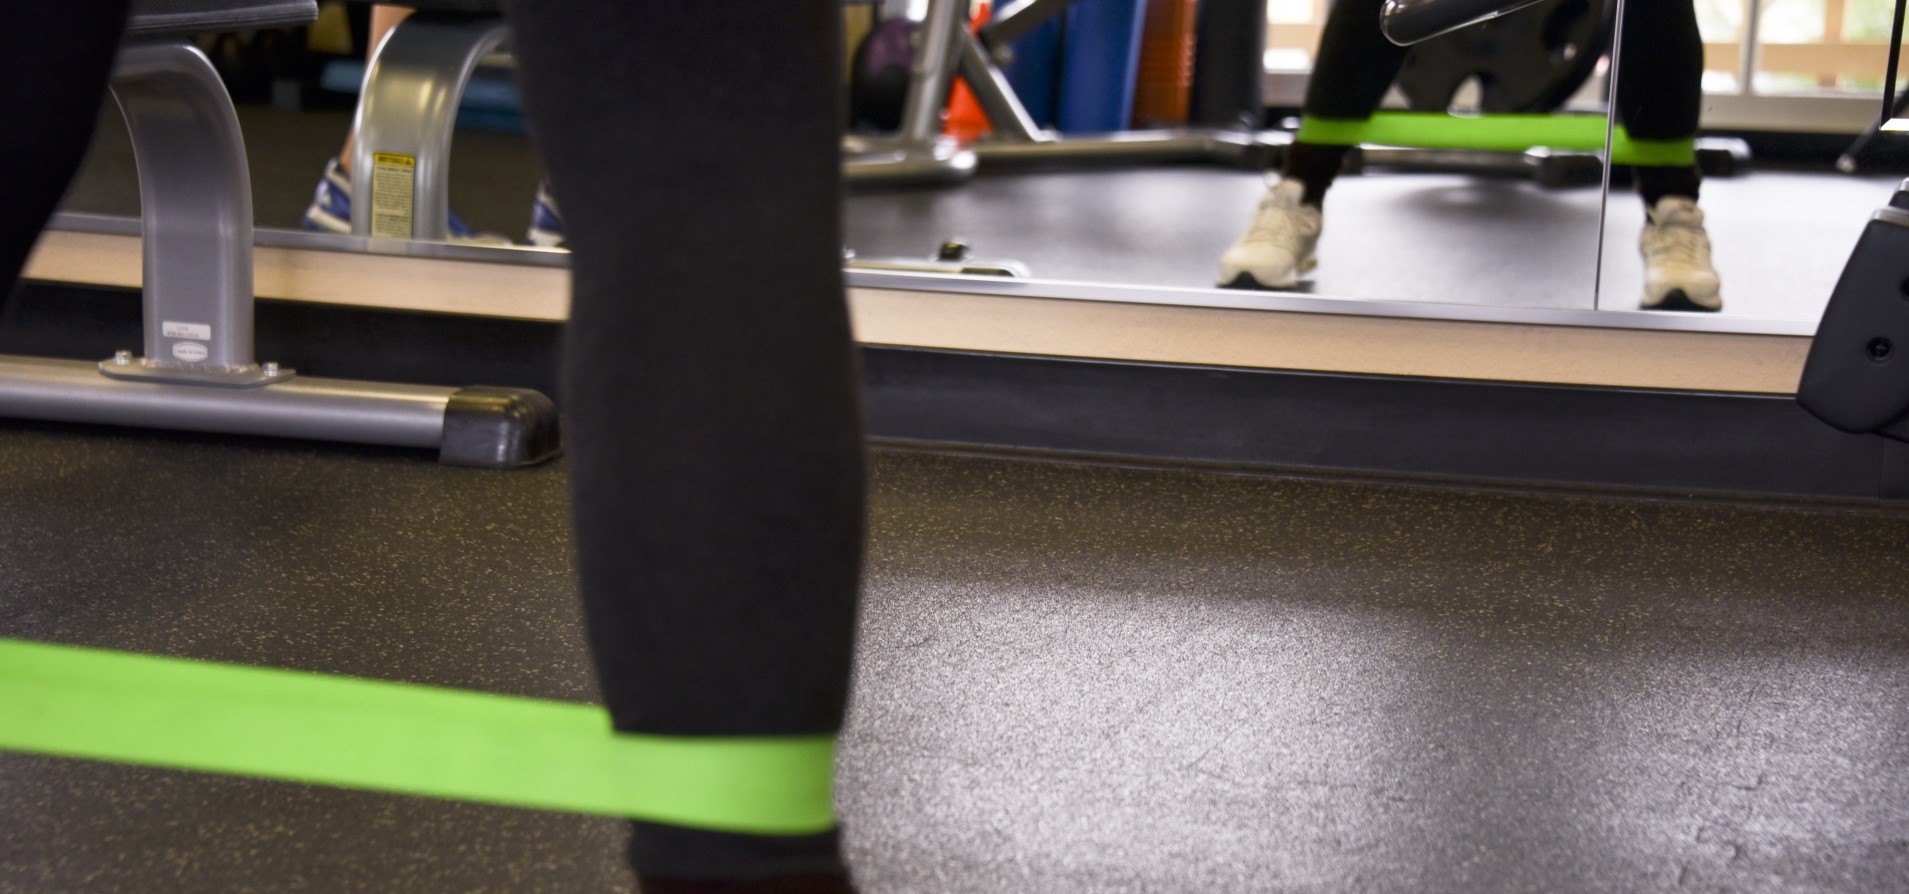
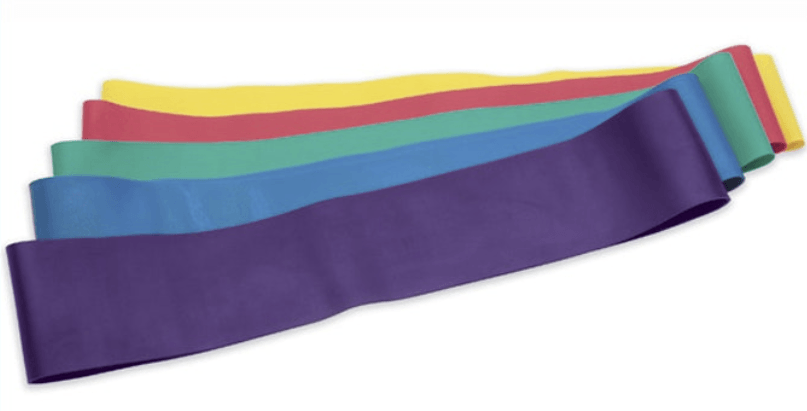
#1) Loop Bands
Much like the name would suggest, loop resistance bands consist of one single band formed in a loop.
They don’t have handles and are more strap-like than chord-like.
Not only can you use these in the exercises covered above but you can also use them to help perform bodyweight exercises like assisted pull-ups or assisted bodyweight dips.
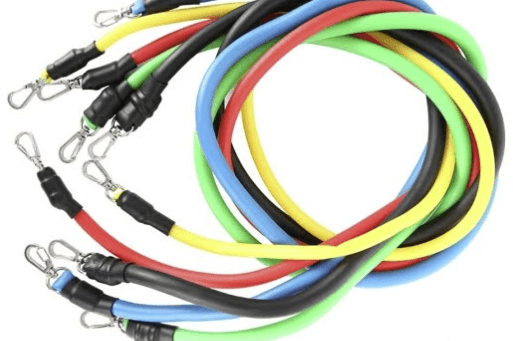
Tube resistance bands will often have handles or carabiners at the end (which you can attach a handle or anchor to). You might also hear these called “fit tubes.”
As Coach Matt showed you, every exercise in our Resistance Band Workout can be done with a tube band, so they’re ideal for creating a home gym.
The other cool thing about these bands: you can attach two of them to the same anchor and handle, increasing the amount of resistance. There’s really nothing stopping you from doing a third band either, which means they can really help increase your strength.
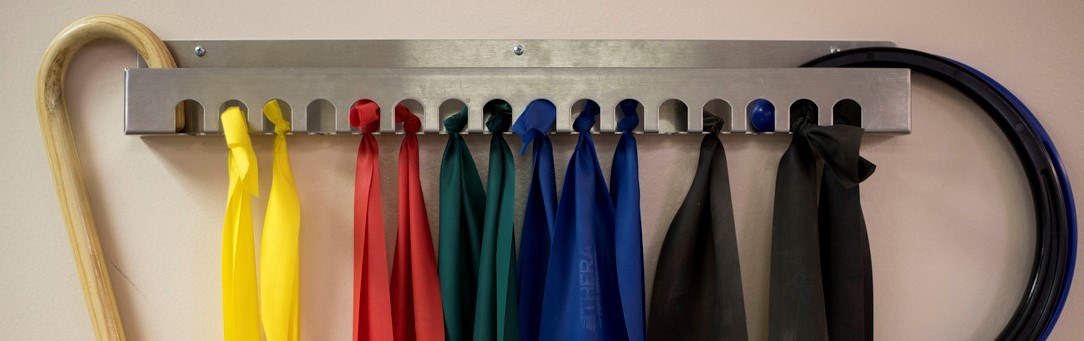
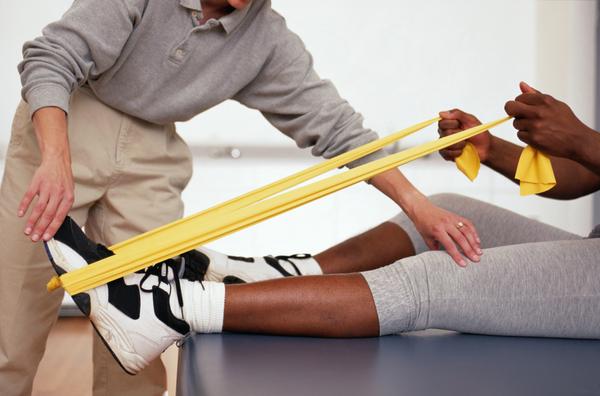
Therapy bands are long (up to 6 or 7 feet) and thin, almost like a sheet.
They do not loop, although they can be tied together to form a loop.
Like the name would suggest, therapy bands are often found in rehabilitation centers, used to help strengthen muscle after someone has gone through an injury.
They’re generally “light” on the resistance offered, making them ideal for someone looking for a low-impact exercise.
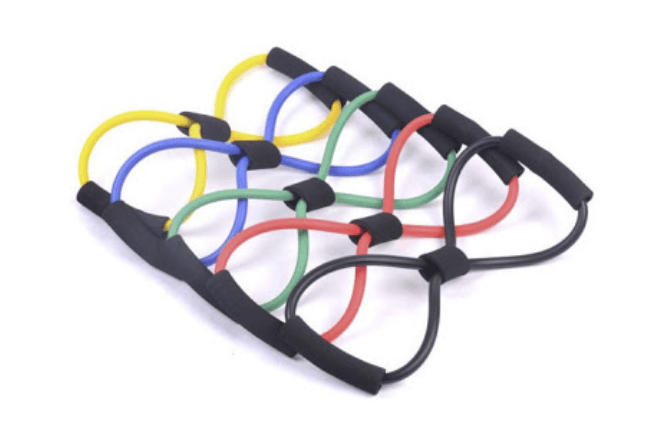
No surprise here: these bands look like a figure 8, with handles on top and bottom.
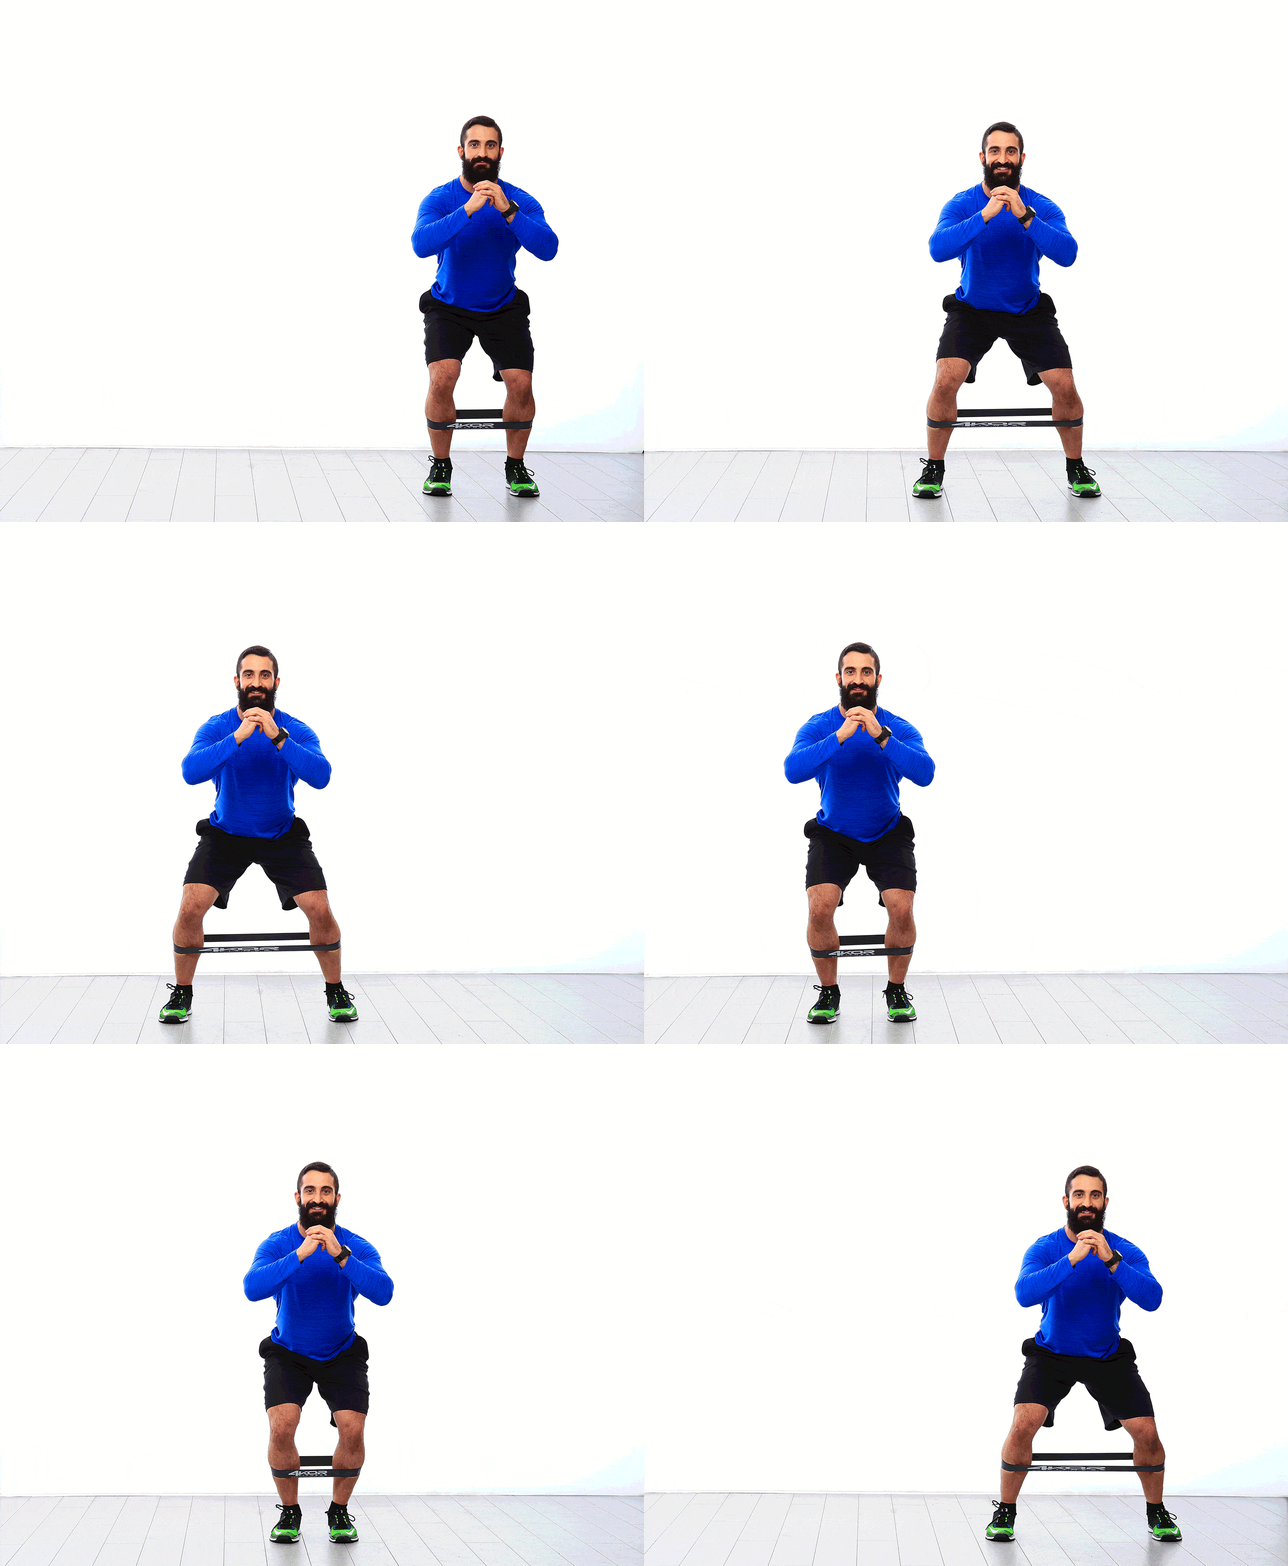
These bands are great for many of the pull-apart exercises we covered earlier, and can also be used like the mini-bands to activate your hips and glutes, by placing each leg through one of the loops.
Let’s discuss a few tips so you can make the most of your resistance band workout.
#1) Do not use the band if you notice cracks or tears.
Seriously, just buy another one. You do not want a resistance band snapping on you while in use.
#2) If you need more resistance, add another band.
The tube resistance bands with carabiners are great for this because you can pretty much always add another band between your handle and anchor.
#3) When anchoring your bands to a door, make sure the door pulls away from you.
You don’t want to accidentally force the door open, which could result in injury or hurt feelings.
#4) Maintain band tension throughout the exercise.
When starting every exercise covered here, you want a little tension at the start of the movement. This will help keep your muscles engaged during the entire exercise.
#5) Be careful what you anchor your bands to.
While a band may fit around a tree, the rough surface could wear down your band, causing it to snap. Check the surface, and if your bands come with anchors, use those.
How to Do Assisted Exercises with a Resistance Band
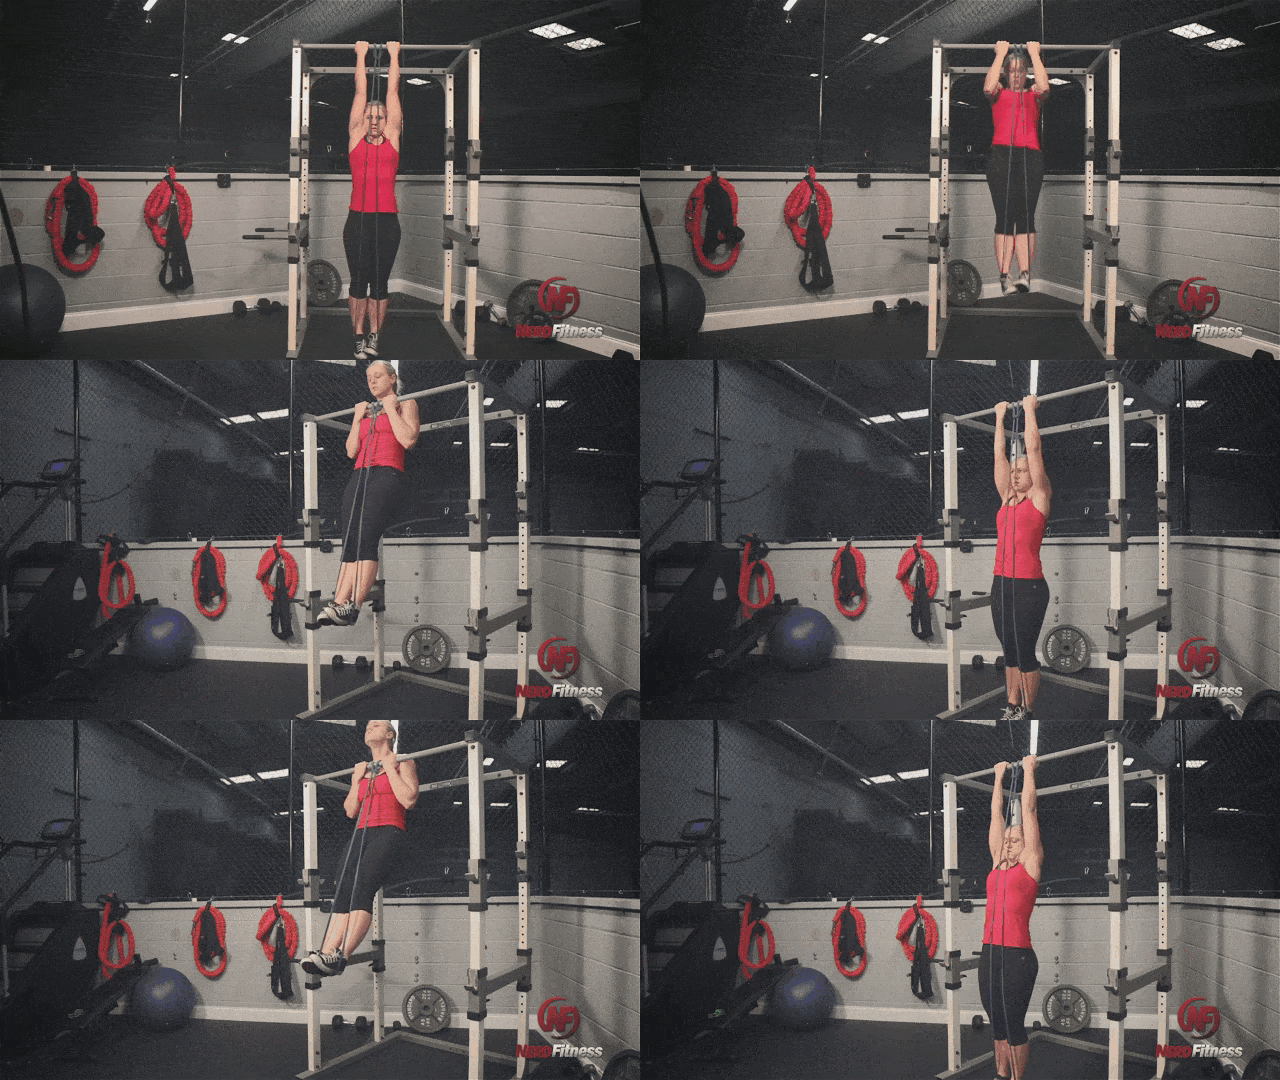
In the video above, Coach Matt walks you through using a resistance band to do pull-ups.
It’s not the only exercise where a band might prove helpful.
Here are some “assisted” exercises where a resistance band may prove helpful:
So will you lose weight training with resistance bands?
Maybe!
If you fix your diet AND begin to incorporate our resistance band routine a few times per week, you’ll find yourself building muscle, losing fat, and getting stronger!
If your goal is weight loss, you have to eat less than you burn each day. This can be through eating less and burning more (from the resistance band workout above)
Processed foods and junk food make it really tough to lose weight: They have lots of calories and carbs, low nutritional value, don’t fill you up, and cause you to overeat.
Liquid calories are sabotaging your efforts. Soda, juice, sports drinks: they’re all pretty much high-calorie sugar water with minimal nutritional value. Get your caffeine from black coffee or tea, fizzy-drink fix from sparkling water.
Eat more protein! Protein helps rebuild muscle and can help you stay under your calorie limit because it’s satiating and filling. Here’s exactly how much protein you should be eating every day.
Those tips should get you started, but if you want more specific instruction and guidance, check out the NF Coaching Program– Your Coach will build a routine tailored to your individual needs and what equipment you have available:
When Should I Do a Resistance Band Workout? (Next Steps)
The only question left to answer here is this: when should you do your resistance band workout?
As I discuss in our guide, How to Build Your Own Workout Routine, I generally recommend newbies complete a full-body workout two to three times a week.
When we say “full-body,” we want a sequence that will hit the following:
Quads (front of your legs): the band squats have you covered here.
Butt and hamstrings (back of your legs): the band deadlifts will hit this muscle group.
Chest, shoulders, and triceps: (“push” muscles):your chest press and pallof press will engage your push muscles.
Back, biceps, and grip ( “pull” muscles): all of the band rows will train your back and biceps.
Core (abdominals and lower back): The pallof press is really going to challenge your core (try it if you don’t believe me).
As you see, the Resistance Band Workout covers all these, so feel free to run through this sequence a few times a week. Just make sure you don’t train on consecutive days (you build muscle while resting).
Here are some options for next steps with Nerd Fitness:
Option #1) If you want a professional coach in your pocket, who can do video form checks, provide feedback, and adjust your workouts based on the equipment you have available, check out our 1-on-1 Online Coaching Program!
For example, let’s say you find yourself stuck indoors during a pandemic, and you want somebody to custom-build you a workout program based on the equipment and furniture you have. That’s where an online coach is a game-changer!
Personally, I’ve been working with the same online coach since 2015 and it’s changed my life. You can learn more by clicking on the box below:
Option #2) If you want an exact roadmap for getting fit, check out NF Journey. Our fun habit-building app helps you exercise more frequently, eat healthier, and level up your life (literally).
Plus, we have Missions specifically designed to help you train with your resistance bands!
Try your free trial right here:
Option #3) Become part of the Rebellion! We need good people like you in our community, the Nerd Fitness Rebellion.
Sign up in the box below to enlist and get our Rebel Starter Kit, which includes all of our “work out from home” guides.
Get your Nerd Fitness Starter Kit
The 15 mistakes you don’t want to make.
Full guide to the most effective diet and why it works.
Complete and track your first workout today, no gym required.
Alright, I want to hear from you and your experience with Exercise Bands!
Do you rock resistance bands in your workout?
Any band exercises that I’m missing?
Any product recommendations that need to be shared?
Let me know in the comments!
-Steve
P.S. If you are trying to stay in shape while your gym is closed, check out:
Are you ready to strengthen and tone your lower body in just 10 minutes?
Sometimes all we have is 10 minutes to fit in a quick workout and as we believe here at The Balanced Life, 10 minutes is always better than zero minutes. Fit this workout in while dinner is in the oven, on a break between meetings, while the kids are napping, or anytime you need a quick boost.
This quick and effective workout will strengthen, tone, and stretch your entire lower body in to help you feel your best.
You’ll end this workout stronger, more energized, and ready to tackle the rest of your day!
Click here to check out this Lower Body Pilates Routine on YouTube – and Sisterhood members, this workout has been dropped into your workout library + app for your convenience!
If you want to lose weight, gain muscle, and/or just look and feel better, strength training will do just that.[1]
In this comprehensive series, we’re going to cover EVERYTHING you need to know about getting strong.
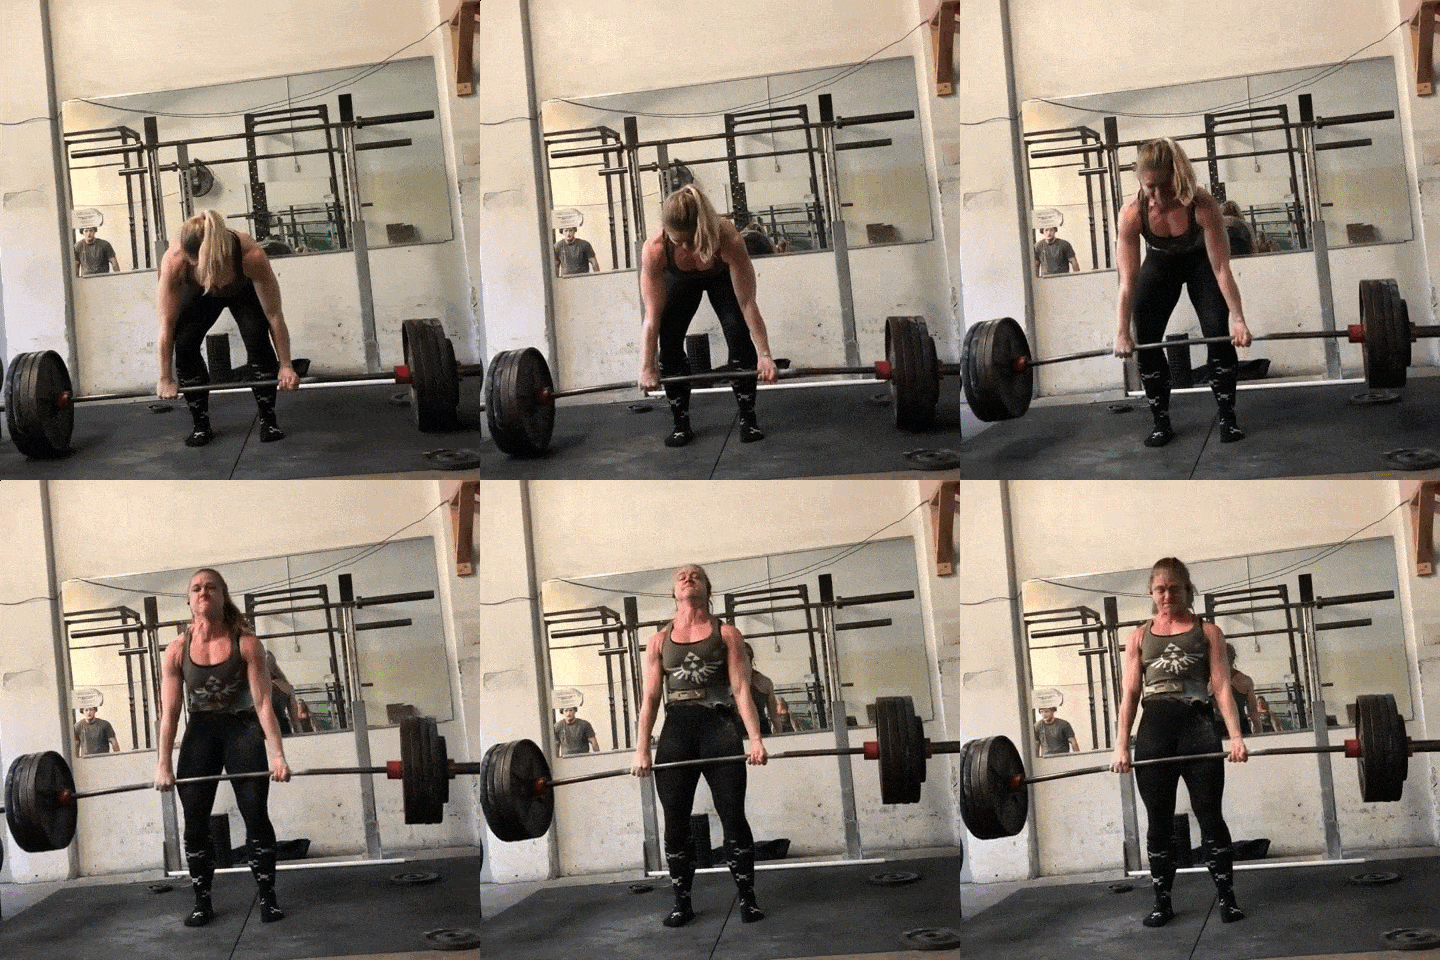
By the way, hi. I’m Staci Ardison,Senior Coach for Team NF, with a 455 pound deadlift, and strength training has changed my life.
Here’s that deadlift by the way (at a bodyweight of 150 lbs):
I help men and women get strong with our 1-on-1 Online Coaching Program, and in addition to this strength series, I’d love for our team to help you get strong too:
In this introduction to Strength and Resistance Training, we’ll cover:
This is also quite a lot to absorb, so we’ve combined this article along with the rest of our strength articles into a “Strength Training 101: Everything You Need to Know” guide.
Grab it free when you join the Rebellion by putting your email in the box below.
Download our comprehensive guideSTRENGTH TRAINING 101!
Everything you need to know about getting strong.
Workout routines for bodyweight AND weight training.
How to find the right gym and train properly in one.
Let’s get the long term benefits out of the way: building strength has been shown to:
#1) Halt and even reverse sarcopenia: As we age our skeletal muscle deteriorates, which is a condition known as sarcopenia. Strength training has been found to reduce the negative effects of sarcopenia allowing us to maintain an independent lifestyle (and out of a nursing home) and live longer.[3]
#2) Prevent disease and degenerative conditions:[4] Heart disease is the leading cause of death for both men and women.
Strength training helps correct issues relating to cholesterol, high blood pressure, obesity, diabetes, and inactivity – all factors for heart disease.
Cardiologists are even starting to recommend strength training for people who have suffered a heart attack as little as three weeks after the attack.[4]
#3) Improve the quality of life for people with: arthritis,[5] osteoporosis,[6]Parkinson’s Disease,[7]Down Syndrome,[8] lymphedema,[9]fibromyalgia,[10]who have recently had a stroke,[11]have had a spinal cord injury,[12]cancer survivors[13] and clinical depression.[14] Clinical exercise physiologists working with these special populations listed above strongly recommend incorporating strength training to slow down the progression of their disease or disorder, decrease their risk for other comorbidities, and decrease their risk for premature mortality.[15]
Now, in addition to making life easier LATER, strength training has a lot of great benefits right now:
Lose weight, look good naked: You can find study[15] after study[16] after study[17] that shows you the benefits of strength training for weight management when combined with “calorie restriction.”(eating fewer calories than you burn every day), such as greater fat loss and improvements in muscle mass. Additionally, the combination of these two behaviors also decreases one’s risk for the development of chronic diseases (e.g., CVD) and premature mortality.[18]
Strength training can help increase your metabolism by speeding up your Resting Metabolic Rate (RMR).[19] It takes your body more calories to maintain muscle than it does to maintain fat!
Strength training has a much greater level of excess post-exercise oxygen consumption than aerobic exercise.[20]What does this mean? When you finish a workout, your body needs to do a lot of work to replenish itself in order to bring itself back to a normal state (the way it was before you worked out). This takes a lot of energy, and some studies have shown that it can boost your metabolism for up to 38 hours after you finish your workout. If you do your resistance training quickly, minimizing rest intervals in-between sets, you can actually increase this effect.[21] This is why it’s important to stay off of the phone in-between sets! If you want to learn more about how to do this, check out our Guide to Circuit Training.
In addition to physical improvements, strength training will make you healthier:
#1) Strength training increases bone density, builds a stronger heart, reduces your resting blood pressure, improves blood flow, halts muscle loss, helps control blood sugar, improves cholesterol levels, and improves your balance and coordination.[22] This is all great news because this will decrease your risk of developing conditions such as osteoporosis, hypertension, and type 2 diabetes.
#2) Strength training will make you FEEL better: Not only will you find yourself with more energy and confidence, less stress and anxiety,[23] and a better overall mood,[24] but you’ll actually begin to think better (resistance training has been proven to help increase cognitive function[25]).
You may be asking how this is possible?
Strength training allows for neurogenesis and neuroplasticity to take place, which is the process of creating new neural pathways in the brain.
Plus, strength training also allows for certain neurotransmitters (e.g., dopamine) to be released that plays a role in brain health.[26]
And while training too close to bedtime can be a bad idea, exercising earlier in the day has been proven to help prevent sleep apnea and insomnia.[27]
I even improved my posture from strength training – when I started lifting, I was 5’4”. Now I’m 5’5.5”.[28]
This is also a major concern for today because of prolonged cell phone use, which finds people constantly tilting their head forward and down resulting in neck pain and faulty posture.[29]
#3) Last but not least, strength training is fun! Whether you are looking for the most effective 20-30 minute workout (to stay fit and look great naked), or are looking for a competitive sport that you can really get into, strength training can help you meet your goals.[30]
It’s easy and fun to see progress as you strength train, almost like leveling up (“You gained 100xp and +1 STR with your deadlift today”).
If you’re looking to improve in other areas (a sport, traditional cardio, or an activity like rock climbing), strength training is an easy choice! Strength training will help keep you injury free too.[31]
We have coaching clients from 18 to 80+, and we work on strength training with practically every single one of them due to just how many benefits it provides! We’d love to work with you too:
Who SHOULDN’T strength train?
Trying to be balanced, I wanted to find studies of a single group of people who should not strength train.
But then I found studies on how strength training can be beneficial for paraplegics.[32]
I also found studies that show the benefits for children and adolescents.[33]
I next found plenty of studies that explain the benefits of strength training for pregnant women.[34]
And thus I’ve decided, not knowing you, you should probably strength train.
IMPORTANT CAVEAT: if you do fall into any of these special populations (e.g., paraplegics, children, pregnant women, etc.) it is imperative that you work with a qualified professional (e.g., clinical exercise physiologist, strength and conditioning coach, etc.).
These qualified professionals will perform a risk stratification and pre-assessments so they can start you off with the perfect training program that will improve your physical and mental health, and will decrease your risk for injury and prevent your condition from progressing to a more severe state.
Oh, and if you are already injured, you should check with a doctor[35]or physical therapist before strength training.
Long story short: EVERYBODY should strength train.
Robots too…probably.
It’s what we’re genetically designed to do: move around, push, pull, jump, and carry things.
What Is Strength Training? The Basics You Need to Know.
“Strength training” of any kind can be explained by two things:
Movement of any weight (including your body weight) – Doing ANY exercise that pushes your muscles outside of their comfort zone, forcing them to rebuild stronger to prepare for the next challenge.
Progressive overload: exerting slightly more effort than last time (lift heavier weight or do 1 more rep) consistently. Your muscles will constantly have to adapt and will constantly be rebuilding themselves to get stronger.[36]
That’s strength training!
If you want seven different ways to achieve progressive overload, watch this video:
All this means if you do 10 squats and 10 knee push-ups right now, you have completed a strength training workout.
Feel free to do this right now to give yourself a quick win.
And we’re back!
So what’s actually happening to our bodies when we strength train?
Let’s get on our magic school bus and learn about the wonders of muscles!
Here’s what you need to know your muscles and strength training:
We’ve got 642 muscles in our bodies (but who’s counting), and they all work together to help our bodies move, stand, and exist.
When you bend your arm, your biceps contract and your triceps do the opposite (elongate) in order to let your elbow bend. Every muscle in your body works alongside other muscles to let you move and do things. In this particular example, the biceps is known as the agonist muscle and the triceps is the antagonist
Strength training starts when you move your bodyweight (doing 10 push-ups), or pick up a weight (a 100 pound deadlift) that is beyond what your body is normally used to.
In other words, you push your muscles outside of their comfort zone.
They “break down” and tear slightly during this workout, and then over the next 24-48 hours they rebuild themselves stronger and more resilient.[37]
This is the foundation of strength training, and it’s called hypertrophy, in which the individual muscle fibers packed into your muscles are growing larger in size.[38]
There are a few types of hypertrophy,[39] which you can nerd out about here (don’t worry, this won’t be on the quiz):
Sarcoplasmic hypertrophy focuses on increasing the amount of sarcoplasm, the non-contractile fluid found in your muscle. This type of hypertrophy helps build overall size.
Myofibril hypertrophy focuses on strengthening the myofibril, the contractile part of the muscle. You are strengthening the actual muscle fiber so it helps you build super dense, strong muscles.
Transient hypertrophy is the temporary increase in muscle size that happens during and immediately after weight training due to fluid accumulation in the intracellular space, that you might know as “the pump”.
“Staci, what does this mean for me?” You might be wondering.
We cover exact strategies in our “How many sets and reps?” guide, but here’s what you need to know:
If you want dense muscle and strength (myofibrillar hypertrophy), keep the reps low and the weight heavy (in the 1 to 5 rep range).
If you’re looking to build muscle size, (sarcoplasmic hypertrophy), do more reps with a lighter weight (in the 8-12 range).
If you’re looking to build cardiovascular health and muscular endurance, hang out in the 12-20 reps per set range.
Please note: each of these rep ranges are NOT exclusive – when you train in a higher rep range you’re not JUST getting size, you’re also getting strength.
And if you get really strong, it can also help you with size and endurance.
#2)Recovery: The general rule is to wait 48 hours before working the same muscle group again. For example, if you trained your biceps and triceps today, then you should wait 48 hours before hitting them again. However, recovery is different for everyone depending on many different factors such as what the actual workout is, how old you are, your sleep quality, diet, and other recovery elements (such as massage, including the popular massage guns, foam rolling, and stretching).[41]
#3) Soreness after a workout: The day after an intense strength training workout – or 2 days after – you’re going to be VERY sore. This is called “Delayed Onset Muscle Soreness(DOMS)”. It’s a normal part of the process of repairing your muscles from the damage to the fibers you created while exercising. More recently, research evidence has found that the eccentric part of a lift, or the part of the lift in which the muscles are lengthening and stretching, produces the greatest degree of soreness.[42]
Expect to be more sore after doing an exercise for the first few workouts. As your muscles get used to that movement (and adapt to being put under stress), they will get less and less sore every time.
If you are sore, don’t skip the next workout!
That’s because:
The best way to alleviate soreness is to continue exercising.
This increases blood flow to the muscles and helps them heal.[43]
Already overwhelmed and just want to be told what to do? I hear you. It’s why we created our coaching program:
Can I strength train to lose weight?
We get questions relating to weight loss and strength training all the time, and it’s a BIG part of this entire Strength 101 series.
Let me quickly address it here:
Fat and muscle are two different things – one can’t transform into the other.
We all have plenty of muscle right now (otherwise we wouldn’t be able to move, walk, sit up, etc.), the muscle is just hiding underneath a layer of body fat.
In order for us to lose weight and look better, we want to do two things:
Build our muscles stronger and tighter.
Burn the fat on top of it!
And luckily, both of those things happen simultaneously through strength training!
So NO, you don’t need to lose weight first before you start strength training.
You will lose weight BY strength training (and keep the muscle you have).
You do NOT need to do hours of cardio for weight loss – weight loss is 90% a result of your nutrition. So honestly, you don’t need to ever set foot on a treadmill again (unless you WANT to).
Strength training will help you lose weight and look better IF you do two key things for effective weight loss:
As we cover in our “Why can’t I lose weight” article (full of fun Harry Potter references), combining a caloric deficit and strength training is magic:[44]
You’re not consuming enough calories to carry out your body’s daily functions. Our bodies require enough calories to support normal physiological functions such as heart rate and breathing. Additionally, enough calories are needed to help maintain our blood glucose, which is the major energy source for our brains.[45]
Your body needs to use lots of calories to rebuild the muscle that was broken down during the strength training workouts. Our bodies use calories to facilitate a process known as protein synthesis, which is the process of muscle hypertrophy.[46]
Your body has no choice BUT to pull from fat stores to get stuff done! As mentioned earlier, higher-intensity strength training results in a greater post-exercise oxygen consumption, resulting in greater caloric expenditure post-exercise.[47]
Just by doing those two things (get strong, reduce calories), all sorts of wizardry and witchcraft takes place in your body:
Get stronger and keep the muscle you have.
Build tight dense muscle.
A revved up metabolism while rebuilding muscle.
Burning of body fat to get things done.
Yeah, you’re hearing me correctly.
Lose the body fat that sits on top of your muscles and you’ll make your muscles tighter and denser = look better without clothes on.
Oh, what’s that? You just want somebody to tell you exactly how to train for your body, and how to eat for your goals?
Fine!
Check out our 1-on-1 Coaching Program– it’s helped thousands of people lose weight through strength training – and proper nutrition. We work with you on habit building and lifestyle design to actually get stuff done!
I cited dozens of studies above that show strength training is beneficial for people of all ages. And even for the frail elderly, studies have shown that drastic resultsare possible in just 10 weeks of weightlifting (for both men and women in their 70s through their 90s).[48]
In fact, weight training has also been shown to delay Alzheimer’s and stave off dementia.[49] As mentioned earlier, strength training allows for neurogenesis and neuroplasticity to take place, which is the process of creating new neural pathways in the brian. And, strength training also allows for the dopamine (i.e., neurotransmitter) to be released that plays a role in brain health.[50]
Research has also shown that older adults can safely engage in higher-intensity strength training resulting in improvements in strength, body composition, disease status, and independent lifestyle.[51]
So, if you think you might be “too old,” you’re probably the exact type of person that SHOULD be strength training!
Team NF’s Steve’s gramma is 89 and she strength trains. You are not too old!
We have plenty of coaching clients who are retired and just STARTING to strength train now in their 50s or 60s+. In fact one of our coaches, Kerry, is certified as a Functioning Aging Specialist, and you better believe she has her clients strength training!
By the way, if you are 90+ and reading Nerd Fitness, please email us at contact@nerdfitness.com – I’d love to hear from you 🙂
Will Lifting Weights Make Me Bulky?
No (unless you are TRYING to get bulky).
Let me first address this from a women’s point of view, then I’ll get to the men.
Or Christina, who got strong as hell, lost 31 total inches, and now crushes sets of pull-ups!
That “bulky” look in women does not happen by mistake or overnight – we simply do not have the hormones necessary to get there on our own.
To achieve this look, women have to eat incredible amounts of food and consume incredible amounts of drugs.
When we strength train normally, without these supplements, we end up looking like athletes.
And for the men: if your fear is getting too bulky, you can rest easy. Steve, creator of Nerd Fitness, has spent his entire life trying to get “too bulky.” It was only after fixing his diet (and hiring an online coach) that he went from Steve Rogers to Captain America.
That’s right, strength training is only 10% of the “slim down or bulk up” equation. The other 90% is nutrition and total calories consumed.
Want to lose weight? Strength train + caloric restriction. It is recommended that you seek a calorie deficit by consuming 250-500 less calories per day below your typical calorie intake. This will result in a realistic weight loss goal of 1-2 pounds per week.[52]
Want to get bigger? Strength train + caloric surplus. It is recommended that you seek a calorie surplus by consuming 250-500 additional calories above your typical calorie intake. This will result in a realistic gain in lean muscle mass of about 0.5 pounds per week.[53]
“My focus is on running/basketball/quidditch and I need to stay slim! How do I strength train for this scenario?”
Studies have shown that strength training increases the endurance of your muscles.[54]
In fact, resistance training and weight training not only help to tune up an out of shape nervous system and increase the activation of motor units within your muscles, but also helps increase their overall endurance. More specifically, strength training can result in improvements in how much force muscles can generate and also how much fatigue they can resist leading to better exercise economy.[55]
You just have to keep challenging your muscles and get strong as heck. Look at any gymnast, male or female – those physiques are built through bodyweight training!
To progress in bodyweight exercises, you need to start, so you have something to advance from. You can begin by trying our beginner bodyweight routine RIGHT NOW:
It’s super fun building your own program, but many people just want to follow a plan that they know is aligned with their goals. If you hate gyms and still want to get strong, let us help!
How to Start Strength Training Today: Next Steps
If you’re ready to start, fantastic.
We’d recommend a simple program to get your feet wet.[56] You know, to learn the movements, build some confidence and prove to yourself that you can DO this!
If you want to take the Next Step, here’s how Team Nerd Fitness (that’s us!) can help you:
1) Work with a professional Yoda! If you want confidence that you’re following a program that is tailor-made for your busy life, situation, and goals, check out our popular 1-on-1 Coaching Program.
You’ll work with a certified NF instructor who will get to know you better than you know yourself, keep you accountable, and help you reach your goals.
2) Join our amazing free community, the Nerd Fitness Rebellion! It’s free to join, and we provide you with free goodies like our Strength Training 101 ebook when you sign up:
Download our comprehensive guideSTRENGTH TRAINING 101!
Everything you need to know about getting strong.
Workout routines for bodyweight AND weight training.
How to find the right gym and train properly in one.
3) Read ALL of the other amazing resources on Nerd Fitness. We’ve published millions of words over 800+ articles at Nerd Fitness that you can read, but these are the guides that will be the most helpful to you on your journey:
Portugal EM, Vasconcelos PG, Souza R, Lattari E, Monteiro-Junior RS, Machado S, Deslandes AC. Aging process, cognitive decline and Alzheimer`s disease: can strength training modulate these responses? CNS Neurol Disord Drug Targets. 2015;14(9):1209-13. doi: 10.2174/1871527315666151111121749. PMID: 26556087
A look at strength training and sleep apnea is right here.
For more on strength training and posture, read “Effects of a Resistance and Stretching Training Program on Forward Head and Protracted Shoulder Posture in Adolescents.” Source, PubMed.
Al-Hadidi F, Bsisu I, AlRyalat SA, Al-Zu’bi B, Bsisu R, Hamdan M, Kanaan T, Yasin M, Samarah O. Association between mobile phone use and neck pain in university students: A cross-sectional study using numeric rating scale for evaluation of neck pain. PLoS One. 2019 May 20;14(5):e0217231. doi: 10.1371/journal.pone.0217231. PMID: 31107910; PMCID: PMC6527223
The important thing to keep in mind is that you have to find the exercises that are most enjoyable to you. Research has found that when you find something to be more enjoyable you are likely to adhere to it.
Zwolski C, Quatman-Yates C, Paterno MV. Resistance Training in Youth: Laying the Foundation for Injury Prevention and Physical Literacy. Sports Health. 2017 Sep/Oct;9(5):436-443. doi: 10.1177/1941738117704153. Epub 2017 Apr 27. PMID: 28447880; PMCID: PMC5582694
A look at strength training during pregnancy is right here.
“I went to the doctor. All he did was suck blood from my neck. Do not go see Dr. Acula” – RIP Mitch Hedberg. ”
In other words, in order to achieve your training goals or to see improvements, your training must gradually and constantly increase. Keep in mind that if the overload increases too quickly, poor technique and injury may result. And if the overload progresses too slowly, improvements will be minimal or non-existent. Rest and recovery must also be included in the progression, as training hard all the time could result in chronic fatigue, a decrease in performance, and eventually injury. Soucre: Haff G, Triplett NT. (2016). Essentials of strength training and conditioning. Fourth edition. Champaign, IL: Human Kinetics
Don’t worry though, this “break down” and tearing does not hurt and the only thing you may experience is muscle soreness.
This totally sounds like something you’d win in Super Smash Bros.
Powers SK, Howley ET. (2011). Exercise physiology: Theory and application to fitness and performance. New York: McGraw-Hill Humanities/Social Sciences/Languages
Powers SK, Howley ET. (2011). Exercise physiology: Theory and application to fitness and performance. New York: McGraw-Hill Humanities/Social Sciences/Languages
Powers SK, Howley ET. (2011). Exercise physiology: Theory and application to fitness and performance. New York: McGraw-Hill Humanities/Social Sciences/Languages
Remember what we said earlier, incorporating both strength training and calorie restriction (i.e., eating less) has been found to result in greater fat loss and improvements in muscle mass. Additionally, the combination of these two behaviors also decreases one’s risk for the development of chronic diseases (e.g., CVD) and premature mortality. For more, read “A carbohydrate-restricted diet during resistance training promotes more favorable changes in body composition and markers of health in obese women with and without insulin resistance.” Source, PubMed.
Spano MA, Kruskall LJ, Thomas DT. (2018). Nutrition for Sport, Exercise, and Health
Spano MA, Kruskall LJ, Thomas DT. (2018). Nutrition for Sport, Exercise, and Health
It should also be noted that when our bodies pull from fat stores to get things done, a few things happen that results in less caloric expenditure: first, we are forced to exercise at a lower-intensity resulting in a lower caloric expenditure, and second, we have a lower post-exercise oxygen consumption resulting in less caloric expenditure post-exercise. So, we need to consume enough calories so we can engage in higher-intensity exercise and have a greater caloric expenditure.
Moro T, Tinsley G, Bianco A, Gottardi A, Gottardi GB, Faggian D, Plebani M, Marcolin G, Paoli A. High intensity interval resistance training (HIIRT) in older adults: Effects on body composition, strength, anabolic hormones and blood lipids. Exp Gerontol. 2017 Nov;98:91-98. doi: 10.1016/j.exger.2017.08.015. Epub 2017 Aug 15. PMID: 28821429
Spano MA, Kruskall LJ, Thomas DT. (2018). Nutrition for Sport, Exercise, and Health
Spano MA, Kruskall LJ, Thomas DT. (2018). Nutrition for Sport, Exercise, and Health
One such study on strength training and endurance is right here.
While periods are a natural part of our cycle, pain is not. For some women, this news may be shocking. Despite what you may think, periods shouldn’t be painful. Today’s guest, Berrion Berry, is a menstrual health educator who helps women have simple and uncomplicated periods. She helps women find ways to optimize their flow and understand their cycle in a deeper and new way.
In this conversation, Berrion and Robin discuss cycle syncing, the different phases of the cycle, and how to honor our cycle with our fitness routine. Berrion shares an abundance of knowledge to help educate you on your cycle, stress management, and how you, too, can be in better flow.
Show highlights: what you can look forward to in this episode!
How Berrion became a menstrual health educator
What inspired Berrion to help other women fix their periods
Things we should all know about our cycle that most women don’t
The four phases of the menstrual cycle
Berrion’s daily journal prompts to stay in touch with herself
Giving ourselves permission to pause + to not be perfect
Honoring your body in your workouts
Ways to manage pain that aren’t birth control
The biggest “aha” moments to improve your lifestyle
The importance of regulating stress
How Berrion aligns her daily life with flow
How Berrion decides what to say yes or no to, and operates using the B.I.G. method
After the last year we’ve had, your stress level may have quadrupled.
If you find yourself responding by “stress eating,” know that you are not alone.
One of the top issues faced by clients in our 1-on-1 Online Coaching Program is emotional or stress eating. After 2020 being all 2020 like (and 2021 having its own challenges), these episodes have only increased.
Today, we’re going to show you exactly how we address emotional eating with our clients, including when it’s – GASP – actually okay to stress eat.
Justin covers three important lessons I want to highlight, but before we do that, we should ask ourselves a question:
“What exactly is stress eating?”
Stress eating is consuming food in response to negative emotions like fear, anger, or sadness.
When we stress eat, food is being used to solve a problem. Now, unless we’re actually hungry, it’s likely a problem that food itself isn’t meant to solve.
That’s stress or emotional eating.
Here’s what compounds the whole problem:stress eating itself can make us feel guilty. We often feel terrible once our spoon hits the bottom of the pint of ice cream.
This can drive more negative emotions, which can trigger even more stress eating.
And the pattern continues.
We’ll talk about ways to break this cycle in a moment, but before we do, we need to create some tools to identify it in the first place.
What Causes Stress Eating? (Lesson #1: Playing Detective)
You may have been surprised in our video above when Coach Justin gives permission to stress eat.
Counterintuitive and seemingly counterproductive, I know. But this is going to be important for two reasons.
How to Approach Stress Eating Step #1: we need to curb the guilty feelings about stress or emotional eating.
I started this guide off by highlighting the frequency of stress eating amongst our Online Coaching clients.
You are not the only one struggling with this.
Most humans do.
And robots with human-like emotions and taste buds
We’ll come back to this idea again, because ending the shame of emotional eating will be critical for moving forward.
How to Approach Stress Eating Step #1: allowing ourselves to stress eat will help us learn why we do it.
We’re going to be playing detective here, to see if we can piece apart your actions and routines.
At the end of the day, our lives are a cumulation of habits. Stress eating is one such habit.
So let’s learn about it!
To do so, we’re gonna need to record some Emotional Eating Notes.
During an episode of stress eating, it’s important to ask ourselves:
What am I doing?
What am I feeling? (Both physically and emotionally)
What am I thinking about?
What time is it?
Where am I?
Who am I with?
Ideally, we’ll start to ask yourself these questions:
An hour or two before the eating episode
Right before it
During it
Right after it
The purpose of theseEmotional Eating Notes?
To look for patterns!
Perhaps you’ll notice some of the following:
“After my recent Tuesday morning conference call, when I got grilled by my company’s leadership, I grabbed some chocolate chip cookies. This happened the week before too.”
“Around 2pm, when I get the ‘afternoon slumps,’ I normally grab a Coca-Cola. This little boost gets me through the end of the day. This is almost a daily practice.”
“Last Sunday evening, when thinking about the start of the workweek, I had a couple glasses of wine. When looking back at my notes, this takes place at the end of most weekends.”
We’re looking for patterns to help us understand what drives our stress eating.
The most important thing about this process: withholding judgment.
We’re looking at our notes for clues into our psyche. Whatever we captured is okay.
If you order pizza every Thursday after talking with your overbearing mom (of course, she means well), step one is to recognize it.
Oftentimes, this awareness step alone can help shift behavior. “Oh, I’m reaching for a beer like I normally do after ending my workday. Typical Me.”
After creating some notes on what spurs our emotional eating, it’s time to think about some alternatives for coping with stress.
How Do I Stop Mindless Eating? (Lesson #2: The Stress Response Menu)
After documenting what sets off our stress eating, we need to formulate a plan on what to do when our anxiety rises.
That means it’s time to build…a Stress Response Menu!
Our Stress Response Menu will be a list of actions or activities you can do to de-stress outside of eating.
Ideally, you’ll do them before an eating episode, but they can be done during or after the fact too.
In other words, if you only realized you were stress eating when your hand reaches the bottom of the Doritos bag, no problem, you can do your stress response activity right then.
The purpose of the Stress Response Menu is to reward yourself with a small moment of self-love, whenever your anxiety levels are too much.
Here are some ideas for activities to place on your Stress Response Menu:
Close your eyes and take five deep breaths (Coach Justin’s go-to move)
Just make sure it’s something you won’t dread doing.
A combination of a “de-stressor” and a “reward.”
This is important, as Coach Justin mentions that many of his clients only reward themselves with food. The self-love they practice only takes place in the kitchen.
Our menu above will help us develop some more options, not solely based on food.
To make the most of your Stress Response Menu:
#1) Make the activities short and easy.
You should feel confident that you can do every item on your list. So avoid activities that will take longer than 10 minutes to complete.
If you’re going to journal when stressed, keep your diary open on your work desk.
If you’re going to drink water before any emotional eating, keep your full glass near you.
If you’re going to take a short walk, keep your kicks near the door.
Don’t set yourself up for failure by picking overly complicated or burdensome activities.
#2) Place your Stress Response Menu somewhere visible.
Once you make your list, print it out and place it in your kitchen or pantry (or wherever you typically stress eat).
You could also write out a couple of your favorite activities and attach them to your refrigerator.
If it’s right in front of you, it’ll be harder to ignore (however, it’s okay to ignore it from time to time, as we aren’t striving for perfection).
Just please don’t write it and then stick the list in the junk drawer that opens to another dimension.
You never can find anything in that drawer.
#3)Track your usage of the Stress Response Menu.
This will help us in two ways:
First, by tracking your usage, you’ll start to feel better about using the SRM. You’ll see an accumulation of all the times you successfully deployed a stress response, helping you visualize the momentum you’re building.
Second, the data will help you understand your patterns of emotional eating. Maybe five deep breaths steered you away from ice cream but the large glass of water did not. You can then use this information to update and revise your response plan.
For the first point, Coach Justin has his clients keep a “Jar of Awesome.”
Every time they have a small win in the day, like taking five deep breaths instead of chugging soda, they place a marble or small token in a jar. After a while, the jar will have a decent amount of marbles or “small wins” in it.
This will then stand as a visual reminder of all the progress being made, proof of their ongoing wins.
How Common Is Stress Eating? (Lesson #3: Learning Self-Compassion)
The American Psychological Association has found that about a third of Americans respond to stress with food.[1]
This research was done BEFORE our global pandemic.
So if you find yourself binging in response to the stress of our global pandemic, know that you are not alone here.
Our coaching clients, and the NF Coaches themselves, have all found themselves turning to food and alcohol for comfort during quarantine.
Heck, recently I mindlessly devoured an entire tub of Animal Crackers too. It was only when the bag was gone did I understand what just happened.
Many of us, even fitness “experts,” are prone to stress eating.
Now, don’t take this as a free pass to stress eat.
If the behavior goes against your goals, it’s something we want to work towards improving.
But there’s a reason they call it “comfort food.” Food can often be used to make us happier, pandemic or no pandemic.
And we’re all emotional bags of meat of this floating hunk of space rock, and we’re doing the best we can.
So give yourself a bit of a break, my friend.
You’re here, you’re reading, and you’re trying. That’s great!
This will bring me to my last point with our handy guide:
Is It Okay to Stress Eat? (Next Steps)
There are times when food is the perfect response to stress.
It’s something Coach Justin mentions in his video.
“Stress eating” might be appropriate if:
After a long workday, a glass of wine with cheese helps you unwind.
To celebrate the coming of the weekend, you have an ice cream party on Friday night.
The week already seems long, and it just started, “Taco Tuesday” might help you survive until Friday.
The important thing here?
“We are making a choice.”
We are choosing to deal with stress or anxiety with food. By making it an intentional activity, we can remove the guilt around emotional eating.
Food can be fine as a reward, as long as it’s us controlling the behavior, and not the food itself.
In addition, if we can recognize the action (or plan for it), we can then adjust our calories before and after and not go off the rails.
If it seems like you aren’t quite there yet, start with your Emotional Eating Notes and your Stress Response Menu.
Even just the process of taking notes on specific episodes of stress eating may be enough to slow down the behavior.
Remember, no matter what happens:
You are not a bad person if you stress eat.
You are not a bad person if you forget to take notes.
You are not a bad person if you ignore your Stress Response Menu.
You are not a bad person (unless you’re a Death Eater, but come on, you know what side you’re on).
If you need any help along the way, we are here for you.
We have three specific paths to continue with Nerd Fitness:
#1) Our Online Coaching program: a coaching program for busy people to help them make better food choices, stay accountable, and get healthier, permanently.
As I said before, “stress eating” is the number one issued faced by our coaching clients, so we know exactly how to help recognize and address the habit.
You can schedule a free call with our team so we can get to know you and see if our coaching program is right for you:
#2) If you want an exact blueprint leveling up your nutrition, check out Nerd Fitness Journey! Our fun habit-building app helps you exercise more frequently, eat healthier, and level up your life (literally).
If you follow our Mindset missions, you’ll learn to de-stress while earning XP! Sah-weeeet.
Try your free trial right here:
#3) Join the Rebellion! We need good people like you in our community, the Nerd Fitness Rebellion.
Sign up in the box below to enlist and get our Rebel Starter Kit, which includes all of our “work out at home” guides, the Nerd Fitness Diet Cheat Sheet, and much more!
Get your Nerd Fitness Starter Kit
The 15 mistakes you don’t want to make.
Full guide to the most effective diet and why it works.
Complete and track your first workout today, no gym required.
Alright, I want to hear from you:
Have you been stress eating more over the last year?
Do you have any tips or tricks to interrupt the pattern?
I want to talk about the “unseen” benefits of Pilates…
We often talk about the physical benefits of Pilates – such as increased strength and muscle tone, more flexibility, and better posture – but Pilates actually has numerous benefits for our mental and emotional health as well.
Here are three “unseen” benefits of Pilates…
1. Pilates can help release emotional tension
Did you know that many of us store emotions in our body? This might look like hunching our shoulders when self-conscious, tensing our jaws when angry, or tightening muscles when afraid.
Pilates helps us release tension in our muscles – including emotional tension that we might be carrying. (This is why many people actually experience a feeling of emotional release at the end of Pilates workouts!)
2. Pilates can help provide stress relief
When we experience high levels of mental stress over prolonged periods of time, our stress hormones can lead to physical symptoms such as aches, pains, and spasms. Through strengthening and stretching, Pilates helps relieve physical stress, which in turn can help with mental stress.
Joseph Pilates actually once said the following: “A body free from nervous tension and fatigue is the ideal shelter provided by nature for housing a well balanced mind…”
3. Pilates can provide benefits of mindfulness
You’ll often hear me remind you during our Pilates workouts to be present and clear your mind of distractions. The reason for this is because when we quiet our minds and focus on the present, we can better focus on our mind-body connection.
The mindfulness aspect of Pilates can lead to multiple benefits, including reduced stress, improved concentration and focus, better sleep quality, and more.
Want to experience these benefits for yourself? Then I invite you to try out Pilates Strong – a FREE, 5-day Pilates challenge that will show you the power of Pilates in just 15 minutes per day.
Simply click here to check it out and I’ll send these quick workouts straight to your inbox!
As you might know from our “How to lose weight” guide, the key to sustainable weight loss is getting ourselves to consume fewer calories in a way that doesn’t make us miserable.
Because our brains and bodies are complicated emotional disasters, there are some tips and tricks we can implement to protect us from…ourselves:
Use smaller plates. Folks will often eat what’s placed in front of them, so using smaller dinnerware has been shown to help people eat less.[1]
Drink a glass of water before your meal. If you chug a glass of water 30 minutes before you plan on eating, the H20 will take up some room in your stomach. This might help you eat less.[2]
Take it slow. It can take about 20 minutes for your body to come around to the fact that it’s full, so slowing down your meals can help you eat less.[3]
Use a food journal. Recording everything you eat and drink is a great way to become aware of portions, which can help you control them.[4] In fact, one of the first missions we have Nerd Fitness Prime members complete is creating a food journal.
All of these strategies will work to some extent, and they’re good to keep in mind and also practice.
However, nothing will get more consistent results than actually learning the number of calories in the food you eat (Portion Control Tip #5)!
Study[4] after study[5] after study[6] shows that our bodies obey the laws of thermodynamics and that in order to lose weight, we need to burn more calories than we consume regularly.
When you consume more calories than you burn, your body tends to store those extra calories as fat (weight gain).
When you burn more calories than you consume, your body will pull from fat stores for energy (weight loss).
However, as we point out in our Calories In, Calories Out guide, determining your exact “calories in” can be a real pain. Not only that, but many people with certain personality traits can become neurotic about tracking every single calorie. They worry if they go 1 calorie over their daily allotment.
So, what’s a nerd to do?
Unless you’re going to weigh out all your food (something I’ve done before) and be militant about tracking, is it possible to “track” your food with a high level of accuracy without having it take over your life?
The answer: yes, by getting darn good at estimating!
Portion Sizes: How to Portion Control (The Best Method)
You already carry with you the best method for portion control.
Your hands!
Even if you have robot hands.
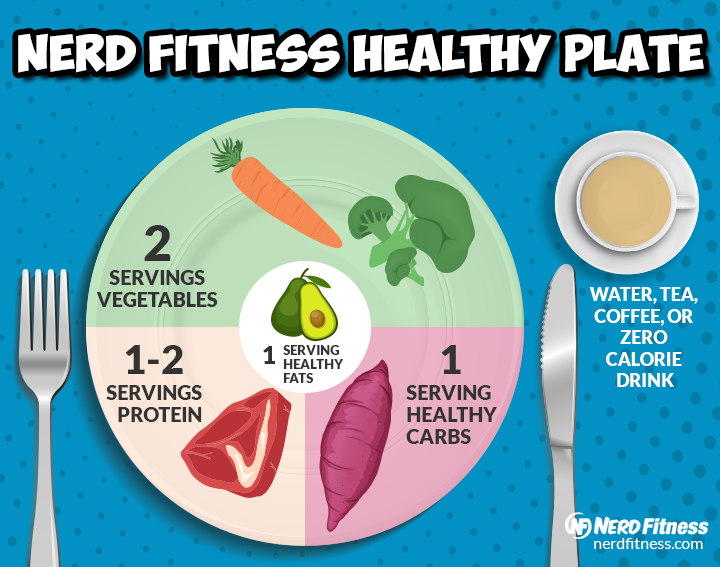
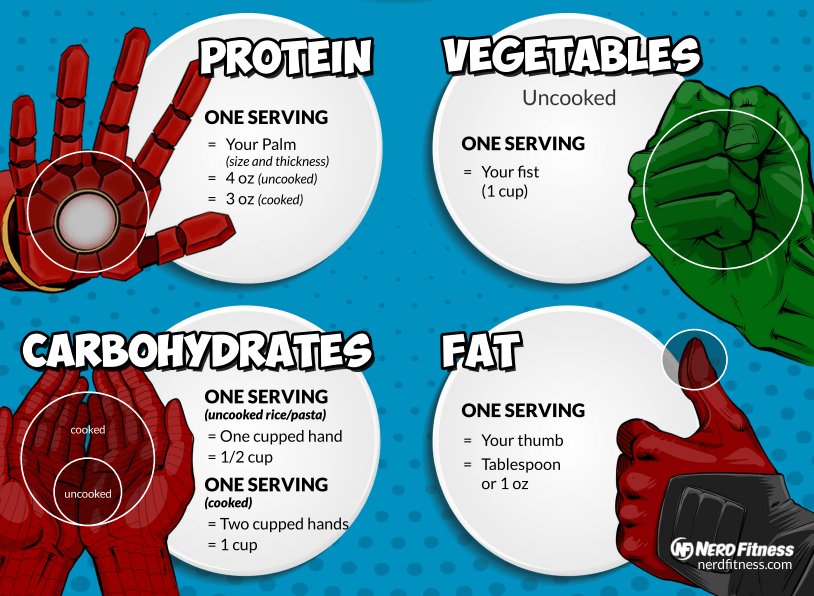
We’re going to use them to build a healthy plate, as shown above.
However, using your hands as a tool for portion control provides a “good enough” strategy that can help your food intake:
As you can see, we’re going to focus our portion control strategy on:
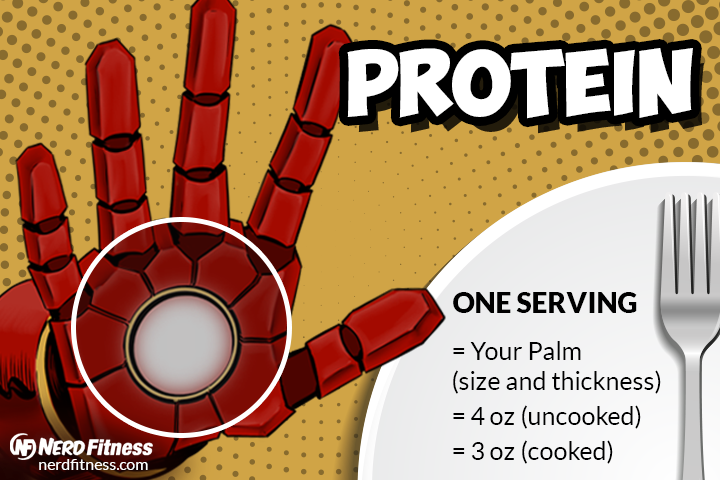
Protein
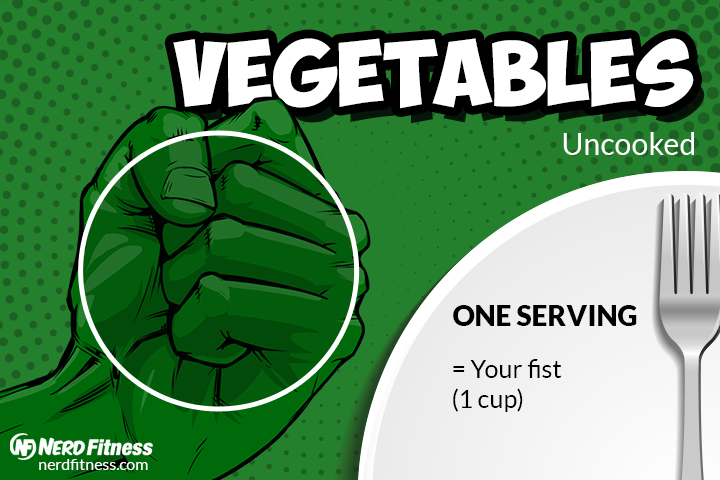
Vegetables (technically carbs, but important enough to deserve their own category)
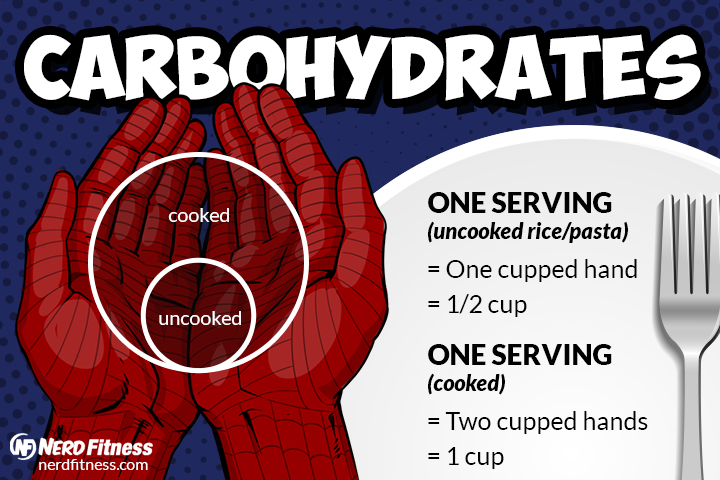
Carbohydrates (think starches and fruit)
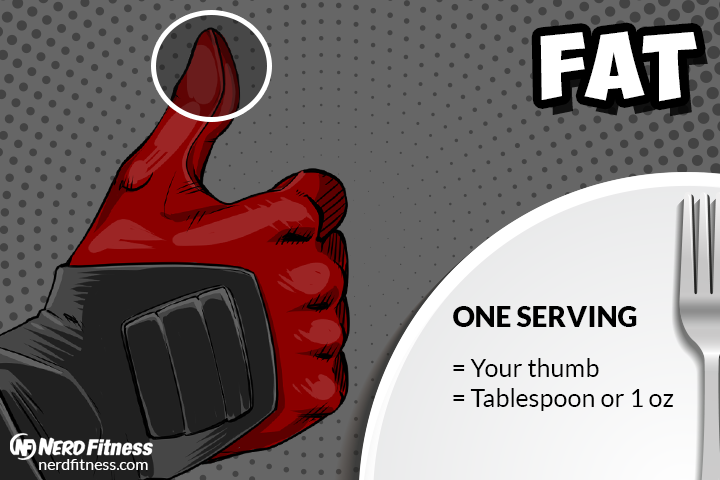
Fat
Each macronutrient will correspond to an area of your hand, to give you a sense of what a proper portion size should be.
We’ve learned that using your hand as a guide is the most helpful strategy for portion control:
You might not always have access to small plates.
You might forget to drink water before each meal.
You might have a short lunch break without the luxury of eating slowly.
You might grow tired of logging all your food intake.
However, having an intuitive sense of what foods should be eaten in what portions will help you level up your healthy eating.
When in doubt, match the food in front of you to your hand and carry on.
Let’s break this down a little by talking about protein and veggies.
What is the Correct Portion Size Part 1: Protein and Vegetables
The above video is taken from Nerd Fitness Prime, as part of our NF Kitchen series.
In it, Coach Lauren and Justin discuss the two most important parts of every meal: protein and vegetables.
Here’s something that might seem counterintuitive: our #1 recommendation for portion control isn’t about limiting food. Instead, make sure you get a proper serving of protein and vegetables every time you sit down to eat.
In other words, when you begin your healthy eating journey, don’t even worry about nixing any specific food. Just make sure you are leaving plenty of room for protein and vegetables.
A serving of protein is about the size and thickness of your palm:
Protein can come from any number of sources, including:
A serving of veggies is about the size of your fist:
Here’s a quick, non-complete list of veggies that can fill half your plate:
Broccoli
Broccolini
Cauliflower
Spinach
Kale
Spaghetti squash
Brussels sprouts
Zucchini
Cucumber
Carrots
Onion
Asparagus
When it comes to learning portion control, start by making sure you eat enough protein and vegetables.
How much?
As we discuss in our protein guide, when building a plate aim for the following amount of protein:
Dudes: 1-2 servings (6-8 oz or about 170-228 g): two palms
Dudettes: 1 serving (3-4 oz or about 85-114 g): 1 palm.
For vegetables, in practice you can probably eat as much as you can stomach (the fiber will likely slow you down), but aim for about 2 fist fulls at most meals, or about half your plate.[9]
Here’s why you should prioritize protein and vegetables if you’re struggling with portion control:
Protein. Eating enough protein will assist your health as you age.[10]Plenty of protein will also help you retain and grow muscle.[11] Plus, prioritizing protein will help you stay full and satiated between meals.[12]
Vegetables. Veggies are both high in nutrients and low in calories, which makes them ideal for a healthy plate. Plus, the fiber will not only help your health, it’ll also keep your indoor plumbing in proper order.[13]
In the video that kicks off this section, Coach Justin makes a great point: aim for a little better than you are today.
Meaning if you don’t really plan your meals at all, start by having ONE meal include a good protein source and some veggies.
You also want to make sure you’re including healthy fat in your diet too.
Fat is actually the most calorically dense macronutrient, so comparatively it’ll take up less room on your hand.
Here is a serving of fat, roughly the size of your thumb!
Healthy fat can be found in foods like:
Avocado
Almonds
Walnuts
Macadamia nuts
Olive oil
Almond butter
Peanut butter
The reason people call it “healthy” is because the fat is unsaturated, although science has recently come around on saturated fat too in the correct amounts.[14]
When it comes to portion control, we need to pay close attention to carbohydrates and fats, because this is where people have the tendency to overeat.
However, that doesn’t mean we want to completely ditch both food groups either.
Here’s why you need to eat these two macronutrients:
Carbohydrates. Did you know fiber is a type of carbohydrate? Yep. As we mentioned earlier, you need plenty of fiber for good health.[15] Carbs are also a great source of quick energy, especially fruit.[16]
Fats. Some nutrients like Vitamin A are fat-soluble, meaning they are best absorbed alongside some fat.[17]Fat will also help you feel full, which can help with overall portion control for the day.[18] While a little goes a long way, you wouldn’t want a “zero fat” diet.[19]
An area of concern when attempting to portion control is dining out.
It seems like restaurants serve you twice the amount of food that you need.
Here’s what Coach Justin does in the situation: ask for a to-go box as soon as you place your order.
Yeah, it’s a little weird, but as soon as you get your food, place half of it in the container.
Boom! An extra meal for later.
Another thing to consider: restaurants want you to leave feeling full.
They often do this by piling on the carbs. Think extra bread, lots of rice, plenty of pasta, etc.
So it might make sense to split these portions in two, and you’re set for lunch the next day.
Also, if you get hungry after eating only half your meal, no problem. Just eat the other half. Even if you’re still at the restaurant.
The point is to consciously think about how much you’re eating. A break halfway through can be used as a decision tree:
Should I keep eating?
This question alone can help with portion control.
One last thing: we know eating out at restaurants is often a family or friend bonding experience, so we’d prefer you ENJOY the night. Food is more than just calories.
Just plan for it! If you eat a really large dinner for a celebration, eat slightly smaller portions for the next day or so and your body will be right back on track.
How to Portion Control for Weight Loss (Next Steps)
In the video above, Coach Lauren and Justin walk you through eating a Nerd Fitness Healthy Plate IRL (In Real Life).
It’s all well and good to build a healthy plate at home, but…
What if you’re at a restaurant?
What if you need to order a sandwich?
How about pizza?
Here are some tips from the Coaches for portion control IRL:
#1) Sandwich
The trick here is to pack in as many vegetables as you can. Yeah, you’re probably not going to get two fist fulls in, but you can squeeze in a lot of spinach, onion, sauerkraut, and tomato (yeah, it’s technically a fruit, whatevs) on your sandwich.
Your carbs can be some type of whole grain bread (you can do an open face sandwich if you want to limit this).
Your protein can come from some turkey.
Your fat can be a little avocado.
Boom.
You now have a turkey sandwich that matches our healthy plate strategy.
#2) Chili/Soup
This can be a little tougher when everything is mixed together.
If you’re making it yourself, perhaps you measure out your hand portions as you cook.
Put a palm-size portion of ground beef in.
Your vegetables can be onion, garlic, and tomatoes (again a fruit, but who cares).
Your carbs can be pinto and/or kidney beans.
Your fat can be a little bit of cheese sprinkled on top.
Sure, maybe you’re doing less than two fistfuls of vegetables, and more than a cupped hand of carbs (beans).
It doesn’t matter. Again, the point is you’re putting a little thought into proper portions.
If you’re eating out and ordering soup or chili, maybe just think of the end product in mind:
“After portioning everything out, it should be about two fistfuls of food. So that’s what I’ll eat. Everything else I’ll take home.”
#3) Pizza
This is a little trickier because pizza is mostly bread (carbs).
But Coach Justin has a solution for this.
First, he eats something he’s proud of, like a salad.
Then he portions out his pizza, which if he uses his hand strategy, would be about two slices:
Is it perfect?
Nope.
Does it help Coach Justin reach his goals and allow him to still enjoy life?
Yep!
So experiment a little by creating some rough guidelines, see how you feel, and course-correct as you go.
Remember, any step you take on leveling up your nutrition is great.
If you don’t know where to start, I actually recommend you begin by not worrying about what to take OFF your plate, but instead what to add!
Make sure every meal you eat has a healthy protein source and a vegetable. Once you have that dialed in, THEN you can worry about portion controlling your carbs and fat.
If you need help along the way, we got you.
Here are three ways to continue your journey with Nerd Fitness.
#1) Our Online Coaching program: a coaching program for busy people to help them make better food choices, stay accountable, and get healthier, permanently.
As I said before, we teach portion control to our clients who struggle with overeating, so we’ll provide a non-judgmental expert to help you reach your goals.
You can schedule a free call with our team so we can get to know you and see if our coaching program is right for you:
#2) If you want an exact blueprint leveling up your nutrition, check out Nerd Fitness Journey! Our fun habit-building app helps you exercise more frequently, eat healthier, and level up your life (literally).
If you follow our Nutrition missions, you’ll learn to portion control while earning XP! Sah-weeeet.
Try your free trial right here:
#3) Join the Rebellion! We need good people like you in our community, the Nerd Fitness Rebellion.
Sign up in the box below to enlist and get our Rebel Starter Kit, which includes all of our “work out at home” guides, the Nerd Fitness Diet Cheat Sheet, and much more!
Get your Nerd Fitness Starter Kit
The 15 mistakes you don’t want to make.
Full guide to the most effective diet and why it works.
Complete and track your first workout today, no gym required.
Alright, I want to hear from you:
Do you have any tips or tricks for portion control?
Do you use the hand strategy that we covered today?
What’s your biggest challenge with portion sizes?
Let us know in the comments!
-Steve
PS: If you’re just starting your weight loss journey, make sure you check out: