Having been running the Zoom and Online Fitness Instructors community on Facebook for nearly two years, I’ve noticed that every now and again, someone (we) need a bit more than just technical support. Because we’re navigating how to run a…
I promise you, if you follow the videos in our guide, you will be more flexible in 30 days.
Let’s get bendy!
What Are the 3 Best Flexibility Exercises? (Intro and Benchmark Test)
The above video comes from Nerd Fitness Prime, kicking off our 30-day challenge “Flexibility for the Inflexible.”
In it, Nerd Fitness Coach Matt discusses the tools he uses for improving mobility with his clients.
The 3 Best Exercises to Improve Flexibility:
The Toe Touch
The Back Scratch
The Butterfly Stretch
Let’s go over each of these moves now.
#1) Toe Touch
To perform a standing toe touch:
Stand straight with your legs about hip-width apart. You want your legs to be straight, but don’t aggressively lock out your knees either (this feels like a “microbend” to a lot of people).
Begin by bending and leaning forward towards the ground with your quads (front of your legs).
Let your body rest naturally, as if you were a ragdoll. Keeping your hands relatively close together, straighten your fingers and begin to stretch down slowly to the ground.
The goal here, ultimately, will be to touch your toes.
Take a comfortable seat (or stand), with your torso and back tall.
Tuck your thumbs inside of your fist.
Place your right hand behind your head, down back over your shoulder. Reach as far down the middle of your back as possible, palm facing you.
Your other arm (left) is going to go behind and up, with your palm facing away. Reach this hand toward your upper hand (don’t strain).
Switch arms and reverse the moment.
Over time, we are going to work to bring your hands closer together.
#3) Butterfly Stretch
To perform a butterfly stretch:
Take a seat, with your legs facing out in front of you.
Bring both of your front feet together, with the bottoms touching, by bending your knees away from each other.
Grab both feet with your hands, with your elbows coming down toward your knee (they don’t have to touch).
Keep your back straight, and allow your knees to come down (if they can, don’t force it).
The goal here will be to bring your knees lower and feet closer to your groin, but don’t fret if this is challenging. Even Coach Matt has trouble with butterfly stretches.
Why these three exercises?
Coach Matt refers to the toe touch, back scratch, and butterfly stretch as “benchmarks.”
If you have decent mobility in these three exercises, you’re probably pretty flexible.
Improving these will be our mission for the next 30 days!
Each week, Coach Matt will provide three different video routines with exercises designed to target these specific benchmarks.
So in Week 1, you’ll find a video for:
Toe Touches
Back Scratches
Butterfly Stretches
You can do these videos all at once if you want, or break them up throughout your week.
Maybe you do a routine Monday, Wednesday, and then on Friday.
We’ll end this guide with some tips on starting a recurring practice.
At the end of our 4-week series, we’ll check in, to see how everything is coming along.
Here’s what we need you to do right now: record where you are with these moves.
How far down can you reach with your toe touch?
How far apart are your hands during the back scratch?
How close are your feet and how high up are your knees during the butterfly stretch?
Coach Matt recommends a few ways to measure these benchmarks in the introductory video above, but even some subjective tracking would be useful:
“On a scale of 1 to 10, this move was tough, so I’d give it an 8.”
Don’t forget about this initial tracking, even if you don’t have a measuring tape. Just go through the initial benchmark tests the best you can.
Before we jump into the series itself, let’s discuss some general tips and tricks for improving flexibility.
Tips and Tricks for Increased Flexibility
First and foremost, all bodies are different.
You might have a great range of motion in your back scratch, but can’t get much range on your toe touch. Or maybe you’re like Coach Matt, where butterfly stretches are challenging.
Our goal here is to improve YOUR flexibility. We’ll all have different mobility ranges on Day 1.
All of us have to start somewhere, so don’t stress if you feel inflexible…
…that’s why you’re reading this guide.
No matter what, by going through this process, you’ll learn more about your body and develop tools for increasing your range of motion.
Next up…
Coach Matt highlights two general ways to increase your flexibility:
Function. This is your technique and awareness of your flexibility. Think of this as maximizing the potential of your current body.
Structure.This would be your body itself, and the range of motion of muscles, tendons, etc. Structure is about changing your body itself through these flexibility exercises.
You’re probably not going to increase the structural flexibility of your body after one stretching session. These things take time
However, you very well may increase your flexibility by improving your function or technique. As you go through the videos, Coach Matt will offer instructions on how to position your body for proper stretching.
This alone may very well increase your range of motion.
We’ll also be using three specific movement tools for improving flexibility:
#1) Active Range of Motion
This would be doing the complete movement of an exercise, fluidly.
So a normal bodyweight squat would be an active range of motion if you did the entire movement:
By going all the way down and back up with your squat, your muscles are engaged evenly throughout.
#2) Pulses
This movement has you stopping at a particular point of an exercise, like the bottom of a squat, and slowly and in control, pulsing slightly up and down:
You’re really only moving about an inch here for your pulses.
This will help you gain control of that particular area.
#3) Holds
As the name would suggest, here you’ll hold the position at a specific point of the exercise.
For example, for your squats, you may pause at the bottom of the movement:
This can help you grow stability during a particular stretch.
During the course of the next four weeks, we’ll be utilizing a combination of active range of motion, pulses, and holds, to increase your flexibility.
And with that, onto week 1!
How to Improve Your Flexibility: Week 1
For our first week, Coach Matt is going to start us off slow.
Here, it’s all about learning the foundations of the movement.
To increase flexibility, it often comes down to properly setting up the stretch.
We’ll begin by teaching you the basics.
Toe Touch Week 1:
Back Scratch Week 1:
Butterfly Series Week 1:
How to Improve Your Flexibility: Week 2
This week, we’re going to identify the edge of your flexibility.
We won’t push or strain ourselves too much, but we’ll use our breath as a sign of difficulty.
The goal here is to understand how flexible you may actually be (you might be able to reach farther than you think).
However, as Coach Matt will continuously reminds, if it feels unsafe, DON’T DO IT!
Toe Touch Week 2:
Back Scratch Week 2:
Butterfly Series Week 2:
How to Improve Your Flexibility: Week 3
In Week 3, it’s all about exploring and expanding your flexibility exercises.
We’ll be testing your movements and begin thinking about ways to “go off the rails” a little here and there.
In our third round of exercises, you’ll begin changing, adapting, and remixing the moves to increase your range of motion.
With flexibility, some creativity can be a good thing, which will be your focus for this stage.
Toe Touch Week 3:
Back Scratch Week 3:
Butterfly Series Week 3:
How to Improve Your Flexibility: Week 4
In the last week of “Flexibility for the Inflexible,” it’s all about building strength.
Muscle will help you hold and expand mobility positions, so this week Coach Matt covers exercises designed to couple strength with your flexibility.
We’ll even mix in some weights into your routine here.
Toe Touch Week 4:
Back Scratch Week 4:
Butterfly Series Week 4:
Next Steps for Becoming More Flexible
The video above is a “re-cap party” with Coach Matt, ending the 30-day Flexibility for the Inflexible challenge we ran for Nerd Fitness Prime members.
Let’s go over some highlights.
#1) Continue to test and retest your flexibility benchmarks.
That which gets measured gets improved, so continue to track your toe touch, back scratch, and butterfly stretch.
Remember, these tests don’t need to be some precise measurement rounded to the nearest millimeter (although if you want to do that, have at it).
Instead, they can be subjective:
“This is really tough, I can’t bring down my knees at all.”
to…
“I could probably sit like this for 15 minutes.”
Don’t stress out over how precise your measurements are, but do keep a record of how these stretches feel. It’ll help us know if you’re improving.
#2) Use your breath as a guide.
Breathing can often be a signal of excretion levels:
If your breath is calm and normal, what you’re doing is within your comfort range.
If you’re huffing and puffing a lot, or even holding your breath, you’re probably exerting yourself too much.
As Coach Matt highlights, during your flexibility exercises, don’t push too far past your comfort zone.
Yes, we should find your edge, but we also want you to feel in control during your stretches so you can really “own” the movement.
If you find yourself having to catch your breath, it could be a sign you’ve gone too far.
Be mindful of your breathing during our flexibility exercises.
#3) You don’t have to stretch every day.
You probably noticed that we provided three 20 minute videos per week to help improve your flexibility.
This was intentional, because you don’t have to stretch every day to increase your range of motion.
Truth be told, you don’t even need to do 20-minute sequences three times a week to improve flexibility. Even just 10 minutes of flexibility exercises a couple of times per week could improve your mobility.
To do so, you can continue to follow the videos in this guide, or I have some other resources for you to check out.
Here are three more guides for improving your flexibility:
21 Yoga Poses for Beginners. Yoga can be a great practice to improve your flexibility. If you’ve never tried it before, check out our guide. We’ll provide video sequences designed for beginners, so don’t worry if you have no clue what a downward dog is. We’ll teach you.
Three Full-Body Stretching Routines to Cool Down. After a workout, a good stretch can be the perfect way to lower your heart rate. Our guide will offer you three different routines to perform after your workout (or whenever) so you can start improving your flexibility.
How to Touch Your Toes. Since the toe touch is the go-to benchmark to see how flexible you are, we have a complete guide on getting you there. If you’ve always dreamed of being able to reach your little piggy wiggies, start here.
The most important thing you can do now?
Get to it!
You’re not going to get any more flexible by reading articles online, so pick a sequence from today and get going!
If you like our style here at Nerd Fitness, I have three great options on how you can continue your journey with us:
Option #1) If you want a professional coach in your pocket, who can do video form checks, provide feedback, and adjust your workouts based on your experience level, check out our 1-on-1 Online Coaching Program!
For example, let’s say you have an old injury and couldn’t perform one of our flexibility exercises. A Nerd Fitness Coach can work with you to create a customized routine for your exact situation.
Personally, I’ve been working with the same online coach since 2015 and it’s changed my life. You can learn more by clicking on the box below:
Option #2) Exercising at home and need a plan to follow? Check out Nerd Fitness Journey!
Our fun habit-building app helps you exercise more frequently, eat healthier, and level up your life (literally).
Plus, you can take part in flexibility challenges alongside a group of nerds who are all trying to better themselves!
Try your free trial right here:
Option #3) Become part of the Rebellion! We need good people like you in our community, the Nerd Fitness Rebellion.
Sign up in the box below to enlist and get our Rebel Starter Kit, which includes all of our “work out from home” guides.
Get your Nerd Fitness Starter Kit
The 15 mistakes you don’t want to make.
Full guide to the most effective diet and why it works.
Complete and track your first workout today, no gym required.
Alright, now I want to hear from you!
Did you try our “Flexibility for the Inflexible” series?
Did you find any of the exercises easier or harder than the others?
Any tips or tricks to help the “inflexible”?
Let me know in the comments!
-Steve
P.S. Personally, I’ve found a yoga practice to be incredibly helpful in improving my mobility.
These are the exact type of workouts we build for our 1-on-1 Coaching clients, busy business travelers like you that are trying to get fit even while living out of hotel rooms and airports!
Do one exercise right after another – this should take you probably 3-4 minutes.
Next set your watch/laptop for 15 minutes and do as many full circuits as possible in that time frame, using PERFECT FORM for each repetition. Try to move from each exercise to the next without stopping.
I’ve also split the workout into three levels – beginners should start at level 1 until they feel comfortable enough to advance to levels 2 and 3.
LEVEL 1 HOTEL ROOM WORKOUT
Body Weight Squats: 20 reps (you don’t need a chair like in video, that’s just if you need help)
Incline Push-Ups: 15 reps (feet on floor, hands on edge of bed or desk)
One-Arm Luggage Rows: 10 reps (each arm, use your suitcase as your weight)
Reverse Crunches: 10 reps
LEVEL 2 HOTEL ROOM WORKOUT
Overhead Squats: 25 reps
Push-Ups: 20 reps
Inverted Rows: 10 reps(using the desk in your hotel room…just don’t break it!)
Reverse Crunches: 15 reps
LEVEL 3 HOTEL ROOM WORKOUT
Jumping Squats: 25 reps
Decline Push-Ups: 20 reps (feet up on bed or desk chair)
So here are the exercises you can do in the comfort of your hotel room while watching guilty pleasure reality shows you’re too embarrassed to watch at home.
Here’s a list of quick exercises you can do in your Hotel Room:
You can always do a little yoga in your hotel room!
Nope, you don’t need a mat. You can just use a towel if you’d like to pad your knees a little.
For instructions on how to do any move in the routine above, check out A Nerd’s Guide Yoga.
WHY YOU SHOULD WORK OUT IN YOUR HOTEL ROOM
Even when I’m living out of hotel rooms, I prioritize working out.
I find that on days when I exercise, I eat better. Something activates in my brain when exercising that says “I’m trying to be healthy, so I’m going to eat healthy.” On days when I don’t exercise at all, I tend to say things like “meh, I’ll do it tomorrow” or ‘it’s only one meal” or “it’s only a few beers.”
That’s why a workout, even if it’s for only 20 minutes, can be very critical while traveling. It really does have a way of stopping you from gorging yourself silly on pizza later. It’ll also help you build momentum.
Speaking of momentum…have you met Jeff?
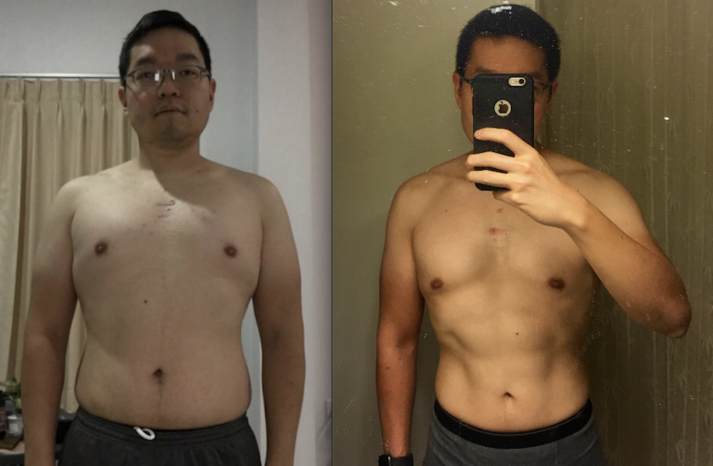
Jeff is a doctor and start-up founder who travels 2+ weeks out of every month and lives out of hotel rooms too! We helped him lose 30+ pounds and get in the best shape of his life despite the fact he was living out of hotel rooms for the past two years.
Jeff is a proud member of our snazzy 1-on-1 Online Coaching Program, and loves the “global accountability” his coach provides.
If you are somebody that can’t seem to stay healthy while traveling, we’d love to help – we’ll build you a program that works at home, and then adjust your workouts to fit into your travel schedule too. We help our clients with expert guidance, support, and accountability.
Interested?
Click below to learn more:
If that’s too much for you right now, I’ve got two other great options for you:
#1) If you want a roadmap for getting in shape on the road, check out NF Journey. Our fun habit-building app will help you exercise and eat better, all while you build your very own superhero…no matter where on Earth you are!
Interested?
Try your free trial right here:
#2) Join The Rebellion! We have a free email newsletter that we send out twice per week, full of tips and tricks to help you get healthy, get strong, and have fun doing so.
I’ll also send you tons of free guides that you can use to start leveling up your life too:
Download our free weight loss guide
THE NERD FITNESS DIET: 10 Levels to Change Your Life
Follow our 10-level nutrition system at your own pace
What you need to know about weight loss and healthy eating
3 Simple rules we follow every day to stay on target
Okay, that about does it.
The next time you’re in a hotel room, or any room, try our 20-Minute Hotel Room Workout. If you find even Level 3 too easy, try this one instead. I’ll warn you though, I don’t hold back on this more advanced circuit.
Alright, now I want to hear from you:
Do you spend a lot of time in hotels?
Travel a lot for work?
What are your tips and tricks for staying healthy while living in hotels?
Get your heart rate up, build strength, and boost your energy in this full body Pilates workout – with a HIIT style twist!
We’ll flow between HIIT and Pilates exercises for a fun, dynamic, effective workout, and we’ll apply Pilates throughout by focusing on our form, control, posture, alignment, and muscle engagement.
Come back to this Pilates HIIT Style Workout any time you want a quick boost for energy, cardio, and strength!
Welcome back to The Balanced Life podcast! To kick off this new season, we’re focusing on nourishment and our relationship with food. This can be a complex subject for many of us, which is why we’re looking at how to take a well-rounded and less complicated approach to food and nutrition. In this episode, we’re joined by Tamar Samuels of Culina Health, who shares ways to enrich our overall wellness with practical and realistic advice.
Tamar is a dietician, nutritionist, and co-founder of Culina Health who takes a holistic approach to help individuals heal their relationship with food. She discusses what causes inflammation, how to improve your sleep, easy additions to your diet, and so much more. Join Robin in this insightful and enriching conversation with Tamar.
Show highlights: what you can look forward to in this episode!
What is inflammation and how does it affect our bodies?
Foods that cause inflammation + foods that help reduce inflammation
The difference between Omega-3 and Omega-6
How what you eat can impact your sleep and ways to improve it
Adding to your diet instead of restricting
The difference between a dieting mentality and making healthy changes
Also, if you’re in a hurry, we’ve compiled all our strength and weight training content into one handy guide called (appropriately): Strength Training 101: Everything You Need to Know.
Grab it for free when you join the Rebellion (that’s us!) below:
Download our comprehensive guideSTRENGTH TRAINING 101!
Everything you need to know about getting strong.
Workout routines for bodyweight AND weight training.
How to find the right gym and train properly in one.
Alright, cue the music. Let’s do this thang.
What are Compound Exercises?
Let’s compare “compound exercises” to “isolation exercises”:
Compound exercises require more than one muscle group working together to complete the movement. This replicates the way your body naturally moves.
Isolation exercises more or less train one specific muscle group. For example, the leg extension machine focuses on your quads, so it “isolates” training that muscle.
Front squats would be an example of a compound exercise, because it engages your entire lower body and core, and quite a bit of your upper body too, as you perform the movement:
As opposed to biceps curls, which more or less just trains your biceps:
As we explain in our Guide to Functional Fitness, whenever possible you want to focus on compound exercises.
Why?
Because in everyday life, you don’t use your muscles in isolation!
When you’re placing luggage in the overhead bin, hoisting a bag of dog food from the floor, or hauling your kid to bed, you’re using your muscle groups together.
Just like you would with a compound exercise.
Plus, since you’re using multiple muscle groups at once, you’re taxing your body more when training. This can provide more efficient use of your time in the gym.
In other words, why do three different exercises when you can just do one?
Now that we’ve got that out of the way, let’s get to working out.
The squat exercise serves a dual purpose – it is the foundation for building strength AND helps build proper mobility. If you are going to ever do barbell squats, you need to work on hitting proper depth with a bodyweight squat first!
Once you can support your body’s weight above the bar, the world becomes your playground. No strength training routine should be without pull-up or chin-up work! (Can’t do a pull-up yet? We got you.)
Muscles trained with the pull-up:
All of your back muscles (Latissimus dorsi, rhomboids, trapezius)
This exercise is simple: press a barbell above your head.
Muscles trained with the overhead press:
Pectoral
Triceps
Deltoids
Rhomboid (Back muscles)
Abs
All the muscles in your chest, shoulders, and arms are engaged in order for you to lift the weight over your head. As a bonus, you need to really flex and brace your core, which gets those muscles working too.
Here are step-by-step instructions on how to perform the overhead press:
To do a weighted lunge, have the bar across your upper back and step out with your right leg. Lower your hips until your back leg’s knee almost touches the ground. Explode up and back by pushing off with your front leg. Repeat on your other side.
Muscles trained with the barbell lunge:
Quads
Glutes
Hamstrings
Your core (as you stabilize yourself and the weight)
Note: The above might be tough if gyms are closed around you. If that’s so, here’s how to build a gym at home (using household equipment).
Start Performing the Best Compound Exercises (Next Steps)
Your mission, should you choose to accept it: commit to trying ONE of these compound movements in the next week. Use 20 seconds of courage, recruit a friend who has lifted or trained before, and try your best.
We all start somewhere!
Speaking of starting out…
Have you yet to do ANY of these compound exercises?
Always start out with bodyweight moves and make sure your form is correct!
If it’s a barbell movement, use a broomstick (or PVC Pipe).
You can pretend you’re Harry Potter after:
When it comes to movements like squats, deadlifts, pull-ups, bench press, etc. – your form is crucial. Develop good habits with lighter weight and you will save yourself months of frustration later and will protect you from injury.
If you’re struggling with certain elements of a movement, don’t get frustrated! Just understand that you’ll have areas in which you can improve.
When I started, I really liked practicing all of the movements at home because I could watch a video online at the same time as I was watching myself do it in a mirror.
Still uncomfortable with the movements after that? Look around at some local strength and conditioning gyms and see if you could hire a coach (here’s how to find a good trainer) for one or two sessions just to go over the basic movements (or consider working with an online coach).
No matter what path you take, the most important thing you can do: START NOW!
Don’t overthink it. Just pick a compound exercise and learn how to do it. We can add more exercises to your routine down the road.
Want a little help getting going? The perfect next step to start your strength training journey!
You got it.
Here’s how Nerd Fitness can help you:
#1) If you want a coach in your pocket, who can do video form checks, provide feedback, and adjust your workouts based on your progress, check out our 1-on-1 Online Coaching Program!
I’ve had an online coach since 2015 and it’s changed my life. You can learn more by clicking on the box below:
#2) If you want a daily prompt for doing compound exercises at home, check out NF Journey. Our fun habit-building app helps you exercise more frequently, eat healthier, and level up your life (literally).
Plus, you get to build an awesome superhero in the process!
Try your free trial right here:
#3) Join the Rebellion! We need good people like you in our community, the Nerd Fitness Rebellion.
Sign-up below and receive our free guide Strength Training 101: Everything You Need to Know. It includes step-by-step instructions for the Best Compound Exercises covered in today’s guide.
Download our comprehensive guideSTRENGTH TRAINING 101!
Everything you need to know about getting strong.
Workout routines for bodyweight AND weight training.
How to find the right gym and train properly in one.
Alright, enough from me. Your turn:
Do you agree with my list of best compound exercises?
Am I missing any?
Any tips or tricks for a newbie just getting started?
Whether you’re comfortable on a yoga mat or you think a downward dog is just something your puppy does, you’re in the right place.
We teach yoga in our Online Coaching Program where some of our clients have used it to improve their back pain…like Brain here:
He also switched up his diet and lost 75 pounds!
I can’t wait to help you get started.
Today’s yoga poses will be broken out into three levels, for you to progress in difficulty.
What can I say, we love leveling up here at Nerd Fitness. Most of our poses are basic, Level One, in case you are completely new to yoga. However, we’ll include a few more advanced poses so you can take it further.
We’ll start by discussing a little Yoga 101, in case you are totally lost right now and don’t know yoga from yogurt. If you wanna skip to your desired video or pose, just click on it.
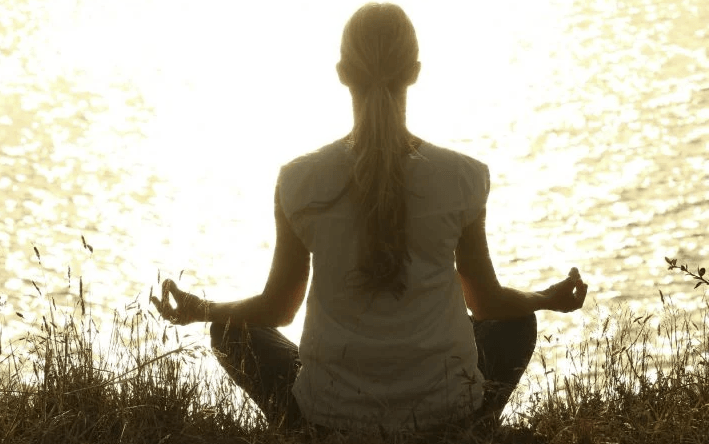
Yoga means lots of different things to different people… like Windfarm Yoga apparently, to the woman in the photo above. As one commenter from Cracked pointed out:
“The only thing I know for sure about yoga is that whatever you’re doing when you practice it, you’ll be assured by someone that it isn’t “real yoga.”[1]
I’m not interested in that particular aspect of the yoga debate: people need things to argue about and get offended over…because Internet. What’s important to me is getting more people interested in trying yoga out because it’s damn fun and can really improve your life.
After all, as Vox explains:
“Yoga seems to help alleviate lower back pain, improve strength and flexibility, and reduce inflammation in the body — which, in turn, can help stave off chronic disease and death.
Emerging research suggests yoga can increase body awareness, or attention to the sensations and things going on inside you. That’s no small matter: Researchers think heightened body awareness can improve how well people take care of themselves.”[2]
Science is essentially telling us: Yoga can help you become more flexible like Black Widow, improve your strength like the Hulk, extend your life like the elves of Rivendell, and give you mental awareness like Yoda.
The jury is still out as to whether or not it grants us telekinetic powers.
Please email me if a yoga practice helps you levitate rocks.
When I approached yoga years ago as an attempt to improve my flexibility and to combat poor posture, I was initially worried about looking foolish or finding some aspect of the exercise that didn’t sit right with me.
Instead, I found a complimentary, enjoyable activity that helped improve my flexibility and mobility, alleviated my lower back pain, opened up my hips to combat a lifetime of sitting, and even helped me quiet my overactive mind!
Plus, it was like a power-up for my strength workouts.
It’s now an activity I do with regularity throughout my week, incorporating yoga stretches during the day in between desk sessions, after working out, and attending the occasional class to level up.
WHY SHOULD I CARE ABOUT YOGA?
If you read Nerd Fitness, you’re probably a skeptic. After all, one of the Rules of the Rebellion is to question everything!
So you might be thinking: “Steve, you’re not going to ask me to start speaking in mantras, chanting OMMMMMM, and work on improving my spiritual chi.”
As somebody who started yoga with the exact same reservations, I sit before you a changed man. For starters, if you decide the spiritual aspects of the practice aren’t for you, you’re not alone: research into yoga’s history can lead down an internet rabbit hole of controversy that is bottomless.[3]
So we’re not going to jump in that fight.
Instead, what you will find when it comes to yoga is study after study showing that this form of exercise rocks.
Here’s why yoga is beneficial:
1) A body prepared to handle anything: at Nerd Fitness, we are huge fans of strength training, and yoga is its perfect compliment. It elongates your muscles, improves your flexibility, can release tension in your neck and shoulders, and helps you do things like touch your toes![4] It can help you build stronger muscles, improve balance and stability (especially for our older rebels[5]), and make you more “antifragile” (one of my favorite terms).
Yoga subjects exhibited increased deadlift strength, substantially increased lower back/hamstring flexibility, increased shoulder flexibility, and modestly decreased body fat compared with control group.
2) Yoga is great for lower back pain: If you’re one of the 31+ million people like myself who struggle with lower back pain, yoga can help.[7] Yoga really helps those of us stuck at a computer all day long as well.[8]
3) Yoga can help meet weight loss goals when combined with a healthy diet. Look, we all know our diet is responsible for 80-90% of our success when it comes to weight loss. The other 10-20% of the equation is participating in physical activities that push your body outside its comfort zone.
Yoga is a great way to burn a few extra calories and keep your brain focused on “I am doing healthy things and thus I should be eating healthy foods!” It can help improve our fight against cardiovascular disease, hypertension, and obesity.[9] It’s also a great rest day activity to keep you on track when you’re not doing your other workouts.
4) Speaking of which…yoga can be done every single day, and can be done anywhere. No gym required, no equipment required – no excuses! On top of that, because it’s a low-impact activity and doesn’t overly tax your muscles like a powerlifting session, you can do yoga every single day, anywhere you can find a soft place to sit down: your living room, a park, a beach, your bedroom, on the moon, etc.
5) Yoga can quiet an overactive mind: We live in a world with a distraction around every corner; we read Facebook or our favorite blog while checking email and texts… while trying to work a day job. If you’re anything like me, your mind races a million miles an hour, and trying to develop a sense of control and calm over your mind is like herding cats. We’ve already explained the benefits of Meditation for Nerds; yoga can be tremendously helpful with becoming more aware of our bodies and help with reducing stress and anxiety.[10]
Lastly, if yoga is good enough for badass Dhalsim from Street Fighter II, it’s good enough for me:
Alright, I’m going to assume at this point you are on board with yoga. If being able to completely demolish a car with your bare hands doesn’t convince you, nothing will.[11]
So let’s go over some yoga poses and routines.
A YOGA ROUTINE FOR BEGINNERS YOU CAN DO AT HOME
We’ll start out our explanation of different yoga poses by showing you what the end result can look like.
Here’s a complete routine covering some basic yoga poses:
The above video (Water Series – A) is taken from our course, Nerd Fitness Yoga (a part of Nerd Fitness Prime). If you like it, I’d encourage you to go browse the page and check it out.
Nerd Fitness Yoga is a course you can follow along within the comfort of your own home, and it’s built specifically for members of the Rebellion: easy to follow instructions, an inviting attitude, and as you can tell… some corny jokes from yours truly.
This course will work for men and women of all shapes, ages, and sizes, giving anybody the confidence to get started IMMEDIATELY. Follow it regularly and you can expect the benefits of the dozens of studies I linked above when it comes to yoga practice.
In addition to a HUGE pose library and step-by-step instructions, it also contains all of the following full-length yoga sessions filmed in HD:
Water sessions: Two beginner yoga videos (25 minutes each, first one was above)
Fire sessions: Two intermediate yoga videos (30 minutes each)
Star sessions: Two advanced yoga videos (40 minutes each)
Deep stretching routine (40 minutes)
6 supplemental mobility videos (that will help with lower back mobility, how to finally touch your toes, and so on. Two of which are below.)
All of these videos can be streamed or downloaded to any device as many times as you’d like so you can practice yoga wherever, whenever.
10 BEGINNER YOGA POSES (LEVEL 1)
#1) Seated Cross Legged
One of the most popular yoga poses is simply Seated Cross Legged.
A seated position helps relax, reset, and open your hips up a bit.
Bring yourself down to a seat on the floor, whatever is most comfortable. Cross one ankle of the other in front of you and sit cross-legged.
Take a big breath in and straighten your spine as if there was a string pulling your head and neck up to the ceiling. Breathe out, but keep that upright posture.
Hands can rest on your knees, but shouldn’t push out or pressure your legs.
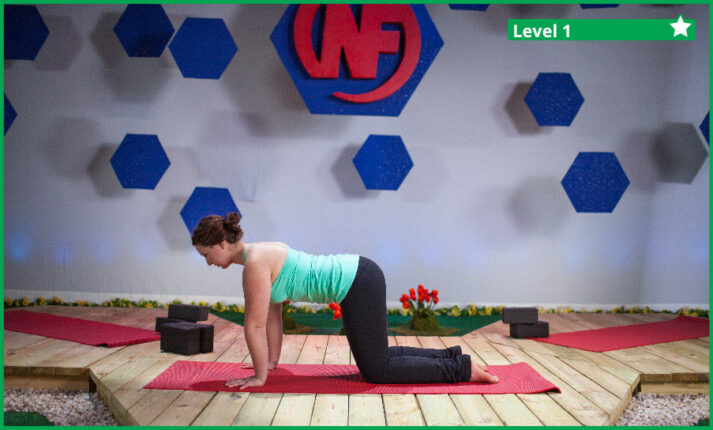
#2) Table Top Cat-Cow
This is actually a series of a few poses (Table Top, Cat, & Cow) that is used in almost every yoga session to help reset your spines and warm up your back.
Start in Table Top, with your hands under your shoulders and your knees under your hips. Your spine should be parallel with the floor to start.
Exhale and slowly press into your hands as you abs up towards your spine. Round your spine to the ceiling as you bring your chin towards your chest. Gently push out your shoulders.
Inhale and relax your abs while you bring your hips back down. Lengthen your torso as your head comes up and looks towards the ceiling. Your chest should come forward slightly and your lower back should push into your pelvis.
Relax and return back to a neutral Table Top position.
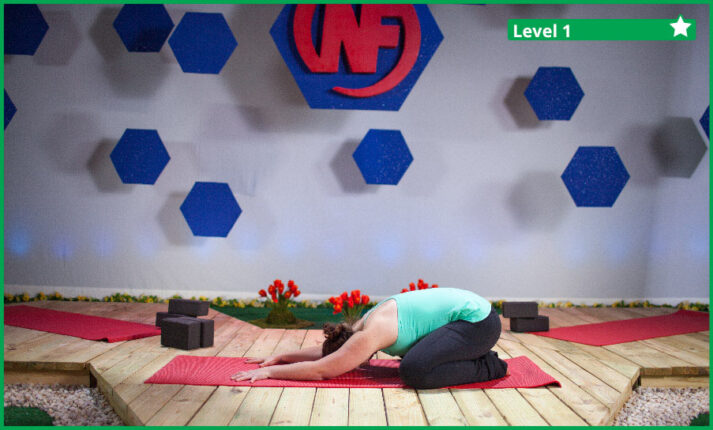
#3) Child’s Pose
Child’s Pose is considered a resting position. This means that any time you feel overwhelmed, overheated, or stressed about a particular pose or variation while doing yoga, STOP what you are doing and come slowly into a Child’s Pose to rest.
This pose helps lower stress, refocus your mind, and lightly stretch primarily your lower back, hips, and thighs.
Start by kneeling on the floor with your toes touching behind you. Widen your knees so they are just a little wider than your hips. Gently lower your body between your knees and hips.
Your arms will stretch out lightly in front of you and you can drop your shoulders to the sides and down.
A variation you can use (which may be easier or harder for you) is to tuck your toes under your feet, instead of having the tops or side of your feet against the ground. Do whichever variation is most comfortable and natural for your body.
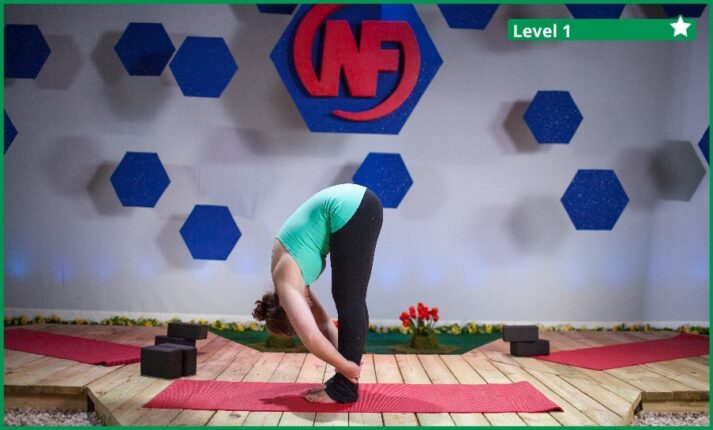
#4) Forward Fold
Forward Fold is another one of our most popular yoga poses. It’s primarily focused on stretching the lower back, hips, hamstrings, and calves.
Start standing and gently bend forward as you lengthen your torso and spine. As you fold towards the ground, keep your knees straight (but not locked out). If you can, grab the back of your calves and gently pull yourself deeper into the fold.
As you breathe in, you can lift slightly and extend your torso and spine forwards. As you exhale, you can fold forward again into the stretch.
To scale this down, you may use blocks to help raise the floor. Keep your knees straight and your spine long, and fold as far as you can comfortably go.
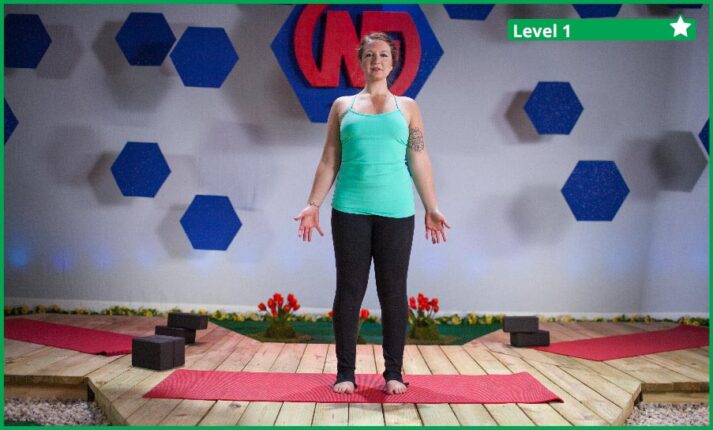
#5) Standing
Standing pose is a resting and centering pose in yoga, but don’t take it for granted.
Even when we are standing in between poses, be sure to stay strong, active, and rooted through your feet. Your feet should also be flat and not rolled in or bowed out.
Activate your hips to prevent locking out your knees and keep your posture and spine tall and elevated.
Finally, your shoulder should be open and your chest broad. Neck in line with your spine (not hunched forward). Stretch tall from your hips through your head.
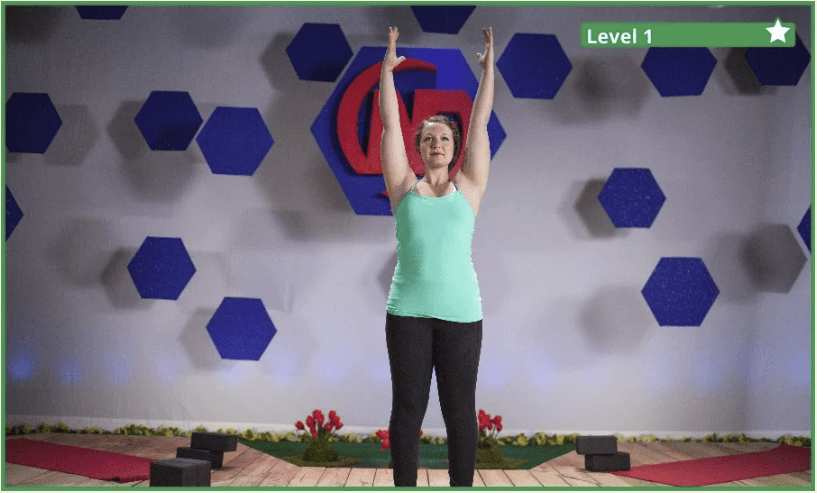
#6) Standing Mountain
Standing Mountain is a great pose to warm up our shoulders and spine.
Start by staying strong and rooted through your feet (which are flat on the ground). Legs active, but not locked out. Shoulders open and neck in line with spine.
As you take a deep breath, bring both arms straight out in front of you and up overhead towards the ceiling. Make sure your shoulders aren’t hunched and close to your ears, but rather relaxed and released down.
Rooting through your shoulder blades, pull your spine and arms towards the ceiling.
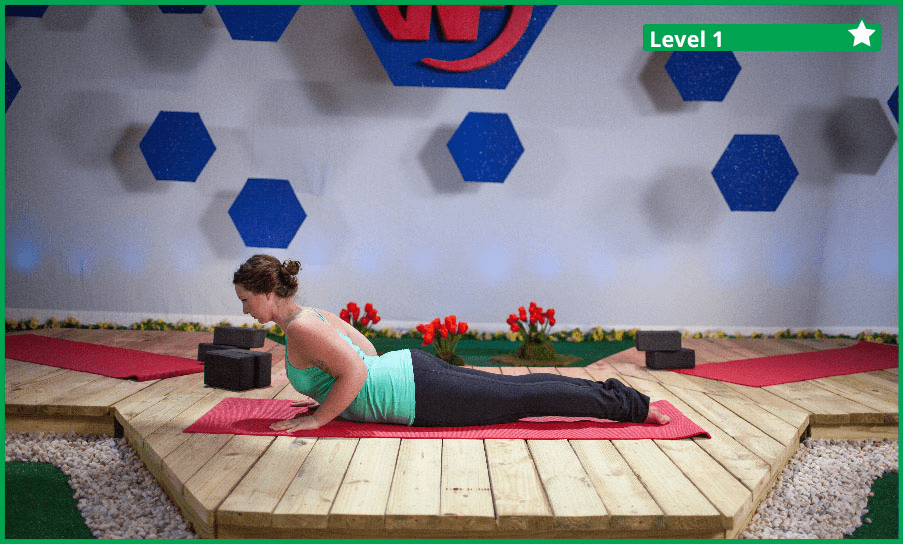
#7) Cobra
Cobra is a popular pose that almost always follows Plank as a transitional sequence in many yoga sessions.
This pose primarily stretches the shoulders, chest, spine, and stomach.
Start by laying flat on the ground on your belly, with the tops of your feet on the floor. Your hands should be positioned under your shoulders (much like you would imagine starting a pushup).
Slowly push down through your hands and straighten your arms to lift your chest up off the floor, but unlike a push-up, keep your hips, thighs, and tops of feet rooted and pushing down towards the ground.
Move your shoulder blades back, lift your chest, and look forward and slightly up. Hold for several seconds and then slowly release down.
To scale this pose down, only raise your chest and head to where you are comfortable. Be sure to keep your hips and thighs pushing down to the floor, even if that means you can only raise your chest a little.
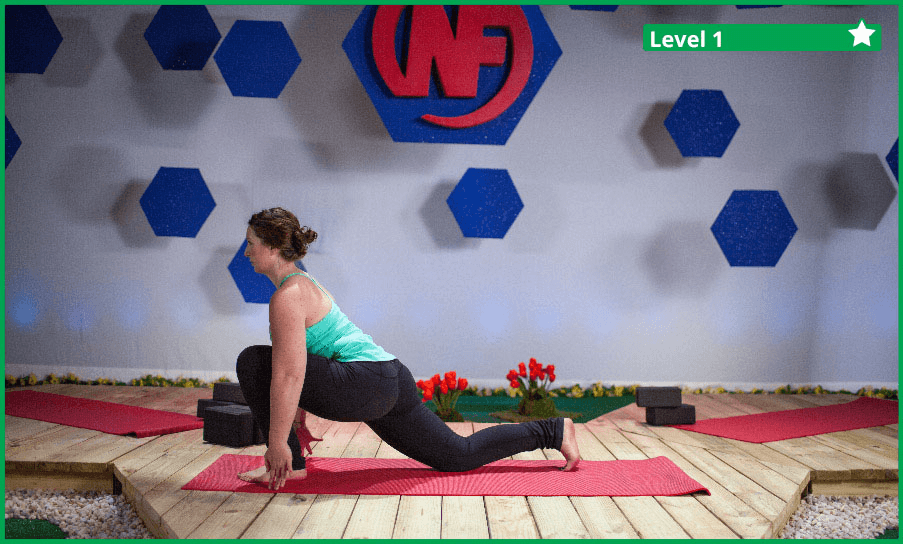
#8) Low Lunge
Low Lunge is a variation of Lunge that is a building block for several more advanced poses. It’s most commonly thought of a Lunge with your knee on the ground.
This pose will primarily stretch and strengthen the groin, hamstrings, and hips.
Often, you’ll get into a lunge by starting in a Forward Fold and slowly stepping one of your legs back behind you. If you need to, you can scoot your foot back several times until you are able to have your front knee directly over your front ankle.
As you bring your leg back, drop your back knee to rest on the ground. This will help support some of your weight, but the majority of your weight should stay pushing forward through your front knee and hips.
Bend your torso over your front knee and lengthen your spine forward. Your weight should be pressing down through your heels.
To scale down, you can use blocks on each side to balance yourself more without having to reach all the way down to the floor.
#9) Knee Hug
This pose is used to compress and tighten your body. It’s often used right before Corpse Pose at the end of sessions to reset.
Start this pose by lying on your back with your arms and legs straight out. Take a deep breath and slowly bring your legs together and your knees lifted toward your chest.
As your knee comes up, wrap your arms around them and clasp your hands together. If you can’t quite wrap your arms you can reach down each hand and gently pull in your kneecaps.
Gently squeeze your knees into your chest, keeping your back flat on the ground and dropping your shoulders down. You can focus your eyes down the center of your body.
If for any reason you have trouble doing this, simply raise your knees towards your chest as far as they will go. Hold for a few seconds and release back down.
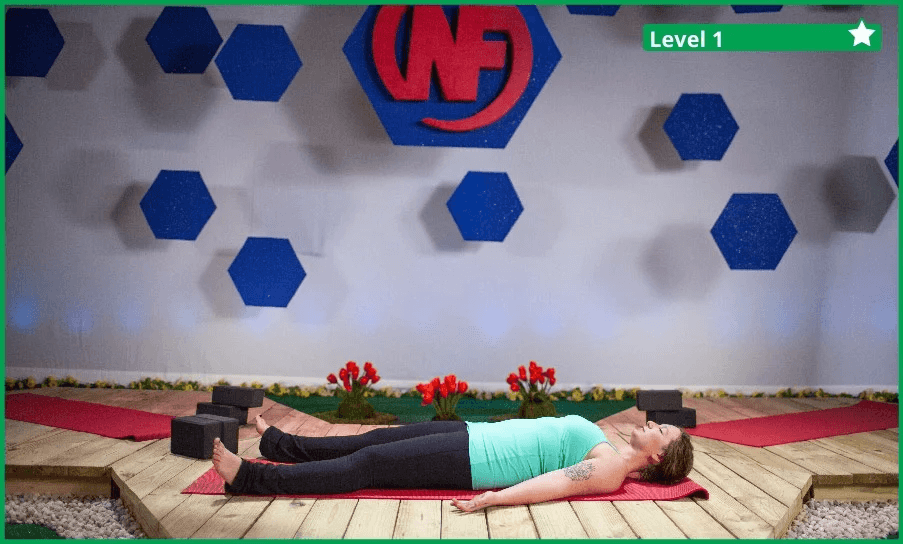
#10) Corpse Pose
Everyone’s favorite yoga pose, and often a way to end a complete session! And while at first, it can seem like just lying on the ground, there’s more to it than that.
This poses is fantastic for calming the mind, relieving stress, and relaxing the body back into a neutral position.
You’ll have a desire towards the end of a session to skip over Corpse Pose and move on.
Don’t! Spend a few minutes coming back down and resetting your body in each session.
Start by laying on your back. Your arms should stretch down comfortably to each side, slightly away from your body. Both your legs stretched out and with a little space, as well.
Do your best to “release” your shoulders and neck and let them fall neutral as well (even when on our backs we tend to engage our necks).
Focus on your breathing and on relaxing any tight or sore areas of your body.
If you need to, turn onto your side and bend your knees (laying on your side completely). Wiggle your toes, ankles, hands, or wrists as needed.
7 BASIC YOGA POSES (LEVEL 2)
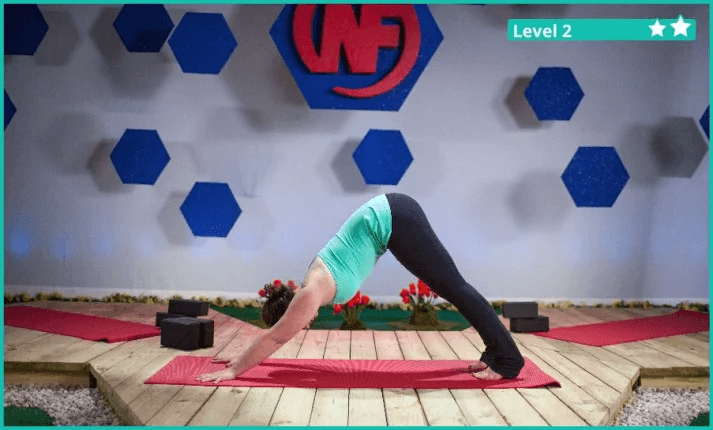
#1) Downward Dog
This pose primarily focuses on stretching the shoulders, hamstrings, and calves.
The first few times you get into Downward Dog, you’ll want to start on your hands and knees (what we call Table Top), but with your arms a little bit forward of your head. Pushing into your hands and toes, slowly lift your knees off the ground.
If you can, slowly straighten your knees (don’t lock them) as you gently stretch your heels down to the ground. Once comfortable, you can work your shoulders back toward your tailbone.
To scale this down, you can lift your heels further off the ground and/or bend your knees for easy modification. You can also use blocks to elevate your arms as another alternative.
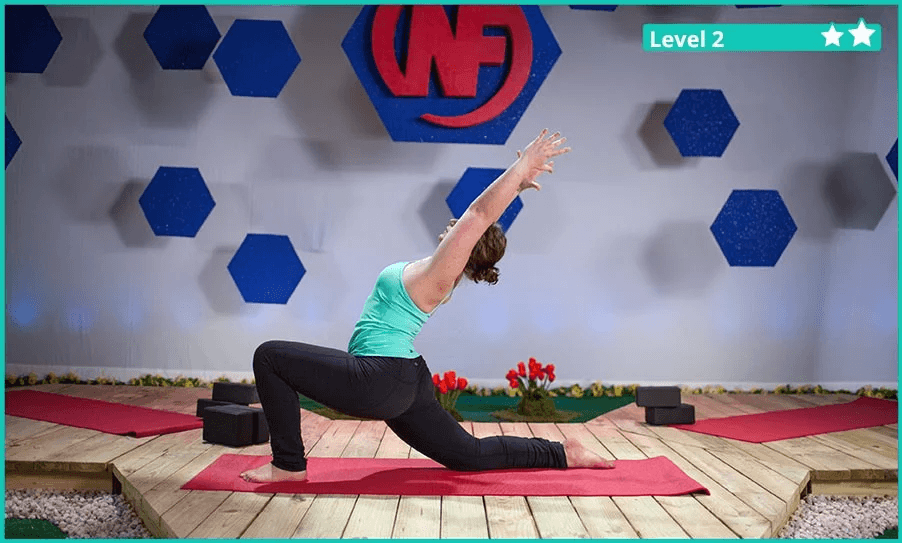
#2) Crescent Moon
Crescent Moon is a variation of Low Lunge where we stretch upright towards the ceiling.
This pose primarily stretches and strengthens the groin, hips, chest, spine, and shoulders.
To start this pose, you’ll want to get into a comfortable Low Lunge. Usually, this means stepping one leg forward from Downward Dog or stepping one leg back from Forward Fold, and then dropping your back knee down rooted on the ground.
As you take a deep breath, bring your torso up from lunge to upright and stretch both hands straight up toward the ceiling.
Instead of arching your back, draw your hips down and forward and lean your shoulder back (keeping it straight and engaged).
To scale this pose down, you can just stay in Low Lunge and work on stretching without extending upward.
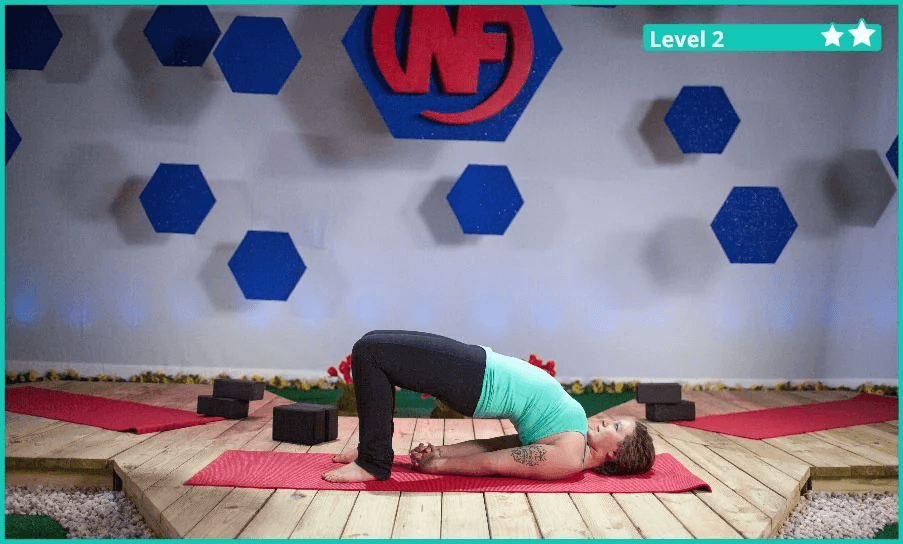
#3) Bridge
Bridge is a backbend pose that primarily stretches and strengthens the back and spine, but also the chest, shoulders, and neck.
Start by laying flat on your back. Bring your feet flat on the ground as close to your butt as they comfortably sit. Arms should be flat and down to your sides.
Pushing down through your feet and arms, slowly lift your butt off the floor and into Low Bridge (around when your spine is straight with your legs).
If you are comfortable, you can bring your hands together under yourself. Continue to slowly push your hips and butt towards the ceiling, making sure to keep your knees over top of your ankles. Work towards parallel with the ground for the full Bridge pose.
To scale this down, stop in Low Bridge if going further is uncomfortable. If Low Bridge is difficult, just practice moving your hips slightly off the ground from the starting position. As you gain more flexibility, you’ll work to hold in Low Bridge.
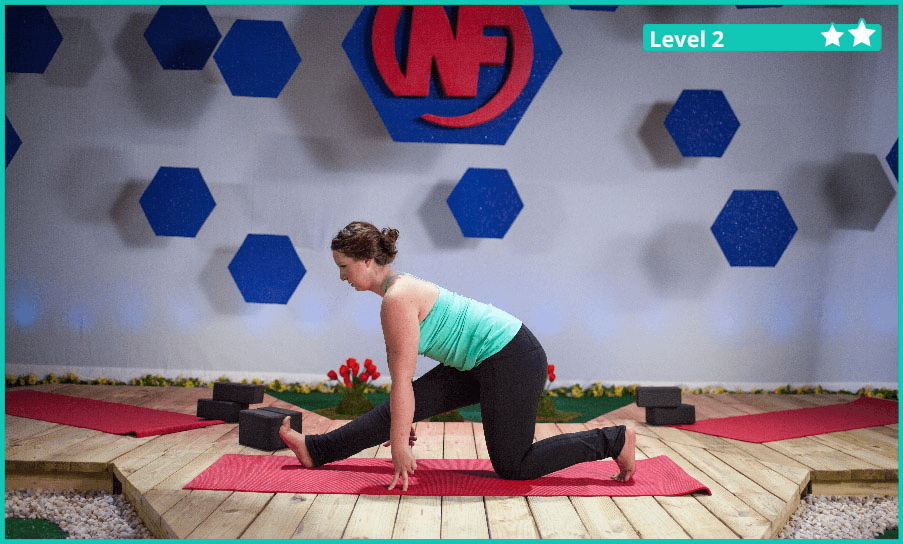
#4) Half Splits
This pose primarily stretches your hamstrings, hips, and lower back.
To start this pose, get into a Low Lunge. Your back knee should be firmly rooted on the ground.
Slowly shift your weight as you move your hips and torso over your back knee. As you do this your front leg will go from bent at the knee to fully extended straight in a line.
If you need them, you can use blocks or a supporting prop on each side now to support your weight (if you can’t reach the ground here).
Slowly fold forward over the top of your extended front leg, with your hips staying rooted back and over top of your knee that’s on the floor.
To scale this down, use blocks on each side as suggested above. You can also stay upright (instead of folding towards the end). Stop in the progression whenever you lose comfort.
#5) Lunge
The Lunge is a major building block for all sorts of yoga poses. Many poses are variations of or come in and out of the Lunge.
This pose will primarily stretch and strengthen the groin, hamstrings, hips, and knees.
Often you will get into lunges starting in a Forward Fold and slowly stepping one of your legs back behind you. If you need to, you can scoot your foot back several times until you are able to have your knee directly over your front ankle.
Bend your torso over your front knee and lengthen your spine forward. Your weight should be pressing down through your heels and your back knee should be active with your knee straight throughout.
To scale down, you can use blocks on each side to balance yourself more without having to reach all the way down to the floor. At any time, you can also drop the back knee down to the ground coming into Low Lunge instead.
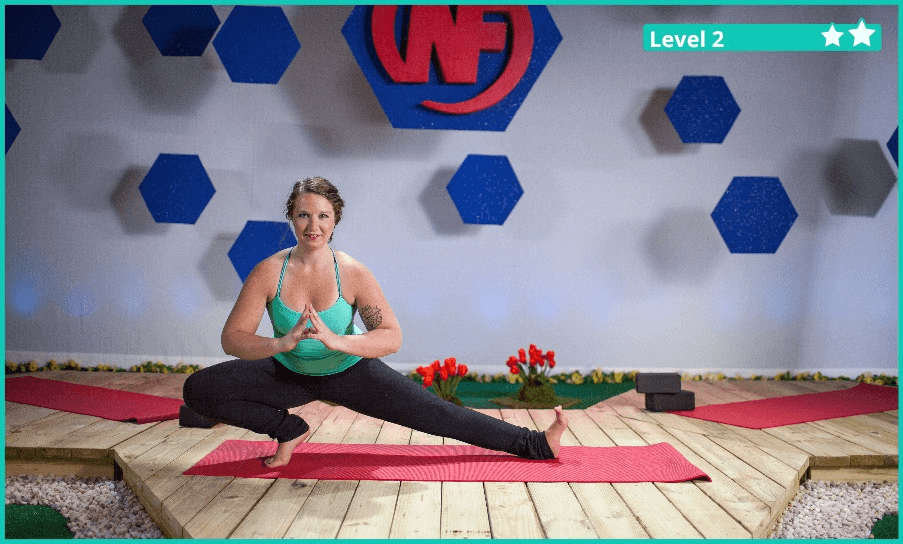
#6) Ninja
One of the most fun poses to make sound effects while doing, Ninja is actually a series of movements rather than a single pose. You might also have heard it called a Side Lunge, but this is Nerd Fitness, so we’re going with Ninja.
This pose helps strengthen the entire lower body and stretch out the hamstrings.
Start by lowering yourself into a half squat (Frog Prep).
Choose a foot and turn your toes out a little wider. Walk your hands over to your foot. Bend deep into that side’s knee as you lift up onto the heel of your opposite foot. Point or flex that foot up towards the ceiling.
Bring your hands to prayer in front of your chest. Extend both arms out in an upward-facing arc and look towards your extended leg. Hold the pose and keep your leg muscles engaged.
Slowly come back up to Frog Prep (body in the middle) and slide over to the other side repeating the steps above.
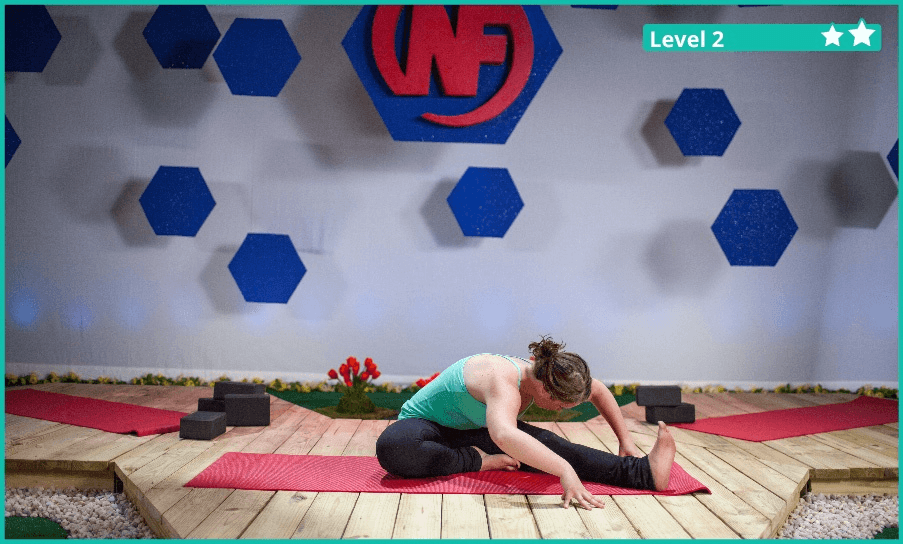
#7) Seated Side Fold
Seated Side Fold is a good, simple combination of a fold and a side stretch in one pose. Sometimes referred to this as “Half Dragonfly” as a nickname.
This pose primarily stretches your spine, lower back, hamstrings, and groin.
Start in a seated position, with your legs outspread wide in a V shape in front of you. About a 90-degree angle between your legs.
Bring one of your feet over to your other thigh, so that the bottom of your foot rests tucked in and touching your thing just above the knee.
Keeping your hips rooted down and your spine extended tall and towards the ceiling, you can gently fold over and use your arms to walk down your chest towards the ground next to the thigh and knee of your fully extended leg.
You should be slightly off-center, in line with your straightened leg (rather than a traditional fold which would come straight to the center).
To scale down this pose, you can stay in the original seated position with both legs out in front of you in a V. Gently fold forward a little to each side and you warm up.
4 INTERMEDIATE YOGA POSES (LEVEL 3)
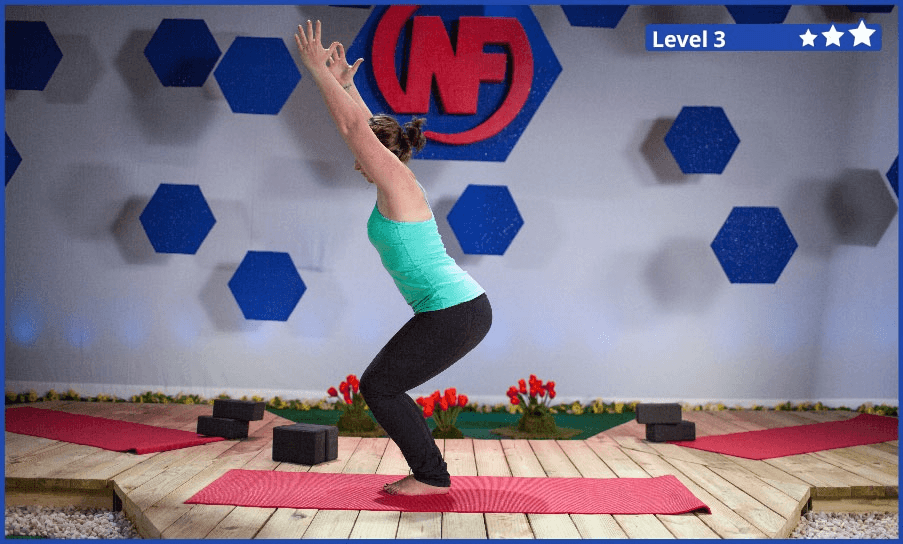
#1) Chair Pose
Chair pose is the basis for many of the more advanced moves found in yoga. It primarily stretches the chest and shoulders, while helping to strengthen your core and legs.
Start in Standing with your arms out in front of you. Slowly bend your knees, moving them gradually more forward away from your toes. At the same time, drop your hips and butt back as you try to achieve a 90-degree angle with your thighs and calves.
As you sit down, your arms will come straight above your head (next to your ears), pointing up with palms facing in.
To scale this down, you’ll find it a little easier to keep your arms out in front of you – or coming towards your chest forming a “ball of energy.” Like in Dragonball. Drop your hips only as low as you can comfortably maintain for a stable hold.
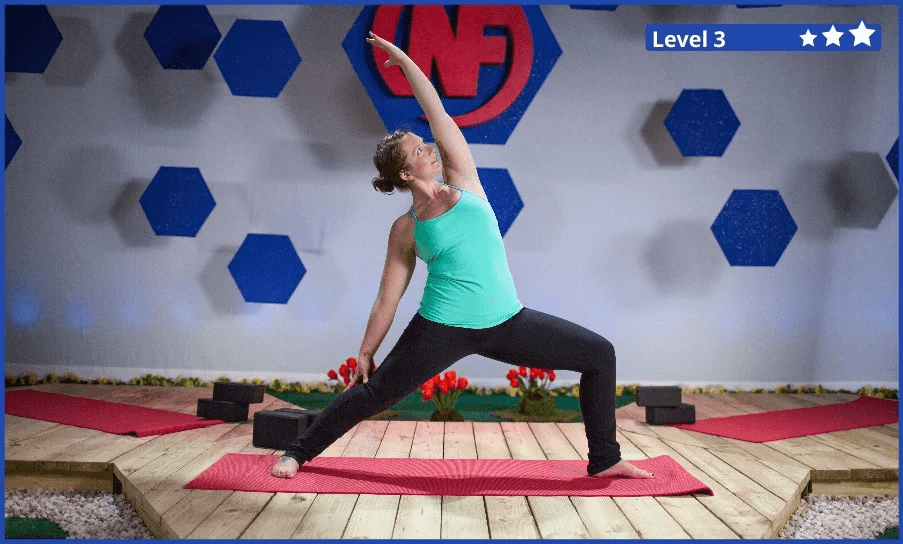
#2) Warrior 2
This pose primarily strengthens your shoulders, arm, thighs and opens up your chest and shoulders.
Starting in Standing, exhale as you step one foot back. Align your back heel behind the other heel and then turn your back foot out 90 degrees.
Turn your hips out and align your forward thigh with your forward knee. Slowly raise your arm, one forward and one back, both parallel to the ground.
As you exhale, bend the right knee forward until it lines up straight over your right heel. Press your heels into the floor.
To scale this pose down, you can bring your legs slightly in closer together. You also have the option to bend forward a little less or bring your hands back down onto your hips.
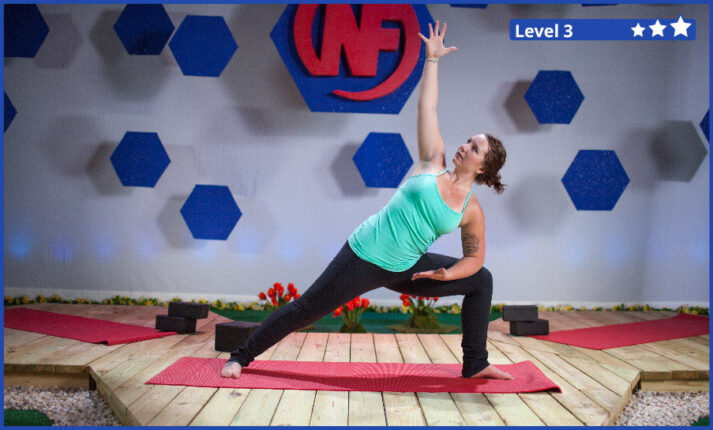
#3) Extended Side Angle
Extended Side Angle is one of our broader Warrior-sequence poses, often done together in pairs or sets with other poses from the same group.
This primarily stretches your groin, back, and torso. It also strengthens your thighs, hips, and legs.
Starting in Standing, spread your legs slightly apart with hips facing forward. Choose one side and rotate that foot outward about 45 degrees.
Bend the knee over the rotated foot and shift your weight to that side. Keep your stretched-out back leg in place and keep pushing down through that foot.
Bring your elbow (same chosen side as the bent knee), down to rest on your bent knee. Your hand and arm coming out in front of you. Your opposite arm now extends high into the air straight overhead.
To scale this pose down, you can narrow your stance a little bit more and bring your hips a little higher in the air. Move deeper down as you get more comfortable.
If you are comfortable enough here to scale up, you can switch your eyes to look at your arm overhead and gently stretch that arm to the side (so it falls in line with your torso and spine).
This will deepen the stretch even further.
#4) Rebel Warrior
Rebel Warrior is another pose in our Warrior-sequences that are often used in pairs or sets as transitions to one another. You’ll sometimes hear it referred to as “Peaceful Warrior,” but, you know…
This pose primarily stretches the groin, hips, and shoulders.
Start in Warrior 2. Bring the rear hand down to the back leg, palm facing down. Turn the front palm facing upwards towards the sky.
On an inhale, extend the front arm up towards the sky, palm facing towards the back of the room. Keep your hips open, but reach your heart up towards the sky. Keep the back of your neck long and your eye gaze pointing in the same direction as your heart.
Keep bending deeply into your front knee; try to keep the weight evenly distributed on your front foot.
To scale this pose, bring your legs in a little closer together to shorten the depth of the stretch. As you get comfortable you can ease back down into the full pose.
YOGA STRETCHES FOR DESK WORKERS
Work a desk job? Consider these two additional videos:
#1) Yoga for Wrist Mobility
Wrists are an often overlooked area of stiffness and soreness for many people. Whether you type on a keyboard daily or are looking to improve front squats and handstands you’ll benefit from this 6-minute yoga session:
#2) Yoga for Proper Posture
Hours hunched over a computer, stuffed into a car, or playing various games can cause some pretty awkward posture habits. This 6-minute yoga session will help you reset and improve your posture as you go through your day:
When you’re able to escape from your desk for a few, these short sequences are perfect to help stretch out your body and help prevent injury.
If you do find yourself stuck at a computer for most of the day, with seemingly no time to work out, we can help! We offer a 1-on-1 private coaching program to help busy people just like you level up their lives.
We will get to know you, your goals, and your lifestyle, and develop a workout plan that’s specific to not only your body, but also to your schedule and life. We can design workouts for at your desk, or a quick session before dinnertime. If you want to learn more about the program, click on the big image below:
TRY A YOGA POSE TODAY
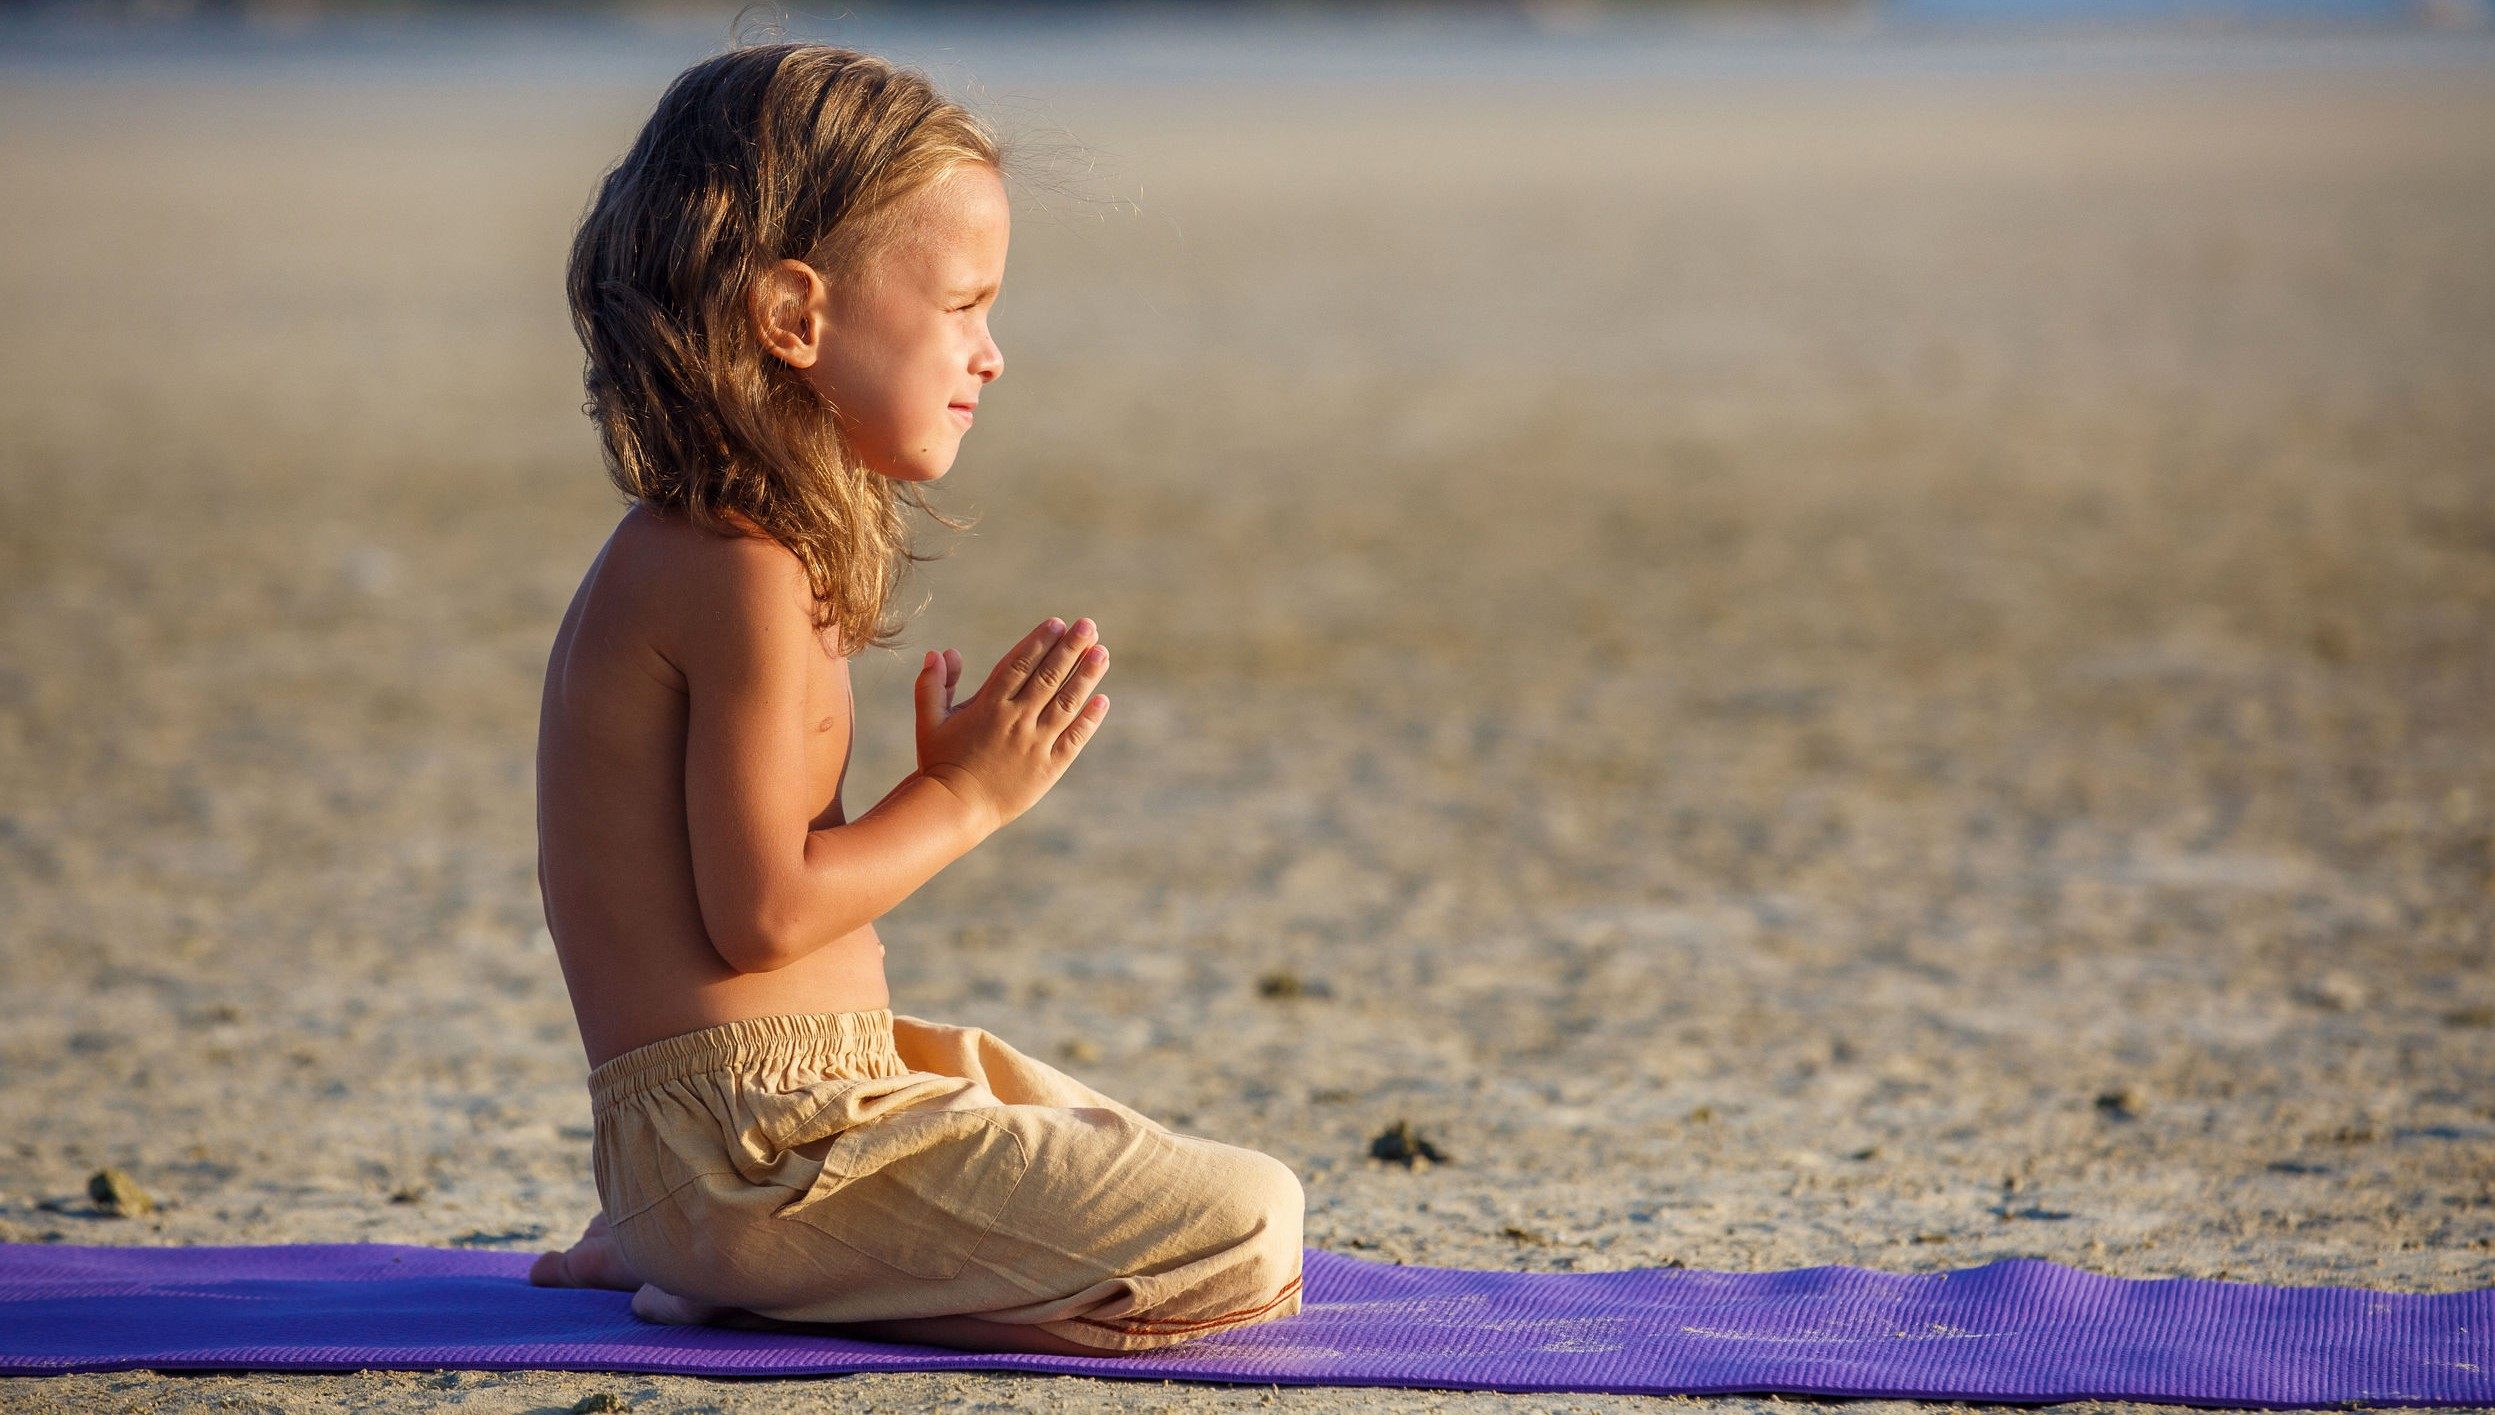
If this kid can do Yoga, so can you!
I don’t care if you’re at home, in a cubicle, or an office, I want you to use 3 minutes of courage to hold a few of the poses above!
Even if you’re not interested in checking out NF Yoga and never attend a yoga class, try these four movements right now. Like, this very moment.
A big reason Nerd Fitness and the Rebellion are successful in getting people healthy is that we encourage people to take action immediately. Not tomorrow, not after breakfast, RIGHT NOW!
Try to hold each of the following positions for 30 seconds. Yes, even if you’ve never done yoga before and have no intention of doing it again… I’m challenging you to give this a shot right now!
I personally get up every 15-20 minutes and go through a few movements (Downward Dog is my favorite) to stay limber.
Crushed those four poses? Take it to the next level and run through our full sequence from the Water Series. It’ll take you a little over 20 minutes.
Want a little more help getting going?
You got it!
I have three great options on how you can continue your journey with us:
Option #1) Liked the yoga videos contained in today’s guide? Want to follow them in an app that also allows you to build your own superhero?
Then check out Nerd Fitness Journey!
Our fun habit-building app helps you exercise more frequently, eat healthier, and level up your life (literally).
Plus, you can join our Yoga Adventure so you can learn poses and grow strong while battling wiley supervillians!
Try your free trial right here:
Option #2) If you want a professional coach in your pocket, who can do video form checks, provide feedback, and adjust your workouts based on your experience level, check out our 1-on-1 Online Coaching Program!
For example, let’s say you have an old injury and couldn’t perform one of our flexibility exercises. A Nerd Fitness Coach can work with you to create a customized routine for your exact situation.
Personally, I’ve been working with the same online coach since 2015 and it’s changed my life. You can learn more by clicking on the box below:
Option #3) Become part of the Rebellion! We need good people like you in our community, the Nerd Fitness Rebellion.
Sign up in the box below to enlist and get our Rebel Starter Kit, which includes all of our “work out from home” guides.
Get your Nerd Fitness Starter Kit
The 15 mistakes you don’t want to make.
Full guide to the most effective diet and why it works.
Complete and track your first workout today, no gym required.
Alright, your turn:
I’d love to hear from you: did you REALLY complete the 4-movement yoga routine above? And where did you do it? An office? In your cubicle?
Remember, who cares if your coworkers think you’re weird – getting judged for doing something healthy is a badge of honor you should be proud of!
If you’ve been a dedicated reader of keep it simpElle over the years, you might remember the days when I used to share my favourite coffee shops on rides. Well, the pandemic meant I had to figure out hot to…
A New Year brings with it the whole New You trope, but there’s one element of fitness that really isn’t just for a New Year, and that’s strength. Incase you missed my announcement on social media, I officially joined the…
As you might know from our “How to lose weight” guide, the key to sustainable weight loss is getting ourselves to consume fewer calories in a way that doesn’t make us miserable.
Because our brains and bodies are complicated emotional disasters, there are some tips and tricks we can implement to protect us from…ourselves.
4 Strategies for Portion Control:
Use smaller plates. Folks will often eat what’s placed in front of them, so using smaller dinnerware has been shown to help people eat less.[1]
Drink a glass of water before your meal. If you chug a glass of water 30 minutes before you plan on eating, the H20 will take up some room in your stomach. This might help you eat less.[2]
Take it slow. It can take about 20 minutes for your body to come around to the fact that it’s full, so slowing down your meals can help you eat less.[3]
Use a food journal. Recording everything you eat and drink is a great way to become aware of portions, which can help you control them.[4] In fact, one of the first missions we have Nerd Fitness Prime members complete is creating a food journal.
All of these methods will work to some extent, and they’re good to keep in mind and also practice.
However, nothing will get more consistent results than actually learning the number of calories in the food you eat (Portion Control Tip #5)!
Study[4] after study[5] after study[6] shows that our bodies obey the laws of thermodynamics and that in order to lose weight, we need to burn more calories than we consume regularly.
When you consume more calories than you burn, your body tends to store those extra calories as fat (weight gain).
When you burn more calories than you consume, your body will pull from fat stores for energy (weight loss).
However, as we point out in our Calories In, Calories Out guide, determining your exact “calories in” can be a real pain. Not only that, but many people with certain personality traits can become neurotic about tracking every single calorie. They worry if they go 1 calorie over their daily allotment.
So, what’s a nerd to do?
Unless you’re going to weigh out all your food (something I’ve done before) and be militant about tracking, is it possible to “track” your food with a high level of accuracy without having it take over your life?
The answer: yes, by getting darn good at estimating!
Portion Sizes: How to Portion Control (The Best Method)
You already carry with you the best method for portion control.
Your hands!
Even if you have robot hands.
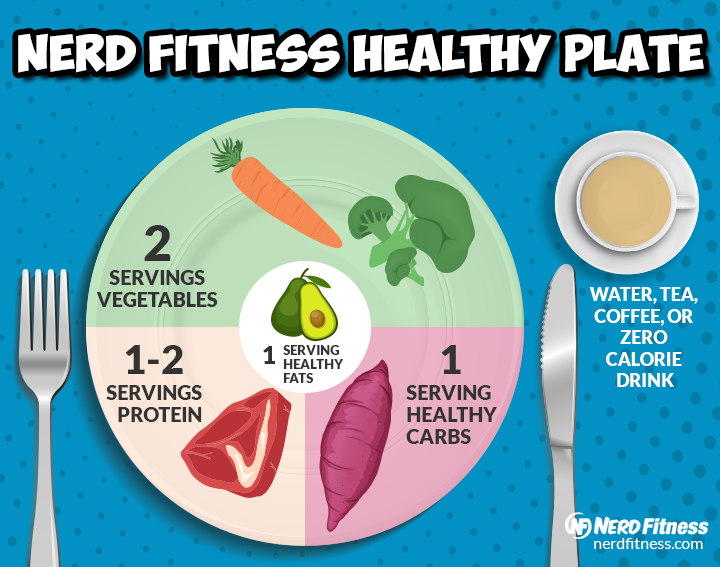
We’re going to use them to build a healthy plate, as shown above.
However, using your hands as a tool for portion control provides a “good enough” strategy that can help your food intake:
As you can see, we’re going to focus our portion control strategy on:
Protein
Vegetables (technically carbs, but important enough to deserve their own category)
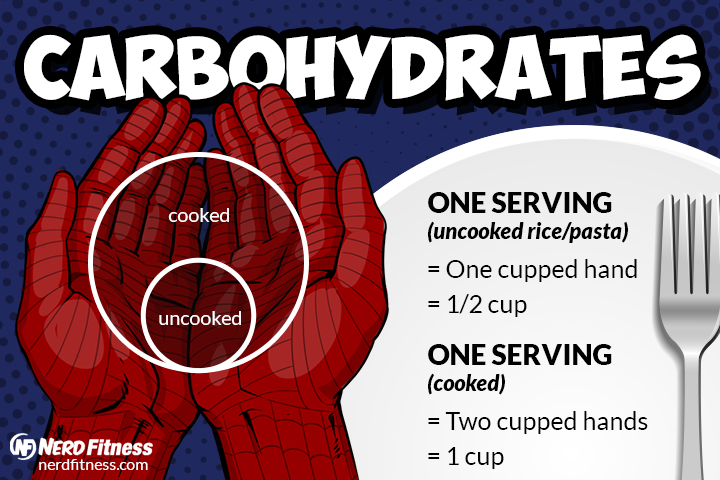
Carbohydrates (think starches and fruit)
Fat
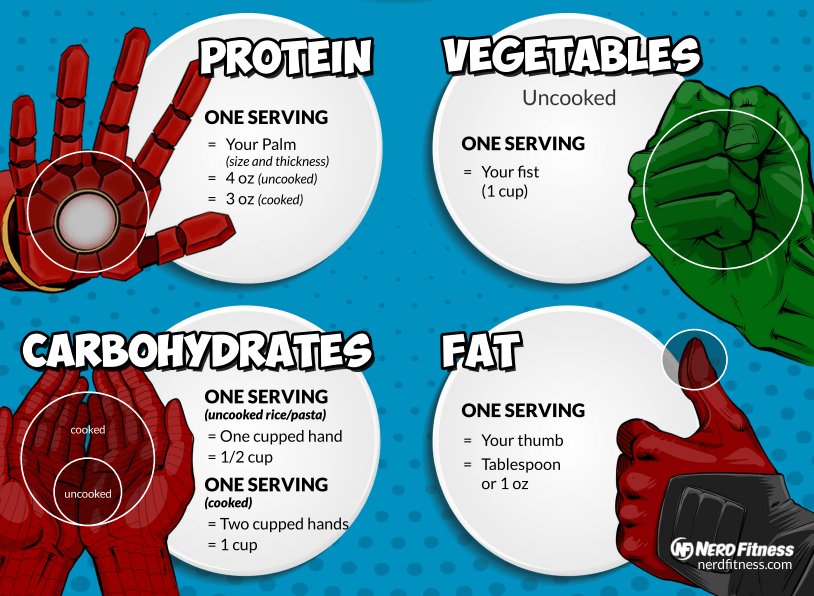
Each macronutrient will correspond to an area of your hand, to give you a sense of what a proper portion size should be.
We’ve learned that using your hand as a guide is the most helpful strategy for portion control:
You might not always have access to small plates.
You might forget to drink water before each meal.
You might have a short lunch break without the luxury of eating slowly.
You might grow tired of logging all your food intake.
However, having an intuitive sense of what foods should be eaten in what portions will help you level up your healthy eating.
When in doubt, match the food in front of you to your hand and carry on.
Let’s break this down a little by talking about protein and veggies.
What is the Correct Portion Size Part 1: Protein and Vegetables
The above video is taken from Nerd Fitness Prime, as part of our NF Kitchen series.
In it, Coach Lauren and Justin discuss the two most important parts of every meal:
Protein
Vegetables
Here’s something that might seem counterintuitive: our #1 recommendation for portion control isn’t about limiting food. Instead, make sure you get a proper serving of protein and vegetables every time you sit down to eat.
In other words, when you begin your healthy eating journey, don’t even worry about nixing any specific food. Just make sure you are leaving plenty of room for protein and vegetables.
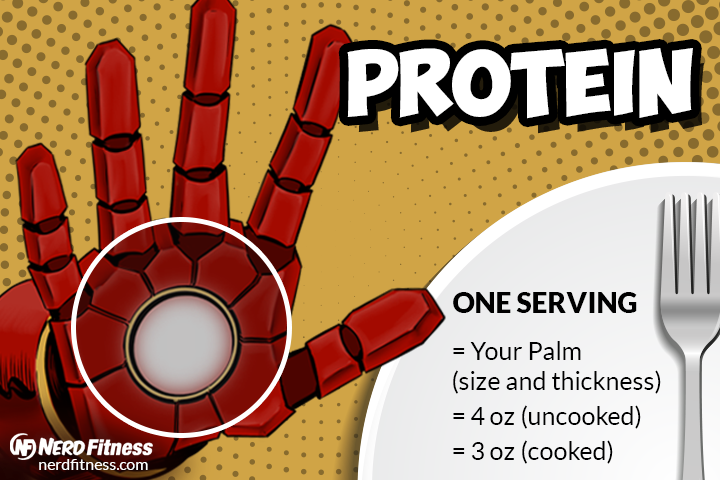
A serving of protein is about the size and thickness of your palm:
Protein can come from any number of sources, including:
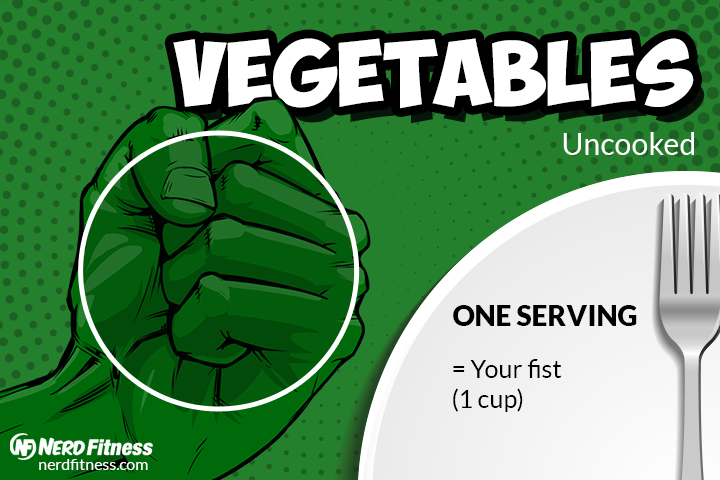
A serving of veggies is about the size of your fist:
Here’s a quick, non-complete list of veggies that can fill half your plate:
Broccoli
Broccolini
Cauliflower
Spinach
Kale
Spaghetti squash
Brussels sprouts
Zucchini
Cucumber
Carrots
Onion
Asparagus
When it comes to learning portion control, start by making sure you eat enough protein and vegetables.
How much?
As we discuss in our protein guide, when building a plate aim for the following amount of protein:
Dudes: 1-2 servings (6-8 oz or about 170-228 g): two palms
Dudettes: 1 serving (3-4 oz or about 85-114 g): 1 palm.
For vegetables, in practice you can probably eat as much as you can stomach (the fiber will likely slow you down), but aim for about 2 fist fulls at most meals, or about half your plate.[9]
Here’s why you should prioritize protein and vegetables if you’re struggling with portion control:
Protein. Eating enough protein will assist your health as you age.[10]Plenty of protein will also help you retain and grow muscle.[11] Plus, prioritizing protein will help you stay full and satiated between meals.[12]
Vegetables. Veggies are both high in nutrients and low in calories, which makes them ideal for a healthy plate. Plus, the fiber will not only help your health, it’ll also keep your indoor plumbing in proper order.[13]
In the video that kicks off this section, Coach Justin makes a great point: aim for a little better than you are today.
Meaning if you don’t really plan your meals at all, start by having ONE meal include a good protein source and some veggies.
You also want to make sure you’re including healthy fat in your diet too.
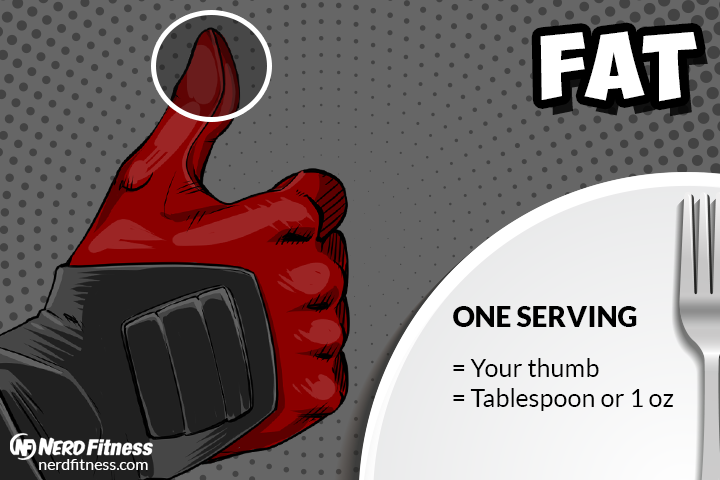
Fat is actually the most calorically dense macronutrient, so comparatively it’ll take up less room on your hand.
Here is a serving of fat, roughly the size of your thumb!
Healthy fat can be found in foods like:
Avocado
Almonds
Walnuts
Macadamia nuts
Olive oil
Almond butter
Peanut butter
The reason people call it “healthy” is because the fat is unsaturated, although science has recently come around on saturated fat too in the correct amounts.[14]
When it comes to portion control, we need to pay close attention to carbohydrates and fats, because this is where people have the tendency to overeat.
However, that doesn’t mean we want to completely ditch both food groups either.
Here’s why you need to eat these two macronutrients:
Carbohydrates. Did you know fiber is a type of carbohydrate? Yep. As we mentioned earlier, you need plenty of fiber for good health.[15] Carbs are also a great source of quick energy, especially fruit.[16]
Fats. Some nutrients like Vitamin A are fat-soluble, meaning they are best absorbed alongside some fat.[17]Fat will also help you feel full, which can help with overall portion control for the day.[18] While a little goes a long way, you wouldn’t want a “zero fat” diet.[19]
An area of concern when attempting to portion control is dining out.
It seems like restaurants serve you twice the amount of food that you need.
Here’s what Coach Justin does in the situation: ask for a to-go box as soon as you place your order.
Yeah, it’s a little weird, but as soon as you get your food, place half of it in the container.
Boom! An extra meal for later.
Another thing to consider: restaurants want you to leave feeling full.
They often do this by piling on the carbs. Think extra bread, lots of rice, plenty of pasta, etc.
So it might make sense to split these portions in two, and you’re set for lunch the next day.
Also, if you get hungry after eating only half your meal, no problem. Just eat the other half. Even if you’re still at the restaurant.
The point is to consciously think about how much you’re eating. A break halfway through can be used as a decision tree:
Should I keep eating?
This question alone can help with portion control.
One last thing: we know eating out at restaurants is often a family or friend bonding experience, so we’d prefer you ENJOY the night. Food is more than just calories.
Just plan for it! If you eat a really large dinner for a celebration, eat slightly smaller portions for the next day or so and your body will be right back on track.
How to Portion Control for Weight Loss (Next Steps)
In the video above, Coach Lauren and Justin walk you through eating a Nerd Fitness Healthy Plate IRL (In Real Life).
It’s all well and good to build a healthy plate at home, but…
What if you’re at a restaurant?
What if you need to order a sandwich?
How about pizza?
Here are some tips from the Coaches for portion control IRL:
#1) How to Portion Control a Sandwich
The trick here is to pack in as many vegetables as you can. Yeah, you’re probably not going to get two fist fulls in, but you can squeeze in a lot of spinach, onion, sauerkraut, and tomato (yeah, it’s technically a fruit, whatevs) on your sandwich.
Your carbs can be some type of whole grain bread (you can do an open face sandwich if you want to limit this).
Your protein can come from some turkey.
Your fat can be a little avocado.
Boom.
You now have a turkey sandwich that matches our healthy plate strategy.
#2) How to Portion Control Chili or Soup
This can be a little tougher when everything is mixed together.
If you’re making it yourself, perhaps you measure out your hand portions as you cook.
Put a palm-size portion of ground beef in.
Your vegetables can be onion, garlic, and tomatoes (again a fruit, but who cares).
Your carbs can be pinto and/or kidney beans.
Your fat can be a little bit of cheese sprinkled on top.
Sure, maybe you’re doing less than two fistfuls of vegetables, and more than a cupped hand of carbs (beans).
It doesn’t matter. Again, the point is you’re putting a little thought into proper portions.
If you’re eating out and ordering soup or chili, maybe just think of the end product in mind:
“After portioning everything out, it should be about two fistfuls of food. So that’s what I’ll eat. Everything else I’ll take home.”
#3) How to Portion Control Pizza
This is a little trickier because pizza is mostly bread (carbs).
But Coach Justin has a solution for this.
First, he eats something he’s proud of, like a salad.
Then he portions out his pizza, which if he uses his hand strategy, would be about two slices:
Is it perfect?
Nope.
Does it help Coach Justin reach his goals and allow him to still enjoy life?
Yep!
So experiment a little by creating some rough guidelines, see how you feel, and course-correct as you go.
Remember, any step you take on leveling up your nutrition is great.
If you don’t know where to start, I actually recommend you begin by not worrying about what to take OFF your plate, but instead what to add!
Make sure every meal you eat has a healthy protein source and a vegetable. Once you have that dialed in, THEN you can worry about portion controlling your carbs and fat.
If you need help along the way, we got you.
Here are three ways to continue your journey with Nerd Fitness.
#1) Our Online Coaching program: a coaching program for busy people to help them make better food choices, stay accountable, and get healthier, permanently.
As I said before, we teach portion control to our clients who struggle with overeating, so we’ll provide a non-judgmental expert to help you reach your goals.
You can schedule a free call with our team so we can get to know you and see if our coaching program is right for you:
#2) If you want an exact blueprint leveling up your nutrition, check out Nerd Fitness Journey! Our fun habit-building app helps you exercise more frequently, eat healthier, and level up your life (literally).
If you follow our Nutrition missions, you’ll learn to portion control while earning XP! Sah-weeeet.
Try your free trial right here:
#3) Join the Rebellion! We need good people like you in our community, the Nerd Fitness Rebellion.
Sign up in the box below to enlist and get our Rebel Starter Kit, which includes all of our “work out at home” guides, the Nerd Fitness Diet Cheat Sheet, and much more!
Get your Nerd Fitness Starter Kit
The 15 mistakes you don’t want to make.
Full guide to the most effective diet and why it works.
Complete and track your first workout today, no gym required.
Alright, I want to hear from you:
Do you have any tips or tricks for portion control?
Do you use the hand strategy that we covered today?
What’s your biggest challenge with portion sizes?
Let us know in the comments!
-Steve
PS: If you’re just starting your weight loss journey, make sure you check out: