By Jessica Thiefels, Lindywell member & Marketing Consultant
My Pilates transformation was unexpected. I’m a former personal trainer, ex-gym rat, and long-time “clean eating” advocate. I’m also in the depths of disordered eating recovery and body image healing.
I always exercised to change the way I look. Get more toned, keep my belly flat, and feel like I was good enough, or in many cases, better than everyone else. Running parallel to my fitness journey, was my food journey, which included intense elimination diets to heal a variety of mysterious body issues, like extreme bloating and a rash all over my chest, shoulders, and back.
For a Type-A, perfectionist who thinks in black and white, this was a recipe for disorder.
However, nearly a decade after I started my body healing journey, in the fall of 2022, I said to my husband, “I’m walking a fine line between disordered eating and conscious eating.”
At that moment, though, I knew which side of the line I was on. I was also more obsessed with how my body looked than ever before. I was doing intense workouts, eating with strict rules—and feeling anxious and stressed.
The realization that I needed to make a change came clear and sharp. I was exhausted. I felt like I was running on a hamster wheel and could not, no matter how hard I tried, get off. So, I did what I do best: went all in.
I listened to stories of eating disorders and recovery through podcasts, started reading books on Intuitive Eating, and most importantly, started working with a professional for body image and disordered eating recovery.
And this is where my story with Pilates begins. Just two months after starting this work I began working with Lindywell as their SEO and content marketing consultant. Part of my job was to try the app, try the workouts, and get familiar with what they do and how they do it.
I resisted logging in and trying a workout until January 1, 2023. But on Day 1, my Pilates transformation began.
Week 1 Transformation
Setting non-body intentions and loving quick and easy workouts that energize and ground me.
I can honestly say, the moment I stepped on the mat, I felt a shift. As someone who had always lifted heavy weights and sprinted hard on the treadmill, this was different in so many ways. The slow-down, the moments of grounding, the gentle movement. It was all exactly what I needed.
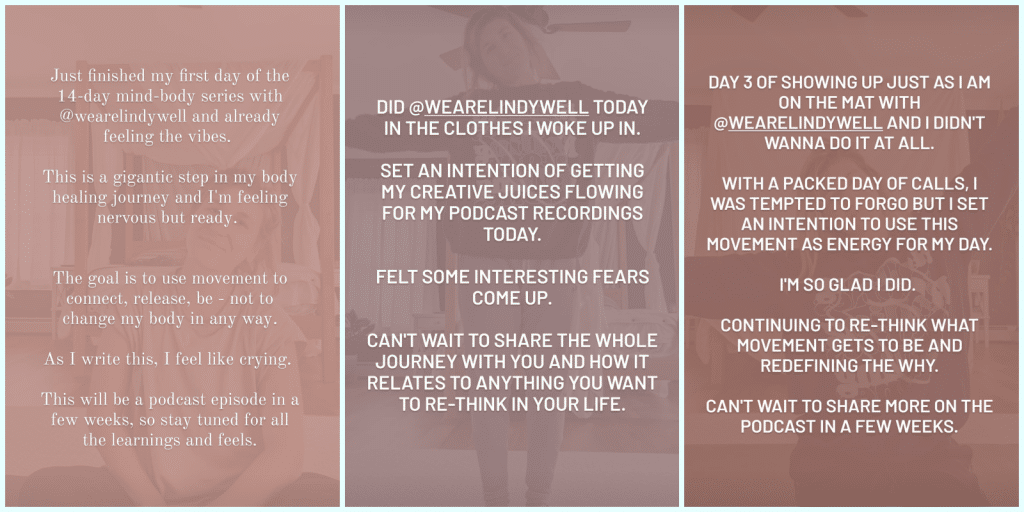
As a natural content creator and 12-year marketer, I decided to share my experience on Instagram Stories for the first 14 days with Lindywell. I posted each day, right after the workout, so rather than telling you how I felt in week 1, I’ll let those posts do the talking.
Within the first few days, I also realized that this was the perfect way to move my body as a busy mama who also runs a business and has an active social life. On Day 4, I posted:
“Day 4 with @Wearelindywell, and my intention was energy. Weston was up real early today and mama is tired!”
If you notice I said, “my intention was…” This was another big part of my Pilates transformation. I wanted to make this time on the mat about more than my body. So each day, I set a clear intention that’s focused on something other than my body, like energy, creativity, or peace.
Almost four months later, I’m still setting an intention before each workout. Shifting my focus from how my body looks or “performs” to how I am feeling from the movement has been incredibly powerful.
Turning Pilates into a daily part of my routine and noticing my physical strength.
As week two rolled in, the calm of the movement became one of my favorite things about it. On Day 8, I posted: “Day 8 with @wearelindywell and feeling so grateful for the slow, powerful pace of Pilates and the calm I always feel when I come onto the mat.”
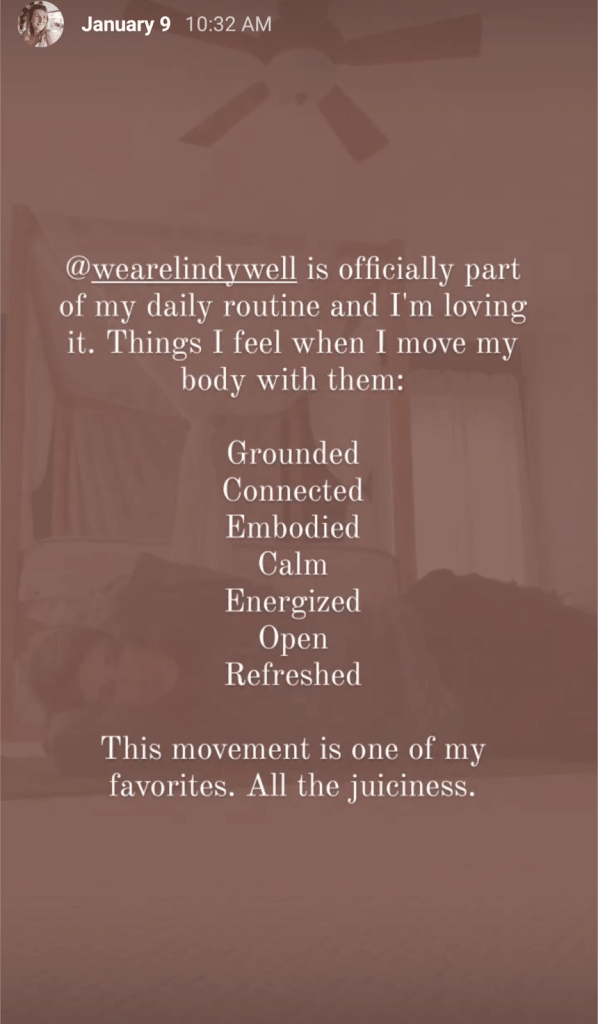
It was at this point that I also realized this was now part of my daily routine. On day 9, I posted:
During week two, I also started noticing how strong my body was becoming. In just 10 days, I could see an increase in strength, especially in my core. After one of my workouts, I was playing around with doing a headstand, something I’ve been able to do for many years. Getting up into the pose had never felt as easy as it did that day.
I was also noticing certain movements—like Rolling Like a Ball—that were challenging on day one already felt so much easier to do. My body was changing, but so was my mind. They were syncing, connecting, and supporting me in every area of my life.
Showing up on my mat without question and loving the variety of options.
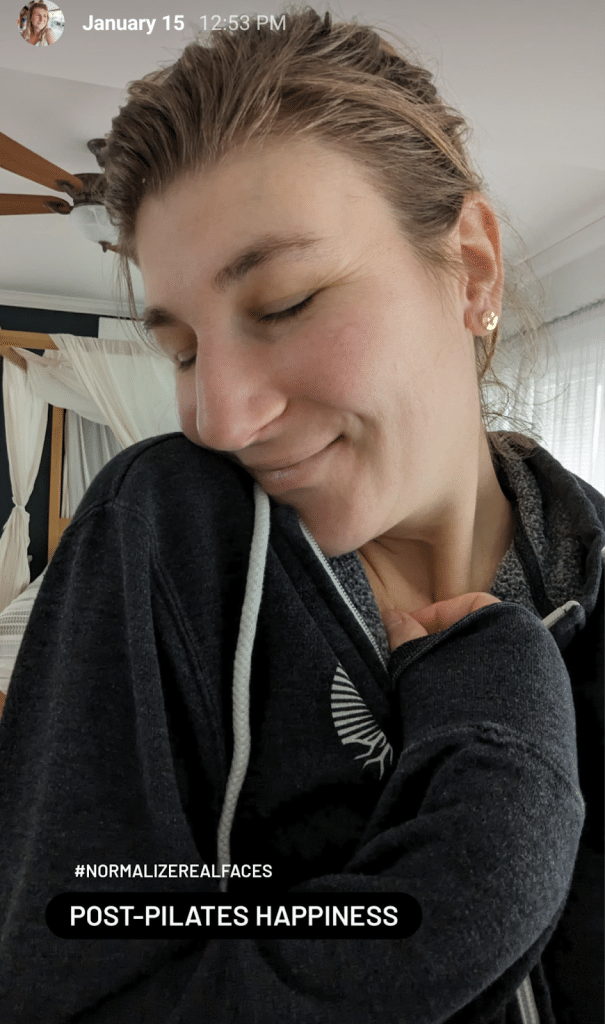
On Day 15, I posted this photo with greasy hair and no make-up, full of those post-movement feels:
This sums up how week 3 felt for me. My Pilates transformation was always about so much more than my body, and during week 3, I began to simply love the process, the experience, and how I was feeling after every single workout.
I also started digging into the different workout options, even doing two a day—one that challenged me in the morning and one that helped me wind down and stretch in the evening. It didn’t feel like I needed to do two to change my body. I was just craving being back on the mat.
Most importantly, I loved that I could choose a long or short workout and, no matter which it was that day, it was always enough. This mindset is the direct result of what Robin, the founder and lead instructor of Lindywell, reminds us every time we step on the mat:
Being here is enough
Meet your body where it’s at
Do what feels good for you today
For me, that translated into total bliss. All the pressure I used to carry around working out disappeared.
In addition to all of that, the mindfulness I was practicing on the mat was also translating into my disordered eating recovery. I was eating foods I love (that I’d sworn off for years), listening to what my body really wanted, and so much more.
Leaning into ease off the mat and feeling beyond grateful for Lindywell.
On Day 23, I posted a Reel titled, “Pilates Lessons for an Easeful Week” and this is the perfect example of how I was feeling as my first month of Pilates closed out. While I was noticing clear strength gains and was able to commit to daily workouts in a way I never had before, the greatest Pilates transformation I experienced wasn’t felt so much on the mat, but off the mat.
As I shared at the beginning, I’ve always had a Type-A, black-and-white, perfectionist personality. Pilates brought a calm and groundedness that I was resisting as I moved through this incredibly challenging healing journey. As Stephen Pressfield, the author of The War of Art (if you haven’t read it, pick it up now), says:
“The more resistance you experience, the more important your unmanifested art/project/enterprise is to you—and the more gratification you will feel when you finally do it.”
This was so true for me. I knew Pilates, specifically from Lindywell, would change me, but I was resisting slowing down and grounding. I was resisting finding a new way to move. On the other side of that resistance, however, was something that will impact me forever.
My Pilates transformation was so much more than I could have ever imagined it would be. It came at a time when I needed it most and has now become a regular part of my routine that I truly love. Whether I get on the mat for 10 minutes or 25, I always feel strong and energized—and somehow also calm and grounded. It changed so many aspects of my life and I know it will do the same for you.
If you haven’t tried Lindywell yet, I highly recommend signing up for their 14-day trial. I have a feeling at the end of the 14 days, you’re going to wonder how you ever got through your days without it!
Before we jump in, if you’re looking for a way to train anywhere (like with push-ups), you may be interested in the new app we built!
Nerd Fitness Journey will guide you through a workout routine that can be done anywhere, all while creating your very own superhero!
You can give it a free test drive right here:
How to Set up for a Proper Push-up (Staging)
When it comes to push-ups, your form is crucial. Each push-up needs to be done with proper form so that your total reps measured from workout to workout are on equal footing.
If you did 20 push-ups two days ago, and then today you did 25 push-ups by only going down halfway, sticking your ass up in the air, etc., it’s absolutely impossible to tell if you got any stronger.
Here’s how to get into proper push-up position:
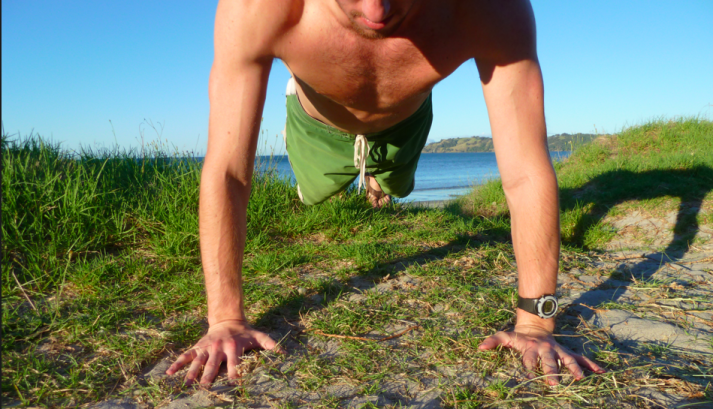
1) On the ground, set your hands at a distance that is slightly wider than shoulder-width apart.
Draw a straight line from your chest/nipple down to the floor – it should be directly over your thumbnail.
Depending on your strength and experience, your hands should be angled in a way that feels comfortable to you. For me, my hands are set up so that my middle finger points straight up and away from me.
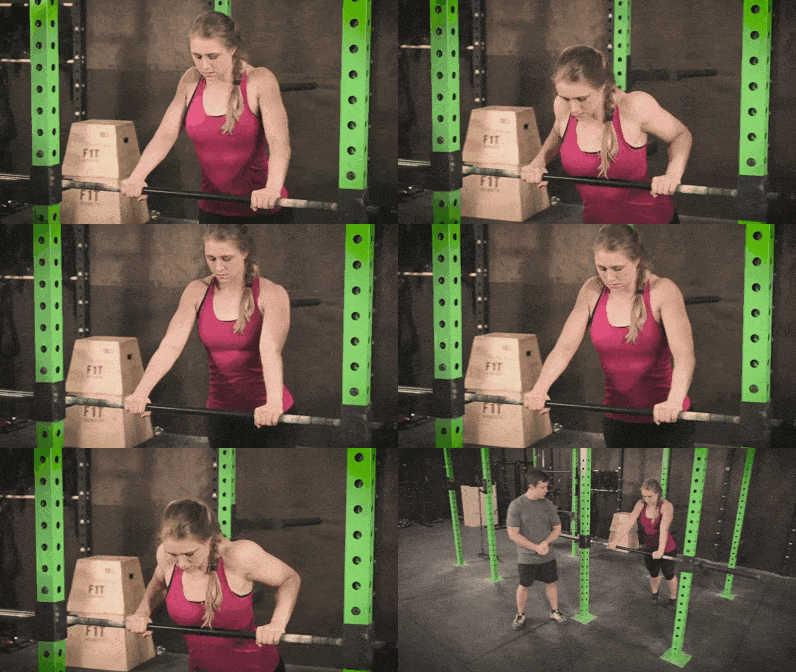
2) To alleviate wrist pain (if you have poor wrist flexibility) do your push-ups holding onto push-up handles (so your wrists aren’t as compromised), or a bar:
If you’re hardcore, you can do them on your knuckles (as long as you’re on a semi-soft surface like grass or carpet or broken glass. Wait, scratch that last one).
3) Your feet should be set up in a way that feels right and comfortable and in balance. For some, that might be shoulder-width apart.
For others, it might be with your feet touching. Generally speaking, the wider apart your feet, the more stable you’ll be for your push-ups.
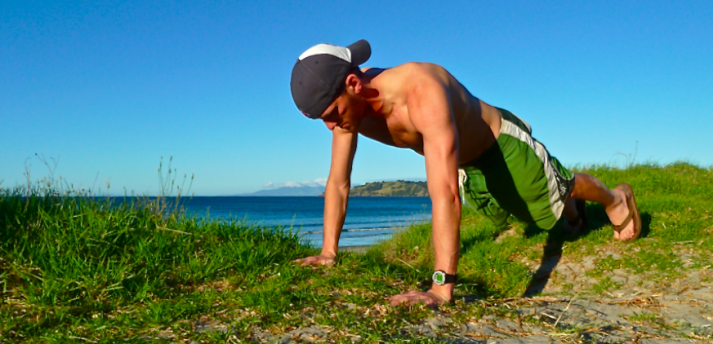
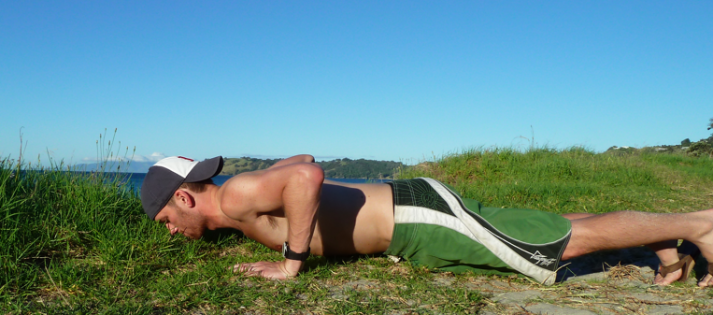
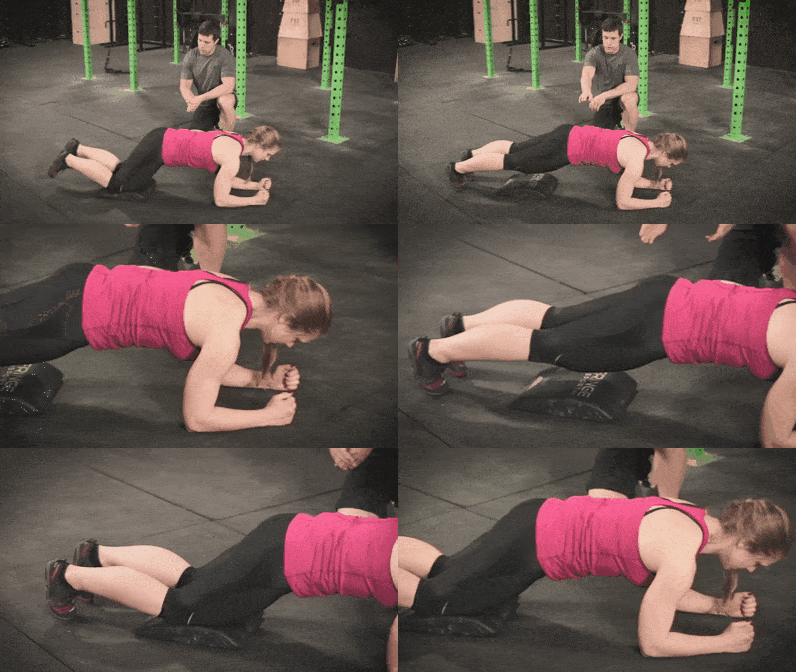
4) Think of your body as one giant straight line – from the top of your head down through your heels. Your butt shouldn’t be sticking way up in the air or sagging. You’re essentially holding a plank throughout the entire movement, as shown in this video below:
5) If you have a problem getting the proper form with your body, try this: clench your butt, and then tighten your abs as if you’re bracing to get punched.
Your core will be engaged, and your body should be in that straight line. If you’ve been doing push-ups incorrectly, this might be a big change for you.
Record a video of yourself to make sure you’re doing it correctly.
6) Your head should be looking slightly ahead of you, not straight down.
I read somewhere that said “if you’re doing them right, your chin should be the first part of your head to touch the floor, not your nose.”
Looking up helps you keep your body in line, but feel free to look down if that helps you concentrate more.
7) At the top of your push-up, your arms should be straight and supporting your weight. You’re now ready to do a push-up.
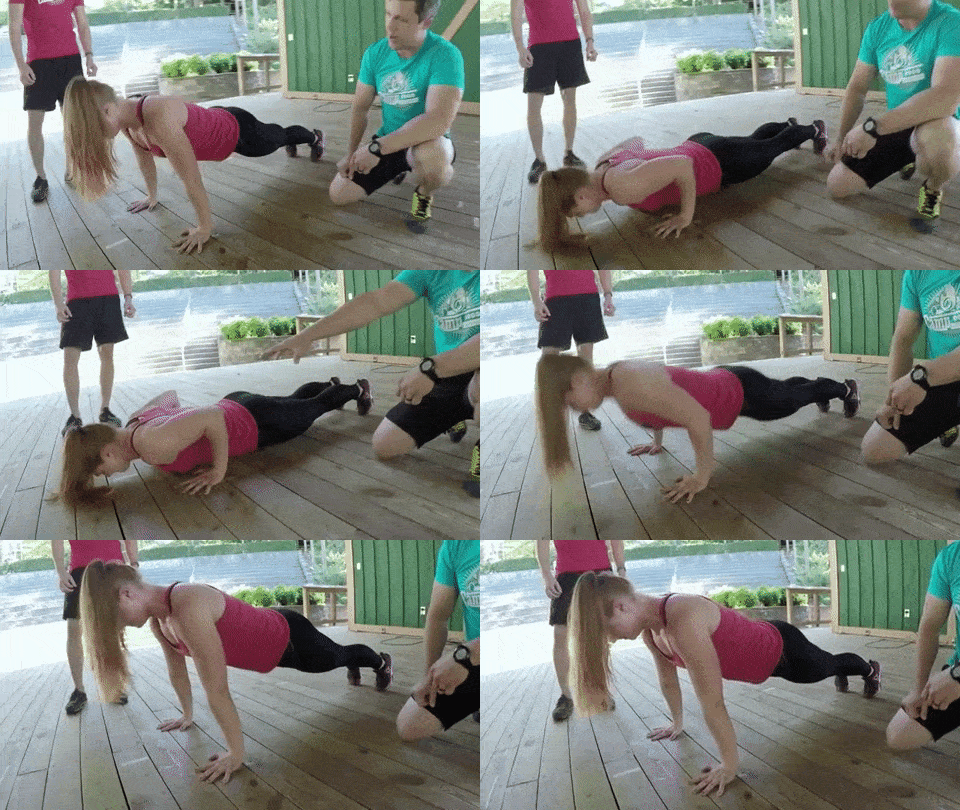
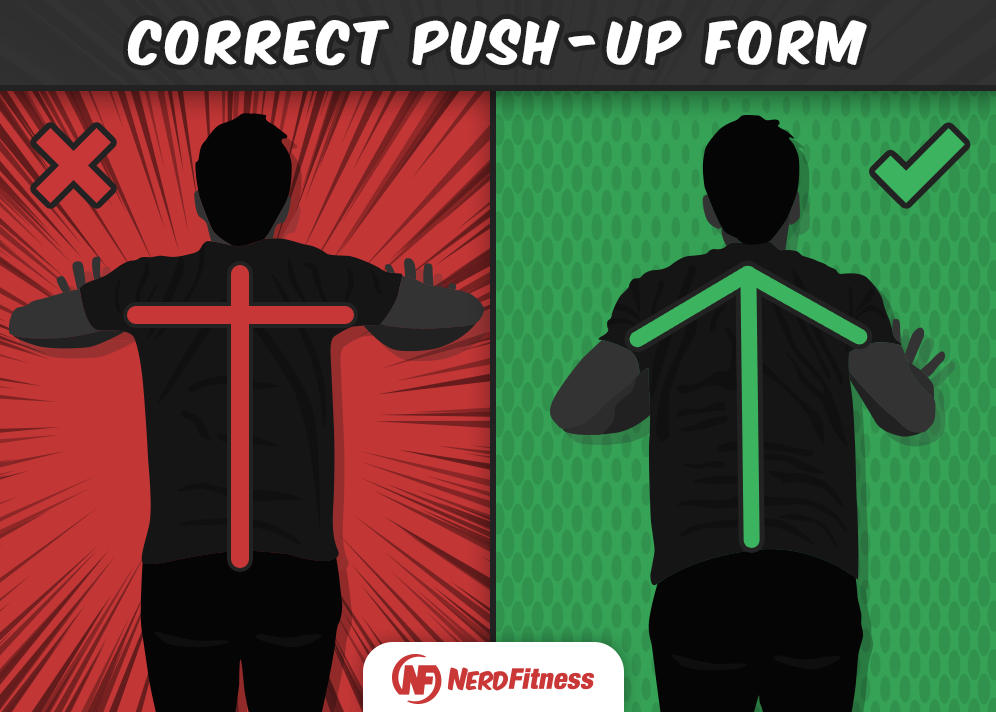
8) I want to draw special attention to that first step with hand position: nearly EVERYBODY does push-ups with their arms out far too wide and their shoulders flared. This is bad news bears.
If I was looking down at you from above, your arms and body should form an ARROW, not a T.
WARNING: If you have been doing push-ups with your arms flared, doing them with proper form will be significantly more difficult!
How to Do a Proper Push-Up (Correct Push-Up Form with Video).
In the 5-minute “Perfect Push-Up” video above, featuring yours truly and two of our coaches, we take you through EACH of the steps of a push-up, including some variations!
Here’s how to complete one perfect repetition of a proper push up:
With your arms straight, butt clenched, and abs braced, steadily lower yourself until your elbows are at a 90-degree angle or less. Depending on your level of experience, age, and flexibility, 90 degrees might be the lowest you’re able to go. Personally, I like to go down until my chest (not my face), hits the floor. That way, I know I’m going the same distance each and every time.
Try not to let your elbows go flying way out with each repetition. Keep them relatively close to your body, and keep note of when they start to fly out when you get tired.
Once your chest (or nose/chin) touches the floor (or your arms go down to a 90-degree angle), pause slightly and then explode back up until you’re back in the same position.
Do as many as you can until you start to feel your form slip (even slightly); you are done for that set.
Here’s why you should focus on form over quantity:
10 good push-ups and 5 crappy ones are tough to quantify against eleven good push-ups.
If you can only do 10 of something, write down your results and aim for 11 next time.
Perfect form allows you to keep track of your improvements week over week.
Want to know where push-ups should fall into your workout routine? I have three options!
1) Try Nerd Fitness Journey!
Nerd Fitness Journey will guide you through a bodyweight workout routine that can be done anywhere (yep, even there). You can try it for free right here:
Grab Your Beginner Bodyweight Routine Worksheet. No Gym Required!
Complete this workout at home, no equipment required
Avoid the common mistakes everybody makes when doing bodyweight exercises
Learn how to finally get your first pull-up
3) Make your own workout with push-ups by following our“Build Your Own Workout” guide! It’ll walk you through everything you need to build an exercise program for your goals in 10 steps.
How Do You Train to Do Push-Ups? (Where to Start If You Can’t Do a Push-Up.)
Don’t worry if you can’t do a push-up yet. As we lay out in the video above, we have a plan that will help you get there.
You need to start with an easier push movement, and work up to progressively more difficult types of moves that will eventually result in you doing true push-ups.
We’ll progress from Level 1 Push-ups to Level 4 Push-ups:
Wall Push-Ups: Level 1
Elevated Push-Ups: Level 2
Knee Push-ups: Level 3
Regular Push-ups: Level 4
LEVEL 1: HOW TO DO WALL PUSH-UPS
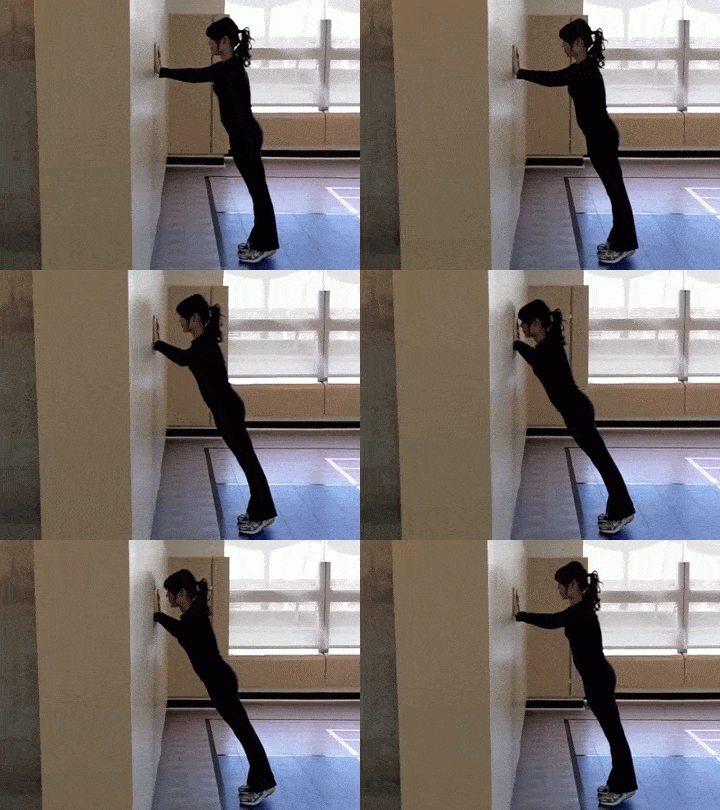
Stand in front of a wall. Clench your butt, brace your abs, and set your hands on the wall at slightly wider than shoulder-width apart.
Walk backwards with your feet until your arms are fully extended and supporting your weight (generally one decent sized step back with both feet will suffice). Keeping the rest of your body in a straight line, steadily lower yourself towards the wall until your nose almost touches the wall, and then explode back up to the starting position.
HOW TO TRAIN WALL PUSH-UPS:
Do 4 sets of wall push-ups with a 2-minute rest between sets, every other day. Keep track of how many repetitions you can do WITH PROPER FORM for each set in a notebook for easy comparison to previous workouts. Once you can do 4 sets of 20 repetitions of wall push-ups, you can progress to knee push-ups.
LEVEL TWO: HOW TO DO ELEVATED PUSH-UPS
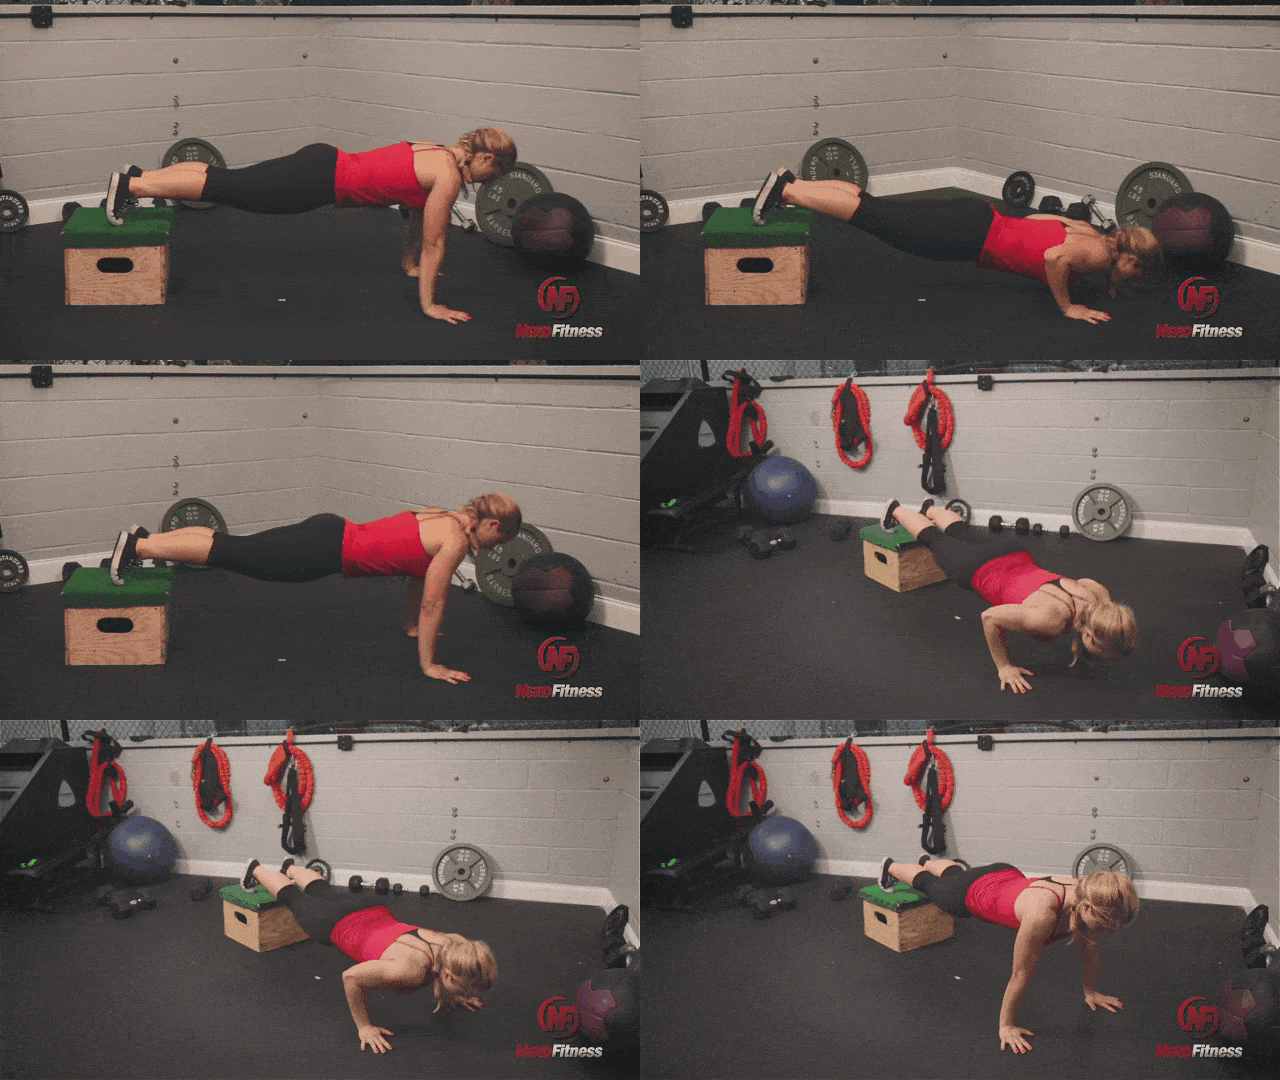
As we demonstrate in this video above from Nerd Fitness Prime, elevated push-ups are just what they sound like – your hands are on an elevated surface, whether it’s something as tall as a kitchen table or as low as a few blocks that are inches off the ground. This will depend on your level of strength and experience.
If you’ve just progressed from wall push-ups, pick something that is at a level that’s right for you – I generally find the back of a park bench or the side of a picnic table to be a perfect height for doing incline push-ups. Like so:
HOW TO TRAIN ELEVATED PUSH-UPS:
Do 4 sets of elevated push-ups with a 2-minute rest between sets, every other day. Again, keep track of all of your stats for how many proper form repetitions you can do in each set. Once you can do 4 sets of 20 repetitions, it’s time to either move to regular push-ups, knee push-ups, or a lower height for your hands to be supported.
Once you can do 4 sets of 20 repetitions, it’s time to either move to regular push-ups, knee push-ups, or a lower height for your hands to be supported.
To work on progression, try to doing your elevated push-ups on the stairs in your house. As you get stronger, you can move your hands to lower and lower steps until your hands are on the ground.
LEVEL THREE: HOW TO DO KNEE PUSH-UPS
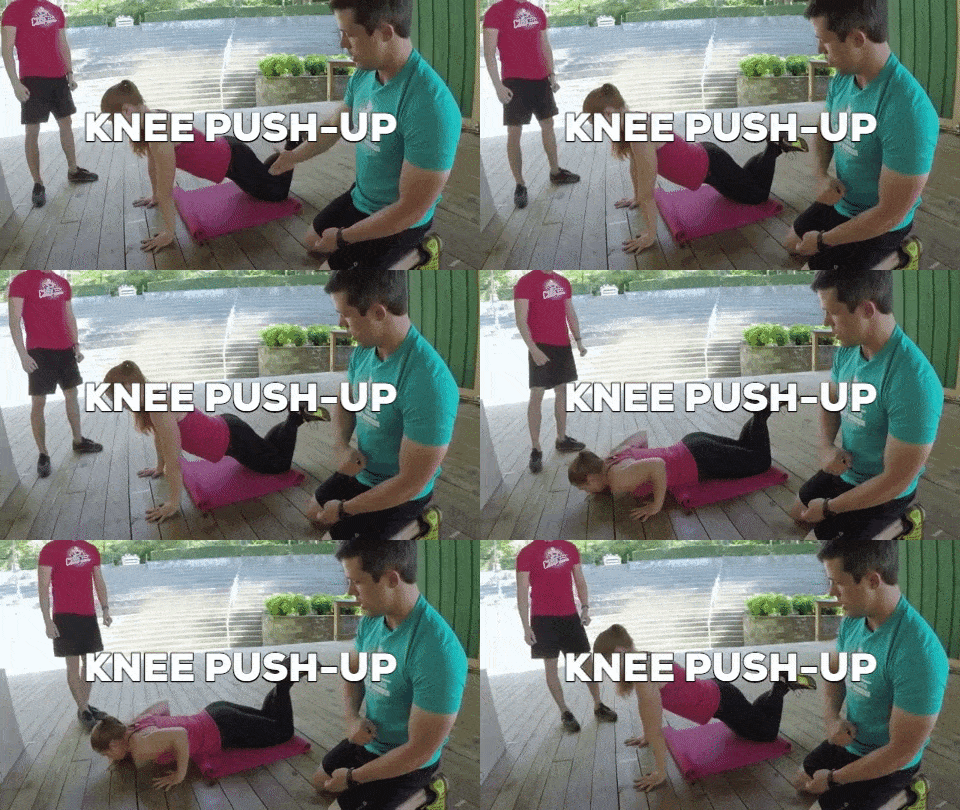
Once you’re comfortable doing wall or elevated push-ups, proceed to knee push-ups. Your shoulder and hand placement will look just like a regular push-up (an “arrow”, not a “T”), but you’ll stabilize yourself on your knees instead of your feet. As demonstrated here:
HOW TO TRAIN KNEE PUSH-UPS
Once you can do 4 sets of 20 repetitions on your knees, you can start thinking about doing regular push-ups.
To recap, if you can’t do a regular push-up, move from:
Wall Push-Ups: Level 1
Elevated Push-Ups: Level 2
Knee Push-Ups: Level 3
Regular Push-ups: Level 4
How do I know the above progression will work? Well, it’s the exact plan we use to help people crush push-ups in Nerd Fitness Journey!
You can see how we scale our bodyweight workouts right here:
What Are Other Types of Push-Ups? (Push-Up Variations)
Basic push-ups can get boring…
Fortunately, there are dozens upon dozens of variations to make things more difficult for you.
Once you’re cranking out perfect form push-ups like it’s your job,[1] try some of these advanced variations on for size.
Click on each for a video demonstration (these are some of the push-up variations pulled from NF Prime):
#1) One-legged Push-ups: introducing some variety and balance by removing one of your legs for less stabilization:
#2) Side-to-Side Push-Ups –Get into the classic push-up position and move your hands farther apart. Now, lower yourself down towards one arm only – you should feel like you’re supporting a lot of your weight.
To complete the rep, slide horizontally over to the other arm, and push-up. The farther apart your hands, the higher percentage of your bodyweight will be supported by that side of your chest/shoulder and arm (thus getting harder)!
#3) Decline Push-Ups – these work your shoulders and triceps more so than normal push-ups.
#4) Diamond Push-Ups – keep your arms tight at your side, rotate your hands outward, and keep your elbows tight as you lower your body. Works your triceps like crazy.
#5) Dive-Bomber Push-Ups – funky, difficult, but oh so fun. I’d explain it, but just watch the video
#6) Plyometric Push-Ups – these are brutal and will wear you out just after a few repetitions. Just don’t hurt yourself and smash your face during a failed attempt (not that I’ve ever done that. Shut up my face always looks like this)!
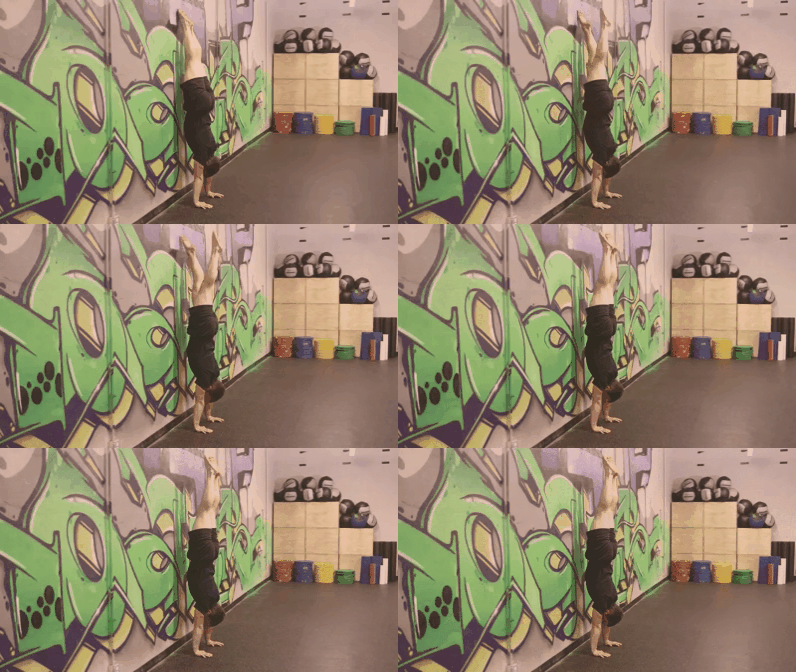
#7) Handstand Push-Ups – This goes without saying, but you should be able to do a proper handstand before attempting these!
Kick up against a wall, and without flailing your elbows way out to the side (which can wreak havoc on your shoulders and elbow joints), slowly lower yourself down until your head touches the ground softly.
Then raise yourself back up.
Rotate some of these advanced push-ups into your workout routine and you’ll be well on your way to a great strength training practice.
If you want more strength building tips, we also have a comprehensive guide, Strength Training 101: Everything You Need to Know, when you sign up for the Rebellion (that’s our community) below:
Download our comprehensive guideSTRENGTH TRAINING 101!
Everything you need to know about getting strong.
Workout routines for bodyweight AND weight training.
How to find the right gym and train properly in one.
How to Get Better at Push-Ups
So you’ve learned how to do a push-up, you can do a few of them, but you want to get better!
Here are some tips to help you along the way:
Get healthy! As you lose weight (which is 80% nutrition!), you will have to move less weight around than before, which will make your push-ups easier to manage. Have you had trouble losing weight in the past? Check out our article “Why Can’t I Lose Weight?” to find out why.
Don’t cheat on the last few push-ups – when you’re tired, it’s easy to skip out on good form for your last few reps. As soon as you do one bad form push-up, you’re done. Finish up your four sets, write down your numbers, and try to beat those numbers next time.
When starting out don’t do push-ups two days in a row. You need to give your muscles time to rebuild and recover – take off at least 48 hours in between your push-up adventure. However, when push-ups became a warm-up exercise for you – you can do them every day if you want. If you’re advanced, you can consider a PLP program.
Get enough protein into your system after finishing up your workout – protein helps rebuild the muscles you just broke down doing push-ups, and it helps them rebuild those same muscles stronger than before. You can read our ultimate guide on protein for some tips on how to up your protein intake.
If you can do 4 sets of 20-25 perfect form push-ups no sweat, then it’s time to start looking into push-up variations to keep things interesting.
Build up your core with planks – this will help keep your core strong so that it’s not the weakest link in your proper form push-ups.
These 6 tips will be a great addition to your strength training plan. Keep at it and before you know it you’ll be doing one-arm push-ups like Batman.
What’s that? You don’t have a strength-building plan!!! Well then…
What’s Your Strength Building Plan?
It makes me sad when we get emails from people who struggle and try and work hard to get healthier, and to be better at push-ups, and just can’t seem to make any progress.
If that’s you, you’re not alone!
1) Consider working with an online coach (or in-person trainer).
Helping people learn push-ups and other bodyweight exercises is why we built our1-on-1 Online Coaching Program:We build programs for busy people to cut through the noise and just get results
2) Exercising at home and need a plan to follow? Check out Nerd Fitness Journey!
Our fun habit-building app helps you exercise more frequently, eat healthier, and level up your life (literally).
Try your free trial right here:
3) Join our community! We have hundreds of thousands of people, and I send out two free emails every week to help them level up their lives. Join our free community today, and I’ll send you a dozen free ebooks, including TONS of workout plans you can do anytime, anywhere.
Join the community by signing up in the box below:
Grab Your Beginner Bodyweight Routine Worksheet. No Gym Required!
Complete this workout at home, no equipment required
Avoid the common mistakes everybody makes when doing bodyweight exercises
Learn how to finally get your first pull-up
YOUR MISSION, SHOULD YOU CHOOSE TO ACCEPT IT:go home, set up a camera, and check your form on your push-ups.
I hope you’ll find that your form is as good as you expected, but it’s okay if it’s not, it’ll give you something to work on.
Go do some push-ups, and work on getting better with them every day.
You’ll be moving from Level 1 to Level 4 push-ups and beyond!
-Steve
PS: Not to brag, but I typed this entire article while doing 1-handed push-ups.
PPS: Okay no I didn’t. But it would have been cool if I did, right?
By Kiesha Yonkers, Head of Breathwork + Somatic Programs
The connection between breathwork and hormone health and wellness cannot be ignored. My experience, from the very start of exploring this practice, is the perfect example.
In mid-2020, my stress hormones (cortisol) were at an all-time high. As was the case for so many of us. I was chronically in fight or flight, and as a result, I was feeling anxious, worried, and far from connected to myself.
When I started doing breathwork, I felt the stress start to melt away. This meant that I was shifting into my parasympathetic system, which is the “rest and digest” system. It’s also the opposite of fight or flight, which is when you’re in the sympathetic system.
Shifting into this parasympathetic state allowed my body to activate the “happy” hormones, like dopamine, serotonin, and oxytocin. In this state, I felt safe and that allowed me to connect with my loved ones and myself more effectively. I was also able to release some of the anxiety and feel all the goodness that those happy hormones were sending my way.
As you know, we strive to keep our discussions here at Lindywell rooted in evidence while keeping things simple and approachable. So let’s bring some science to this scenario with a few practical tips on how to use breathwork for your hormone health and wellness.
First: Why Do Hormones Matter?
Let’s break down the key hormones that impact us as women and what they do.
Estrogen: Estrogen keeps us on our toes! It’s a multi-purpose hormone that supports everything from your menstrual cycle to bone health and that glowing skin we’re all trying to achieve. This hormone naturally fluctuates throughout your life as a woman, all the way through menopause.
Progesterone: Progesterone (sometimes called the feel-good hormone because it can make us feel calm—yes, please) varies throughout your cycle each month. Its main role is to prepare your body for pregnancy and support fetal development.
Testosterone: Testosterone is not just a hormone in men! This hormone supports muscle growth, bone health, and libido for women.
Thyroid hormones: Your thyroid hormones are the unsung heroes of health and wellness. They come from the thyroid gland and regulate many of the most popularly discussed aspects of our health, like metabolism and energy levels.
When I talk about supporting hormone health and wellness, I’m referring to the steps we can take to keep these hormones (and all the others that are at play in our bodies) in balance. This means we feel good and our body can function.
If any of these hormones are out of balance or not being produced, you may notice a wide range of symptoms. These symptoms, which depend on the type of hormone imbalance and underlying cause, can include fatigue, mood changes, weight gain, hot flashes, acne, low sex drive, depression and so much more.
How to Breathe Your Way to Healthier Hormones
Breathwork activates the parasympathetic system, and when your body is in this state, it is better able to produce and activate the hormones you need to feel safe, loved, connected, and happy. This is also when your metabolism improves, digestion works well, and your body can function exactly as it should.
While it’s not necessary to always be in one of those states to keep your hormones happy (that’s not even possible!), breathwork helps you come back to that place of “rest and digest” regularly, rather than staying in fight or flight.
The good news is, you don’t need to be experienced in the art of meditation to reap the hormone benefits of breathwork. Even better, you don’t need to spend hours each day doing it! Here’s what you need to know about using breathwork as a tool for your hormone health and wellness.
Start Slow and Simple
Breathwork can be intimidating (I get it, I’ve been there!) so I encourage you to start slow and simple with box breathing. Breathe in slowly and deeply for four seconds, hold for four seconds, breathe out for four seconds, hold for another four, and start again. You may be surprised by how at ease you feel after doing this just 4 or 5 times.
You can try a guided breathwork session from yours truly in the Lindywell app! If you’re not a member, start your 14-day trial and get instant access to a variety of breathwork sessions and techniques.
Make it a Part of Your Routine
As with anything, consistency is key to success. A single breathwork session is helpful. Still, the goal is to continually bring ourselves back into the parasympathetic system over and over. This is what activates those happy hormones needed to help us thrive.
Remember that taking even just 2 or 3 minutes for breathwork can have benefits like less stress and anxiety, better focus and mental clarity, and boosted energy levels (yes, please!). Longer sessions can offer even more benefits, like better lung capacity and sleep, and the ability to release blocked emotions that are making you feel stuck or anxious.
Short daily breathing exercises are important and effective. However, longer sessions guided by an expert can increase the benefits and provide an opportunity for significant transformation. If you want to experience the power of these longer, guided breathwork sessions, reserve your spot for Exhale Hour. Join me for live breathwork sessions that deeply support you, both mind and body.
Pair Breathwork With Pilates
There are many ways to support your hormones. Breathwork is one of them and exercise is another, specifically Pilates. Research has found that this form of movement is especially beneficial for women’s hormone balance. One study saw a significant decrease in participants’ menopausal symptoms, which are directly impacted by hormone health, after practicing Pilates.
The best way to pair these two powerful hormone helpers is to join Lindywell.Sign up today and you’ll get your first 14 days for free!
Once signed up, you get immediate access to 250+ Pilates workouts, multiple guided breathwork sessions, and hundreds of recipes created to support hormone health and reduce inflammation.
Breathwork is a Powerful Partner in Hormone Health and Wellness
Our hormones want to support us, but if we’re constantly in fight or flight, we inhibit their ability to do so. This is why breathwork is so important and can’t be overlooked for your hormone health and wellness.
Deep breathing gets us into that all-important parasympathetic state, which in turn supports our hormones. When we commit to breathwork (and Pilates!), we feel happier and less stressed. In the process, we also feel more connected and our bodies can function exactly as they’re supposed to. A win-win!
Cycle syncing is a powerful way for you, as a woman, to choose food, movement, and tasks that support where you are in your cycle. In this case, we’re talking about syncing your Pilates routine to your cycle, in other words: choosing the workouts that best suit your mood, energy, and body as they naturally fluctuate throughout the month.
Tuning into your body’s unique needs at each phase can make it easier to choose a workout that helps you meet your body where it’s at, which is a key factor in the way we move here at Lindywell.
Choosing your workouts based on your cycle can also eliminate the guilt associated with choosing a shorter or “easier” workout. It’s not about pushing yourself every single time you step on the mat, but listening to your body’s needs.
With that in mind, let’s dive into what you need to know about cycle syncing and Pilates—and how simple it is to get started.
For those of you who have shifted into menopause, please know that we see you! Stay tuned for some similar tips and strategies to work with your body coming soon!
My Cycle Syncing and Pilates Experience
Cycle syncing with your Pilates routine helps reduce burnout, fatigue and stress that might happen when you do more than your body is ready for. I pushed my mind and body to the brink for many years. But ever since my conversation with Berrion Berry on this subject, I’ve been more mindful of how my cycle impacts which workouts I choose and how I schedule my work.
Let me just say, this shift has been a game-changer for me so I had to share it with you! It’s important to remember, though, that this should not be a reason to pressure yourself into exercising “perfectly” or pushing yourself to exercise every single day.
Instead, I hope this serves as a guideline for you to tune into your body and choose what your body needs. For example, I took a day off from my workouts this week and chose a more gentle routine today knowing that other areas of my life were demanding more from me.
Like we always say here at Lindywell, it’s about progress over perfection.
The Four Phases of Your Cycle
Cycle syncing is a term coined by functional nutritionist and hormone balance expert Alisa Vitti. Adjusting your Pilates workouts (or diet or other lifestyle habits) with each phase of the menstrual cycle will help you align your routines and activities with your shifting hormonal needs.
Women’s cycles last 28-32 days, on average, and there are four distinct phases of this cycle: Menstruation, Follicular, Ovulation, and Luteal. While each body is unique, here is a basic rundown of how the reproductive hormones typically fluctuate from one phase to the next.
Menstruation (Days 1-5): This phase occurs when your uterus sheds its lining (your period starts) and both the estrogen and progesterone levels dip. You know what this one feels like: fatigue, lower energy, and a greater sense of introspection and slowing down.
Follicular (Days 6-14): This phase occurs right when your period ends but before your ovaries release an egg. It causes both estrogen and progesterone levels to rise. In other words, you’re feeling energized and confident.
Ovulation (Day 15-17): This phase occurs when an egg is released from your ovaries. It causes the estrogen levels to peak, while progesterone continues to rise. This can cause a continued increase in energy levels, along with a higher sex drive.
Luteal (Days 18-28): This phase occurs when the egg is fertilized for pregnancy, or hormone levels start to decline for menstruation to begin. During this phase, the longest of your cycle, you might feel a drop in energy and greater mood fluctuations.
Note that the days for each phase of your cycle mentioned here represent the average. Your phases may last longer or shorter, and likely change over time as well.
Syncing Pilates With Your Cycle
At Lindywell, we encourage members to move at their own pace and always offer modifications. This means, no matter what you choose, most of our workouts can support the cycle you’re in.
However, learning how to navigate our 250+ workouts based on what you’re feeling each day can help you dial in on exactly what you need each and every time you step on the mat.
Let’s break down what to look for at each phase of the cycle. I’ll also share some Lindywell workouts that would be great for each phase.
If you’re already a Lindywell member, just click the workout to open it in your app. If you’re not, sign up for a 14-day free trial and you’ll get immediate access to every workout in our library.
Pilates Workouts for the Menstruation Phase
Days 1-5
It’s common for the body to crave gentle movement during this phase. Try some of our recovery workouts and stretching workouts that promote circulation and stretch your muscles without too much exertion. This is also a great time to slow down with breathwork, if movement doesn’t feel good or in addition to your workout. Check out our guided Breathwork Sessions.
For many women, this is the best time for a short cardiovascular workout. Right now you can take advantage of your increased energy levels without totally burning yourself out. While most Lindywell workouts will support this phase very well, this is a good time to explore our standing workouts and Barre workouts to give your body an extra challenge without overdoing it.
If you want to incorporate more high-intensity exercises into your routine, this is typically a good time to do it! You’ll be able to capitalize on your body’s increase in hormones and energy levels. This is a good time to push yourself with harder and longer workouts, like those in our 35+ minute section. These will help you challenge your body during a time when you have the energy to complete a longer workout.
Now is a great opportunity to enjoy moderate exercises that use resistance to build strength without draining your lower energy levels. Make the most of this phase by heading to our Props section, where you’ll find lots of workouts that allow you to boost the resistance. If you need props for your Pilates workouts, head to the Lindywell Store to get your mat, hand weights or even resistance bands!
Cycle syncing makes it easier to align withyour body instead of pushing against or even ignoring the changes happening within. This feel better during your workout and support your body’s specific needs, so you can maintain your energy and support your mood. All while still building mind-body strength! A win-win, right?!
PS: As Dr. Aviva Romm shared on The Balanced Life podcast (Part 1 and Part 2), our cycles are an important signal of our health as women. If you’re noticing changes in your cycle or are concerned about irregularity or lack of menstruation, make it a goal to reach out to your doctor to share your concerns. Listen to Part 1 and Part 2 of our conversation.
Wondering what are the best strength exercises for beginners and where to start with training? I got you. Strength training is probably the most underestimated form of exercise, yet is great to add some variety to your weekly activities. Not…
You can’t have not noticed how much attention Strength training – especially focused on women – is getting these days. And that’s for good reason. As female specific research is being increased, we’re getting the evidence to back up the…
Women’s hormone health is a hot topic in the wellness world—and for good reason. Our hormones impact every area of our life, as I’ve learned in the last few years after being diagnosed with a hormonal imbalance.
My doctor was surprised I was even functioning when I was first diagnosed with hormone imbalance! I attribute this resilience of my body to the Pilates routine and our Lindywell approach to wellness, both of which had been a part of my life for many years before my diagnosis.
Over the course of this journey (that I’m still on), I’ve learned so much about women’s hormone health and how to find even more balance in my body. Along the way, Pilates has continued to be a key tool, and I want to share why and how.
My hope is that this article—and a membership with Lindywell, if you choose to join us!—will help you find greater balance, ease, and strength in your body.
Why Hormone Balance is So Important for Women
Experiences that impact our stress levels, sleep habits, eating or exercise patterns, and autoimmune function can lead to hormone dysfunction. For some women, this is caused by major life transitions like puberty, childbirth, peri-menopause, and menopause. For me, this was a result of the demands on my life, including having four kids in five years (including twins!), a miscarriage, and exposure to toxic mold. All of that added stress to my system because of how taxing it was to my endocrine system.
This hormonal imbalance is temporary and can be treated with conventional medicine or basic lifestyle shifts for many women. If you don’t come back into balance, however, you may start to experience uncomfortable symptoms and chronic health problems.
Because hormones regulate several important systems and functions in the body, from mood and appetite to sleep and stress, it’s so important to for women to find that balance once again. While there are different ways to do this through diet, lifestyle, and supplementation, one of our favorite tools for supporting women’s hormone balance is Pilates.
Pilates and Women’s Hormone Health
While we may seem biased—we love Pilates here at Lindywell!—it’s true that this form of movement can be extremely supportive of your hormone health and help you come back into balance. Here’s why:
Pilates Strengthens the Mind-Body Connection
Pilates teaches you how to be mindful of the present, as you bring awareness to each and every movement. This Pilates method combines precise, controlled movements with a focus on intentional, conscious breathing to strengthen the mind-body connection.
Mind-body exercise has been shown to support the production of Serotonin (the “happy hormone”) and the reduction of Cortisol (known as the “stress hormone). This means that doing Pilates can support your ability to deal with life’s everyday obstacles. And our thousands of members around the globe can attest to this!
Pilates Supports Weight Management
If the hormones that control energy metabolism and blood sugar levels are out of balance, you can experience insulin resistance. Over time, this causes inflammation, weight fluctuations, and chronic health issues like diabetes.
Researchers at the University of Mohaghegh Ardabil in Iran monitored the effect of Pilates on women with excess weight. They saw that this particular Pilates routine, which included mat and ball workouts, reduced three hormones (chemerin, visfatin, and resistin) that can impact your body’s ability to manage weight, insulin, and metabolism when elevated.
In other words, Pilates helped balance these three important hormones. One of the results of that re-balancing was weight loss. If you want to experience a similar workout as the study participants, try this free workout, which includes ball and mat exercises!
Pilates Keeps Oxygen Flowing Through Your Systems
Endocrine glands create and release hormones into your bloodstream. These glands need oxygen to perform their critical function. If they don’t get this, you risk disrupting the endocrine system as a whole. This can escalate into diabetes, infertility, endometriosis, or even some forms of cancer.
Because Pilates combines rhythmic breath and full-body movement, you naturally stimulate oxygenation and circulation, which can lead to greater hormone balance, head to toe. I want to exhale just thinking about how good that feels!
Pilates Boosts Brain Health
The low-impact movement and a continuous pattern of breathing that supports oxygen flow through your body are also linked to a well-functioning brain. Both of these things help regulate three of the brain’s primary hormone groups (metabolic, stress, and sex). This means getting on your Pilates mat regularly helps boost brain health and even reduce cognitive decline.
At Lindywell, we make it easy to commit to this daily brain-boosting movement with a wide variety of short, 15-20 minute workouts that help you build strength too! Lindywell member, Catherine, experienced this and so much more:
“I’m stronger, have better balance, have lost several inches all over, and just look better. On an emotional and mental level, I have more confidence, am less stressed – or better able to handle it, and just feel more joy.”
If you’ve experienced hormonal imbalance—or you’re in a life transition that might cause those hormones to fluctuate—bring Pilates into your routine. This mindful movement is a powerful tool for women’s hormone balance and one that’s been critical on my journey as well.
Not only can it help you restore balance in your body (yes, please!), but it will also help regulate your mind. This helps you You may be surprised by how great you feel if you commit even just 10 minutes a day to a Pilates workout.
Have you ever considered Pilates for scoliosis relief? I discovered how supportive this type of movement can be more than a decade ago when I took my first Pilates class, well before I ever became a teacher or created Lindywell!
I was diagnosed with scoliosis in high school. We discovered that I have an S-curve in my mid-thoracic spine—the mid-upper section of my back. While it didn’t significantly worsen over the years, I did develop a lot of pain in my shoulder, neck, and jaw as a result of muscular and postural imbalances from one side to the other and TMJ from my jaw being out of alignment.
Pilates has greatly (greatly!) reduced my pain. The consistent practice of getting back into alignment and rebalancing my body has been key to living with this diagnosis with less pain.
If you’re struggling with pain or discomfort from a curvature in your back, you’ve come to the right place. Let’s dig into how you can lean on Pilates for scoliosis relief.
Please note the information provided in this article should not be used for diagnosing or treating scoliosis. Always seek the advice of your doctor or another qualified health provider regarding a medical condition.
What You Need to Know About Scoliosis
Scoliosis is an abnormal rotation and curvature of the spine. It can manifest in the cervical (neck), thoracic (upper back), or lumbar (lower back) regions. As I shared earlier, my scoliosis created an S curve in my spine but was luckily not severe enough for surgery or a brace.
Although posture does not cause scoliosis, this condition can affect how you stand or move. For example, a few common signs include:
Uneven hips or shoulders
A significant curve in the back
Forward jutting ribs
Bump in the lumbar area
Sideways lean
Trouble walking
If you feel pain, numbness, and a lack of balance or coordination in your legs, this could point to scoliosis as well.
It’s important to note that mild forms of scoliosis are easy to overlook. In fact, some of my past clients had scoliosis without realizing it. As they did a Roll-Down, I noticed a hunch or lift on one side of their back, indicating they might have a curve in their spine. Sure enough, they were diagnosed after seeing a doctor.
If you notice any of the signs and symptoms mentioned above, we encourage you to see a doctor. With a diagnosis, you can understand how to best manage the pain and find support.
How Pilates Can Alleviate Scoliosis Pain
I’ve experienced pain from my scoliosis ever since I was diagnosed in high school. Mild and serious cases of scoliosis can exert pressure on the nerves and muscles which connect to your spine. This can be uncomfortable or disruptive to your life. In fact, those with scoliosis are highly prone to suffer from chronic musculoskeletal low-back pain.
Orthotic treatments, such as braces, can relieve some of that pressure, but another intervention can also support, in addition to, or in some cases, instead of, a brace. It’s effective, low-impact, and gentle on the body. I’m talking (of, course!) about Pilates, which has been a game-changer for my diagnosis.
Here are a few of the ways Pilates can provide pain relief for you as it has for me:
Pilates uses intentional and controlled movements to lengthen the muscles, bring flexibility into the spine, and stabilize the core. Not only does this promote balance, strength, and flexibility, but a strong, stable core reduces pressure on the spine. This can help alleviate back pain and increase mobility.
Muscle elongation plays a role in scoliosis relief too. Performing an exercise that stretches and lengthens your muscles (and fascia) can ease stiffness or compression in the vertebrae joints. This, in turn, can help relieve any chronic or acute neck, shoulder, back, and pelvic tension you might experience.
Pilates has been found to gently correct balance and postural alignment issues, which is just one more way to alleviate pain and support your body through scoliosis.
I have more rotation in one direction compared to the other and one of my shoulders is higher than the other. The rotational and side-strengthening movements in Pilates help to balance that out.
In extreme cases, there’s only so much relief that Pilates can provide, but if your scoliosis is either mild or moderate, Pilates for scoliosis relief can be a great option. This type of movement can help you build and maintain a functional range of motion while relieving pain, tension, and discomfort.
How to Practice Pilates with scoliosis
I know what you’re thinking: I’m ready for relief now. I get it, I’ve been there—and some days, I’m still there. That’s why I want to share a few strategies you can use to make the most of Pilates for scoliosis whenever you step on your mat.
Remember that doing Pilates once or twice will likely not give you the relief you’re looking for. While I still have occasional discomfort, it’s mild, and that’s only because I continually do Pilates to balance my body and build strength on both sides.
This is why a Lindywell membership can be so powerful. With workouts that range from 10 to 30 minutes, it’s easier to make time for your movement each day. If you’re not a member, sign up for your free 14-day trial and start with a workout like Total Body Alignment. If you’re already a member log in to push play on your next workout!
Here are a few ways to make your Pilates workouts most effective for reducing pain and supporting your scoliosis.
Don’t force a painful movement—allow for modifications.
Move gently through your Pilates session and listen to your own body. We always say this at Lindywell, but it’s even more important for you. If a certain movement causes pain, a joint or muscle group is tense, or you notice restriction in a particular area, be mindful of this.
It’s your practice. This means I want you to listen to your body and scale back on the resistance or modify an exercise so that it feels more comfortable. In most Lindywell workouts, we offer modifications to make this easier for you.
Stay connected to your core.
We always say your core is at the heart of ours. That’s because the connection to your core is so important, in life and Pilates. This is especially true if you’re struggling with back pain or discomfort. This helps take the pressure off your spine and allows your core to support your body exactly the way it’s supposed to. This also helps you build greater core strength, which will support your scoliosis off the mat too.
Pilates and breathwork are closely intertwined. Each movement can be made more effective (and in some cases, easier!) when you coordinate with the rhythmic flow of breathing. We start most Lindywell workouts with a moment to connect to the body and breath.
If you can hold this awareness throughout the entire workout, you’ll not only make it more effective, but you’ll also help your body relieve even more stress and tension.
A Routine to Support Your Body
Get a sense of how Pilates can provide relief for your scoliosis with this restorative workout. In just 10 minutes, you’ll stretch your body, practice intentional breathing, and build strength. It’s a perfect example of what you can expect from every Pilates workout with Lindywell.
Try Pilates for scoliosis Relief
If you’re ready to get the full experience, start your free trial of Lindywell today! We have more than 250 online Pilates workouts for all fitness and experience levels, taught by certified instructors, and founded by me, Robin, someone who’s managed a scoliosis diagnosis for nearly 25 years.
Each routine is built to develop strength, increase mobility, restore balance, realign posture, and boost flexibility—often in just 15 minutes or less. This means you can use Pilates for scoliosis relief without adding a time-consuming task to your to-do list—a win-win!
The difference in the spelling of mindful vs. mindFULL is minor, but the difference in how each of these things can impact your life is significant.
You’re probably familiar with the feeling of being mindfull. It starts from the moment you hear the alarm each morning, as the thoughts come rushing in:
What time is that appointment tomorrow?
I need to pay that bill later today.
What should I make for dinner tonight?
This isn’t surprising, considering the average human processes about 6,200 thoughts per day. As a busy mom and business owner, I am working on this daily. My mind gets so full and runs wild with thoughts of to-do list items, past conversations, upcoming meetings, etc.
But notice how none of those thoughts pertain to the present moment. It’s normal to think, feel, sense, interpret, and create meaning from the world around you, but focusing so much of our inner dialogue on what’s behind or ahead, what could go wrong, or what we might miss, can lead to anxiety.
If we’re being honest with ourselves, most of us automatically slip into this anxious state automatically—and that’s okay. Awareness of this is key to shifting to being mindful vs. mindfull so you can finally experience more inner calm.
What Does it Mean to Be Mindful?
Mindfulness is an awareness that arises when you’re present and attentive to life in real-time. Here’s an example that might sound familiar:
You turn off the shower and think: I don’t recall anything from the last 10 minutes. That inner chatter had you so distracted, you didn’t even notice the hot water on your skin or the smell of the soap in your hair.
I know I can go through entire routines, like showering, without even noticing what is really happening. I’ve tried to implement more rhythms and routines into my day to bring me back to a place of more mindfulness, which is the experience of noticing those sensations, tuning into the moment, and being present, rather than getting lost in your thoughts.
It’s not about silencing the chatter altogether (reality check: that’s pretty much impossible!) but bringing awareness to it and then tuning back into the sensations and experiences of the present moment.
As I became more mindful through Pilates, breathwork, being in nature, and simply pausing to tune into the moment, I found I was more balanced, peaceful, and less reactive. That impulse to criticize myself or get lost in my thoughts became less automatic and it made every aspect of life more enjoyable.
What Does It Mean to Be MindFULL?
Nope, we’re not repeating ourselves! The difference in the spelling of mindful and mindFULL may be easy to miss, but the impact in life is significant! That shower experience we mentioned above is an example of being mindFULL; all the tabs in your brain are open, the chatter is going—your mind is full.
Whether you’re prone to ruminating on the past or anticipating the future, getting stuck in this constant state of anxious thinking can lead to depression, anxiety, substance abuse, eating disorders, or insomnia, among other health challenges.
I know how these thoughts can feel intrusive and all-consuming, making it seem impossible to shift into mindfulness. However, I’ve learned that not only is making this shift possible, but it will have a ripple effect throughout your life.
How to Cultivate a State of Mindfulness
If you’re ready to replace the anxious mindfull spiral with mindful inner calm, here are a few simple strategies to try. The key is to practice mindfulness in small, consistent ways so you can build it into an automatic habit over time.
Notice Inner or Outer Sensations
The goal of this practice is to name your feelings as they arise, and then notice what that physical sensation is in your body.
All thoughts and emotions are connected with a physical reaction. For example, when I feel stressed, I notice my stomach tightens and my shoulders creep up and feel tight. You may also notice your throat constricts, your hands tingle, or your armpits sweat. On the other hand, a sense of calm might cause your breath to deepen, your shoulders to relax, or your chest to expand.
Another simple starting point for this is to check in with your senses. Start by looking around you and naming one item you can see, one you can touch, one you can hear, and one you can smell. This exercise is a great way to bring your mind into the moment. I even do this with my kids to help them be more mindful too!
Tune Into Your Breathing
We offer breathwork sessions in the Lindywell app because tuning into your breath is one of the most powerful tools in your toolbox, it certainly is for me. A recent study found that intentional breathing techniques relieved markers of depression, anxiety, stress, or other low mood states.
A great starting point is simply taking note of the natural, rhythmic flow of breath at any time will shift you into a state of mindfulness. You may also find that this almost immediately calms your mind while relaxing your muscles and body.
You’ve been there before: You open a social media app, start scrolling and before you know it, 20 minutes have passed! This mindless scrolling fills your brain with endless content that can cause stress and anxiety.
The good news is, you can create a balanced relationship with your smartphone really easily by setting daily screen limits on social media. You can do this for yourself by setting a mental boundary or downloading an app that cuts access to the apps you specify after a certain amount of time.
With this simple boundary, you can enjoy the content you love without slipping into that mindless scrolling.
Practice Pilates
One of the reasons I love Pilates so much is because it helps me in my practice to be more mindful. It’s based on mindful and intentional movement. This means, every time you step on your mat, you’re encouraged to practice mindfulness. This is especially true for all Lindywell workouts, which always start with a few minutes to connect to the moment, your breath, and your body. As you do each exercise, you’re continually reminded to come back to the breath again and again. This is why Lindywell members say they feel rejuvenated after their workout instead of depleted.
Meditation doesn’t mean you have to sit motionless with your eyes shut and legs crossed for 30 minutes. It is simply the practice of slowing down and breathing with intention, which means you can do it anywhere, even if you’re moving or having a busy day and can’t commit to a long period of sitting alone.
Meditation can be done sitting to laying down, during walking or even stretching. In fact, coordinating movements with mindful awareness rejuvenates your mind and body.
Whether you take a meditative walk or sit with peaceful music or silence for 5 minutes, you will be practicing meditation.
Create Calm By Being Mindful vs. MindFULL
No one’s perfect, it’s nearly impossible always to be mindful. But when we check in with ourselves and remember that we can choose what gets our focus, attention, and mental energy we set ourselves up for less mental chatter and more enjoyment. Try checking in with yourself this week to see if you’re being mindful vs mindFULL. It could make all the difference!
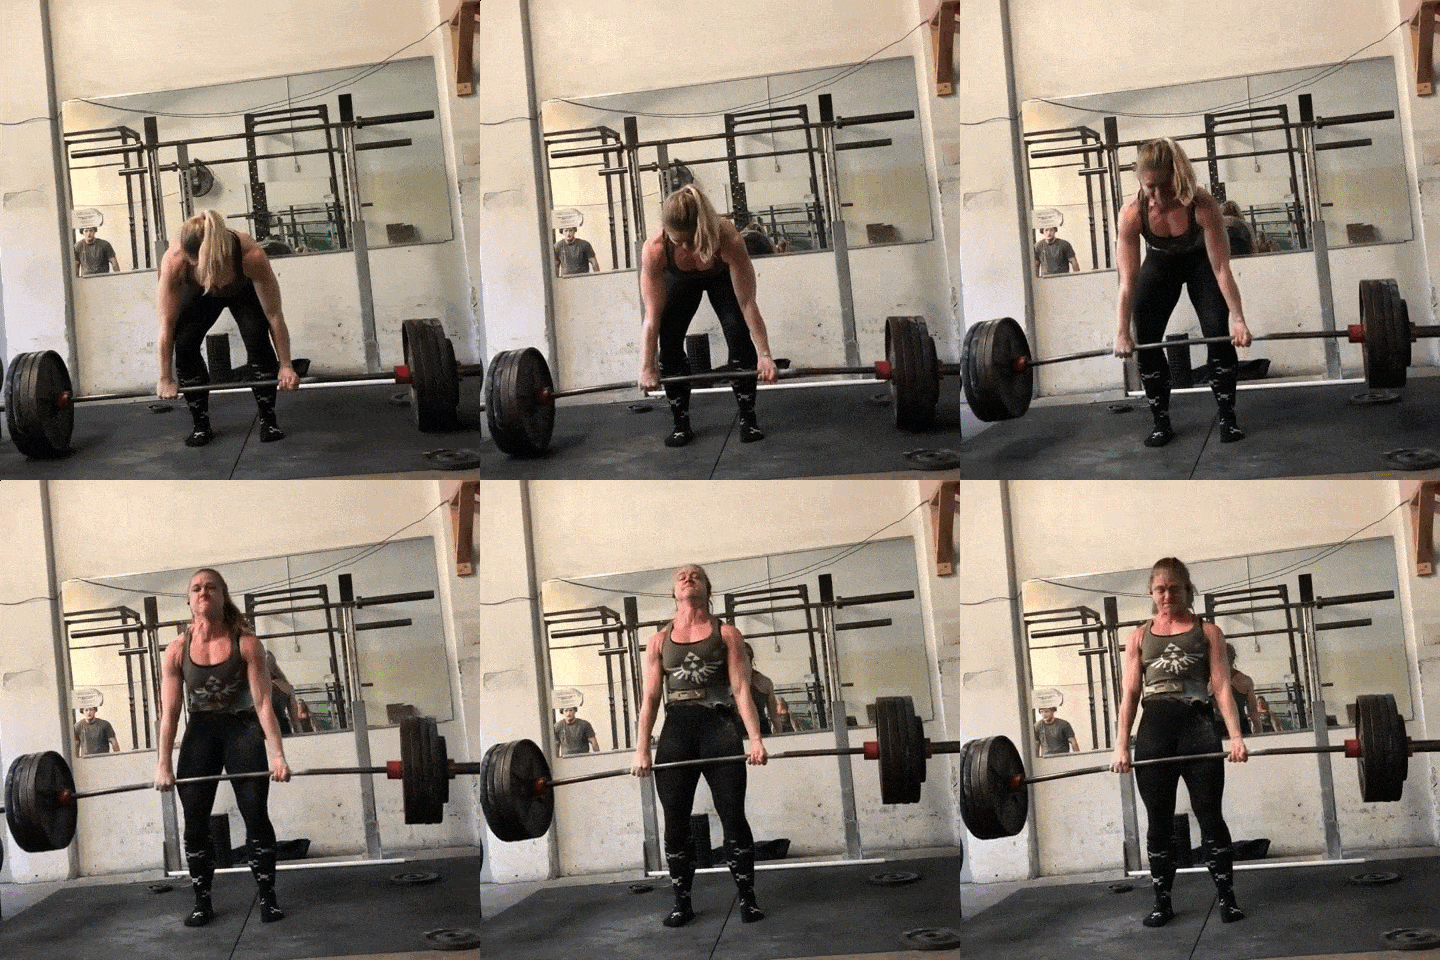
And no, I wasn’t born this strong (that would be strangely awesome). It’s only after discovering a love of strength training that I learned how to handle weight like this.
Obviously, we won’t start you out lifting that much at first. But we will set you up on a path that if you want to, one day you’ll be able to.
Before we get to it, if you’re in a hurry, I want you to know we’ve compiled all our strength training material into a friendly guide so you can read it at your leisure (I’m picturing you reading the guide poolside, sipping a lemonade).
Download Strength Training 101: Everything You Need to Know when you enlist in the Rebellion (that’s us!) below:
Download our comprehensive guideSTRENGTH TRAINING 101!
Everything you need to know about getting strong.
Workout routines for bodyweight AND weight training.
How to find the right gym and train properly in one.
Alright, let’s do this!
Should Women Lift Weights? (Why You Should Start Strength Training)
Everyone should start strength training: people of every sex and gender, the young, the old…everyone.[1]
#1) When you’re stronger – life is easier. No need to call for help to get that 50lb bag of dog food off the top shelf, or carrying an air conditioner unit up a flight of stairs. LIFE is easier when you’re stronger.
#2) Less injury risk – when you build strong muscles, you’re also building stronger bones, ligaments, and tendons, making you less prone to injury doing things you love (like playing in a quidditch league).[3]
#3) Helps combat age-related muscle loss,[4] allowing us to remain independent longer as we age:
#4) Muscle is harder to maintain, which means you need to eat more just to hold on to it.[5]
#5) Reduce pain – having a strong body makes living easier on your joints, as well as allows you to hold a better posture and reduce back / hip pain.[6]
#6) Appearance – this is a personal preference! Some women like to have a lot of muscle, and some don’t. While you can’t spot reduce fat, you can choose to build more muscle in specific areas, changing your body shape. Growing up, I was an extreme pear shape, but due to strength training, I now have more of an hourglass shape.
#7) Live longer – want to spend more time on Earth? Strength training and growing muscle will help you do just that.[7]
Boom!
Although strength training is one of the best things you can do for your health, it’s estimated that only about 20% of women do it, far below that of our male counterparts.[8]
That sucks.
It’s part of my life’s work to reverse this trend and to do so, I’m going to need your help.
You in?
Perfect!
Is Strength Training Different for Women?
Here’s something that may shock you: there’s no reason everybody – of any gender or sex – shouldn’t strength train the same way!
Yep, you don’t need 3-pound pink dumbbells, unless you like 3-pound pink dumbbells! You can train with free weights and barbells just like everybody else at the gym.
Sure, there are biological differences between the sexes. For example when strength training, people with typical male anatomy will produce more type IIa fibers than people with typical female anatomy, who will in turn produce more type I fibers than men.[9]
The American College of Sports Medicine doesn’t differentiate between sexes in their strength training recommendation.[11] So neither shall we.
So what exactly is strength training, you may be asking?
“Strength training” of any kind can be explained by two things:
#1) Movement of any weight (including your body weight) – Doing ANY exercise that pushes your muscles outside of their comfort zone, forcing them to rebuild stronger to prepare for the next challenge.
#2) Progressive overload: exerting slightly more effort than last time (lift a heavier weight or do 1 more rep) consistently. Your muscles will constantly have to adapt and will constantly be rebuilding themselves to get stronger.
Coach Jim walks you through different strategies for progressive overload in this video:
Before we get into the ins and outs of strength training, I need to address a question we get over and over from the women in our coaching clients:
Will I get bulky if I lift weights?
If you see a woman who is incredibly muscular and at an extremely low body fat percentage, I guarantee she has been working her butt off for a very long time with the very specific goal of building muscle and looking that way.
It’s not something that happens overnight, or by mistake.
We simply don’t have the same amount of testosterone as people with male anatomy to get there easily.[12] It’s something we cover in great detail in our guide on How to Build Muscle as a Woman.
If you’d like to build muscle, but not as much as a professional bodybuilder – don’t worry, it’s not something that happens by accident.
It’s something Rebel Leader Steve brings up in the video below:
So strike “I don’t want to get bulky” from your vernacular.
Alright, let’s talk about how to actually get started strength training.
Strength Training Level 1: Bodyweight Workouts
If you’re just starting your strength training journey, our first stop will be a bodyweight workout.
Bodyweight training is simply doing an exercise in which your own body is the “weight” you are “lifting.”
Duh.
This is the BEST place for anybody – regardless of weight or age – to start their strength training journey.
Why is this the best place to start?
Here are two big reasons to do bodyweight training:
#1) You always have your body with you (unless you are a ghost, in which case, this is awkward). This means you can work out ANYWHERE with bodyweight training:
#2) Using your body for resistance training is the most “human” thing ever! By learning to push and pull and hang and squat and lunge, you are doing what your body is literally designed to do.
By getting strong with bodyweight movements, you’re making yourself antifragile and less injury-prone.
Bodyweight training isn’t as easy to ‘scale’ the difficulty as some of the other strength training methods (“put more weight on barbell”), but you can get REALLY strong with just bodyweight training.
For example…
You can start with knee push-ups:
Then go to regular push-ups:
Then elevated push-ups:
Then even up to things like handstands:
And even handstand push-ups:
You just have to know HOW and WHEN to scale up (we can help there too).
Want a sample bodyweight workout you can try? You got it:
This is the Beginner Bodyweight Workout (3 Circuits):
20 Bodyweight squats.
10 Push-ups.
10 Walking lunges (each leg).
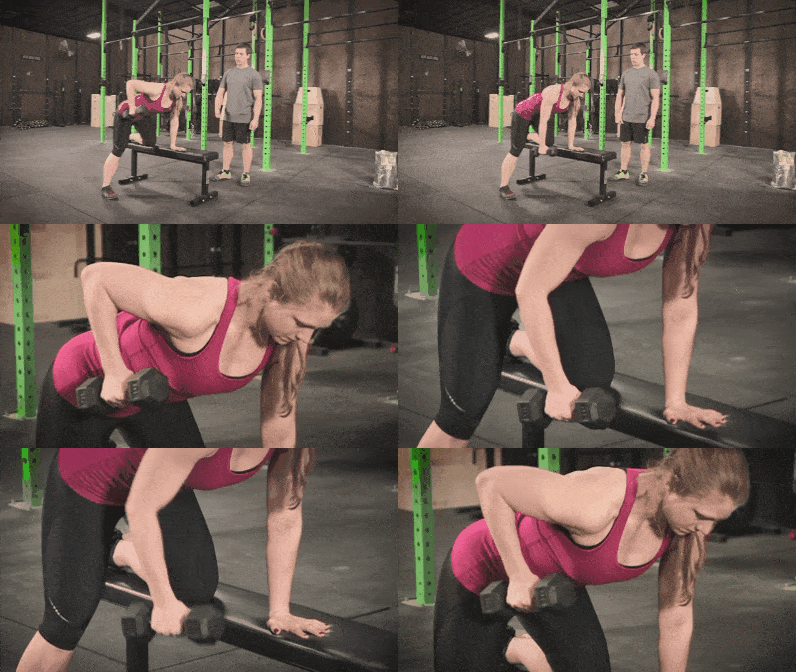
10 Dumbbell rows (use a milk jug or other weight).
If you’re following along at home, you just did your first full-body workout using weights!
Want a custom-built dumbbell workout? Something designed for the weights in your apartment’s gym?
Our Nerd Fitness Coaches can do just that! Plus they’ll scale your workouts as you grow stronger, turning you into a superhero!
Strength Training Level 3: The Wide World of Barbells
You made it! It’s now time to start training with barbells!
This is going to help you become ultra-powerful and strong.
It’s how I transformed myself into the person I am today.
The reason barbell training is so important is that it allows you to pick up heavy weights and do movements that recruit every muscle in your body. This is great for building powerful, strong muscles in your core, legs, glutes, and so on.
Show me somebody that’s strong at both of these movements, and I’ll show you somebody that’s in better shape than most of the human population.
But wait!
Even an empty barbell can be heavy (normally 45 pounds or 20Kg), so before we jump into the deep end, let’s make sure you are strong enough to proceed.
You’ll need to be able to complete a goblet squat with a 45 pound dumbbell (shown earlier) and the Romanian deadlift with 20 pound dumbbells.
Here’s how to perform the Romanian deadlift with dumbbells:
Our test to see if you can handle barbell training will be the Level 4 Gym Workout: Dumbbell Division C (taken from our Beginner’s Guide to the Gym).
You’ll need to be able to go through the following before you start training with barbells:
10 goblet squats – 45 lbs (20Kg dumbbell),
10 Romanian deadlifts with 20 lbs dumbbells (9-10 Kg)
10 push-ups (on knees or regular)
10 dumbbell rows with each arm – at least a 20 lb dumbbell
Can’t do those movements at that weight? Stick to the Level 4 Gym Workouts until you build up the strength to progress to barbells.
Once you CAN do the above, the real fun is going to start!
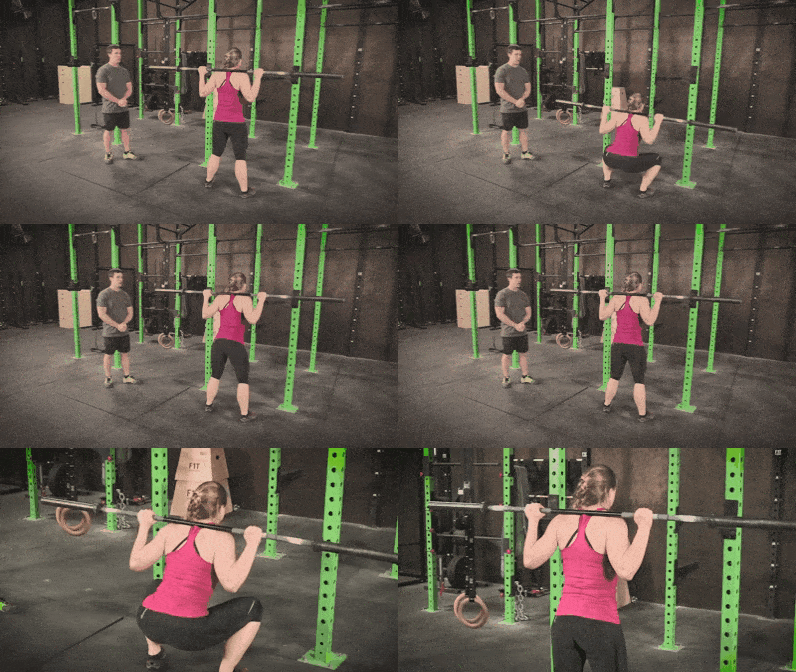
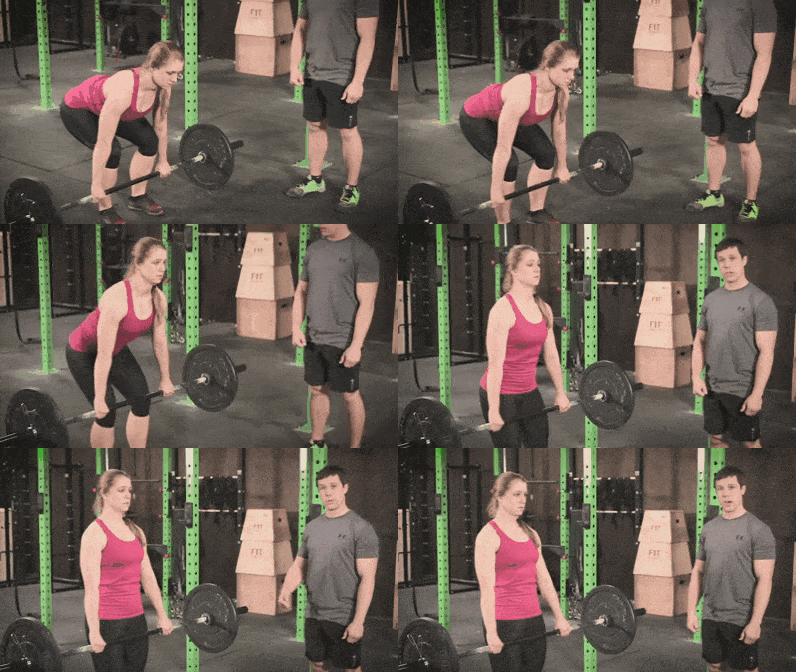
We’re gonna replace the goblet squat with a back squat and the RDL with a barbell deadlift.
Here’s a video demonstration on how to perform the barbell back squat:
I would also encourage you to read How to Squat Properly for a full tutorial, especially if you’re just learning how to squat.
Here’s a step-by-step video on how to do the deadlift:
That’s it! Do each of these once a week and you’ll be rocking an awesome strength training practice.
Are you doing the workouts correctly?
A good way to tell would be to record yourself doing the movement and then match them against the gifs and videos in this guide. If they look close you’re doing great!
We also provide form checks in our 1-on-1 Online Coaching Program. Through our snazzy app, a Nerd Fitness Coach (like me!) will review your movement to make sure you are training correctly and safely!
The simple to learn but tough to implement answer: lift enough so that you can get through the set, but not too much that you have NO fuel left in the tank at the end.
And then, try to lift sliiiightly more than last time.
How much weight should I start with?
If you are using dumbbells or a kettlebell, always err on the side of “too light” versus “too heavy.” You want to learn the movement correctly and build correct form.
If you are training with a barbell, ALWAYS start with JUST the bar, no matter the exercise (as a reminder, a standard barbell weighs 45 pounds).
“How fast should I add weight to the bar?”
Here’s what we teach all of our coaching clients: add the minimum amount of weight each week you can, even if you THINK you can lift more. It’s better to finish a workout full of momentum and say “I can do more!” than defeated and saying “that was too much, crapola.”
Think of it this way, even if you are adding just 5 pounds per week to the bar, within a year you would be lifting 300+ pounds!
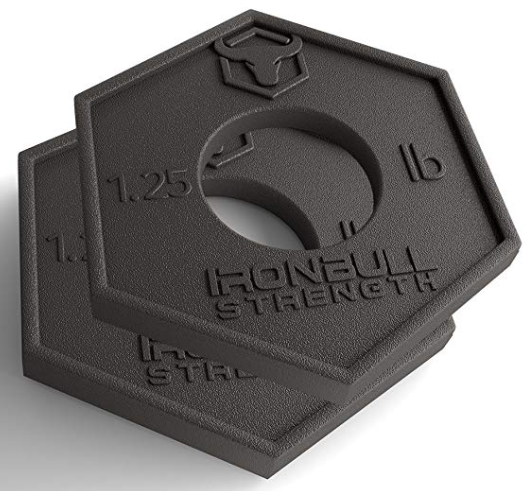
So go SLOW. Team NF’s Steve even bought little half-pound weights and increases many of his lifts by just 1 pound per week.
And if you are looking for this content in an easily digestible form, make sure you download our free Strength 101 Guide when you join the Rebellion below:
Download our comprehensive guideSTRENGTH TRAINING 101!
Everything you need to know about getting strong.
Workout routines for bodyweight AND weight training.
How to find the right gym and train properly in one.
Can Strength Training Help with Weight Loss?
We get questions relating to weight loss and strength training all the time, and it’s something we cover throughout our Strength Training 101 series.
Let me quickly address it here:
Fat and muscle are two different things – one can’t transform into the other.
We all have plenty of muscle right now (otherwise we wouldn’t be able to move, walk, sit upright, etc.), the muscle is just hiding underneath a layer of body fat.
In order for us to lose weight and look better, we want to do two things:
Build our muscles stronger and tighter.
Reduce the fat covering those muscles!
And luckily, both of those things happen simultaneously through strength training!
So NO, you don’t need to lose weight first before you start strength training.
You will lose weight BY strength training (and keep the muscle you have).
You do NOT need to do hours of cardio for weight loss – weight loss is 90% a result of your nutrition. So honestly, you don’t need to ever set foot on a treadmill again (unless you WANT to).
Strength training will help you lose weight and look better IF you do two key things for effective weight loss:
As we cover in our “Why can’t I lose weight” article (full of fun Harry Potter references), combining a caloric deficit and strength training is magic:
You’re not consuming enough calories to carry out your body’s daily functions.
Your body needs to use lots of calories to rebuild the muscle that was broken down during the strength training workout.
Your body has no choice BUT to pull from fat stores to get stuff done!
Just by doing those two things (get strong, reduce calories), all sorts of wizardry and witchcraft takes place in your body:
Get stronger and keep the muscle you have.
Build tight dense muscle.
A revved-up metabolism while rebuilding muscle.
Burning of body fat to get things done.
Yeah, you’re hearing me correctly.
Lose the body fat that sits on top of your muscles and you’ll make your muscles tighter and denser = look better without clothes on.
So how do you put this into practice?
Pick one of the strength workouts we covered earlier (start at the Beginner Bodyweight Workout if you feel unsure where to begin).
Oh, what’s that? You just want somebody to tell you exactly how to train for your body, and how to eat for your goals?
Fine!
Check out our 1-on-1 Coaching Program – it’s helped hundreds of women lose weight through strength training – and proper nutrition. We work with you on habit-building and lifestyle design to actually get stuff done!
The Best Strength Training Exercises for Women
Great news:
The best strength training exercises are universal. No matter your size, shape, sex, gender, age, or whether you love Star Trek more than Star Wars, these are the best exercises to build a great physique.
I’m going to share with you the exercises that every beginner should master (scroll down for full video and explanations!).
The 9 Best Strength Training Exercises for Women are:
Push-up: uses every push muscle in your body (chest, shoulders, triceps)
Bodyweight squat: uses every muscle in the lower body (quads, hamstrings, glutes, core)
Bodyweight row: works every “pull” muscle and helps prepare you for a pull-up!
Pull-up or chin-up: the best “pull” exercise in history! Everybody should have a goal to get their first pull-up.
Bodyweight dip: advanced “push” movement that targets your push muscles (chest, shoulders, triceps) in a different way than push-ups.
Barbell squat: the best bang for your buck on muscle building. Recruits nearly every push muscle in your whole body, and a great core workout.
Barbell deadlift: the favorite exercise of every coach at Nerd Fitness. Uses every “pull,” leg, and core muscle in your body.
Barbell benchpress: as basic and powerful as they come. Uses every “push” movement in your upper body and can get you strong as heck!
Barbell press: press the bar above your head! Targets shoulders and triceps more than the chest.
Click on any of these exercises to get a FULL explanation of the movement, step-by-step:
1) The Push-Up: The best exercise you could ever do for yourself when it comes to using your bodyweight for push muscles (your chest, shoulders, and triceps):
2) The Bodyweight Squat: This exercise serves a dual purpose as it’s the foundation for building strength AND helps build proper mobility. If you are going to ever do barbell squats, you need to work on hitting proper depth with a bodyweight squat first!
3) The Inverted Bodyweight Row: Until you can get your first pull-up or chin-up, these exercises are GREAT to start building your pull-muscle strength (back, biceps, and forearms).
4) The Pull-Up and Chin-Up: Once you can support your bodyweight above the bar, the world becomes your playground. No strength training routine should be without pull-up or chin-up work! (Click here if you can’t do a pull-up or chin-up yet?)
5) The Bodyweight Dip: As you start to get stronger with push-ups and need to find a way to increase the challenge, consider doing dips. Warning: these are very advanced, but incredible strength-building exercises.
And now we’re into the best weight training exercises:
6) The Barbell Squat: Probably the best exercise when it comes to building strength and muscle throughout your whole body. It also burns crazy calories and makes life better. This is a MUST:
7) The Barbell Deadlift: Maybe the best exercise of all time. Actually no, it IS the best exercise of all time. It’s certainly the most primal: “pick the weight up off the ground. Done.”
This is a very technical lift, so make sure you read our article on how to do it with proper form:
8) The Barbell Press: Press a barbell above your head. This recruits all of the muscles in your chest, shoulders, and arms in order for you to lift the weight over your head.
As a bonus, you need to really flex and brace your core, which gets those muscles working too.
9) The Barbell Bench Press. Lie on a bench, and lower a barbell until it almost touches your chest. Pause, and then press it back up towards the sky. Repeat! And get strong.
Your mission, should you choose to accept it: commit to trying ONE of these movements in the next week. Use 20 seconds of courage, recruit a friend who has lifted or trained before, and try your best.
And if you want somebody to help you put these into a workout program, teach you HOW to do these movements properly, and have the confidence to know you’re training correctly for your goals…
A Meal Plan for Strength Training (Healthy Eating 101)
So far, we’ve been more or less just talking about exercises when it comes to strength training.
This is logical, because this is in fact a guide on how to perform certain exercises to grow strong.
However, we constantly remind our coaching clients that 90% of their success or failure on their fitness journey will come down to what they eat.
“Success” in this context really comes down to your goals.
Are you looking to bulk up? You’ll need to eat more calories than you burn.
Are you looking to slim down? You’ll need to eat fewer calories than you burn.
At this point, you might be thinking “Staci, how many calories do I need?”
To answer that question, it’s time for the Nerd Fitness Calorie Calculator!
(Note: we have used The Mifflin-St Jeor Equation to create this calculator! [14]).
If you want to bulk up and gain weight, take your TDEE and add 250 calories to it to get your daily goal. This should result in gaining half a pound per week.
Want to lose weight? Take your TDEE and subtract 250 calories to receive your daily goal. This should result in losing about a half-pound a week.
The other piece of the equation outside of a caloric surplus/deficit is protein.
Since you will be strength training and building muscle, you’ll need to make sure you are eating protein at every meal. It’s the number one macronutrient for creating new muscle tissue.[15]
Protein can come from any number of sources, including:
As we cover in our “How much Protein do I need?”, claims for the amount of protein required for muscle growth vary wildly from source to source (and woman to woman).[17]
Here is our recommendation:
If you’re of healthy weight, active, and wish to build muscle, aim for 1 g per pound of bodyweight (2.2 g/kg).
If you’re an experienced lifter on a bulk, intakes up to 1.50 g/lb (3.3 g/kg) may help you minimize fat gain.
Let me simplify it for you:
“To build muscle, target at least 1 gram of protein per pound of bodyweight (2.2 grams per kg).”
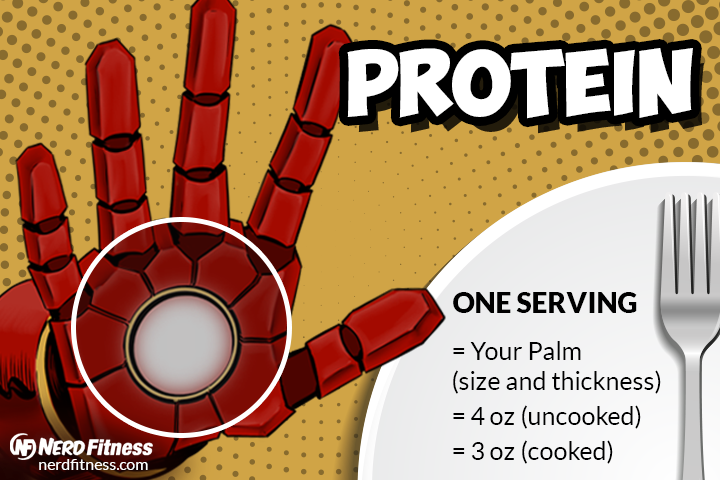
If you’re curious, from our healthy eating article, this is what a portion of protein looks like:
Here’s how much protein is in a serving of food:
4 oz (113 g) of chicken has around 30 g of protein.
4 oz (113 g) of salmon has 23 g of protein
4 oz (113 g) of steak has 28 g of protein.
Want to get more protein? Consider protein shakes. Rebel Leader Steve and I both supplement with shakes daily to meet our protein goals.
Whatever you do, make sure you’re getting enough!
Whenever we speak with new Online Coaching Clients, protein is the macronutrient we begin every discussion with! It’s THAT important when it comes to either weight loss or building muscle. I’m not kidding when I say it should make up a portion of every meal you eat.
The Top Frequently Asked Strength Training Questions for Women
Here are some of the most common questions we receive from women beginning their strength training practice in our 1-on-1 Coaching Program.
#1) Will I get bulky lifting weights? I really don’t want to.
I have GREAT NEWS!
Strength training will not make you bulky, UNLESS you want it to!
You get to pick how you want to look, so you do you.
Just remember that women who compete as bodybuilders didn’t start looking like overnight:
They have eaten, trained, and potentially taken supplements specifically so they can look like that! Which is great. Good for them.
They’ve been working towards that goal for years, probably decades.
Here’s the truth: when you pick up heavy things (like barbell training), your muscles get STRONGER (but not necessarily bigger).
If you actively eat for the goal of building muscle and getting bigger, you CAN build muscle and size.
Again, if you want bigger arms or stronger glutes, AWESOME. You do you.
Let’s talk about the reverse: If you pick up heavy things and eat a caloric deficit, your muscles will get stronger and denser; you will burn the fat on top of your muscle, and you will lose weight and get that “toned” look that many women are after.
Sir Mix-A-Lot was wrong. Don’t do side bends and sit-ups, because you’re wasting your time!
Side bends don’t get rid of love handles. They will simply strengthen your side muscles without actually reducing any fat there, potentially making you bigger around the waist unless you change your diet as well.
Sit-ups will not remove belly fat. They can also wreak havoc on your lower back, and are an incomplete exercise.
Your body cannot spot reduce fat in specific locations. If you have flabby arms or a big stomach, doing thousands of bicep curls and thousands of crunches won’t help.
Your body is genetically predisposed to storing fat in certain locations in a certain order.
When you start to lose weight, your body will lose the fat you currently have in a certain order as well – it might come off your arms first, then your legs, then your belly, then your chest, and THEN your butt.
Or in a different order, depending on your personal genetic makeup.
No amount of targeted exercise will change how that fat disappears.
Want to lose weight? Reduce your caloric intake in a way that doesn’t make you miserable:
Big compound movements that recruit lots of muscle (and thus force your body to rebuild lots of muscle, which requires extra calories burned, even after the workout is done). Our section on the best strength training exercises for women would be good examples of compound movements.
#3) How many days a week should a woman lift weights?
Unless you’ve been strength training for years and know what you’re doing, we recommend that you pick a full-body routine that you can do 2-3 times a week.
You build muscles while resting, not working out, so you generally want 48 hours before engaging the same muscle group again.
If you made it up to our “The Wide World of Barbells” section, you can do the DAY A workout on Monday and the DAY B workout on Thursday. That’ll give you plenty of time to recover.
Want more? Maybe on the weekend, you sneak away for a short hike.
Don’t worry if this doesn’t seem like a lot at first. We are interested in building the habit of strength training initially. We can up the frequency once you’re rocking and rolling.
Learning to meal prep would also be a good use of your time between training sessions.
4) Can I do strength training at home?
You sure can!
Many of our coaching clients have gotten in great shape simply by doing bodyweight exercises at home.
Here are a few resources to get you strength training in your living room:
Beginner Bodyweight Workout: many a Rebel have started their fitness journey here, and you can do it right in your own living room (if your dog will let you).
Advanced Bodyweight Workout: crushed the Beginner Bodyweight Workout? Then try this advanced circuit on for size.
42 Best Bodyweight Exercises: want to get your hands dirty? Use this guide to create your own bodyweight workout you can do anywhere!
20-Min Kettlebell Workout: own a kettlebell? Want one? With one single piece of equipment you can get in a great workout.
We can also build you a custom workout for your exact situation, whether you’re stuck at home or in an office, we can create a solution that fits your busy life!
How to Begin Lifting Weights as a Woman (Next Steps)
Since 2009, Team Nerd Fitness has learned a tremendous amount about how to best serve the ladies of this community.
I want to share with you my favorite success story.
Meet Leslie, a very sedentary single mom who works long hours that managed to lose 100+ lbs with the Nerd Fitness Coaching Program:
So if you’re tired of the same ole same ole and you’re ready to start strength training, you’re in the right place!
Not sure what to do or how to get started?
1) Check out our 1-on-1 Coaching Program! Our philosophies help women like Leslie above and they can be the philosophies that help you become strong inside and out.
Click on the image below to schedule a call and see if we’re a good fit for each other!
2) If you want a daily prompt for doing workouts at the gym (or at home), check out NF Journey. Our fun habit-building app helps you exercise more frequently, eat healthier, and level up your life (literally).
Try your free trial right here:
3) Join the Rebellion! Our free community numbers in the hundreds of thousands scattered throughout the globe, and we need good people like you!
You can join by signing up in the awesome yellow box below, and I’ll send you a bunch of free guides and printable workouts, including our Strength 101 guide!
Download our comprehensive guideSTRENGTH TRAINING 101!
Everything you need to know about getting strong.
Workout routines for bodyweight AND weight training.
How to find the right gym and train properly in one.
4) Do a strength training workout this week! The most important step you can do is to actually start.
Check out “Value of resistance training for the reduction of sports injuries” to learn more. Source: PubMed.
Read “Resistance training and sarcopenia” for more. Source: PubMed
This study “Skeletal muscle metabolism is a major determinant of resting energy expenditure” explores more. Source: PubMed
Here’s a study on different forms of exercise and their impact on pain, “Physical activity and exercise for chronic pain in adults.” Source: PubMed.
You can learn more at, “Strength Training and All‐Cause, Cardiovascular Disease, and Cancer Mortality in Older Women.” Source: PubMed.
Read “Practices, Perceived Benefits, and Barriers to Resistance Training Among Women Enrolled in College.” Source, PubMed.
Read “Age and sex affect human muscle fibre adaptations to heavy‐resistance strength training.” Source, The Physiological Society.
Since Women produce more type 1 muscle fiber, they might be able to perform more reps of an exercise than a man could. Don’t stress this. This marginal difference is overkill for a beginner.
Read, “American College of Sports Medicine position stand. Progression models in resistance training for healthy adults.” Source, PubMed.
Read “Circulating Testosterone as the Hormonal Basis of Sex Differences in Athletic Performance.” Source, PubMed.
There’s always one of you.
Studies have shown the Mifflin-St Jeor Equation to bevery accurate in determining BMR and TDEE
Read, “Dietary protein for athletes: from requirements to optimum adaptation.” Source, PubMed.
If you are pregnant or lactating, you’ll need even more protein than our below recommendation. Examine has a great article pointing out protein requirements.