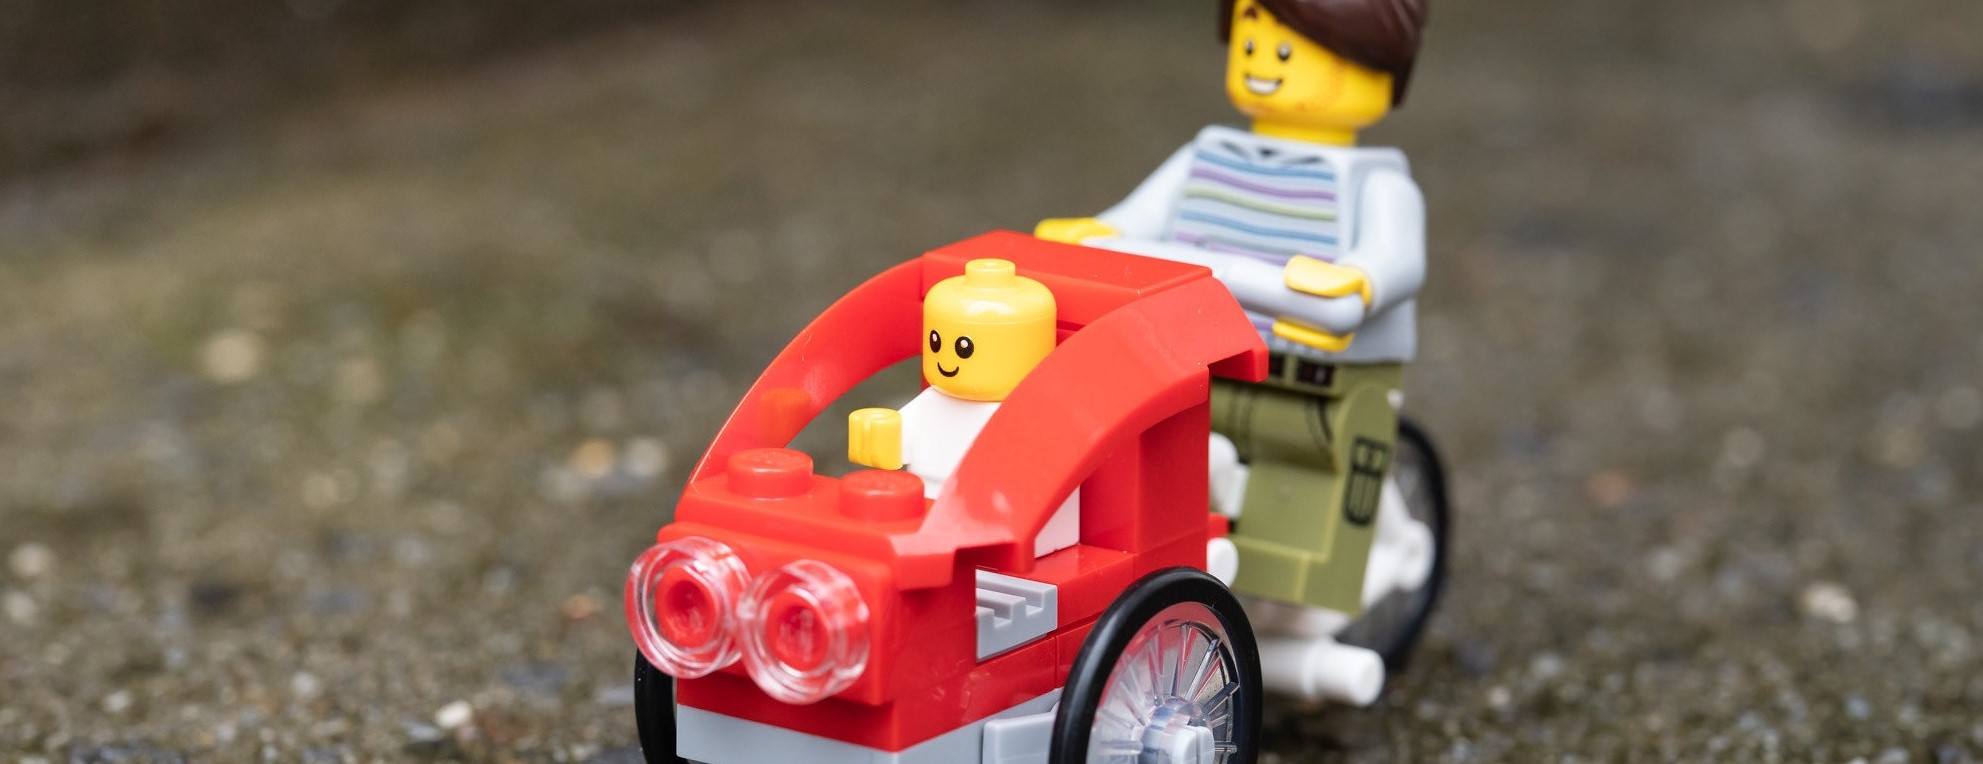
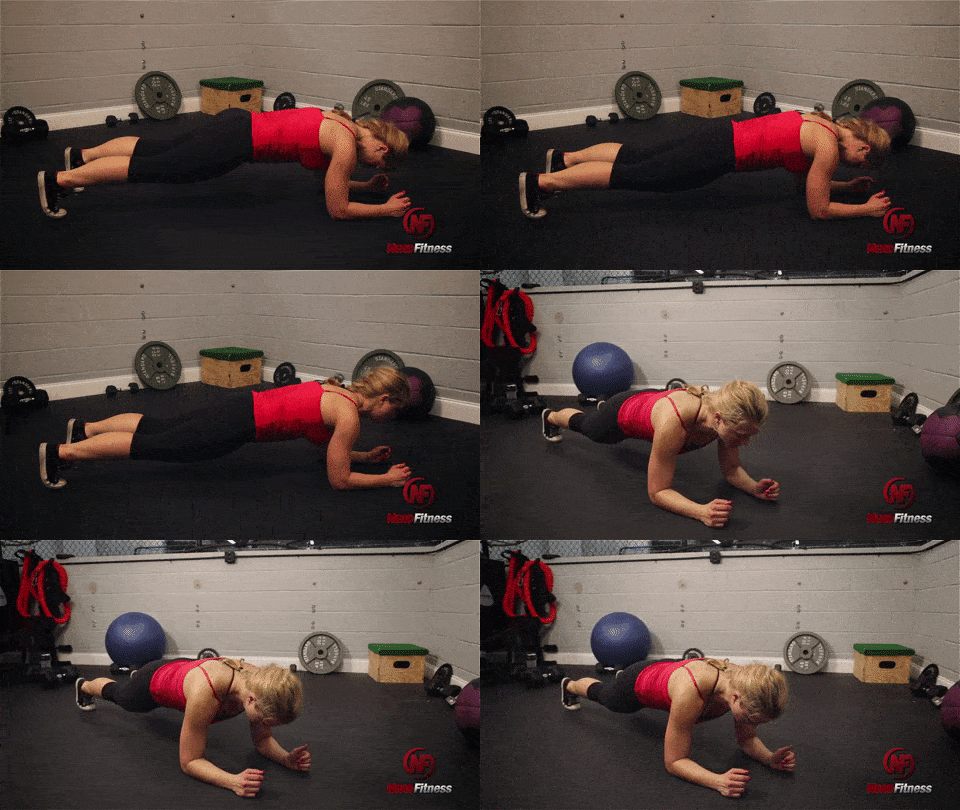
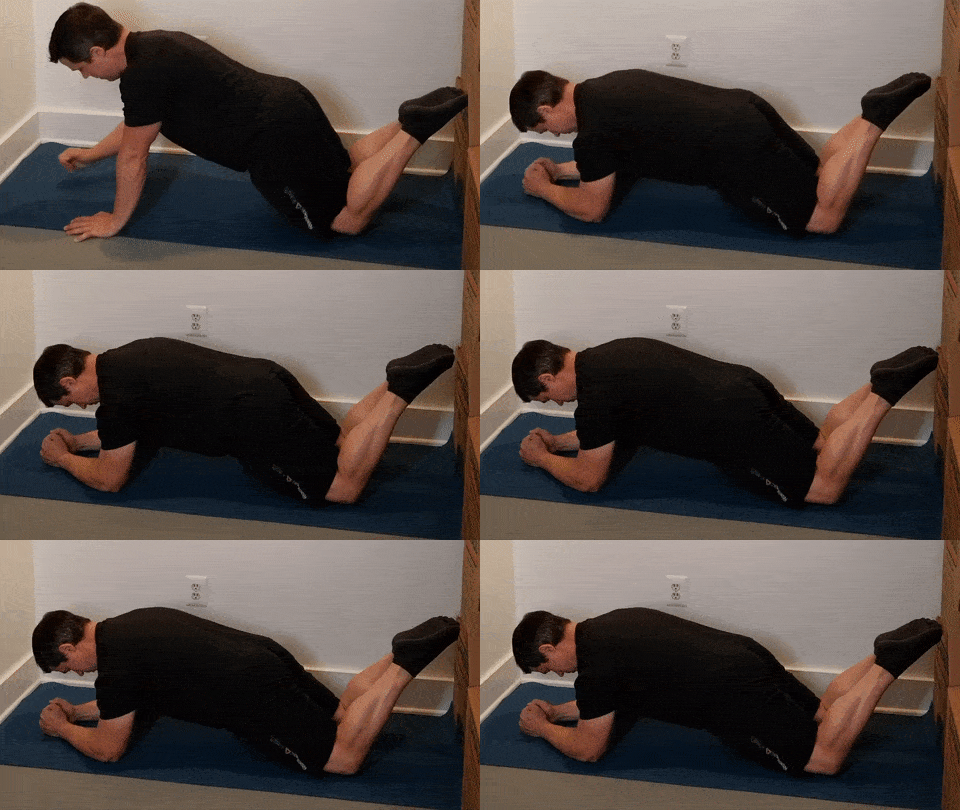
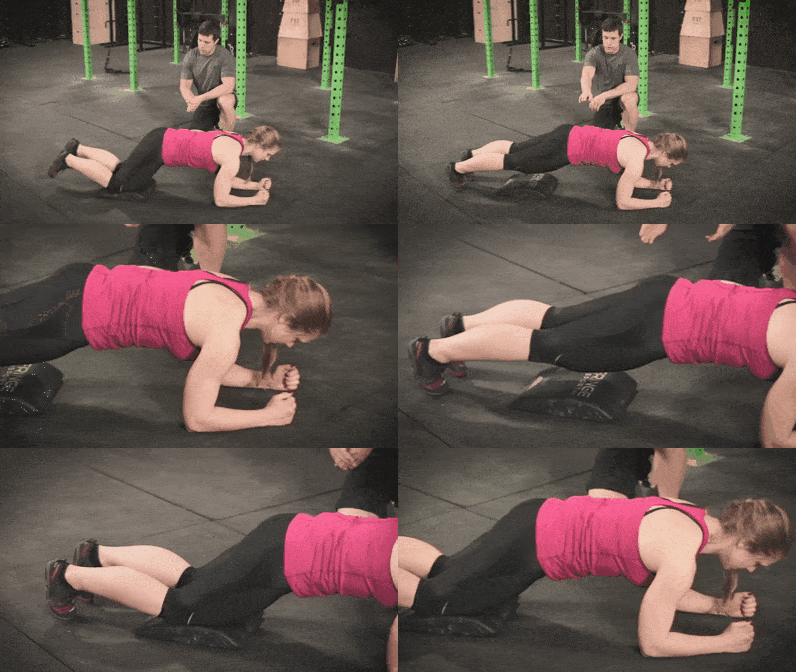
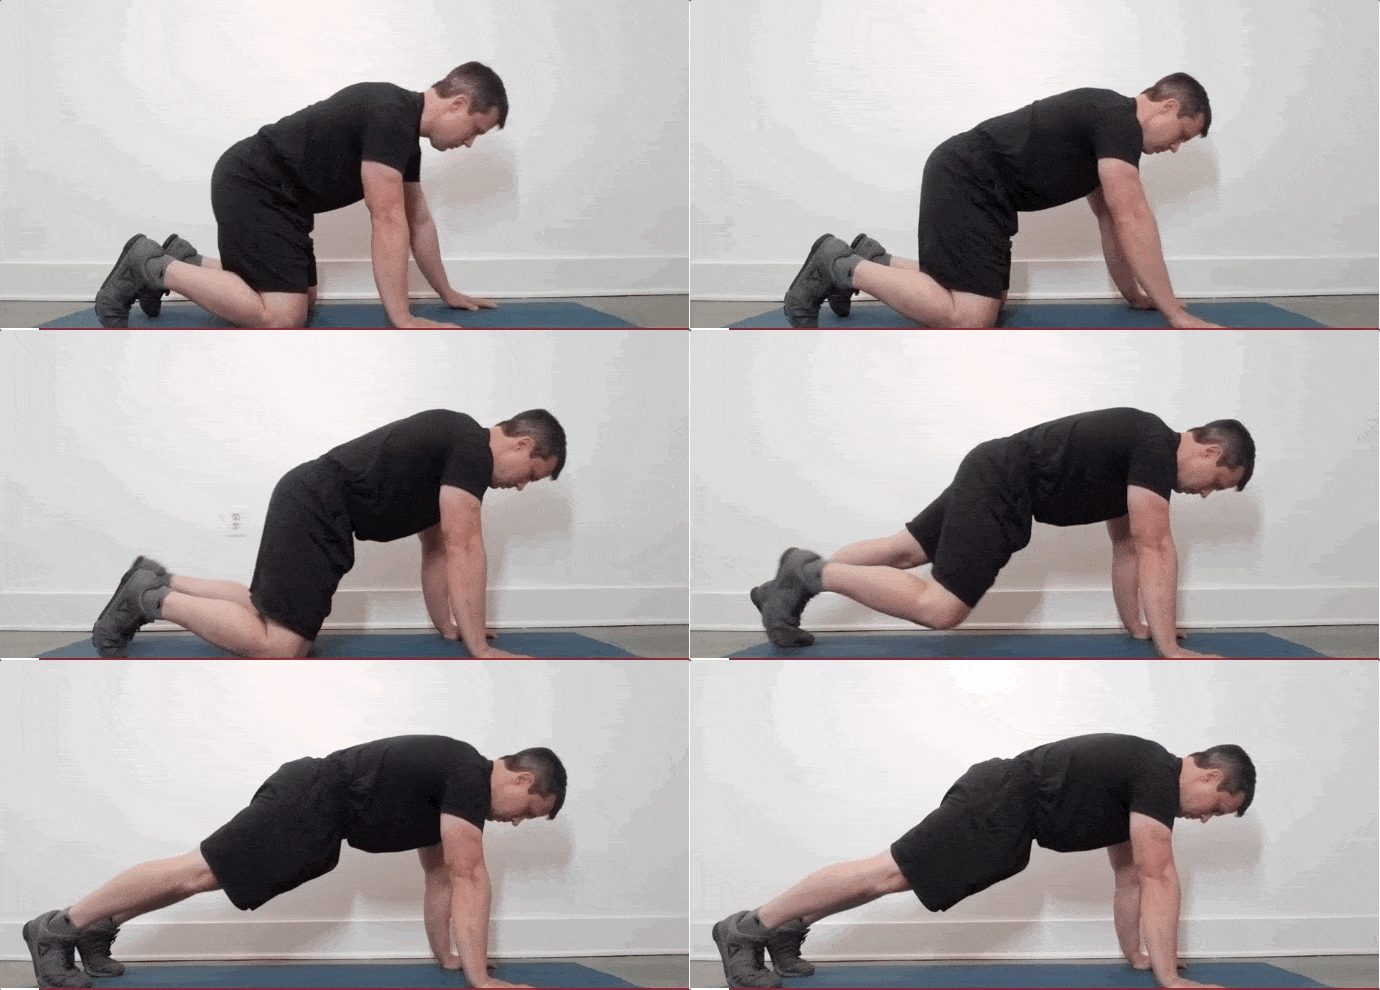
Quite a few of our Nerd Fitness Coaches are parents, so they know firsthand how challenging it can be to train while you have a three-year-old running around in the background.
When I asked them for advice for this guide, the most common response I received went something like:
“Training with kids running around is going to be chaos. That’s okay. Do the best you can.”
In other words, it might be challenging to hit personal records (PRs) in your deadlift while also watching over a four-year-old.
This doesn’t mean “Don’t bother working out.”
It just means you should forgive yourself ahead of time if all doesn’t go according to plan.
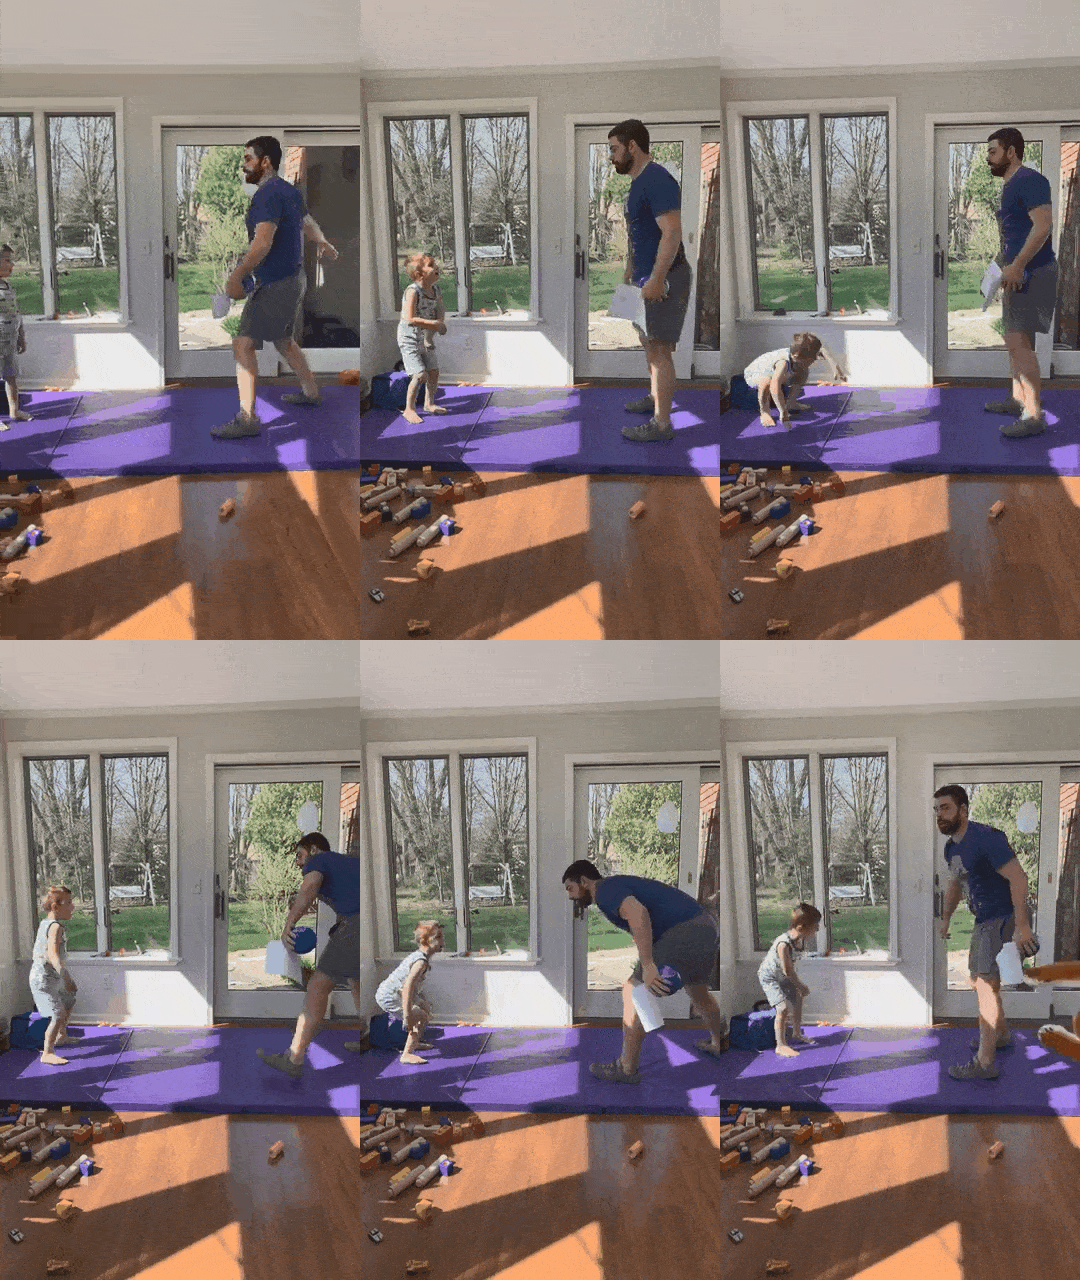
If you want proof of how working out with kids can be “a hot mess,” watch Coach Matt exercising with his young children.
#1) Meet kids where they are. For young kids, invite them to be a partner. Maybe they can count your reps, tell you when to start, etc.
On the other hand, older kids might be able to participate more fully, and maybe even train alongside you.
No matter what, it’s a good idea to invite kids to join when and IF they want, without requiring it.
#2 ) While every kid is different,here are some very general guidelines from Coach Matt’s experience:
2-6 Years Old. These kids are often way more interested in just playing, wrestling, etc. So doing a specific workout may be challenging. However, these kids may still want to be a part of things, so look for ways to get them involved.
7-12 Years Old. At this age, they can start handling a little more structure. They will probably really enjoy “skills” training (more on this below), as well as many play aspects.
13+ (Depending on the Kid). They may be ready to step in and join you more fully in a workout if they want to.
#3) Consider a focus on skills/practice. It can be really frustrating to have a timed exercise or workout interrupted.
Instead, consider thinking of it like “practice time” of building a skill. You can practice for a couple of minutes, take a break, come back to it, etc.
Kids might respond better to “skills” training instead of “exercises” too. Together, you can practice:
#4) There are lots of different ways to get workouts in throughout the day:
Short workouts: a lot of times Coach Matt finds himself squeezing a workout in 10 mins or less.
Accumulation: take little micro-breaks throughout the day to do a couple of reps of some bodyweight exercises. Kind of like “exercise snacks.”
Longer workouts: maybe creating that time and space for your training is still important. If possible, defend this time and let the kids move in and out of the frame as they are interested.
“I go, you go”: you may snag a workout set in, then play a game with your kids, then go back to the workout set. Breaking it up like this can make them still feel engaged and give you a little more time to train.
#5) Whatever happens is okay! Remember, do the best you can, and it’s perfectly fine if your workout gets cut short because your kid starts drawing on the walls.
The 8 Best Exercises to Do With Young Kids
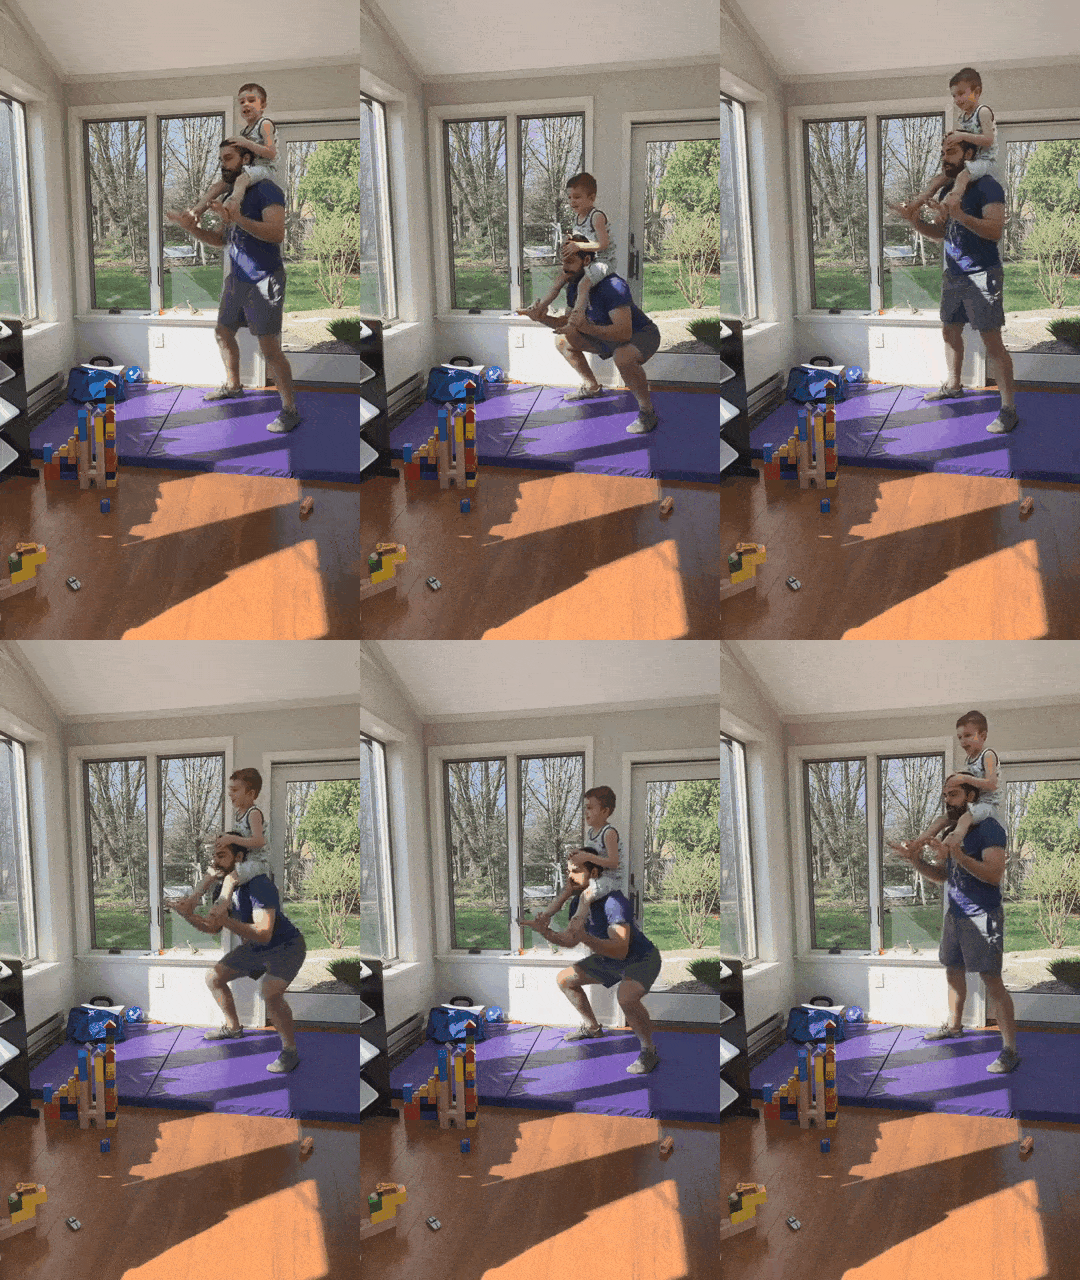
If your kids are light enough, you can actually use them as makeshift weights during your workout.
Just be careful, and if anything feels unsafe, don’t do it.
But if things DO feel good, here are some exercises you can do along with kiddos (or using them as weight).
Coach Matt recommends having your kid’s legs come forward, and for you to grab them, almost like you would with a safety squat bar.
Before attempting this, make sure you can do squats with comparable weight!
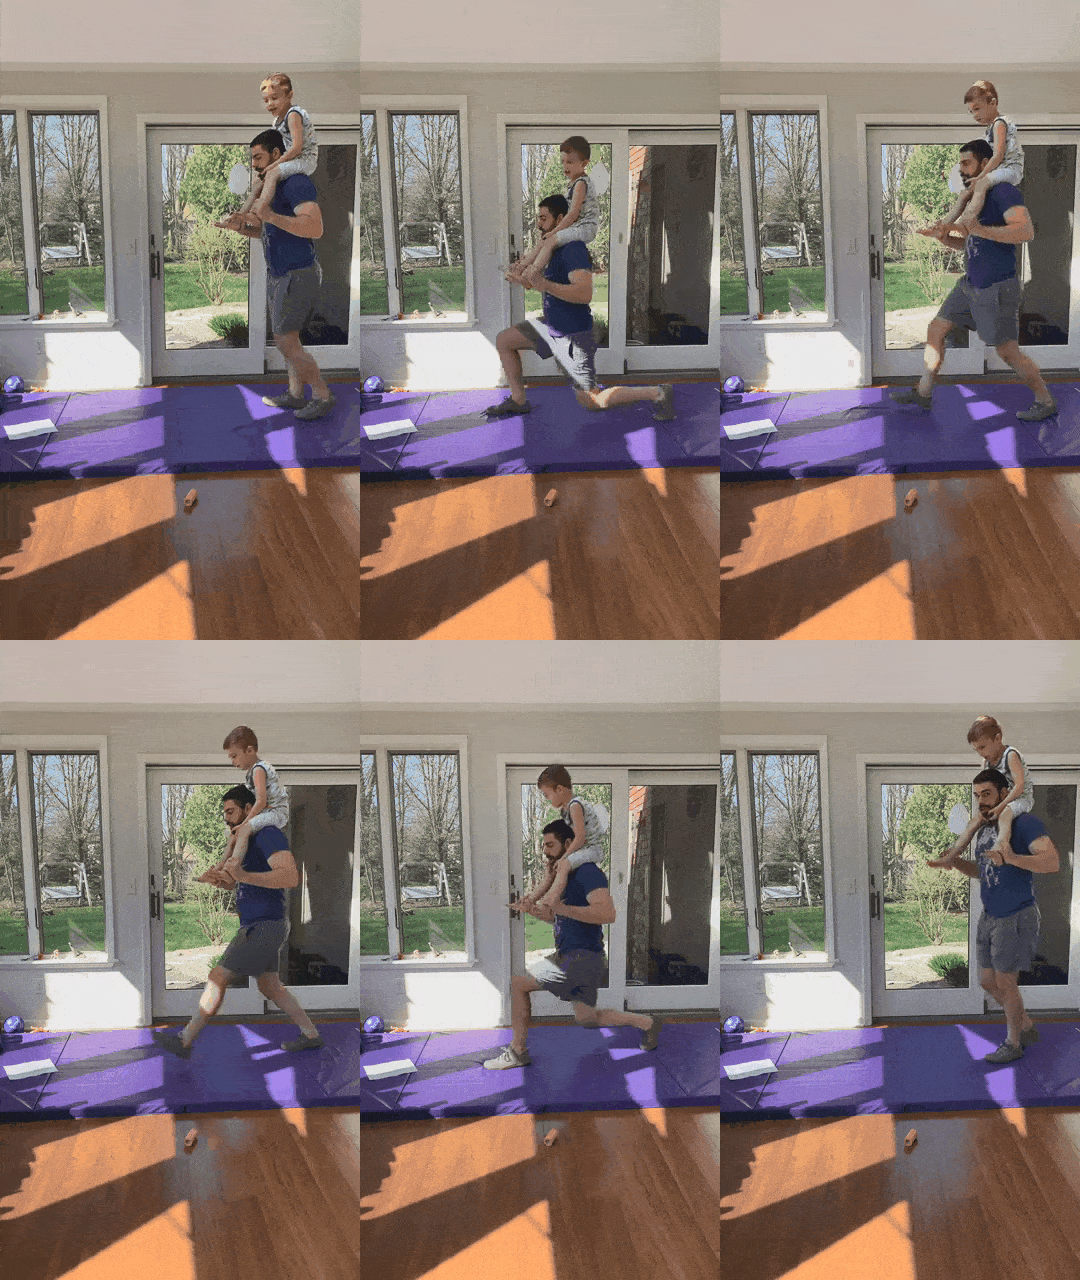
#2) Lunges
Much like the bodyweight squats above, but instead do a lunge:
Since you’re engaging one leg at a time, this can be really challenging with a kid on your shoulders.
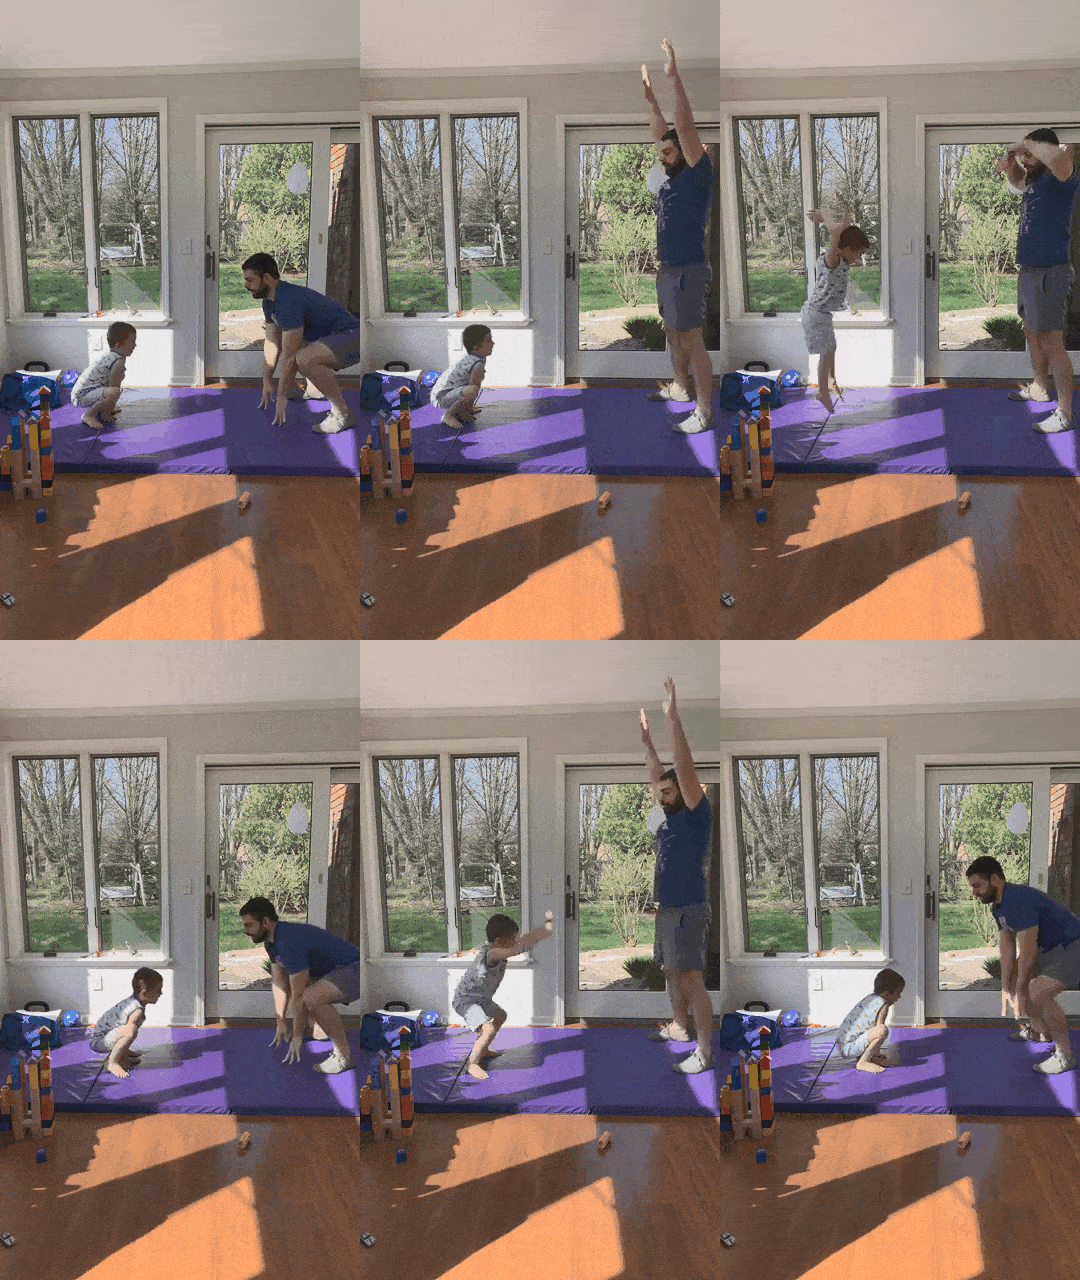
#3) Touch the Sky
As Coach Matt explains, getting young kids to do squats and push-ups might be tough.
But kids do like to jump!
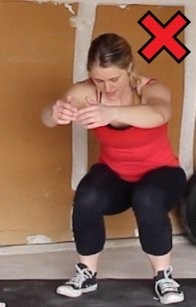
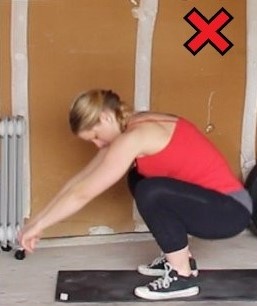
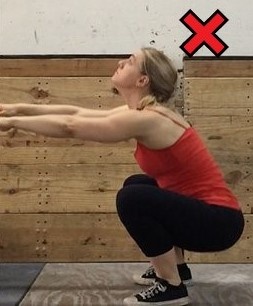
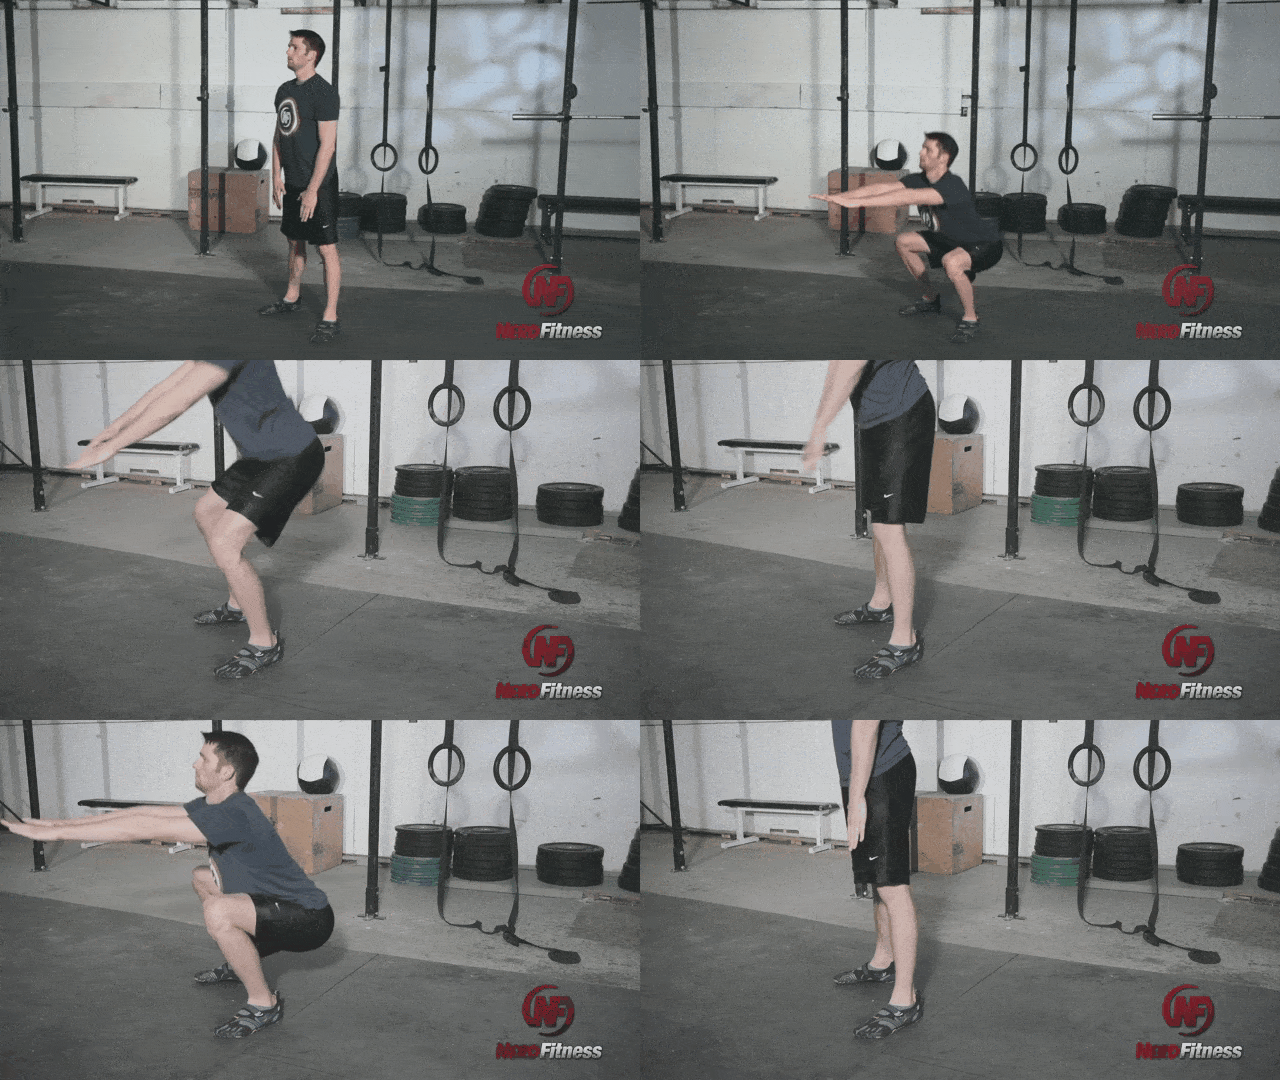
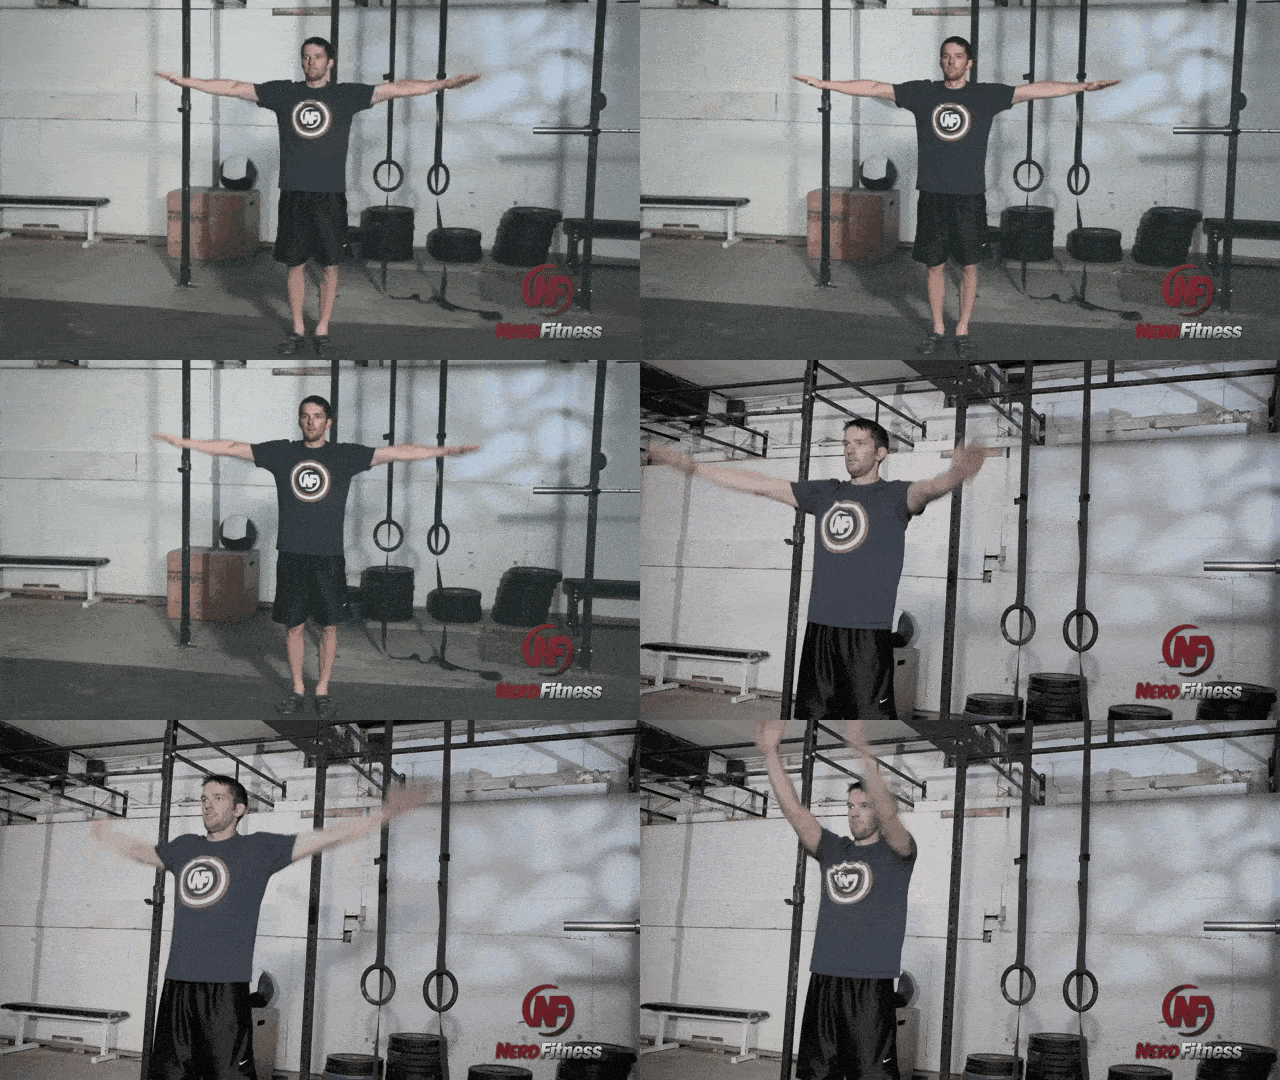
For “Touch the Sky,” sit in a squat or frog position. Then stand up tall, arms reaching towards the sky.
Bonus points if you jump up!
This will train many of the same muscles as you would with squats.
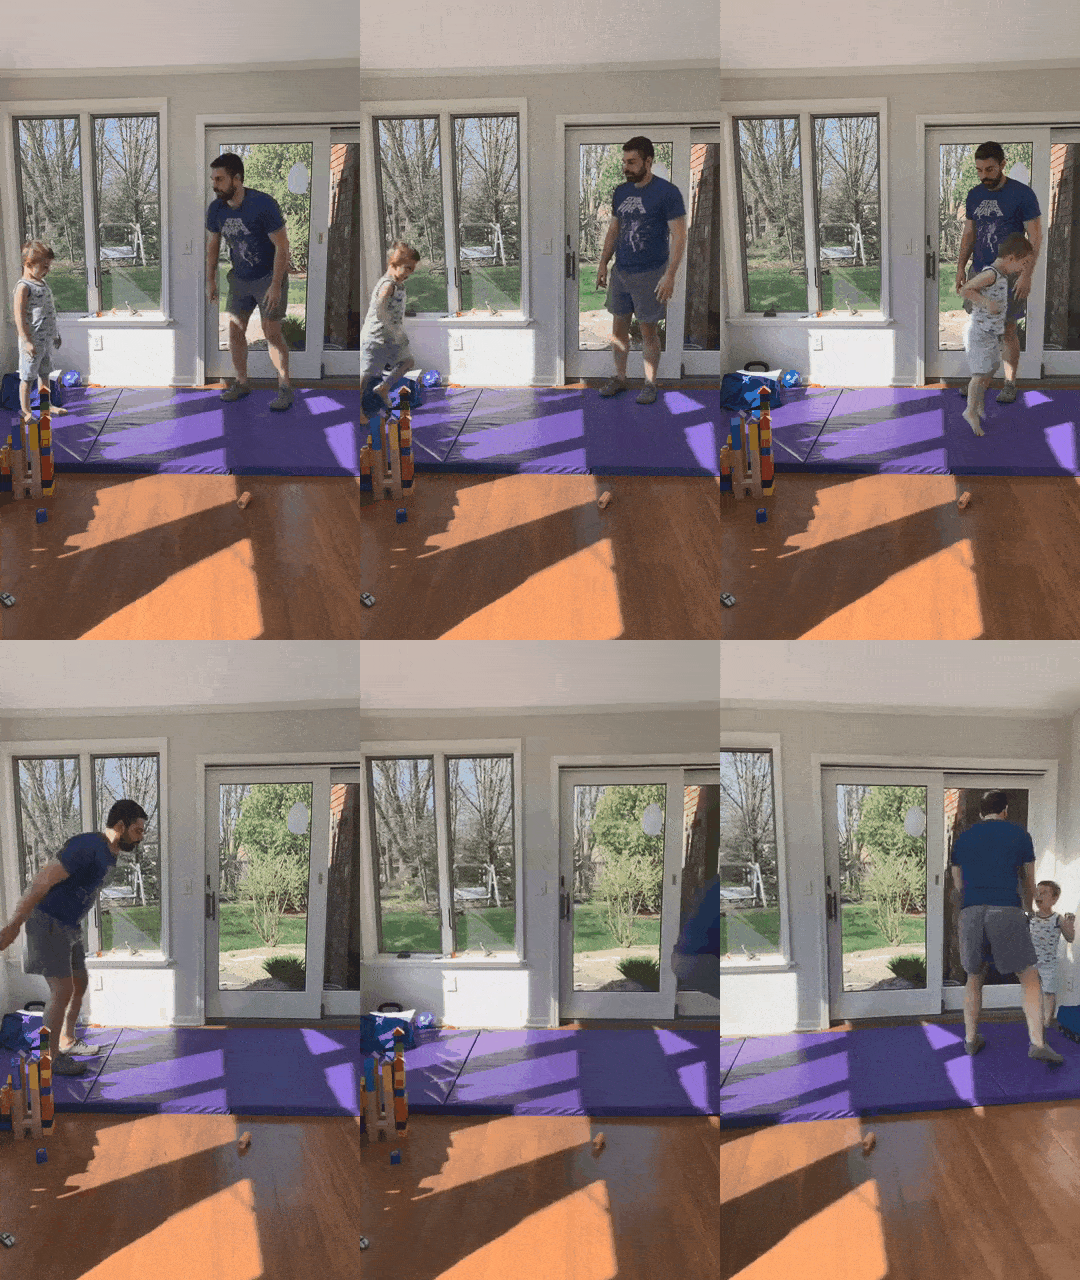
#4) Jumps
Another good squat substitution to try with kids is long jumps!
You probably want to try this on some type of soft surface (or in your backyard), like the tumbling mat Coach Matt uses. As long as it’s safe, jumping can be really fun with kids.
Make a game out of it, by pointing to a line (or marking one with a soft object) and seeing who can jump over it. You’ll not only train your lower body with jumps, but you’ll also build some explosive power.
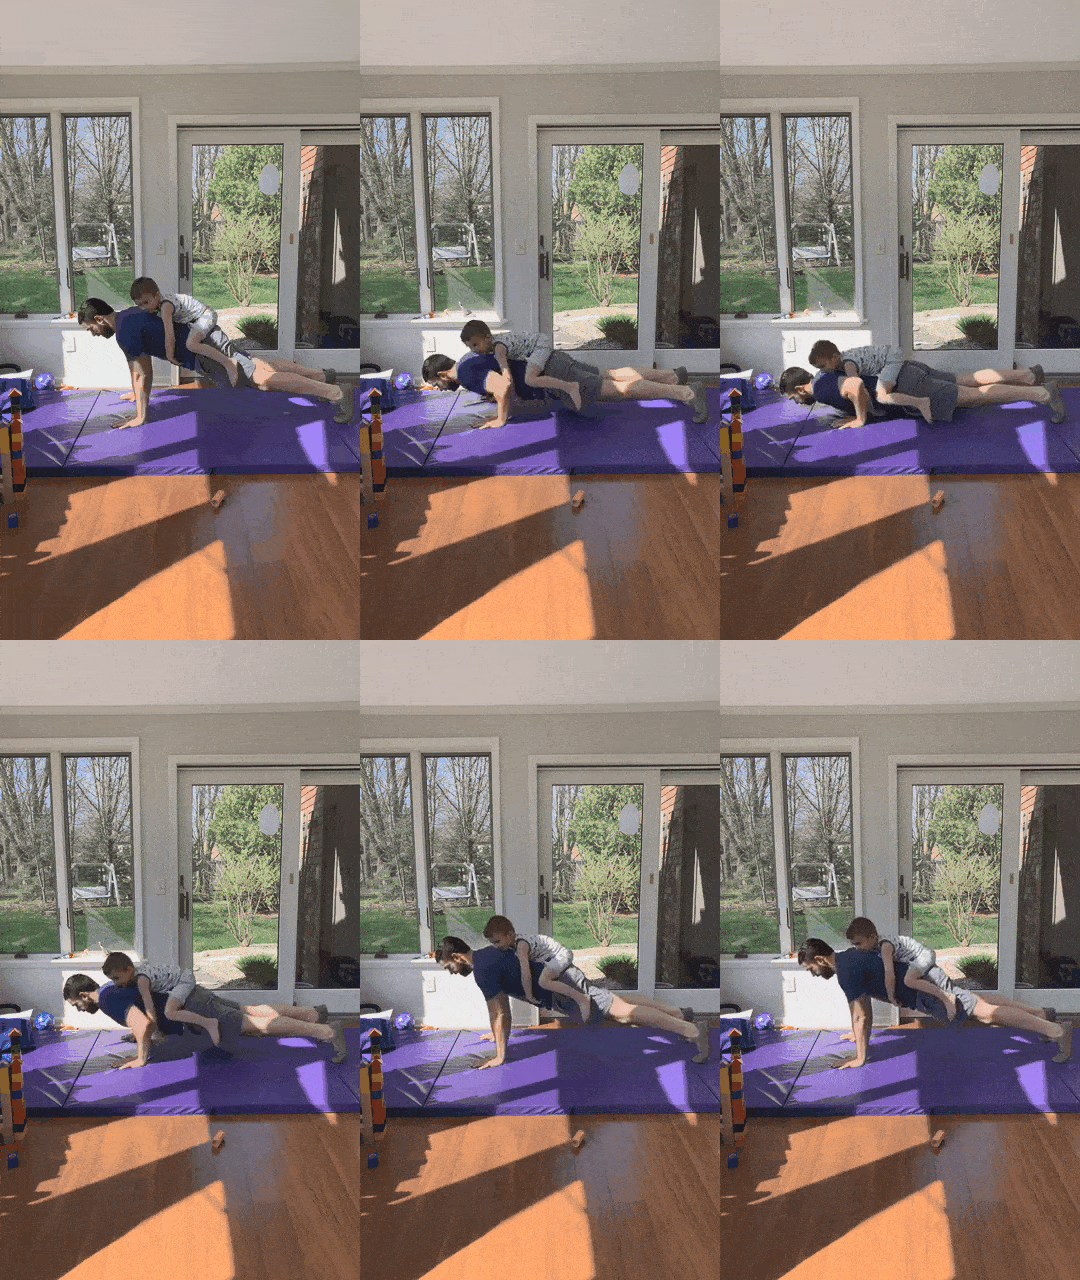
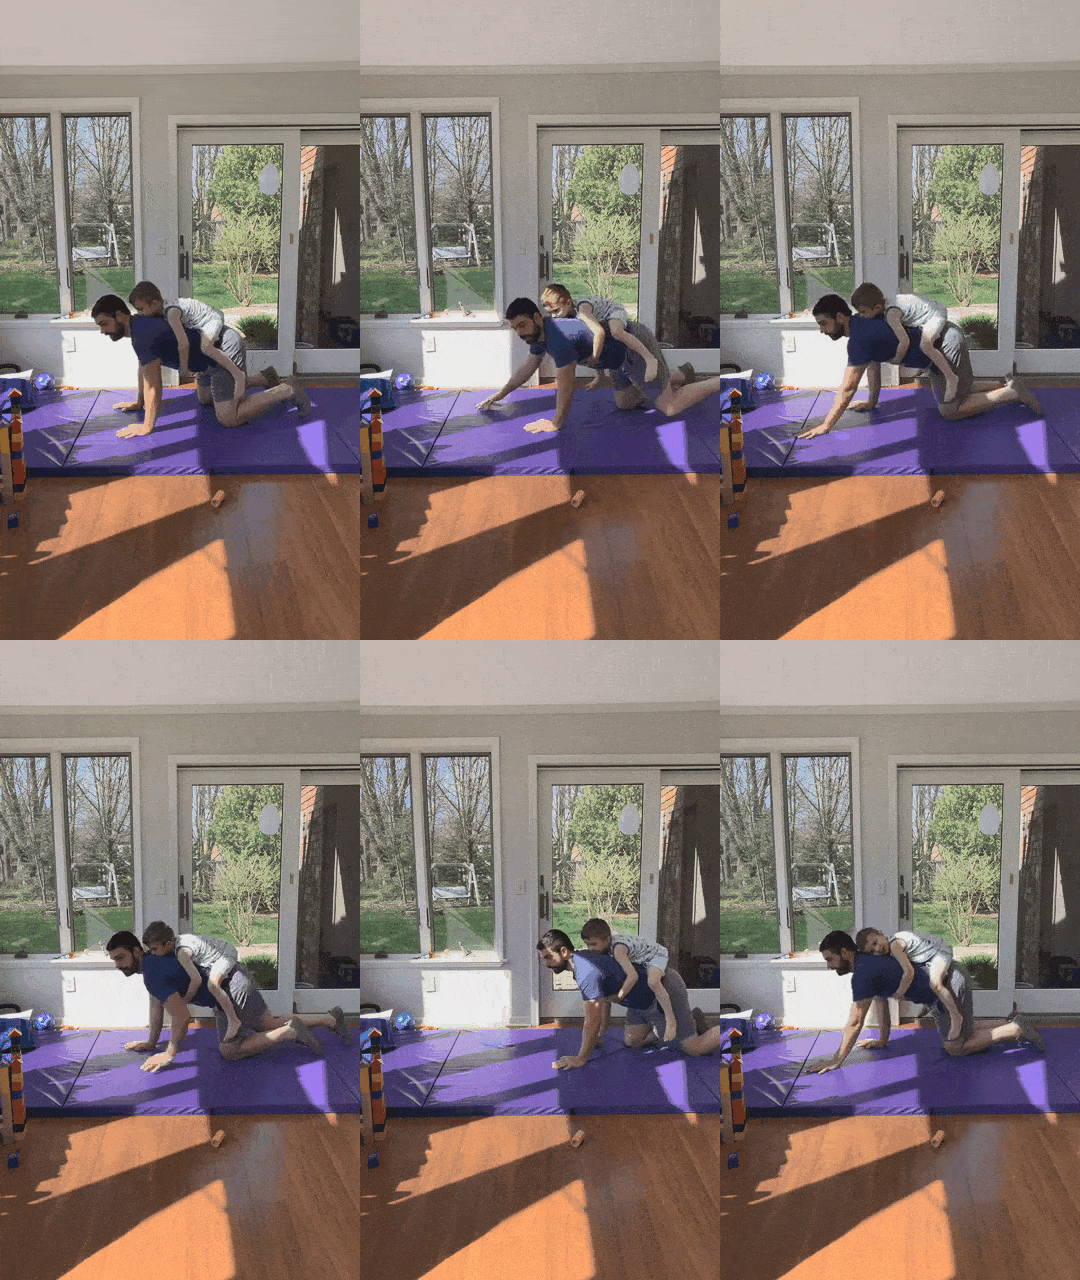
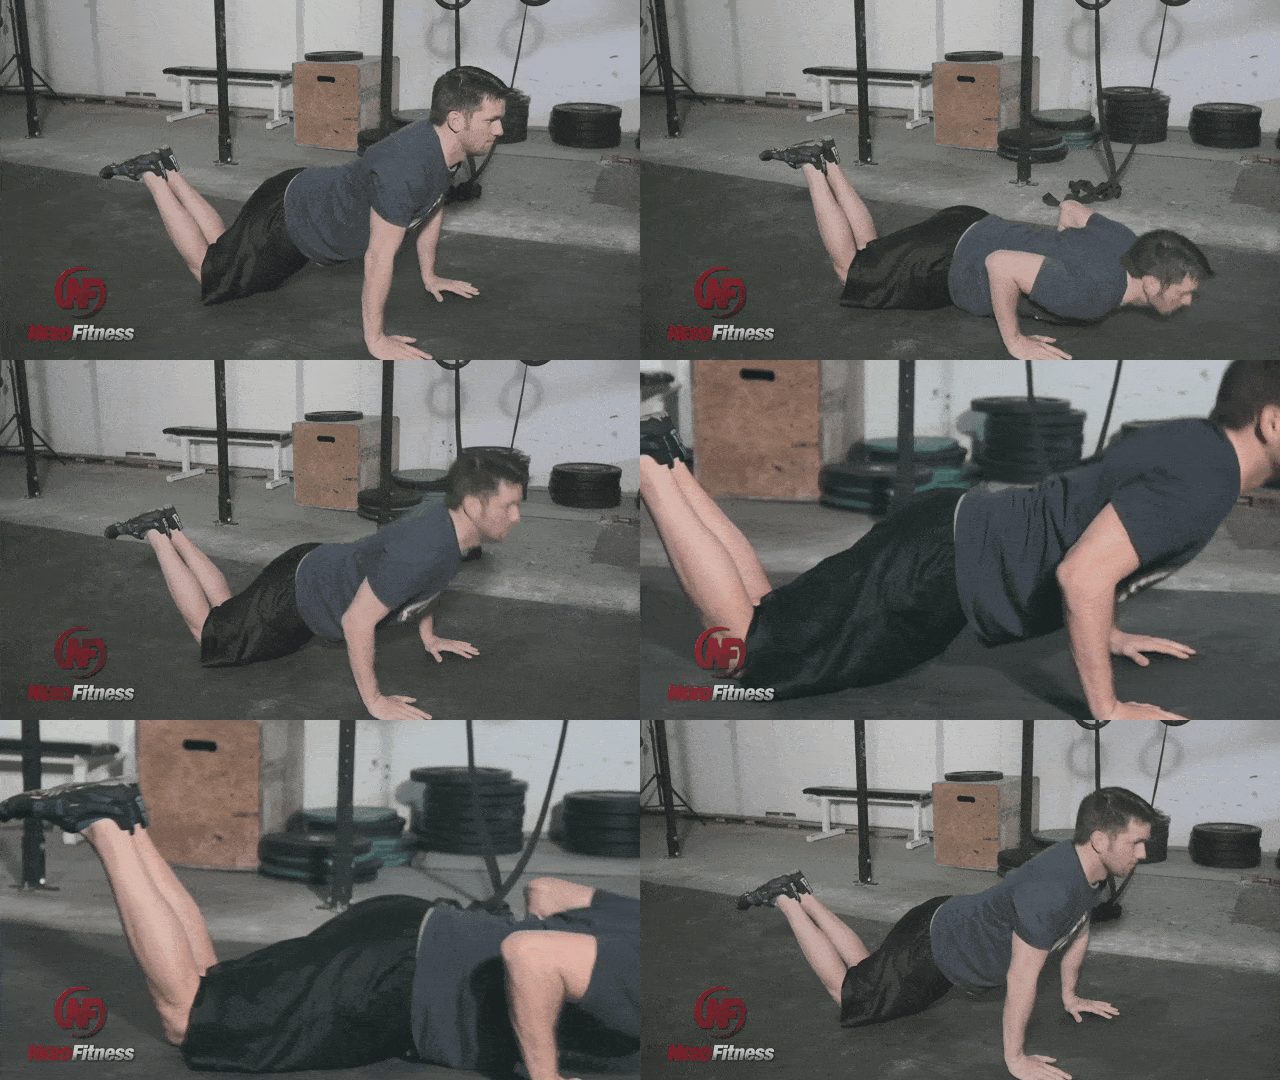
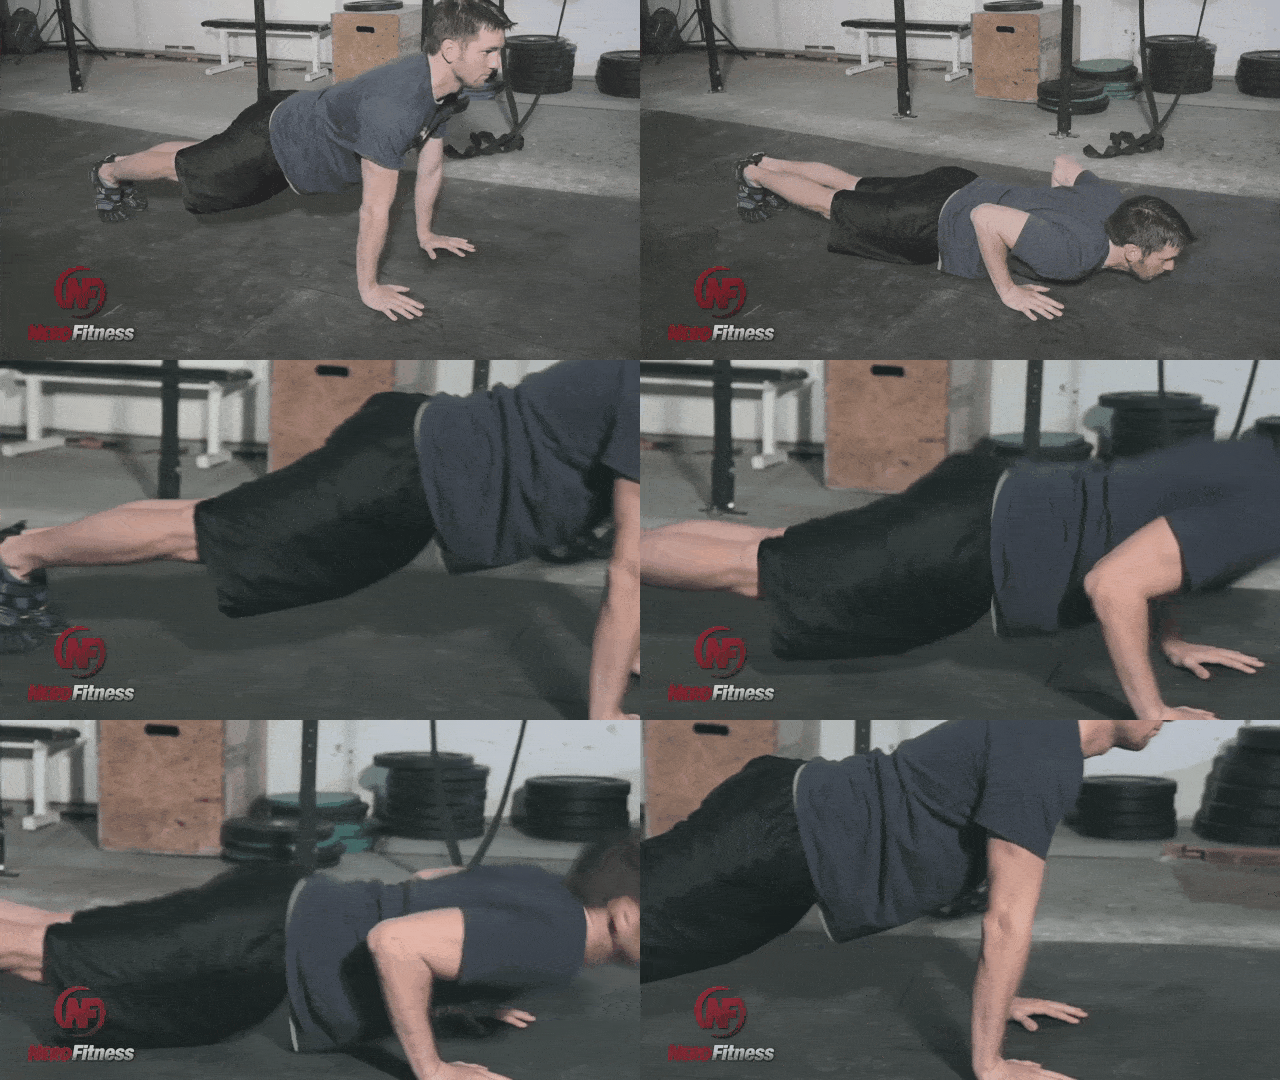
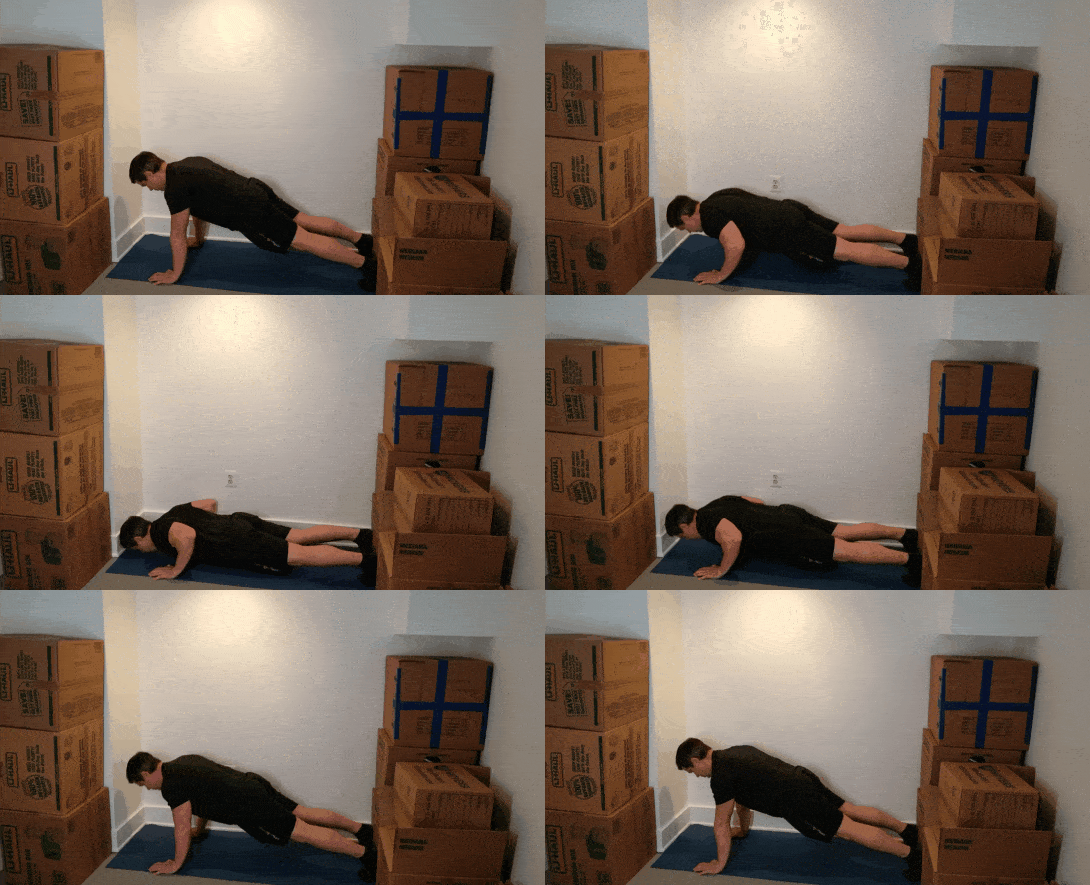
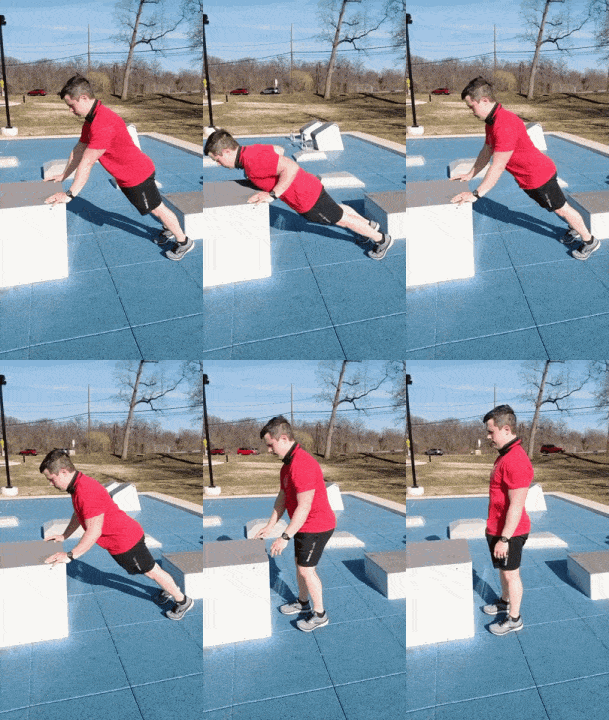
The first is to have your kid crawl on your back and use them as a weight:
Feel free to do knee push-ups here too if it’s a little too challenging.
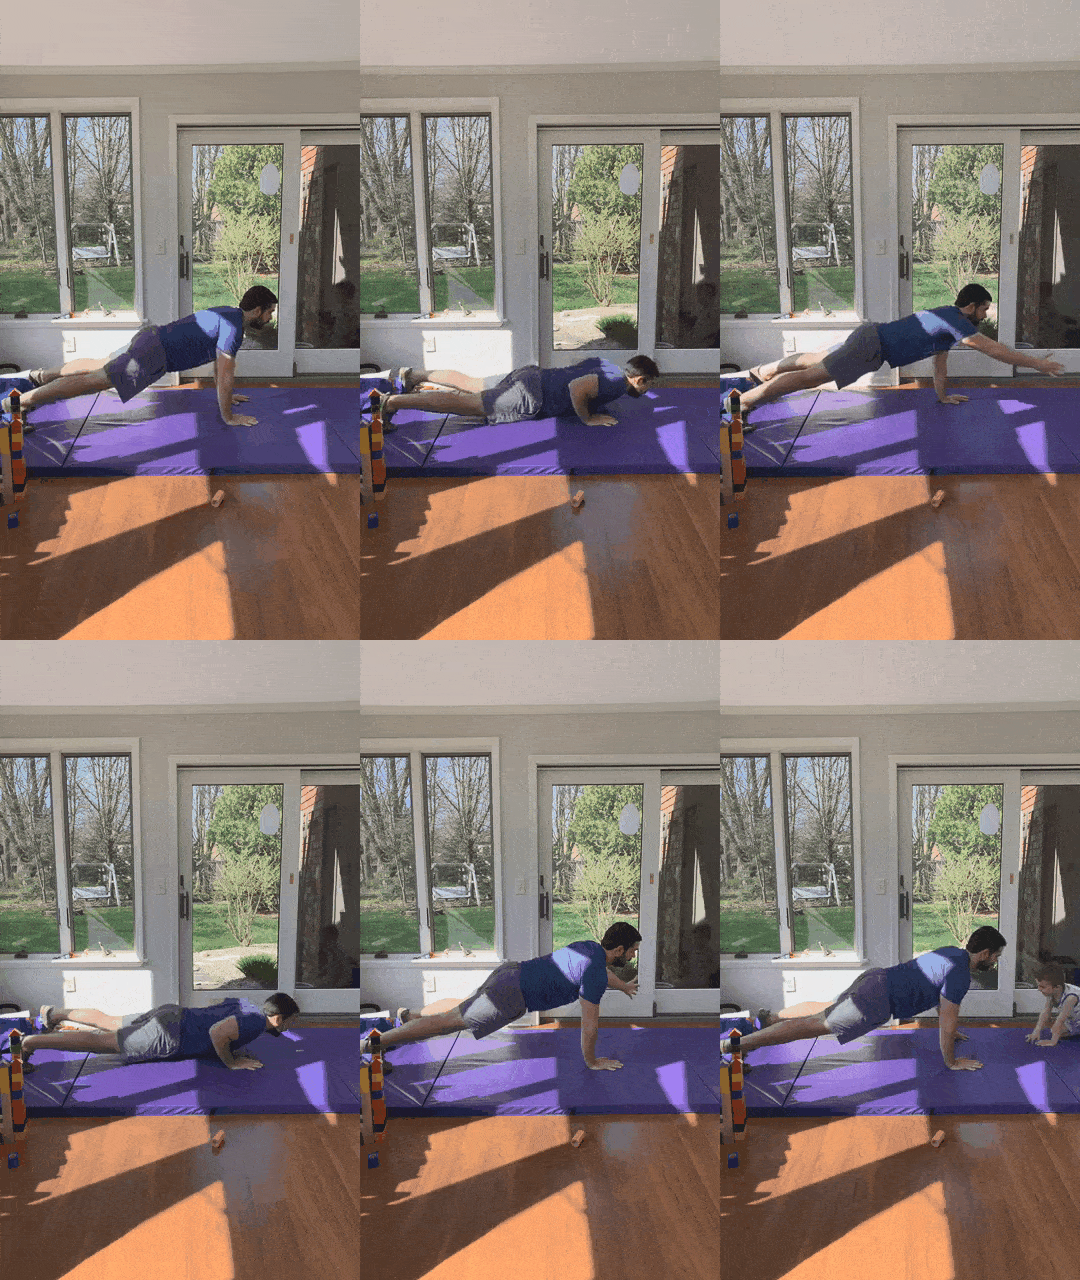
The next option is to include your kid in the workout by giving them high-fives between reps:
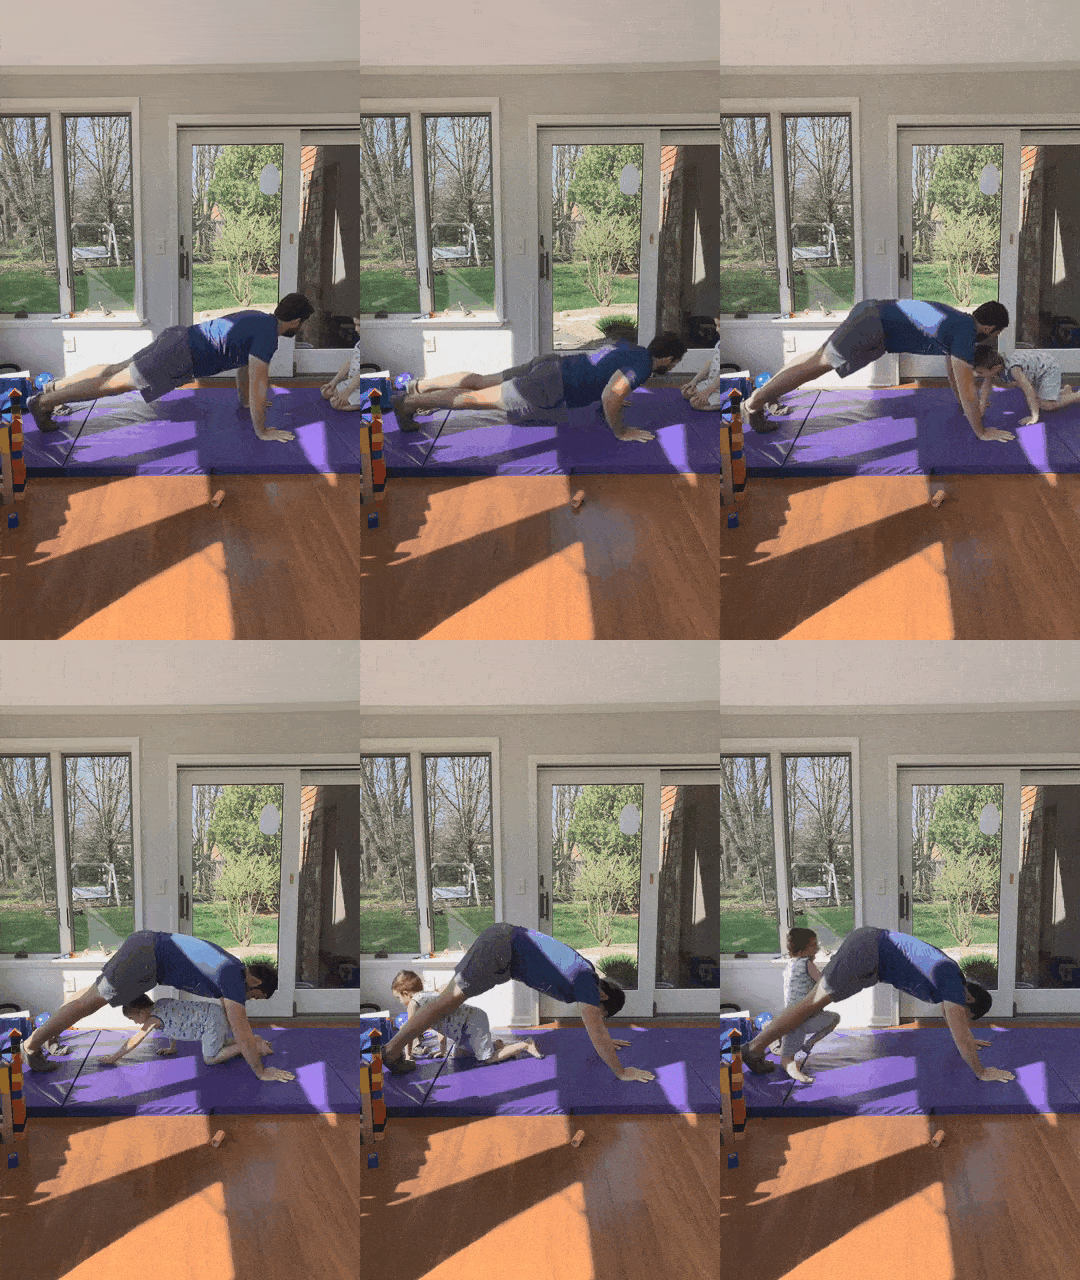
Lastly, you can have your kids crawl under you between repetitions, trying to worm their way from one end to the other:
#6) Bear Crawl
A fun exercise to do with your kids is to crawl around like a bear with them latched on!
Crawling is a great functional fitness exercise that will help you stay mobile on the floor. A kid on your back will up the intensity of the workout.
Bonus points if you make growling and roaring noises.
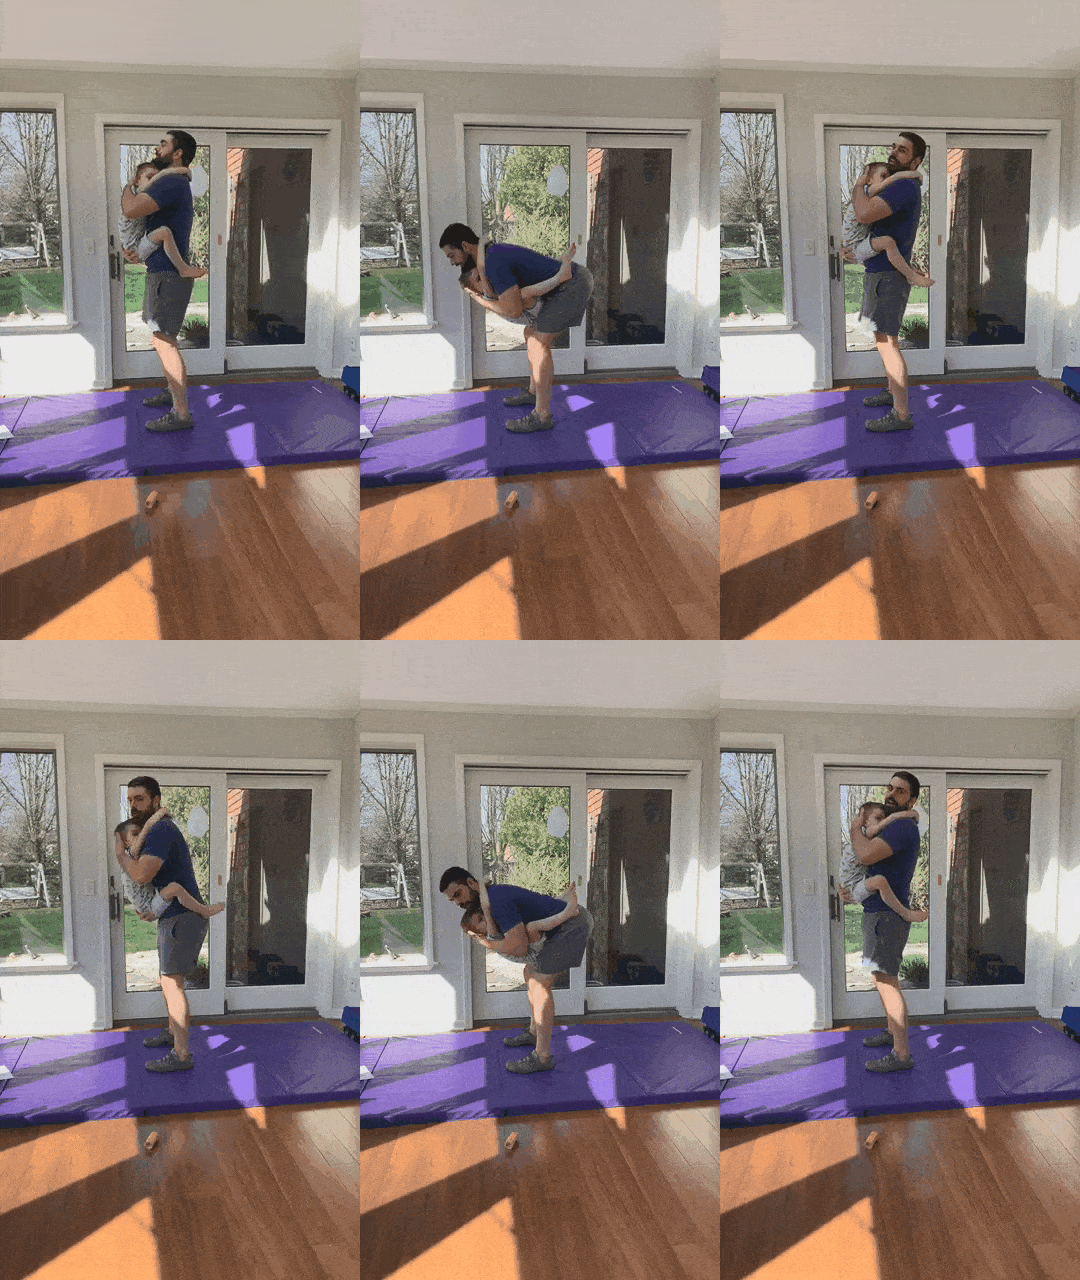
#7) Goat Bag Hinge
This exercise will have you strengthening your hinge muscles, kind of like you would in a kettlebell swing or deadlift.
Stand tall, clenching your kid, chest to chest. Have them hold onto you too.
Push your hips back, again, like you would in a kettlebell swing. When your torso is parrell-ish to the ground, come back up, driving through your heels.
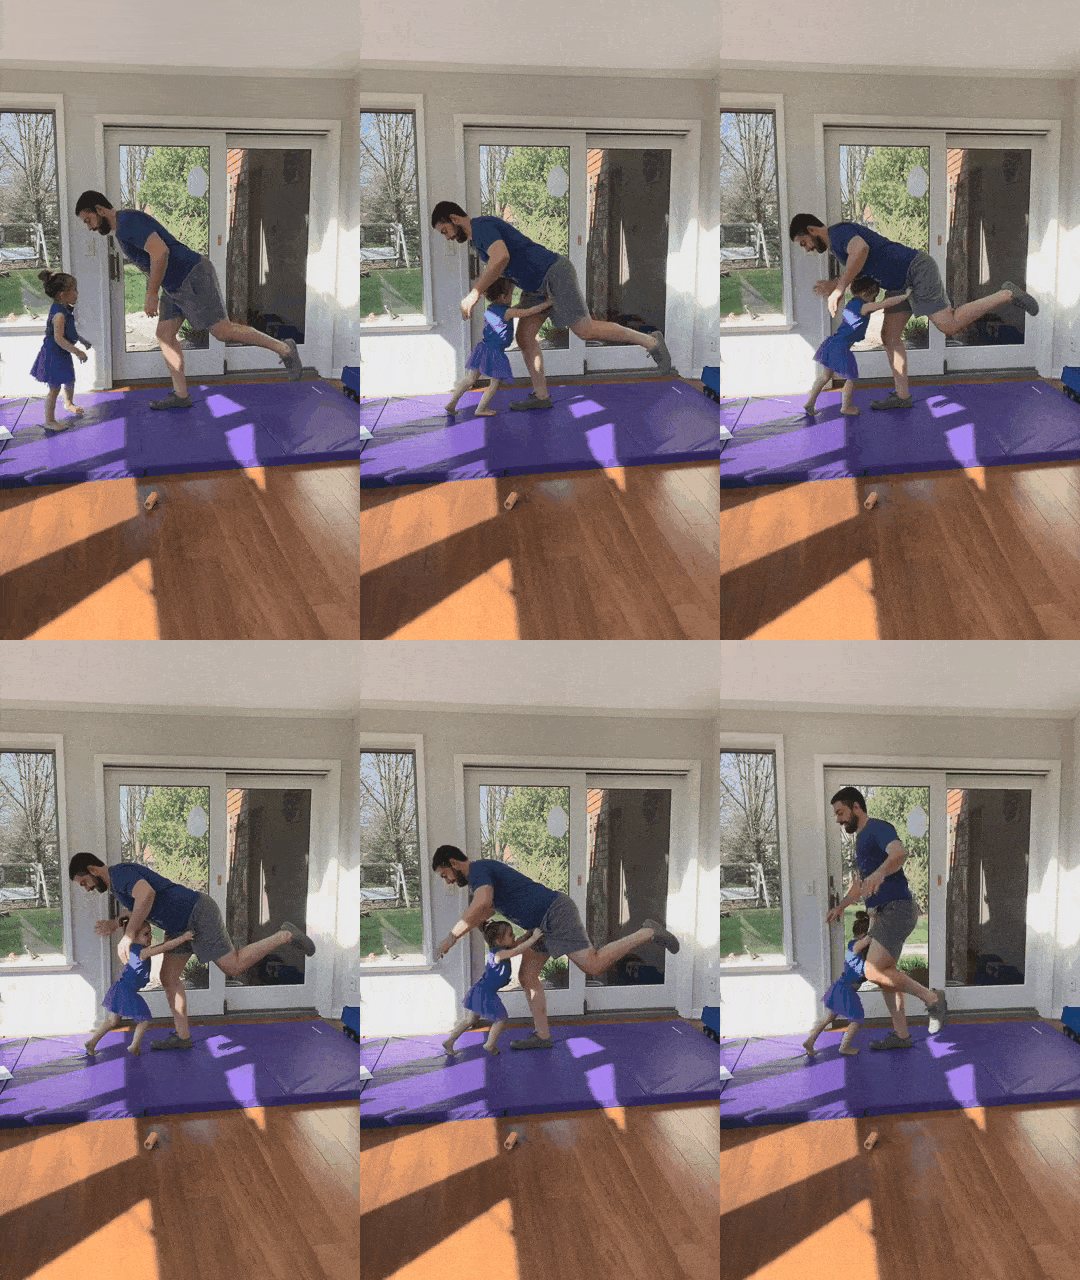
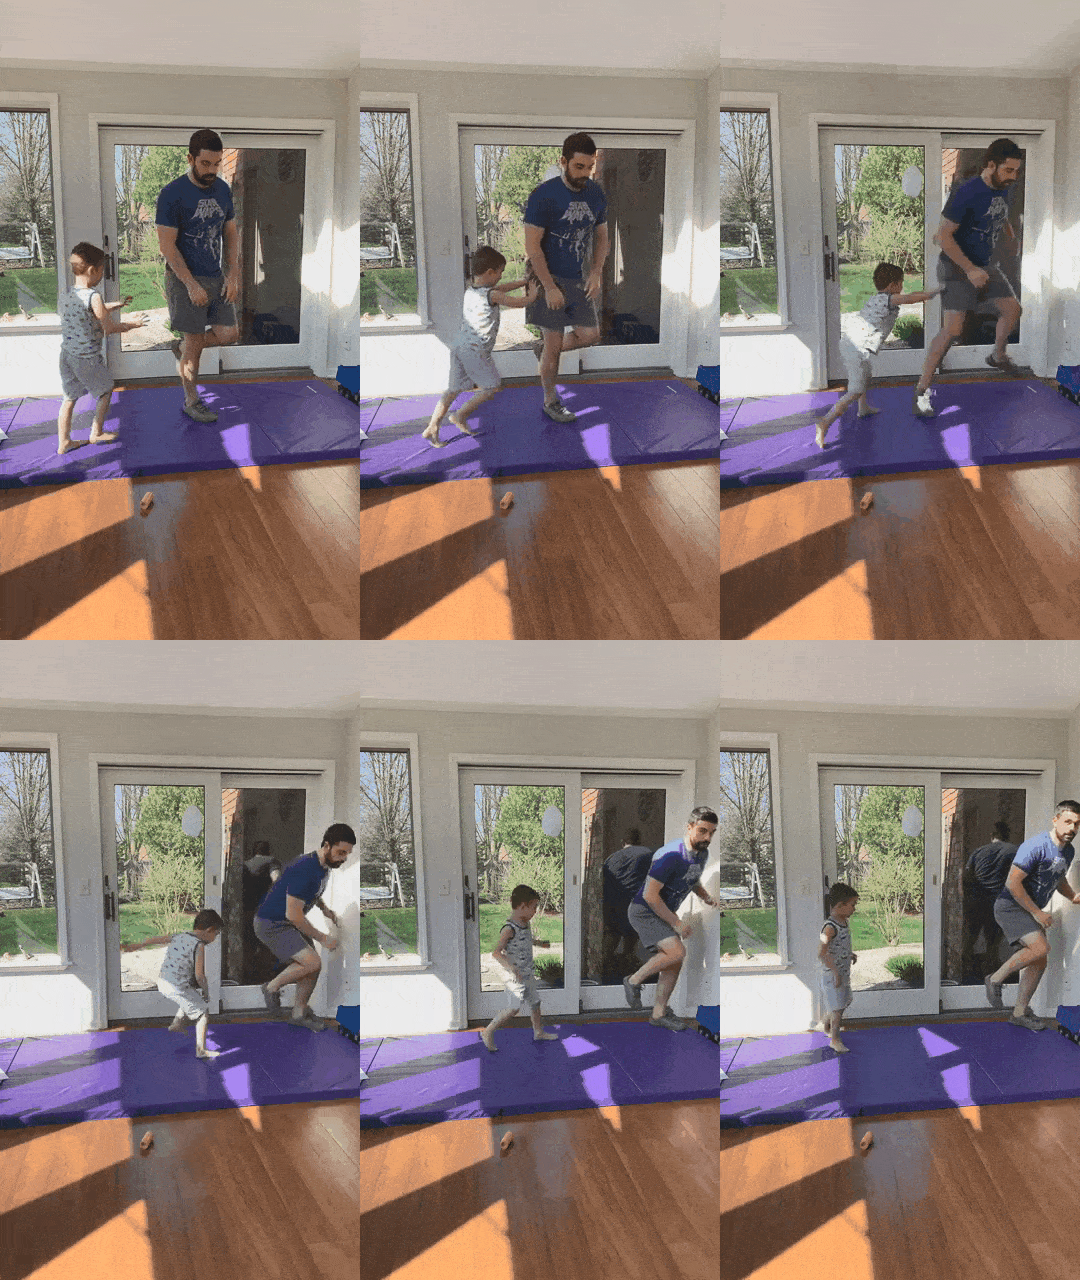
#8) Balancing
One leg balances can become a lot more challenging when your kid is trying to push you over:
Another idea is to stand on one leg, then have your kid push you, and use that force to jump onto your other leg. Attempt to only use one leg at a time to balance:
10 Workout Games to Play as a Family
Being able to lift your kid a few times for some exercises is great. But Coach Matt highlights that anything over 10 repetitions, probably isn’t happening.
The kids will get bored, whine, or revolt.
That’s why you might be better off playing some games with them.
Here are 10 fun and active games to play as a whole family:
#1) Ninja Training
This is easy: just ask your child: “Want to train like a ninja with me?”
If they’re into it, start practicing some of your jumps and crawls!
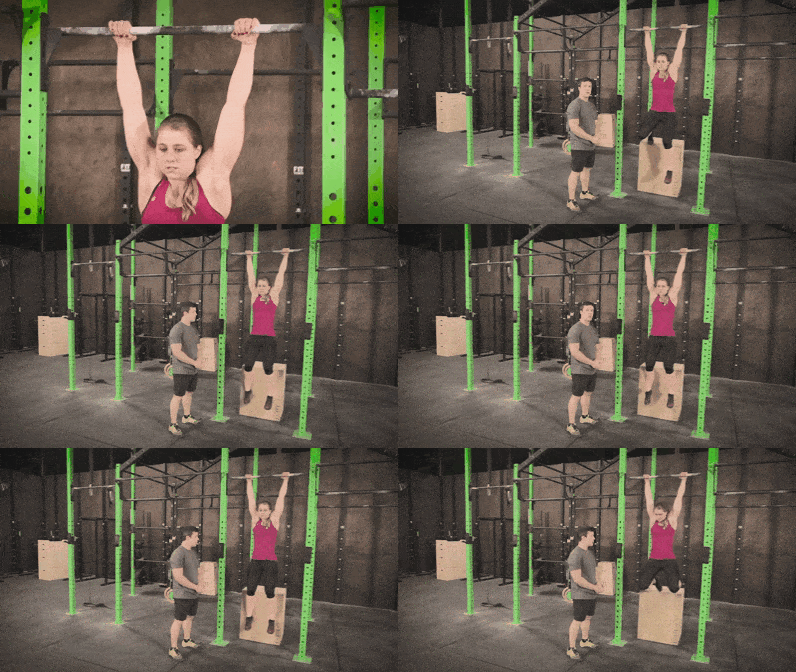
You can also hoist them up and help them hang from something (ninjas always have to climb up buildings), which would work if you have a pull-up bar:
Some house parkour might also be in the cards here.
#2) Chase (Cops and Robbers)
Here, you’re gonna build some type of fort. When playing this game, Coach Matt stands up his gymnastic mat tall and together, then places his kids in the middle.
Their job? Escape!
Run and track them down and send them back to jail (or your makeshift fort)
Feel free to teach them the phrase, “You’ll never catch me alive, coppers!”
#3) Freeze Ball
This might require a purchase, but foam dodgeballs are a great way to play with kids.
Have the different colored dodgeballs result in a different outcome:
Red: if you’re hit with the “fireball,” hop five times in a row.
Blue:if you’re hit with the “iceball,” you need to freeze for five seconds.
Green:if you’re hit with the “earthball,” it’s time to place your chest to the ground, like you would in a burpee.
#4) Animal Walks
Have someone call out an animal. Then everyone has to walk around like that!
Walking to Mordor is much tougher if you need to crawl like a snake for part of the journey.
#5) Hot Lava
With this game, you’re more or less building an obstacle course in your house, trying to jump from furniture to furniture…because the floor is now lava.
Here are some ideas on creating home obstacle courses:
Another fun way to start this game: start counting down from 5 out loud.
After “1” shout “hot lava” and if anyone is still on the normal floor, it’s time for them to start playing like Gollum when he finally got the ring:
This is a fun standing game to ensure spontaneous activity.
#6) Jump/Duck
This game is pretty easy: take an imaginary sword and swing high or low at the kids, or have them come at you with their imaginary weapon.
You need to either jump if they’re coming low or duck if they’re coming high.
This is really simple, but lots of fun, and can be done with a group of people.
#7) King of the Log (Balance Challenges)
Much like the balance exercises we showed you earlier, but as a game!
Find some territory (a mat, some comfy carpet, grass) and try to push the other off it. Let your kiddos team up on you for a more even match.
#8) Wolf & Rabbit
Create a mark or identify a “safe place” within a short sprint away.
Have two people face each other, but keep enough distance that the “Rabbit” feels comfortable reaching safety.
The Rabbit stays frozen until the Wolf makes a move. Then the Rabbit attempts to sprint to safety before the Wolf can tag it.
#9) Ninja Red Light, Green Light
If you’ve ever played “Red Light, Green Light” this is similar, although it involves some sneaking around, because ninjas.
“The Mark” walks around aimlessly, taking turns liberally, while the Ninja tries to sneak up behind and tag them.
If the Mark faces the Ninja, the Ninja must freeze.
Otherwise, the Ninja is free to tag the Mark.
#9) Commando
This game is kind of like Ninja Red Light, Green Light.
You have a Counter (normally the adult).
You have Runners (kids).
The Counter picks a number from five to ten, then counts down.
Before doing so, they announce “Fast” or “Slow.”
Fast, you would count “5, dot, 4, dot, 3, dot, 2, dot, 1.”
Slow, you would count “5, dot, dot, 4, dot, dot, 3, dot, dot, 2, dot, dot, 1.”
So twice as many “dots” are said allowed.
While the Counter counts, they move about (carefully) with their eyes closed. They make sure to turn around a lot to keep the Runners on their toes.
When the Counter reaches “1,” they freeze and open their eyes.
Any Runners caught in the Counter’s eyes has to do a silly “croak” finality.
Working at Home With Kids: A Discussion With Two Nerd Fitness Coaches (And Parents)
Over the last year, many parents found themselves having to work with their kids running in the background.
In the video above, taken from Nerd Fitness Prime, “The Matts” talk to you about how they handled this “new normal.”
Some highlights of the “Quarantine with Kids” discussion:
Doing the best you can (a common theme around here)
The importance of having a schedule with kids
Open communication between spouses
Creating a “school space” within your home
How to find “balance” during quarantine
The importance of “quiet time”
And much more!
If you’re juggling working remotely with your kiddos around, give the video a watch.
How to Workout as a Family (Next Steps)
The most important thing about working out with your kids: have fun!
If kids see you having fun, they might want to join you.
If you make your exercise together enjoyable by including some game elements, they might want to keep doing it.
The most important thing you can do now: try an exercise or game with your kids!
You’ll never know how your kids deal with your workouts, until you try it out.
So pick one of the exercises or games we highlighted and give it a whirl.
If it devolves to chaos, you can always try again with a different workout or strategy.
Again, just do the best you can.
If you want some more help, Nerd Fitness is here for you.
We have three options on how to continue with us. Pick the option that best aligns with your goals:
Option #1) If you want a daily prompt for doing home workouts, check out NF Journey. Our fun habit-building app helps you exercise more frequently, eat healthier, and level up your life (literally).
Try your free trial right here:
Option #2) If you want a professional coach in your pocket, who can do video form checks, provide feedback, and adjust your workouts based on the equipment you have available, check out our 1-on-1 Online Coaching Program!
For example, let’s say you find yourself stuck indoors and you want somebody to custom-build you a workout program based on the equipment and furniture you have. That’s where an online coach is a game-changer!
Personally, I’ve been working with the same online coach since 2015 and it’s changed my life. You can learn more by clicking on the box below:
Option #3) Become part of the Rebellion! We need good people like you in our community, the Nerd Fitness Rebellion.
Sign up in the box below to enlist and get our Rebel Starter Kit, which includes all of our “work out from home” guides.
Get your Nerd Fitness Starter Kit
The 15 mistakes you don’t want to make.
Full guide to the most effective diet and why it works.
Complete and track your first workout today, no gym required.
Alright, I want to hear from you and your experience with working out with your children!
Are you a parent who is now learning how to exercise with your kids?
Any tips or tricks for training with screaming kids in the background?
Any fun games we missed?
Let me know in the comments!
-Steve
P.S. If you have older kids, they might be more into doing a workout right alongside you. If so, have them pick a routine from The 7 Best At-Home Workouts and try it together!
You now have a range for the amount of protein you need in a day!
I know…we just threw a lot at you.
Let’s explain some of these numbers and equations in case you want to nerd out on the details.
How Much Protein Should I Eat in a Day?
As we cover in our guide How Much Protein Do I Need to Eat, you’re going to find all sorts of different recommendations for how much protein you should be consuming.
For example, the current international Recommended Dietary Allowance (RDA) for protein is 0.4g per pound of bodyweight (0.8 g per kg of body weight).[1]
Case closed?
Nope.
In our opinion, and as pointed out by this study[2] the RDA for protein is too low and should be higher regardless of your body composition.
Our calculator actually starts you off at 0.54–0.82g per pound of bodyweight (1.2–1.8 g/kg), which tops out at over twice the level of the RDA.[3]
Another criticism of the RDA recommendation: the amount of protein you should eat is really going to be dependent on you and your goals. That’s why we had so many variables in our calculator above.
The RDA’s blanket recommendation for protein intake is oversimplified.
We’ll dive into this more with our next two sections.
One last piece of general advice: we gave you protein intake ranges from low to high. That’s because you as an individual may react to certain levels of protein differently.
So don’t take our protein recommendation as gospel!
Consider your results here as a starting point. Try one range, see how you feel, and take it up or down from there.
If you seem to do better on a certain amount of protein, don’t worry if it’s not within our range.
The protein recommendations here come from studies, and studies are based on averages. You may be an outlier, which 100% happens.
Use the results of our protein calculator as a starting point and see how you feel. This is advice we give every coaching client when we discuss protein with them.
How Much Protein Should I Eat to Build Muscle?
If you’re trying to build muscle, you’re going to want to eat enough protein to induce muscle repair and growth.
After all, protein is the building blocks of muscle tissue, so you’ll need plenty if you’re looking to bulk up or just build muscle.
How much?
If you’re of healthy weight, active, and wish to build muscle, aim for 0.64–1.09 g/lb (1.4–2.4 g/kg).[4]
There is some evidence that a higher range might be beneficial. Not so much in gaining more muscle, but to minimize fat gain during a bulking phase.[5]
As we mention in our guide, 12 Tips to Gain Weight Quickly, you might put on a little fat when eating in a caloric surplus to grow muscle.
The Beginner Bodyweight Workout. If you’re looking for an exercise routine that can be done ANYWHERE, look no further. Our beginner routine has jumpstarted many Rebels in their strength training. You’d be surprised how much muscle you can build with your own weight, a milk jug, and a sturdy table.
Build Your Own Workout Routine. After you do a workout or two, it’s time to strategize. What should you train and on what days? When should you rest? Our guide will walk you through building a complete routine.
Another option is to check out our Online Coaches Program, where a trained expert can build you a customized workout, then adjust it each month based on your progress:
How Much Protein Should I Eat to Lose Weight?
If you’re looking to lose weight, eating plenty of protein will be an important part of the equation.
Why is protein important for weight loss?
Think of it this way: protein is the only macronutrient you don’t store.[7]
Carbs are stored as muscle glycogen and blood glucose. Fat is stored as body fat. If your body needs either because it’s in a caloric deficit, it can look to its held reserves for resources.
Not so for protein.
Meaning most of the protein in your body is currently doing a job: building muscle tissue, making enzymes, strengthening bones, etc.
If you don’t eat enough protein, your body will turn towards your muscles for its needs.
So if you’re not careful when you’re losing weight, you could lose muscle AND fat.
Obviously, from a health and physique standpoint, this is not good.
That’s why you need to eat plenty of protein and strength train during periods of weight loss, so most of the weight you’ll lose will be fat while retaining the muscle you have.
The other important point about protein and fat loss: protein will help you stay full.[8]
If you’re trying to reduce your calorie intake to lose weight, keeping your hunger at bay will be really important. Luckily, studies have found that those on a high-protein diet tend to eat fewer calories overall.[9]
The 5 Rules of Weight Loss. If you’ve ever been on a diet, or are currently on a diet, give this a read. Here we discuss why people succeed with popular dieting programs and why they don’t, plus actionable steps you can take to achieve sustainable weight loss.
Start Eating Healthy Without Being Miserable. If you’re confused about healthy eating (“Should I nix carbs? Do I have to count calories?”), start here. We’ll explain how to consistently build healthy meals while still eating the foods you love. Nobody should be forced to give up pizza forever.
How Many Calories Should I Eat Every Day?We’re not going to make you count calories for the rest of your life. However, we do want you to have some awareness of the number of calories you are eating. We’ll give you a range to shoot for, plus some tips on how to portion control.
You can also download a Free 10 Level Diet Guide too when you join the Rebellion and sign up in the box below:
Download our free weight loss guide
THE NERD FITNESS DIET: 10 Levels to Change Your Life
Follow our 10-level nutrition system at your own pace
What you need to know about weight loss and healthy eating
3 Simple rules we follow every day to stay on target
Can I Eat Too Much Protein?
Now that I’ve drilled into your head that should be consuming plenty of protein, a natural question will arise:
How much protein is too much protein?
The good news here is that as long as you have healthy kidneys, you can eat a lot of protein with no ill effects.
As Examine points out in its research on protein:[10]
“Higher protein intakes seem to have no negative effects in healthy people,”**
**Of course, if you have specific kidney or medical issues with regards to protein intake, PLEASE go with your doctor’s recommendation for required protein consumption!
Check out The Ultimate Protein Shake Guide for more protein powder recommendations and recipes on how to make delicious smoothies.
Whether through whole foods or supplements, protein should be a main part of every meal you eat. It’s one of our top recommendations for being a healthy nerd.
You can always adjust up or down based on your results.
If you need any help along the way, we got you.
Here are three ways to continue your journey with Nerd Fitness.
#1) Our Online Coaching program: a coaching program for busy people to help them make better food choices, stay accountable, and get healthier, permanently.
As I said before, we teach portion control to our clients who struggle with overeating, so we’ll provide a non-judgmental expert to help you reach your goals.
You can schedule a free call with our team so we can get to know you and see if our coaching program is right for you:
#2) If you want an exact blueprint leveling up your nutrition, check out Nerd Fitness Journey! Our fun habit-building app helps you exercise more frequently, eat healthier, and level up your life (literally).
If you follow our Nutrition missions, you’ll learn to eat more protein while earning XP! Sah-weeeet.
Try your free trial right here:
#3) Join the Rebellion! We need good people like you in our community, the Nerd Fitness Rebellion.
Sign up in the box below to enlist and get our Rebel Starter Kit, which includes all of our “work out at home” guides, the Nerd Fitness Diet Cheat Sheet, and much more!
Get your Nerd Fitness Starter Kit
The 15 mistakes you don’t want to make.
Full guide to the most effective diet and why it works.
Complete and track your first workout today, no gym required.
Alright, I want to hear from you:
Did you calculate your protein requirements?
Do you generally consume around this target?
Have any tips or tricks for getting enough protein?
Read, “The Effects of Consuming a High Protein Diet (4.4 g/kg/d) on Body Composition in Resistance-Trained Individuals.” Source, PubMed.
Read, “A High Protein Diet (3.4 g/kg/d) Combined With a Heavy Resistance Training Program Improves Body Composition in Healthy Trained Men and Women–A Follow-Up Investigation.” Source, PubMed.
Read, “The Effects of Overfeeding on Body Composition: The Role of Macronutrient Composition – A Narrative Review.” Source, PubMed.
Read, “Protein, weight management, and satiety.” Source, PubMed.
Read, “A High-Protein Diet Induces Sustained Reductions in Appetite, Ad Libitum Caloric Intake, and Body Weight Despite Compensatory Changes in Diurnal Plasma Leptin and Ghrelin Concentrations.” Source, PubMed.
Read, “Controlled Changes in Chronic Dietary Protein Intake Do Not Change Glomerular Filtration Rate.” Source, PubMed.
Read, “Effect of Short-Term High-Protein Compared With Normal-Protein Diets on Renal Hemodynamics and Associated Variables in Healthy Young Men.” Source, PubMed.
One of the best exercises for you, whether you’re trying to build muscle or lose weight (or both) HAS to be the squat.
However, it’s also an exercise I see nearly EVERYBODY do incorrectly.
We do video form checks with every Online Coaching Client to make sure they’re squatting correctly, and we use a LOT of the same cues and instruction we cover in this guide!
So have no fear…
After reading this big ass squat guide (pun intended, I suppose?) – part of our Strength 101 series – you can start performing this compound exercise safely and effectively.
Click any link below or scroll down to read the whole guide:
Squats are one of the most foundational functional movements in our lives. Let’s talk about the benefits and why you should be squatting all the time.
#1) We’re designed to squat: We’ve been squatting since we were babies, but as we get older and sit in unnatural positions all day, our squat form goes from perfect to terrible.
Crap.
In many countries, people often sit in a full squat for hours at a time.
From an evolutionary standpoint – it makes sense that we are genetically designed to, and can be really good at – squatting.
Before modern-day furniture and technology, you didn’t stop sitting in a full squat once you got older like we do today…you continued squatting your entire life.
#2) Squats are a compound movement that recruits most of our muscles – this means it’s a movement that uses multiple muscle groups and joints (your hip and knee joints) to complete.
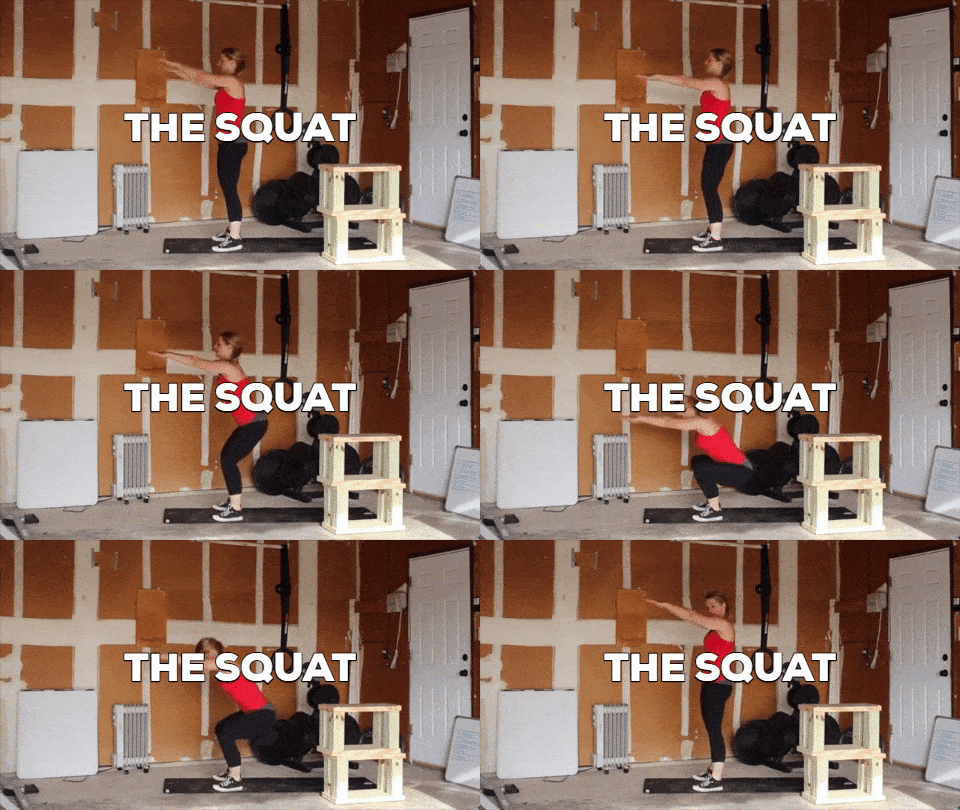
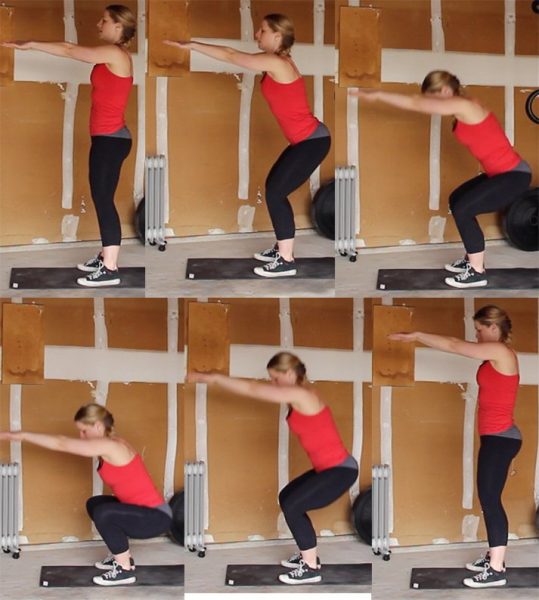
A simple bodyweight squat – which I’m demonstrating above – uses almost every muscle in the core and lower body.
If you add a dumbbell or barbell into the equation, I would even argue that they use every single major muscle group to complete.
In addition to every muscle in your “legs,” you need your:
Hips
Back
Core
Shoulders
Arms.
Nothing is left out with this monster movement.
Because of the utilization of a large amount of muscle groups, squats cause your body to increase our anabolic hormone production, helping us lose fat and build muscle.[1]
#3) Squats will help strengthen your bones and your muscles (and your knees!), and can also increase flexibility.
Increasing the strength in your knees and hips (and entire body) reduces your chance of injury while doing both athletic movements and everyday life things (such as shoveling the driveway or standing up and sitting down).
And by learning to squat deeply, safely, you’re improving your range of motion and helping make you antifragile and protecting yourself against future injury.
Bazinga!
If your goals are to:
Build muscle and get stronger, squats will get you there faster.
Lose weight and get ‘toned,’ squats will get you there faster.
Look better naked, squats will get you there faster.
Get healthier and happier, squats will get you there faster.
Feel like an absolute badass in the gym, squats will get you there faster.
In short, squats are amazing.
(See what I did there?)
My name is Staci Ardison, I’m a Senior Coach at Nerd Fitness, and my life has been absolutely transformed by barbell training, which is why I’m so excited to share this guide with you.
I am so excited to teach you how to squat today, as I’ve taught tons of coaching clients how to get started too.
Let’s start off by taking a look at the bodyweight squat – the first move you should master before you add weight.
How to Do a Bodyweight Squat With Proper Form
The setup for the squat exercise is incredibly simple.
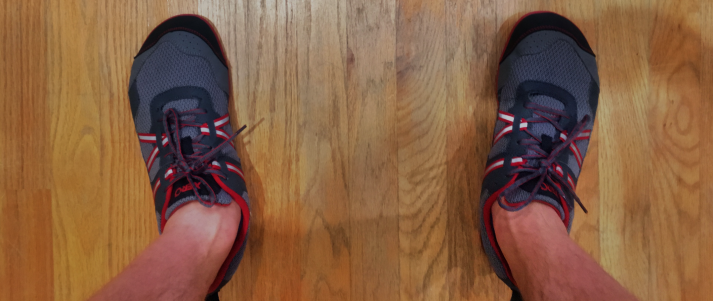
Stand with your feet slightly wider than your hips.
Your toes should be pointed slightly outward – about 5 to 20 degrees outward (the wider your stance, the more you’ll want to rotate your feet outward).
Look straight ahead and pick a spot on the wall in front of you.
Look at this spot the entire time you squat, not looking down at the floor or up at the ceiling.
I go over the setup and the full movement in this video:
1) Put your arms straight out in front of you, parallel to the ground. Keep your chest up and proud, and your spine in a neutral position.
2) Your weight is on your feet – it should be on the heels and the balls of your feet, as if they were pasted to the ground. You should be able to wiggle your toes the entire movement (though that’s not a part of squatting!).
3) Keep your entire body tight the entire time, your core flexed like you’re bracing to be punched in the gut!
4) Breathe deeply into your stomach, break at your hip and push your butt back. Keep sending your hips backwards as your knees begin to bend.
It’s important to start with your hips back, and not by bending your knees.
5) As you squat down, focus on keeping your knees in line with your feet.
Many new lifters need to focus on pushing their knees out so they track with their feet.
When your knees start to come inside the toes, push them out (but not wider than your feet).[2]
Make sure your knees aren’t moving inward toward each other through the movement – this is very common.
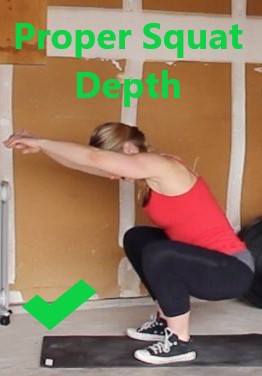
6) Squat down until your hip joint is lower than your knees (what we call “parallel” in the squat game). Note: if you THINK you might not be squatting deep enough, you probably aren’t!
Once at the bottom, it’s time to stand back up from your squat:
7) Keeping everything tight, breathe out and drive through your heels (keep the balls of your feet on the ground as well).
8) Drive your knees outward (away from each other) the same way you did on the way down, and squeeze your butt at the top to make sure you’re using your glutes.
Here is a video from us nerds at Team Nerd Fitness (with instructions from Jim, lead trainer at our 1-on-1 Online Coaching Program) that will teach you good form on a bodyweight squat, including all the mistakes NOT to make:
Once you can do multiple sets of 15+ deep bodyweight squats with proper form, it’s time to move onto barbell squats!
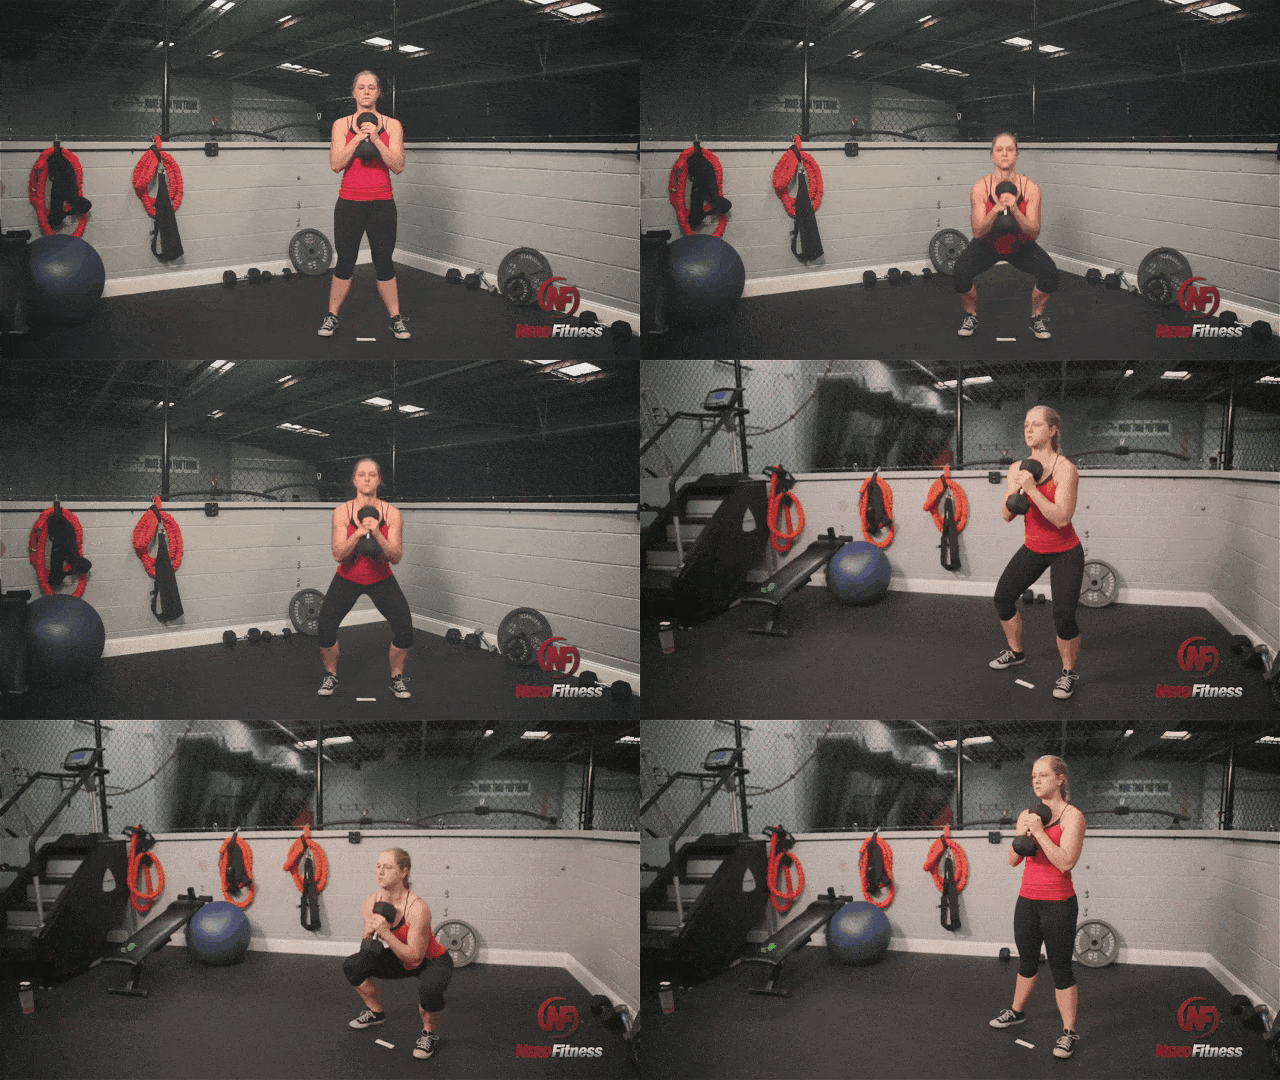
If you are confident in doing bodyweight squats and want to work up to a barbell squat, follow our Gym Workout Level 4 Program, which includes dumbbell goblet squats, a good stepping stone to barbell squats:
The majority of the population has some sort of mobility issue (including myself!) that they are working on fixing.
We have LOTS of 1-on-1 coaching clients who are new to squatting, and it often comes down to ankle flexibility and hip mobility.
If you spend all day, every day, sitting in a desk chair, this might be you.
If you want us to help you fix your squat depth and start getting stronger, that’s what we’re here for!
How to Set Up Properly For The Barbell Back Squat
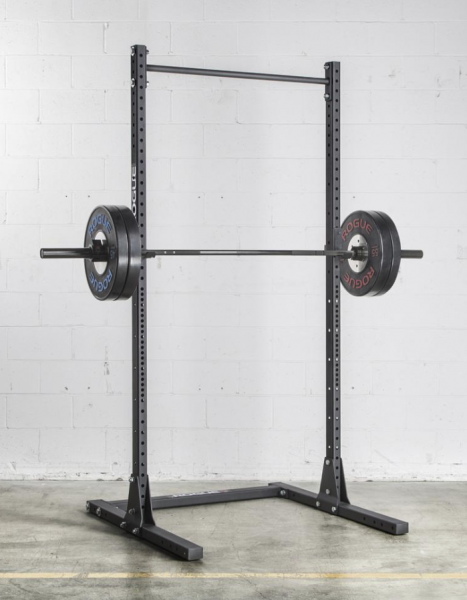
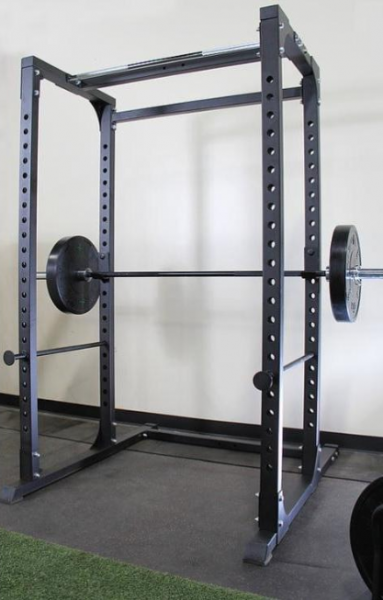
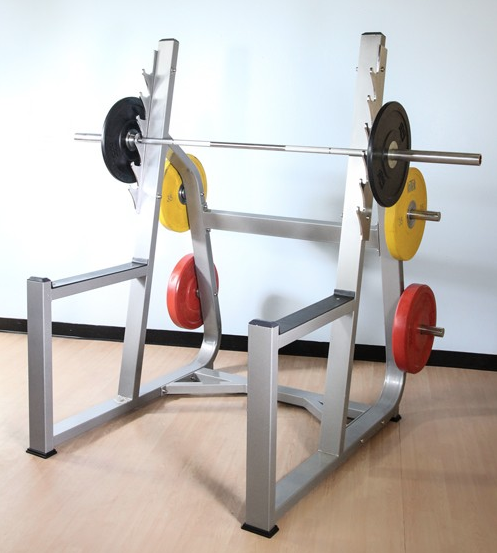
#1) Find your squat rack! It’ll look something like this, with an unattached barbell:
A. Squat Stand:
B. Power Cage/Squat Rack:
C. Half Rack (Least favorite*):
*I don’t like Half-racks without adjustable safety bars – if you want to squat deep the barbell might hit the immovable bars! Not cool. Aim for the A or B options if you have the choice!
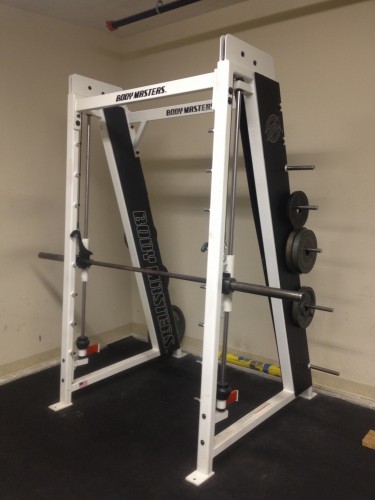
Note: a squat rack is NOT the same thing as a Smith Machine, where the barbell is attached to the machine, and slides up and down two bars:
You do NOT want a Smith Machine.
You need a completely unattached barbell in order to do a barbell squat properly and safely. Don’t squat in a Smith Machine.
#2) Set the height of the bar to be about the same height as your collarbone.
Not sure how to set the height of the bar? I got you:
If your options are either too high or too low, it’s always best to set the pins slightly lower than you need them.
You don’t want to have to get up on your toes to rack/unrack the bar, especially as the weight gets heavier.
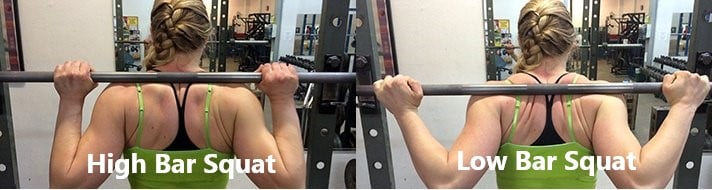
#3) Decide if you are going to do a high bar squat, or a low bar squat. Either is fine, but there IS a difference:
The “Low Bar Back Squat” is the most common form done by beginners, general lifters, and powerlifters.
It’s also the form taught in Starting Strength, one of the best books for beginners on the market.
So we’ll be focusing on that version for the rest of this section:
#4) Always squat with just the bar to start – as we discuss in “How much weight should I be lifting,” even if you’re planning on squatting 500 lbs, always start with just the bar!
How to Do a Proper Barbell Back Squat, Step By Step
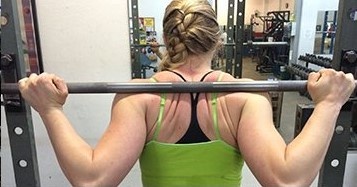
1) Facing the bar, step under it, and put your hands around it on either side of you.
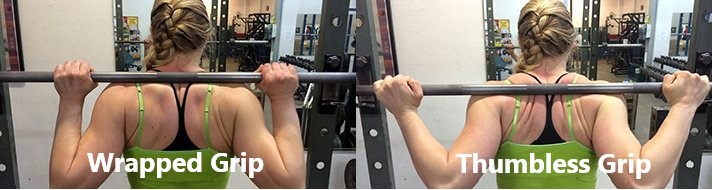
For this type of squat in our example, we are going to want a thumbless grip, so that our wrists are properly aligned with our forearms.
The width of your grip will be dependent on flexibility, but generally, a narrower (hands closer to your shoulers) grip will help create a meaty shelf for you to place the bar on the muscles in your upper back.
If you lack the flexibility for the narrower grip (which is super common), start out wider, then slowly bring it in as you get more flexible.
See the difference here between a “high bar, wrapped grip” (Left) and “low bar, thumbless grip” (right):
And now time to DO A BARBELL BACK SQUAT!
Definitely watch the video above and listen to the instructions, and then read this description when you need to restart:
With the weight on your shoulders, step back from the supports.
Your feet should be slightly wider than hip-width apart.
Your toes should be slightly pointing outward.
Flex your stomach, squeeze your glutes, inhale deeply into your stomach.
Move your butt back, squat down slowly.
Continue to drop until the tops of your legs are parallel or lower (the crease of your hip is below your waist).
Explode back up to the starting position.
After your set is complete, walk carefully forward to return the weight to the rack, and lower it down safely onto the supports.
High five yourself, you just did a barbell squat!
Not sure if you squatted deep enough?
Record yourself! 95% of the people I see doing squats in a gym don’t go deep enough!
Nervous about squatting correctly? Yes, I am a mind reader, and yes we can help you!
If you want an expert to check your squat form check out our 1-on-1 Coaching program. Our coaching app lets you record and send a video of your movement directly to your coach, who will provide specific feedback and build a custom program just for you.
Interested? Click below to jump on a free call with our team to see how our online coaching program will get you the results you’re after:
How To Bail Out of a Squat Safely
If you are going to squat, you have to know how to “fail” at squatting safely! After all, there’s nothing scarier than being stuck in the bottom of a squat movement and not knowing how to get out of there!
A squat is very different from a barbell deadlift in that aspect: if you fail on a deadlift, you just don’t pick up the weight.
If you fail on a squat, you’re trapped under a bar…with potentially a lot of weight on it.
This can lead to SERIOUS injury. So please, learn how to bail out of a squat safely before you start attempting to do heavy barbell squats.
This will help give you the confidence to push yourself and get stronger!
7 Common Mistakes When Doing Squats
The squat is a basic movement, but those new to lifting often fall victim to a handful of common mistakes.
Let’s take a look at some of the big problems and how to fix it!
#1) Coming up on your toes with your knees forward during your squat
It’s important to keep your heels on the ground the entire time you’re squatting.
You should be driving down through your heels, and in order to do that, they need to be on the ground!
While some of your weight will be on the balls of your feet, you never want all of your weight to be on the balls of your feet or your toes.
You should be able to lift your toes up off the ground and wiggle them at any point and it shouldn’t change anything about your squat.
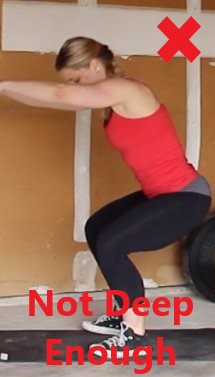
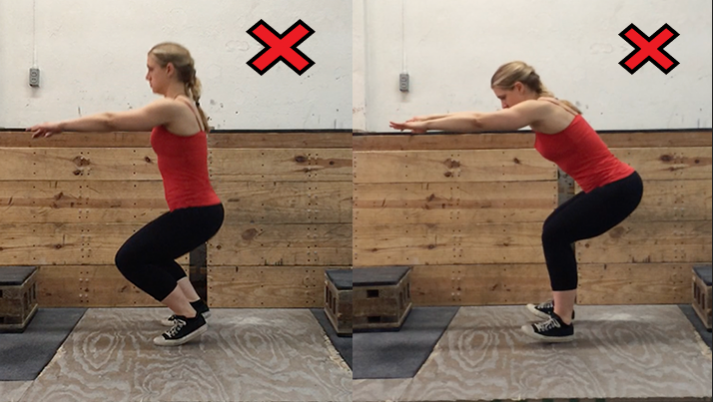
#2) Not going deep enough on your squats
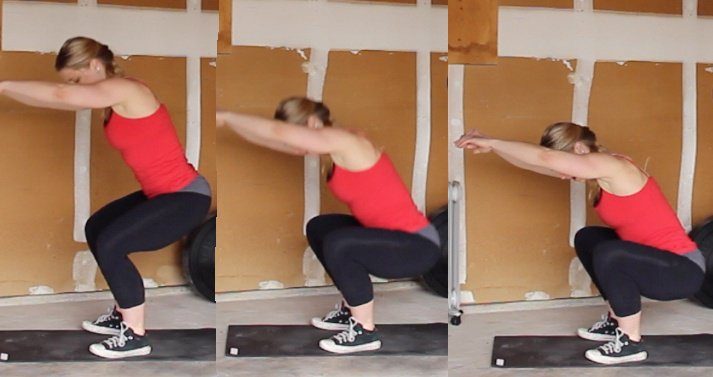
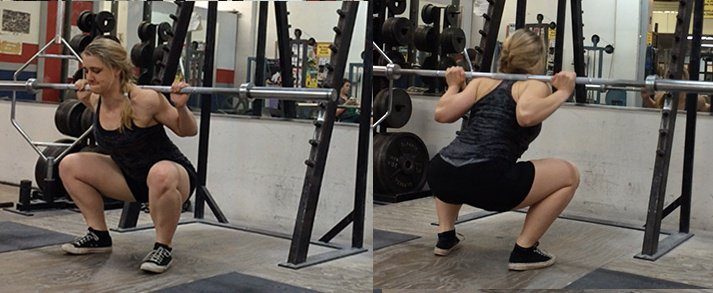
Your squat should hit at least parallel (middle image above) – where your hip joint goes below the knee.
Depending on what you’re training for, you can go lower, but in order to maximize the muscles worked in the squat, it needs to be done to at least parallel or lower (you can see lower in the upper right image).
If you squat above parallel (a partial squat) you’re leaving the hamstrings out of the movement. This puts more pressure on the knee – the force put on your knee is actually reduced as you drop below parallel.
Unfortunately, there’s a lot of misunderstanding about squats and knee issues.
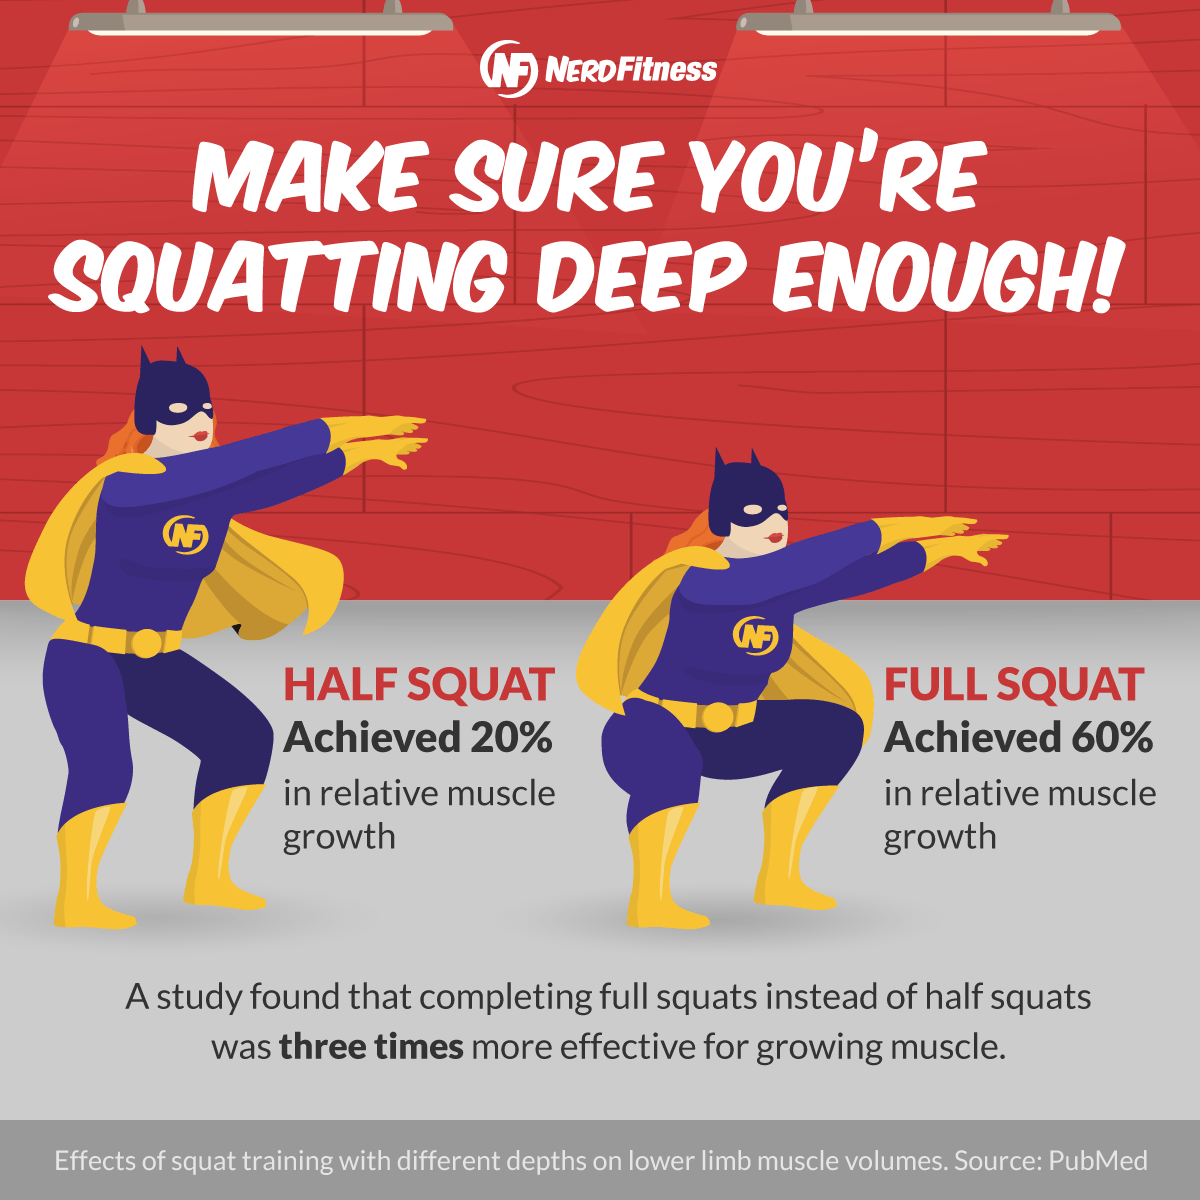
The deeper the squat, the more glutes that are activated as well.[3] This will result in more muscle being created from the squat, as shown by this infographic:
Now, a deeper squat is typically harder, both strength and flexibility wise.
However, depending on your goals, squatting to parallel may make more sense.
If you’re struggling hitting depth there could be many causes – you could have poor ankle mobility, tight hip flexors and/or hamstrings, weak glutes, or poor pelvic alignment (among many other things).
This is something we work closely with our coaching clients on, and often prescribe ankle and hip mobility drills to help clients reach proper depth on squats!
#3) Knee Positioning
When you squat, you want your knees to track along with your toes.
This means if you are looking down at your knees and feet, your knees should be aligned at the same angle as your feet throughout the movement.
This infographic shows you the correct knee position for a squat:
Everyone’s exact positioning is going to be slightly different, but they should not be on the outside or the inside of the foot.
#4) Back Positioning
Your chest should be up and your shoulders should be back, like you’re King Kong about to pound your chest proudly.
Your body should stay in this position the entire time.
You don’t want your shoulders to round forward, but you also don’t want to hyperextend your back either.
Keeping your spine in a neutral position will help your spine safe and build a strong foundation throughout the heavy squat movement.
#5) Head Positioning
Many coaches will tell their lifters to look up, as that is the direction in which you want to be moving, but this is actually the last thing you want to do.
Take a second quick and look at the ceiling (I’ll wait! 🙂 ).
Now, see that position your neck vertebrae are in? That is a very unsafe position for your spine to be in, especially when more weight starts getting included in the equation.
You also don’t want to be looking directly at the floor.
Look straight out in front of you the entire time, with your head in a “neutral” position. Your chin should be in a position where you could hold a tennis ball between your chest and your chin.
#6) Attempting to keep your shins vertical.
Unless there is a current underlying knee issue that would cause additional pain – the shin can and should go past vertical in the squat. This will often allow a deeper squat which will build more strength and stability in the knee.
A forward lean in the shins is also present when we engage in any number of daily activities such as walking up steps or standing up from a chair. Squat as deep as you are able, but do not focus on holding a vertical shin.”
#7) Too much weight on the heels/on the outside or inside of feet during your squat
When trying to fix coming up on your toes, or your knee positioning, it is common for people to focus so much on keeping their weight on their heels that they forget to keep the balls of their feet on the ground!
Some of your weight will still be on the ball of your foot – if you are truly only having weight on your heels, it’s pretty hard to balance.
To the same effect, if the inside of your foot or the outside of your foot comes up off the floor, this is also not a good thing!
How do you know if you’re making these mistakes? Simple!
Record yourself doing squats.
I do.
And so does anybody else who is serious about improving their squats.
Often we look VERY different than we think we look when doing an exercise, so having a video of the movement is often the only way we can improve.
If you can’t self-diagnose your squat challenges, let us help!
Squat Variations for Beginners (Box Squat):
In this section, we’re going to go over some squat variations to help you improve your form and build confidence before hitting the free weights section of the gym.
If you’re struggling to do a squat correctly, don’t fret!
I’m going to teach you about…
BOX SQUATS!
Squatting to a box will help teach you to sit back and keep your weight on your entire foot, instead of squatting with your knees forward and up on your toes.
Squatting back to a box is also great for people who have bad knees and can’t do bodyweight squats anymore.
You can do box squats with a barbell as well, but for this explanation, we’re just going to keep it simple with bodyweight box squats.
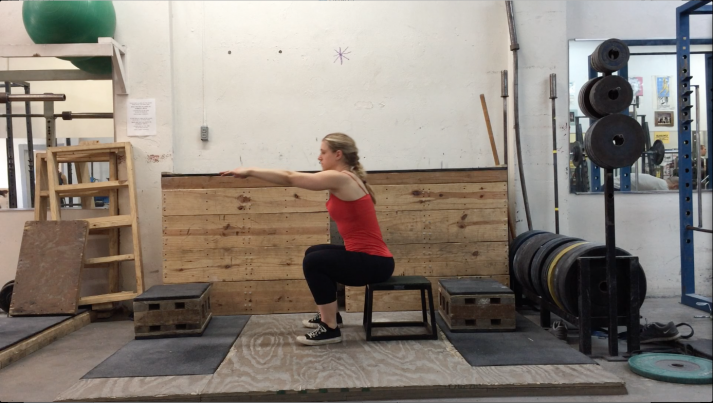
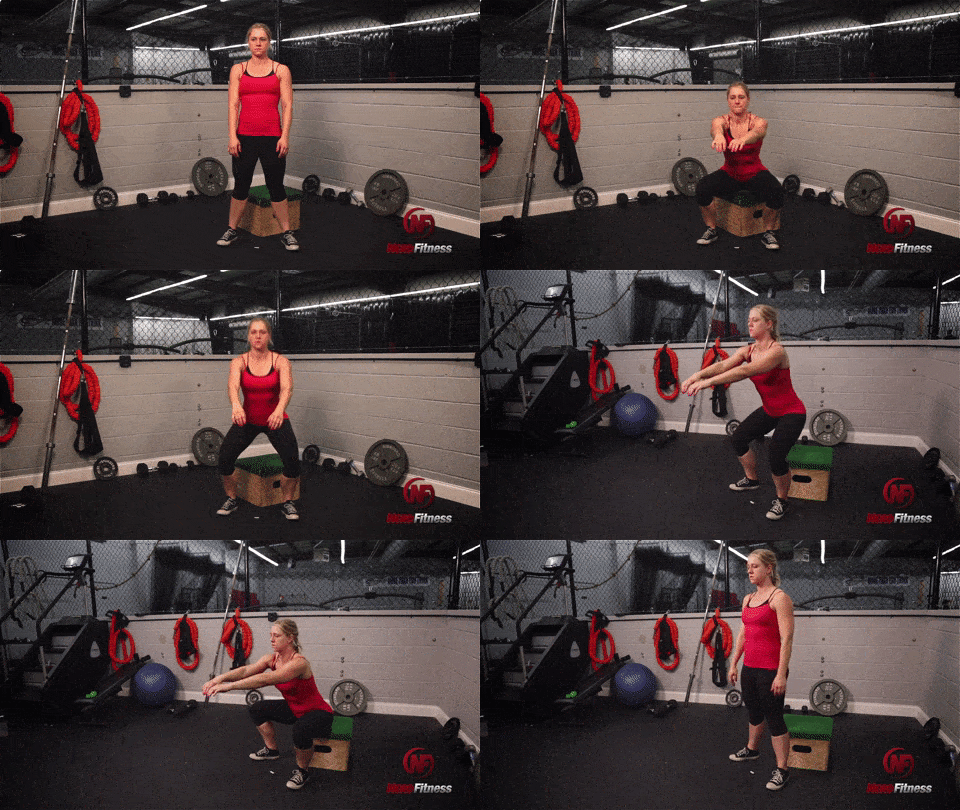
In order to do this, find a box or a chair that is the right height so when you sit on it, you are at parallel with your squat.
Your options include things like step stools, milk crates, or the smallest box at the gym (there’s usually a set of plyo boxes, and the shortest is around 10″.)
The lower the box, the more it will help you develop stronger hips and low back – the box at exactly parallel will help you more with quad strength.
Set up exactly as if you were going to do a regular bodyweight squat, only standing about a foot in front of the box.
1) Breathe in deeply, brace your core, move butt back, and keep your knees in line tracking in the same direction as your toes and squat back until you sit completely on the box.
Don’t plop back on the box, make it slow and deliberate while keeping your entire body tight.
2) Now, don’t move! Think about your positioning:
Are your back and core still super tight?
Is your weight on your heels and your mid foot?
Is your head in a neutral position?
Great, now stand up by driving your hips upward, don’t let your weight shift forward and onto your toes (drive through your heels!), shoulders and chest up, knees out keeping them lined up with your toes.
For your first few, feel free to sit on the box while you evaluate your positioning, but as you get better at them, sit back and then quickly stand up again.
You know you’re doing a good squat when you can stand back up from the bottom of a squat position without having to lean forward and use momentum to get up.
You can squat, touch your butt to the box, and then stand back up without having to shift your weight around!
KEEP THAT BUTT BACK!
How to Perform a Front Squat
If you’re up for a similar-but-different squat, try…
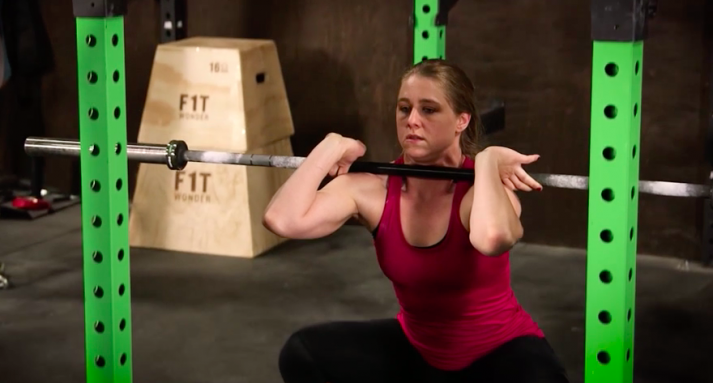
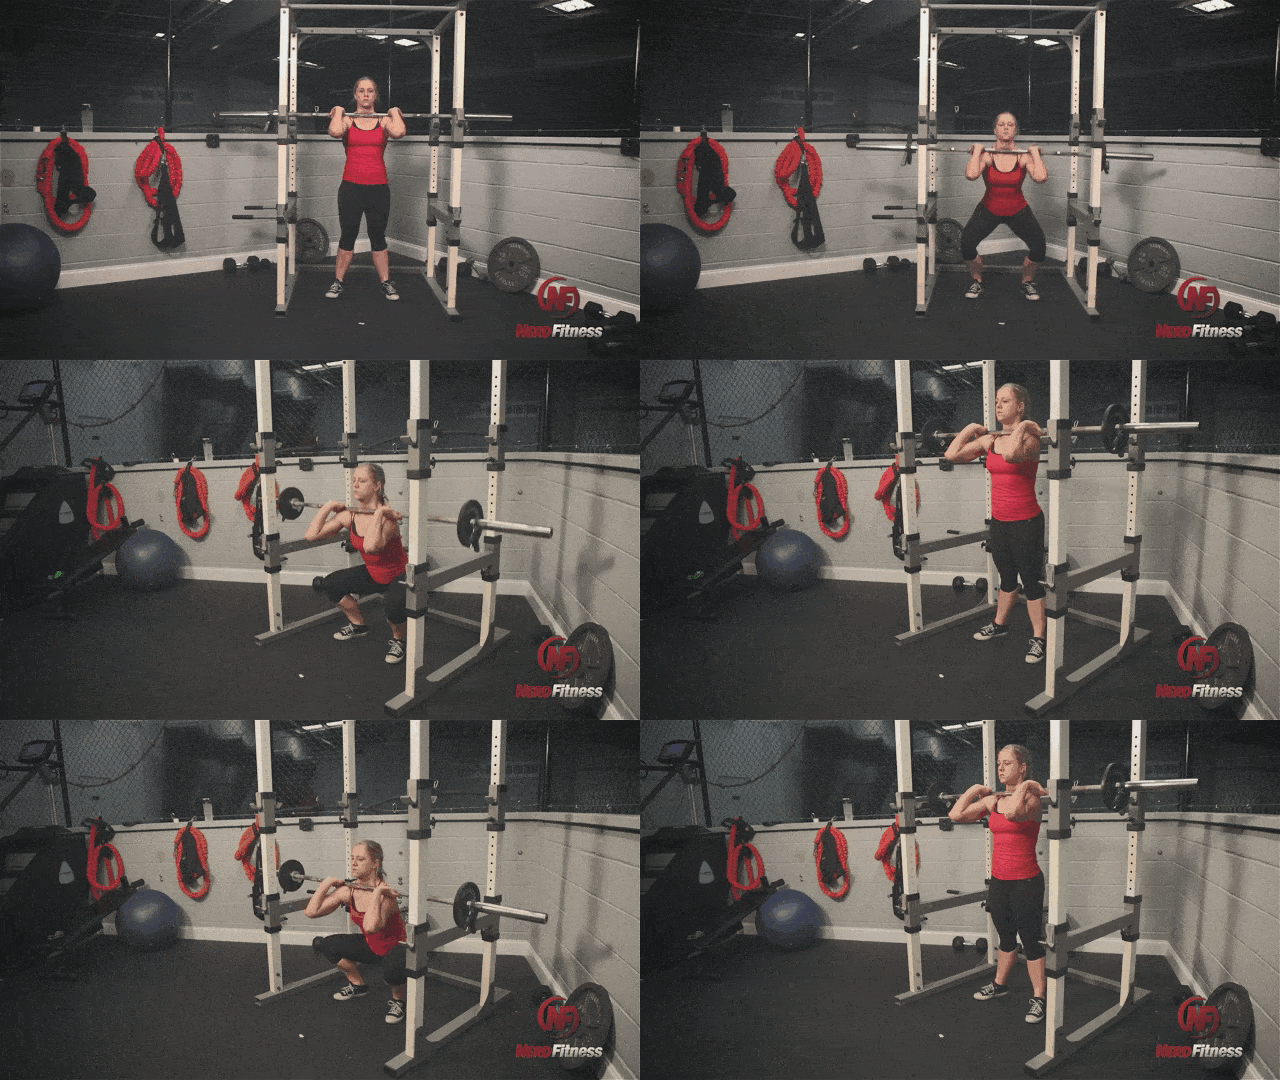
The barbell front squat!
A front squat moves the weight from behind you to in front of you, which requires different muscles and mobility in different places.
I personally alternate front squats and back squats on my leg days.
I know all of this can be overwhelming, so the important thing is that you START! I realize I sound like a broken record at this point, but I really want you to begin strength training today.
We created our free guide, Strength Training 101: Everything You Need to Know, just for that purpose. I’d love to send it to you, because I know it’ll help you overcome any fears and confusion and have you getting stronger TODAY
Get it when you sign up in this box below – I’m excited to hear what you think of it!
Download our comprehensive guideSTRENGTH TRAINING 101!
Everything you need to know about getting strong.
Workout routines for bodyweight AND weight training.
How to find the right gym and train properly in one.
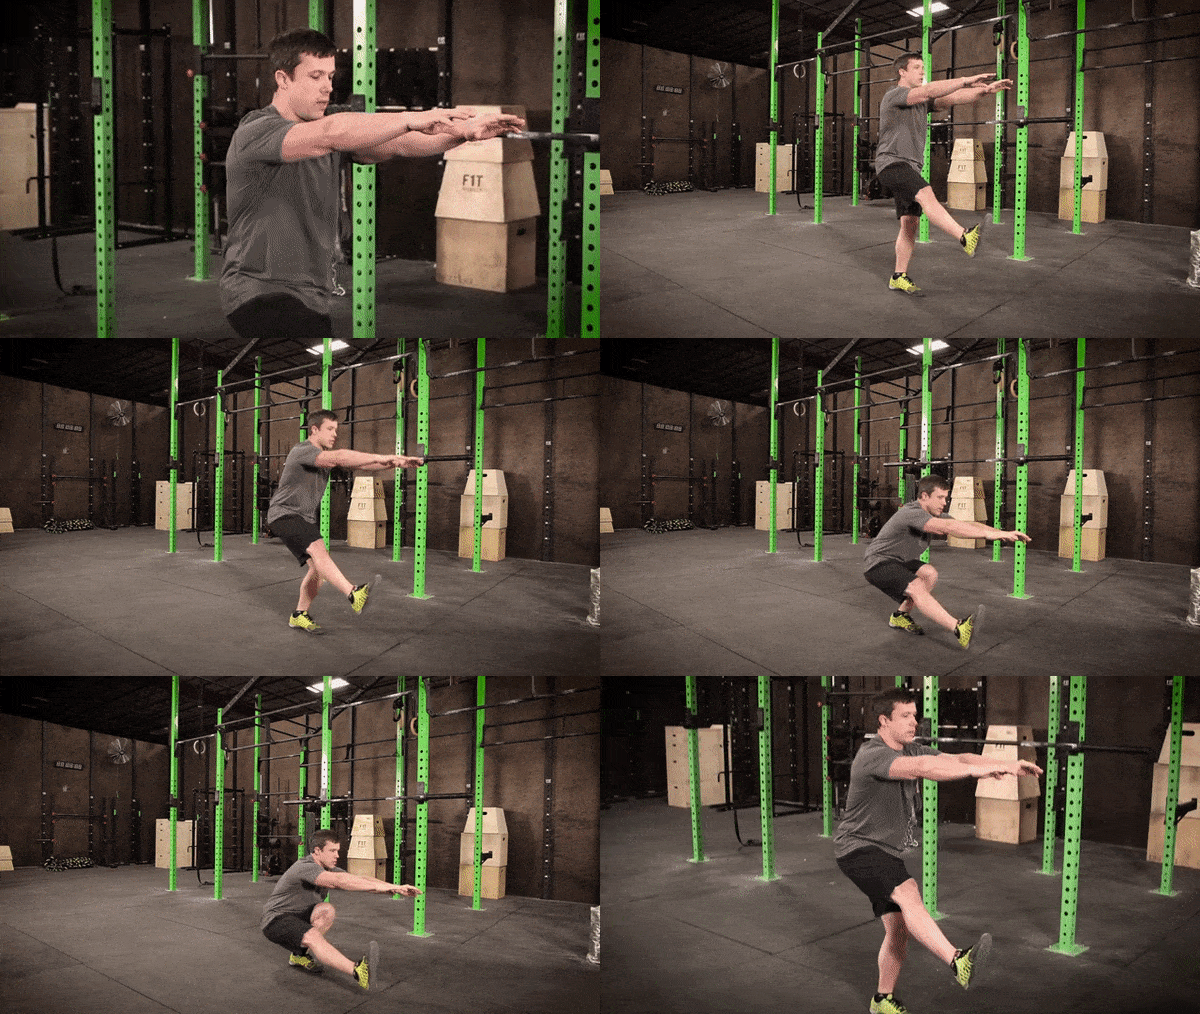
How to Perform a One-Legged Squat (The Pistol Squat)
In the video above, Coach Jim shows you how to perform the one-legged squat, also known as the pistol squat.
To perform a one-legged squat:
Squat down on one leg as low as you can go.
Keep the heel flat on the ground and lift the other leg out in front of you.
It’ll look something like this:
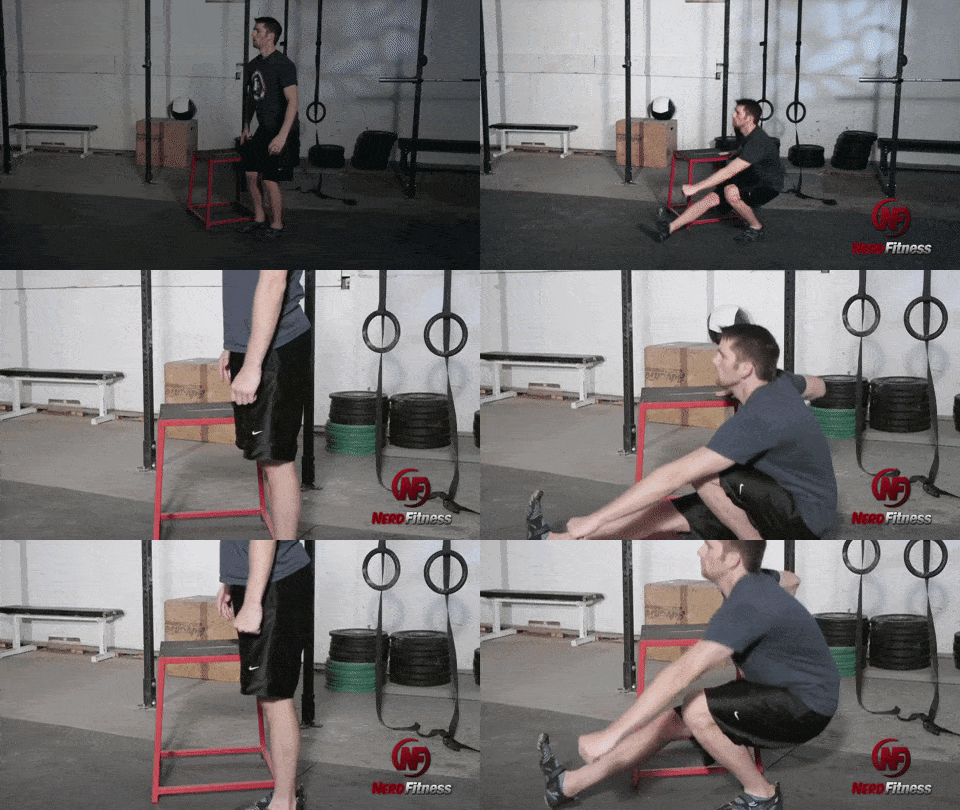
If this is too much, work on performing an assisted one-legged squat.
Perform an assisted one-legged squat by holding onto a doorframe, squat rack, rings or another stable object, then squat down on one leg as low as you can go.
How to Start Squatting Like A Pro
Squats are awesome.
How awesome? Look at that woman above owning her squat before owning her putt!
Once you’ve mastered the Back Squat, give Front Squats a try!
And if you want to learn more about squats, or you’re looking to build more confidence before you get started, we have a few options for you:
You’ll work with our certified NF instructors who will get to know you better than you know yourself, check your form, and program your workouts and nutrition for you.
2) If you want a snazzy app to teach you exactly how to start crushing squats, check out NF Journey. Our fun habit-building app helps you exercise more frequently, eat healthier, and level up your life (literally).
Try your free trial right here:
3) Download our free Strength 101 Guide, which you can get when you sign up in the box below:
Download our comprehensive guideSTRENGTH TRAINING 101!
Everything you need to know about getting strong.
Workout routines for bodyweight AND weight training.
How to find the right gym and train properly in one.
And I’d love to hear from you! PLEASE leave your questions, squat or fitness or otherwise below so we can answer them and become best friends:
What struggles do you have when trying to squat?
What questions do you have?
If you haven’t squatted before, what else do you need us to tell you to give you the confidence to start squatting TODAY!?
-Staci
PS: Be sure to check out the rest of the Strength Training 101 series:
One of the best exercises for you, whether you’re trying to build muscle or lose weight (or both) HAS to be the squat.
However, it’s also an exercise I see nearly EVERYBODY do incorrectly.
We do video form checks with every Online Coaching Client to make sure they’re squatting correctly, and we use a LOT of the same cues and instruction we cover in this guide!
So have no fear…
After reading this big ass squat guide (pun intended, I suppose?) – part of our Strength 101 series – you can start performing this compound exercise safely and effectively.
Click any link below or scroll down to read the whole guide:
Squats are one of the most foundational functional movements in our lives. Let’s talk about the benefits and why you should be squatting all the time.
#1) We’re designed to squat: We’ve been squatting since we were babies, but as we get older and sit in unnatural positions all day, our squat form goes from perfect to terrible.
Crap.
In many countries, people often sit in a full squat for hours at a time.
From an evolutionary standpoint – it makes sense that we are genetically designed to, and can be really good at – squatting.
Before modern-day furniture and technology, you didn’t stop sitting in a full squat once you got older like we do today…you continued squatting your entire life.
#2) Squats are a compound movement that recruits most of our muscles – this means it’s a movement that uses multiple muscle groups and joints (your hip and knee joints) to complete.
A simple bodyweight squat – which I’m demonstrating above – uses almost every muscle in the core and lower body.
If you add a dumbbell or barbell into the equation, I would even argue that they use every single major muscle group to complete.
In addition to every muscle in your “legs,” you need your:
Hips
Back
Core
Shoulders
Arms.
Nothing is left out with this monster movement.
Because of the utilization of a large amount of muscle groups, squats cause your body to increase our anabolic hormone production, helping us lose fat and build muscle.[1]
#3) Squats will help strengthen your bones and your muscles (and your knees!), and can also increase flexibility.
Increasing the strength in your knees and hips (and entire body) reduces your chance of injury while doing both athletic movements and everyday life things (such as shoveling the driveway or standing up and sitting down).
And by learning to squat deeply, safely, you’re improving your range of motion and helping make you antifragile and protecting yourself against future injury.
Bazinga!
If your goals are to:
Build muscle and get stronger, squats will get you there faster.
Lose weight and get ‘toned,’ squats will get you there faster.
Look better naked, squats will get you there faster.
Get healthier and happier, squats will get you there faster.
Feel like an absolute badass in the gym, squats will get you there faster.
In short, squats are amazing.
(See what I did there?)
My name is Staci Ardison, I’m a Senior Coach at Nerd Fitness, and my life has been absolutely transformed by barbell training, which is why I’m so excited to share this guide with you.
I am so excited to teach you how to squat today, as I’ve taught tons of coaching clients how to get started too.
Let’s start off by taking a look at the bodyweight squat – the first move you should master before you add weight.
How to Do a Bodyweight Squat With Proper Form
The setup for the squat exercise is incredibly simple.
Stand with your feet slightly wider than your hips.
Your toes should be pointed slightly outward – about 5 to 20 degrees outward (the wider your stance, the more you’ll want to rotate your feet outward).
Look straight ahead and pick a spot on the wall in front of you.
Look at this spot the entire time you squat, not looking down at the floor or up at the ceiling.
I go over the setup and the full movement in this video:
1) Put your arms straight out in front of you, parallel to the ground. Keep your chest up and proud, and your spine in a neutral position.
2) Your weight is on your feet – it should be on the heels and the balls of your feet, as if they were pasted to the ground. You should be able to wiggle your toes the entire movement (though that’s not a part of squatting!).
3) Keep your entire body tight the entire time, your core flexed like you’re bracing to be punched in the gut!
4) Breathe deeply into your stomach, break at your hip and push your butt back. Keep sending your hips backwards as your knees begin to bend.
It’s important to start with your hips back, and not by bending your knees.
5) As you squat down, focus on keeping your knees in line with your feet.
Many new lifters need to focus on pushing their knees out so they track with their feet.
When your knees start to come inside the toes, push them out (but not wider than your feet).[2]
Make sure your knees aren’t moving inward toward each other through the movement – this is very common.
6) Squat down until your hip joint is lower than your knees (what we call “parallel” in the squat game). Note: if you THINK you might not be squatting deep enough, you probably aren’t!
Once at the bottom, it’s time to stand back up from your squat:
7) Keeping everything tight, breathe out and drive through your heels (keep the balls of your feet on the ground as well).
8) Drive your knees outward (away from each other) the same way you did on the way down, and squeeze your butt at the top to make sure you’re using your glutes.
Here is a video from us nerds at Team Nerd Fitness (with instructions from Jim, lead trainer at our 1-on-1 Online Coaching Program) that will teach you good form on a bodyweight squat, including all the mistakes NOT to make:
Once you can do multiple sets of 15+ deep bodyweight squats with proper form, it’s time to move onto barbell squats!
If you are confident in doing bodyweight squats and want to work up to a barbell squat, follow our Gym Workout Level 4 Program, which includes dumbbell goblet squats, a good stepping stone to barbell squats:
The majority of the population has some sort of mobility issue (including myself!) that they are working on fixing.
We have LOTS of 1-on-1 coaching clients who are new to squatting, and it often comes down to ankle flexibility and hip mobility.
If you spend all day, every day, sitting in a desk chair, this might be you.
If you want us to help you fix your squat depth and start getting stronger, that’s what we’re here for!
How to Set Up Properly For The Barbell Back Squat
#1) Find your squat rack! It’ll look something like this, with an unattached barbell:
A. Squat Stand:
B. Power Cage/Squat Rack:
C. Half Rack (Least favorite*):
*I don’t like Half-racks without adjustable safety bars – if you want to squat deep the barbell might hit the immovable bars! Not cool. Aim for the A or B options if you have the choice!
Note: a squat rack is NOT the same thing as a Smith Machine, where the barbell is attached to the machine, and slides up and down two bars:
You do NOT want a Smith Machine.
You need a completely unattached barbell in order to do a barbell squat properly and safely. Don’t squat in a Smith Machine.
#2) Set the height of the bar to be about the same height as your collarbone.
Not sure how to set the height of the bar? I got you:
If your options are either too high or too low, it’s always best to set the pins slightly lower than you need them.
You don’t want to have to get up on your toes to rack/unrack the bar, especially as the weight gets heavier.
#3) Decide if you are going to do a high bar squat, or a low bar squat. Either is fine, but there IS a difference:
The “Low Bar Back Squat” is the most common form done by beginners, general lifters, and powerlifters.
It’s also the form taught in Starting Strength, one of the best books for beginners on the market.
So we’ll be focusing on that version for the rest of this section:
#4) Always squat with just the bar to start – as we discuss in “How much weight should I be lifting,” even if you’re planning on squatting 500 lbs, always start with just the bar!
How to Do a Proper Barbell Back Squat, Step By Step
1) Facing the bar, step under it, and put your hands around it on either side of you.
For this type of squat in our example, we are going to want a thumbless grip, so that our wrists are properly aligned with our forearms.
The width of your grip will be dependent on flexibility, but generally, a narrower (hands closer to your shoulers) grip will help create a meaty shelf for you to place the bar on the muscles in your upper back.
If you lack the flexibility for the narrower grip (which is super common), start out wider, then slowly bring it in as you get more flexible.
See the difference here between a “high bar, wrapped grip” (Left) and “low bar, thumbless grip” (right):
And now time to DO A BARBELL BACK SQUAT!
Definitely watch the video above and listen to the instructions, and then read this description when you need to restart:
With the weight on your shoulders, step back from the supports.
Your feet should be slightly wider than hip-width apart.
Your toes should be slightly pointing outward.
Flex your stomach, squeeze your glutes, inhale deeply into your stomach.
Move your butt back, squat down slowly.
Continue to drop until the tops of your legs are parallel or lower (the crease of your hip is below your waist).
Explode back up to the starting position.
After your set is complete, walk carefully forward to return the weight to the rack, and lower it down safely onto the supports.
High five yourself, you just did a barbell squat!
Not sure if you squatted deep enough?
Record yourself! 95% of the people I see doing squats in a gym don’t go deep enough!
Nervous about squatting correctly? Yes, I am a mind reader, and yes we can help you!
If you want an expert to check your squat form check out our 1-on-1 Coaching program. Our coaching app lets you record and send a video of your movement directly to your coach, who will provide specific feedback and build a custom program just for you.
Interested? Click below to jump on a free call with our team to see how our online coaching program will get you the results you’re after:
How To Bail Out of a Squat Safely
If you are going to squat, you have to know how to “fail” at squatting safely! After all, there’s nothing scarier than being stuck in the bottom of a squat movement and not knowing how to get out of there!
A squat is very different from a barbell deadlift in that aspect: if you fail on a deadlift, you just don’t pick up the weight.
If you fail on a squat, you’re trapped under a bar…with potentially a lot of weight on it.
This can lead to SERIOUS injury. So please, learn how to bail out of a squat safely before you start attempting to do heavy barbell squats.
This will help give you the confidence to push yourself and get stronger!
7 Common Mistakes When Doing Squats
The squat is a basic movement, but those new to lifting often fall victim to a handful of common mistakes.
Let’s take a look at some of the big problems and how to fix it!
#1) Coming up on your toes with your knees forward during your squat
It’s important to keep your heels on the ground the entire time you’re squatting.
You should be driving down through your heels, and in order to do that, they need to be on the ground!
While some of your weight will be on the balls of your feet, you never want all of your weight to be on the balls of your feet or your toes.
You should be able to lift your toes up off the ground and wiggle them at any point and it shouldn’t change anything about your squat.
#2) Not going deep enough on your squats
Your squat should hit at least parallel (middle image above) – where your hip joint goes below the knee.
Depending on what you’re training for, you can go lower, but in order to maximize the muscles worked in the squat, it needs to be done to at least parallel or lower (you can see lower in the upper right image).
If you squat above parallel (a partial squat) you’re leaving the hamstrings out of the movement. This puts more pressure on the knee – the force put on your knee is actually reduced as you drop below parallel.
Unfortunately, there’s a lot of misunderstanding about squats and knee issues.
The deeper the squat, the more glutes that are activated as well.[3] This will result in more muscle being created from the squat, as shown by this infographic:
Now, a deeper squat is typically harder, both strength and flexibility wise.
However, depending on your goals, squatting to parallel may make more sense.
If you’re struggling hitting depth there could be many causes – you could have poor ankle mobility, tight hip flexors and/or hamstrings, weak glutes, or poor pelvic alignment (among many other things).
This is something we work closely with our coaching clients on, and often prescribe ankle and hip mobility drills to help clients reach proper depth on squats!
#3) Knee Positioning
When you squat, you want your knees to track along with your toes.
This means if you are looking down at your knees and feet, your knees should be aligned at the same angle as your feet throughout the movement.
This infographic shows you the correct knee position for a squat:
Everyone’s exact positioning is going to be slightly different, but they should not be on the outside or the inside of the foot.
#4) Back Positioning
Your chest should be up and your shoulders should be back, like you’re King Kong about to pound your chest proudly.
Your body should stay in this position the entire time.
You don’t want your shoulders to round forward, but you also don’t want to hyperextend your back either.
Keeping your spine in a neutral position will help your spine safe and build a strong foundation throughout the heavy squat movement.
#5) Head Positioning
Many coaches will tell their lifters to look up, as that is the direction in which you want to be moving, but this is actually the last thing you want to do.
Take a second quick and look at the ceiling (I’ll wait! 🙂 ).
Now, see that position your neck vertebrae are in? That is a very unsafe position for your spine to be in, especially when more weight starts getting included in the equation.
You also don’t want to be looking directly at the floor.
Look straight out in front of you the entire time, with your head in a “neutral” position. Your chin should be in a position where you could hold a tennis ball between your chest and your chin.
#6) Attempting to keep your shins vertical.
Unless there is a current underlying knee issue that would cause additional pain – the shin can and should go past vertical in the squat. This will often allow a deeper squat which will build more strength and stability in the knee.
A forward lean in the shins is also present when we engage in any number of daily activities such as walking up steps or standing up from a chair. Squat as deep as you are able, but do not focus on holding a vertical shin.”
#7) Too much weight on the heels/on the outside or inside of feet during your squat
When trying to fix coming up on your toes, or your knee positioning, it is common for people to focus so much on keeping their weight on their heels that they forget to keep the balls of their feet on the ground!
Some of your weight will still be on the ball of your foot – if you are truly only having weight on your heels, it’s pretty hard to balance.
To the same effect, if the inside of your foot or the outside of your foot comes up off the floor, this is also not a good thing!
How do you know if you’re making these mistakes? Simple!
Record yourself doing squats.
I do.
And so does anybody else who is serious about improving their squats.
Often we look VERY different than we think we look when doing an exercise, so having a video of the movement is often the only way we can improve.
If you can’t self-diagnose your squat challenges, let us help!
Squat Variations for Beginners (Box Squat):
In this section, we’re going to go over some squat variations to help you improve your form and build confidence before hitting the free weights section of the gym.
If you’re struggling to do a squat correctly, don’t fret!
I’m going to teach you about…
BOX SQUATS!
Squatting to a box will help teach you to sit back and keep your weight on your entire foot, instead of squatting with your knees forward and up on your toes.
Squatting back to a box is also great for people who have bad knees and can’t do bodyweight squats anymore.
You can do box squats with a barbell as well, but for this explanation, we’re just going to keep it simple with bodyweight box squats.
In order to do this, find a box or a chair that is the right height so when you sit on it, you are at parallel with your squat.
Your options include things like step stools, milk crates, or the smallest box at the gym (there’s usually a set of plyo boxes, and the shortest is around 10″.)
The lower the box, the more it will help you develop stronger hips and low back – the box at exactly parallel will help you more with quad strength.
Set up exactly as if you were going to do a regular bodyweight squat, only standing about a foot in front of the box.
1) Breathe in deeply, brace your core, move butt back, and keep your knees in line tracking in the same direction as your toes and squat back until you sit completely on the box.
Don’t plop back on the box, make it slow and deliberate while keeping your entire body tight.
2) Now, don’t move! Think about your positioning:
Are your back and core still super tight?
Is your weight on your heels and your mid foot?
Is your head in a neutral position?
Great, now stand up by driving your hips upward, don’t let your weight shift forward and onto your toes (drive through your heels!), shoulders and chest up, knees out keeping them lined up with your toes.
For your first few, feel free to sit on the box while you evaluate your positioning, but as you get better at them, sit back and then quickly stand up again.
You know you’re doing a good squat when you can stand back up from the bottom of a squat position without having to lean forward and use momentum to get up.
You can squat, touch your butt to the box, and then stand back up without having to shift your weight around!
KEEP THAT BUTT BACK!
How to Perform a Front Squat
If you’re up for a similar-but-different squat, try…
The barbell front squat!
A front squat moves the weight from behind you to in front of you, which requires different muscles and mobility in different places.
I personally alternate front squats and back squats on my leg days.
I know all of this can be overwhelming, so the important thing is that you START! I realize I sound like a broken record at this point, but I really want you to begin strength training today.
We created our free guide, Strength Training 101: Everything You Need to Know, just for that purpose. I’d love to send it to you, because I know it’ll help you overcome any fears and confusion and have you getting stronger TODAY
Get it when you sign up in this box below – I’m excited to hear what you think of it!
Download our comprehensive guideSTRENGTH TRAINING 101!
Everything you need to know about getting strong.
Workout routines for bodyweight AND weight training.
How to find the right gym and train properly in one.
How to Perform a One-Legged Squat (The Pistol Squat)
In the video above, Coach Jim shows you how to perform the one-legged squat, also known as the pistol squat.
To perform a one-legged squat:
Squat down on one leg as low as you can go.
Keep the heel flat on the ground and lift the other leg out in front of you.
It’ll look something like this:
If this is too much, work on performing an assisted one-legged squat.
Perform an assisted one-legged squat by holding onto a doorframe, squat rack, rings or another stable object, then squat down on one leg as low as you can go.
How to Start Squatting Like A Pro
Squats are awesome.
How awesome? Look at that woman above owning her squat before owning her putt!
Once you’ve mastered the Back Squat, give Front Squats a try!
And if you want to learn more about squats, or you’re looking to build more confidence before you get started, we have a few options for you:
You’ll work with our certified NF instructors who will get to know you better than you know yourself, check your form, and program your workouts and nutrition for you.
2) If you want a snazzy app to teach you exactly how to start crushing squats, check out NF Journey. Our fun habit-building app helps you exercise more frequently, eat healthier, and level up your life (literally).
Try your free trial right here:
3) Download our free Strength 101 Guide, which you can get when you sign up in the box below:
Download our comprehensive guideSTRENGTH TRAINING 101!
Everything you need to know about getting strong.
Workout routines for bodyweight AND weight training.
How to find the right gym and train properly in one.
And I’d love to hear from you! PLEASE leave your questions, squat or fitness or otherwise below so we can answer them and become best friends:
What struggles do you have when trying to squat?
What questions do you have?
If you haven’t squatted before, what else do you need us to tell you to give you the confidence to start squatting TODAY!?
-Staci
PS: Be sure to check out the rest of the Strength Training 101 series:
One of the best exercises for you, whether you’re trying to build muscle or lose weight (or both) HAS to be the squat.
However, it’s also an exercise I see nearly EVERYBODY do incorrectly.
We do video form checks with every Online Coaching Client to make sure they’re squatting correctly, and we use a LOT of the same cues and instruction we cover in this guide!
So have no fear…
After reading this big ass squat guide (pun intended, I suppose?) – part of our Strength 101 series – you can start performing this compound exercise safely and effectively.
Click any link below or scroll down to read the whole guide:
Squats are one of the most foundational functional movements in our lives. Let’s talk about the benefits and why you should be squatting all the time.
#1) We’re designed to squat: We’ve been squatting since we were babies, but as we get older and sit in unnatural positions all day, our squat form goes from perfect to terrible.
Crap.
In many countries, people often sit in a full squat for hours at a time.
From an evolutionary standpoint – it makes sense that we are genetically designed to, and can be really good at – squatting.
Before modern-day furniture and technology, you didn’t stop sitting in a full squat once you got older like we do today…you continued squatting your entire life.
#2) Squats are a compound movement that recruits most of our muscles – this means it’s a movement that uses multiple muscle groups and joints (your hip and knee joints) to complete.
A simple bodyweight squat – which I’m demonstrating above – uses almost every muscle in the core and lower body.
If you add a dumbbell or barbell into the equation, I would even argue that they use every single major muscle group to complete.
In addition to every muscle in your “legs,” you need your:
Hips
Back
Core
Shoulders
Arms.
Nothing is left out with this monster movement.
Because of the utilization of a large amount of muscle groups, squats cause your body to increase our anabolic hormone production, helping us lose fat and build muscle.[1]
#3) Squats will help strengthen your bones and your muscles (and your knees!), and can also increase flexibility.
Increasing the strength in your knees and hips (and entire body) reduces your chance of injury while doing both athletic movements and everyday life things (such as shoveling the driveway or standing up and sitting down).
And by learning to squat deeply, safely, you’re improving your range of motion and helping make you antifragile and protecting yourself against future injury.
Bazinga!
If your goals are to:
Build muscle and get stronger, squats will get you there faster.
Lose weight and get ‘toned,’ squats will get you there faster.
Look better naked, squats will get you there faster.
Get healthier and happier, squats will get you there faster.
Feel like an absolute badass in the gym, squats will get you there faster.
In short, squats are amazing.
(See what I did there?)
My name is Staci Ardison, I’m a Senior Coach at Nerd Fitness, and my life has been absolutely transformed by barbell training, which is why I’m so excited to share this guide with you.
I am so excited to teach you how to squat today, as I’ve taught tons of coaching clients how to get started too.
Let’s start off by taking a look at the bodyweight squat – the first move you should master before you add weight.
How to Do a Bodyweight Squat With Proper Form
The setup for the squat exercise is incredibly simple.
Stand with your feet slightly wider than your hips.
Your toes should be pointed slightly outward – about 5 to 20 degrees outward (the wider your stance, the more you’ll want to rotate your feet outward).
Look straight ahead and pick a spot on the wall in front of you.
Look at this spot the entire time you squat, not looking down at the floor or up at the ceiling.
I go over the setup and the full movement in this video:
1) Put your arms straight out in front of you, parallel to the ground. Keep your chest up and proud, and your spine in a neutral position.
2) Your weight is on your feet – it should be on the heels and the balls of your feet, as if they were pasted to the ground. You should be able to wiggle your toes the entire movement (though that’s not a part of squatting!).
3) Keep your entire body tight the entire time, your core flexed like you’re bracing to be punched in the gut!
4) Breathe deeply into your stomach, break at your hip and push your butt back. Keep sending your hips backwards as your knees begin to bend.
It’s important to start with your hips back, and not by bending your knees.
5) As you squat down, focus on keeping your knees in line with your feet.
Many new lifters need to focus on pushing their knees out so they track with their feet.
When your knees start to come inside the toes, push them out (but not wider than your feet).[2]
Make sure your knees aren’t moving inward toward each other through the movement – this is very common.
6) Squat down until your hip joint is lower than your knees (what we call “parallel” in the squat game). Note: if you THINK you might not be squatting deep enough, you probably aren’t!
Once at the bottom, it’s time to stand back up from your squat:
7) Keeping everything tight, breathe out and drive through your heels (keep the balls of your feet on the ground as well).
8) Drive your knees outward (away from each other) the same way you did on the way down, and squeeze your butt at the top to make sure you’re using your glutes.
Here is a video from us nerds at Team Nerd Fitness (with instructions from Jim, lead trainer at our 1-on-1 Online Coaching Program) that will teach you good form on a bodyweight squat, including all the mistakes NOT to make:
Once you can do multiple sets of 15+ deep bodyweight squats with proper form, it’s time to move onto barbell squats!
If you are confident in doing bodyweight squats and want to work up to a barbell squat, follow our Gym Workout Level 4 Program, which includes dumbbell goblet squats, a good stepping stone to barbell squats:
The majority of the population has some sort of mobility issue (including myself!) that they are working on fixing.
We have LOTS of 1-on-1 coaching clients who are new to squatting, and it often comes down to ankle flexibility and hip mobility.
If you spend all day, every day, sitting in a desk chair, this might be you.
If you want us to help you fix your squat depth and start getting stronger, that’s what we’re here for!
How to Set Up Properly For The Barbell Back Squat
#1) Find your squat rack! It’ll look something like this, with an unattached barbell:
A. Squat Stand:
B. Power Cage/Squat Rack:
C. Half Rack (Least favorite*):
*I don’t like Half-racks without adjustable safety bars – if you want to squat deep the barbell might hit the immovable bars! Not cool. Aim for the A or B options if you have the choice!
Note: a squat rack is NOT the same thing as a Smith Machine, where the barbell is attached to the machine, and slides up and down two bars:
You do NOT want a Smith Machine.
You need a completely unattached barbell in order to do a barbell squat properly and safely. Don’t squat in a Smith Machine.
#2) Set the height of the bar to be about the same height as your collarbone.
Not sure how to set the height of the bar? I got you:
If your options are either too high or too low, it’s always best to set the pins slightly lower than you need them.
You don’t want to have to get up on your toes to rack/unrack the bar, especially as the weight gets heavier.
#3) Decide if you are going to do a high bar squat, or a low bar squat. Either is fine, but there IS a difference:
The “Low Bar Back Squat” is the most common form done by beginners, general lifters, and powerlifters.
It’s also the form taught in Starting Strength, one of the best books for beginners on the market.
So we’ll be focusing on that version for the rest of this section:
#4) Always squat with just the bar to start – as we discuss in “How much weight should I be lifting,” even if you’re planning on squatting 500 lbs, always start with just the bar!
How to Do a Proper Barbell Back Squat, Step By Step
1) Facing the bar, step under it, and put your hands around it on either side of you.
For this type of squat in our example, we are going to want a thumbless grip, so that our wrists are properly aligned with our forearms.
The width of your grip will be dependent on flexibility, but generally, a narrower (hands closer to your shoulers) grip will help create a meaty shelf for you to place the bar on the muscles in your upper back.
If you lack the flexibility for the narrower grip (which is super common), start out wider, then slowly bring it in as you get more flexible.
See the difference here between a “high bar, wrapped grip” (Left) and “low bar, thumbless grip” (right):
And now time to DO A BARBELL BACK SQUAT!
Definitely watch the video above and listen to the instructions, and then read this description when you need to restart:
With the weight on your shoulders, step back from the supports.
Your feet should be slightly wider than hip-width apart.
Your toes should be slightly pointing outward.
Flex your stomach, squeeze your glutes, inhale deeply into your stomach.
Move your butt back, squat down slowly.
Continue to drop until the tops of your legs are parallel or lower (the crease of your hip is below your waist).
Explode back up to the starting position.
After your set is complete, walk carefully forward to return the weight to the rack, and lower it down safely onto the supports.
High five yourself, you just did a barbell squat!
Not sure if you squatted deep enough?
Record yourself! 95% of the people I see doing squats in a gym don’t go deep enough!
Nervous about squatting correctly? Yes, I am a mind reader, and yes we can help you!
If you want an expert to check your squat form check out our 1-on-1 Coaching program. Our coaching app lets you record and send a video of your movement directly to your coach, who will provide specific feedback and build a custom program just for you.
Interested? Click below to jump on a free call with our team to see how our online coaching program will get you the results you’re after:
How To Bail Out of a Squat Safely
If you are going to squat, you have to know how to “fail” at squatting safely! After all, there’s nothing scarier than being stuck in the bottom of a squat movement and not knowing how to get out of there!
A squat is very different from a barbell deadlift in that aspect: if you fail on a deadlift, you just don’t pick up the weight.
If you fail on a squat, you’re trapped under a bar…with potentially a lot of weight on it.
This can lead to SERIOUS injury. So please, learn how to bail out of a squat safely before you start attempting to do heavy barbell squats.
This will help give you the confidence to push yourself and get stronger!
7 Common Mistakes When Doing Squats
The squat is a basic movement, but those new to lifting often fall victim to a handful of common mistakes.
Let’s take a look at some of the big problems and how to fix it!
#1) Coming up on your toes with your knees forward during your squat
It’s important to keep your heels on the ground the entire time you’re squatting.
You should be driving down through your heels, and in order to do that, they need to be on the ground!
While some of your weight will be on the balls of your feet, you never want all of your weight to be on the balls of your feet or your toes.
You should be able to lift your toes up off the ground and wiggle them at any point and it shouldn’t change anything about your squat.
#2) Not going deep enough on your squats
Your squat should hit at least parallel (middle image above) – where your hip joint goes below the knee.
Depending on what you’re training for, you can go lower, but in order to maximize the muscles worked in the squat, it needs to be done to at least parallel or lower (you can see lower in the upper right image).
If you squat above parallel (a partial squat) you’re leaving the hamstrings out of the movement. This puts more pressure on the knee – the force put on your knee is actually reduced as you drop below parallel.
Unfortunately, there’s a lot of misunderstanding about squats and knee issues.
The deeper the squat, the more glutes that are activated as well.[3] This will result in more muscle being created from the squat, as shown by this infographic:
Now, a deeper squat is typically harder, both strength and flexibility wise.
However, depending on your goals, squatting to parallel may make more sense.
If you’re struggling hitting depth there could be many causes – you could have poor ankle mobility, tight hip flexors and/or hamstrings, weak glutes, or poor pelvic alignment (among many other things).
This is something we work closely with our coaching clients on, and often prescribe ankle and hip mobility drills to help clients reach proper depth on squats!
#3) Knee Positioning
When you squat, you want your knees to track along with your toes.
This means if you are looking down at your knees and feet, your knees should be aligned at the same angle as your feet throughout the movement.
This infographic shows you the correct knee position for a squat:
Everyone’s exact positioning is going to be slightly different, but they should not be on the outside or the inside of the foot.
#4) Back Positioning
Your chest should be up and your shoulders should be back, like you’re King Kong about to pound your chest proudly.
Your body should stay in this position the entire time.
You don’t want your shoulders to round forward, but you also don’t want to hyperextend your back either.
Keeping your spine in a neutral position will help your spine safe and build a strong foundation throughout the heavy squat movement.
#5) Head Positioning
Many coaches will tell their lifters to look up, as that is the direction in which you want to be moving, but this is actually the last thing you want to do.
Take a second quick and look at the ceiling (I’ll wait! 🙂 ).
Now, see that position your neck vertebrae are in? That is a very unsafe position for your spine to be in, especially when more weight starts getting included in the equation.
You also don’t want to be looking directly at the floor.
Look straight out in front of you the entire time, with your head in a “neutral” position. Your chin should be in a position where you could hold a tennis ball between your chest and your chin.
#6) Attempting to keep your shins vertical.
Unless there is a current underlying knee issue that would cause additional pain – the shin can and should go past vertical in the squat. This will often allow a deeper squat which will build more strength and stability in the knee.
A forward lean in the shins is also present when we engage in any number of daily activities such as walking up steps or standing up from a chair. Squat as deep as you are able, but do not focus on holding a vertical shin.”
#7) Too much weight on the heels/on the outside or inside of feet during your squat
When trying to fix coming up on your toes, or your knee positioning, it is common for people to focus so much on keeping their weight on their heels that they forget to keep the balls of their feet on the ground!
Some of your weight will still be on the ball of your foot – if you are truly only having weight on your heels, it’s pretty hard to balance.
To the same effect, if the inside of your foot or the outside of your foot comes up off the floor, this is also not a good thing!
How do you know if you’re making these mistakes? Simple!
Record yourself doing squats.
I do.
And so does anybody else who is serious about improving their squats.
Often we look VERY different than we think we look when doing an exercise, so having a video of the movement is often the only way we can improve.
If you can’t self-diagnose your squat challenges, let us help!
Squat Variations for Beginners (Box Squat):
In this section, we’re going to go over some squat variations to help you improve your form and build confidence before hitting the free weights section of the gym.
If you’re struggling to do a squat correctly, don’t fret!
I’m going to teach you about…
BOX SQUATS!
Squatting to a box will help teach you to sit back and keep your weight on your entire foot, instead of squatting with your knees forward and up on your toes.
Squatting back to a box is also great for people who have bad knees and can’t do bodyweight squats anymore.
You can do box squats with a barbell as well, but for this explanation, we’re just going to keep it simple with bodyweight box squats.
In order to do this, find a box or a chair that is the right height so when you sit on it, you are at parallel with your squat.
Your options include things like step stools, milk crates, or the smallest box at the gym (there’s usually a set of plyo boxes, and the shortest is around 10″.)
The lower the box, the more it will help you develop stronger hips and low back – the box at exactly parallel will help you more with quad strength.
Set up exactly as if you were going to do a regular bodyweight squat, only standing about a foot in front of the box.
1) Breathe in deeply, brace your core, move butt back, and keep your knees in line tracking in the same direction as your toes and squat back until you sit completely on the box.
Don’t plop back on the box, make it slow and deliberate while keeping your entire body tight.
2) Now, don’t move! Think about your positioning:
Are your back and core still super tight?
Is your weight on your heels and your mid foot?
Is your head in a neutral position?
Great, now stand up by driving your hips upward, don’t let your weight shift forward and onto your toes (drive through your heels!), shoulders and chest up, knees out keeping them lined up with your toes.
For your first few, feel free to sit on the box while you evaluate your positioning, but as you get better at them, sit back and then quickly stand up again.
You know you’re doing a good squat when you can stand back up from the bottom of a squat position without having to lean forward and use momentum to get up.
You can squat, touch your butt to the box, and then stand back up without having to shift your weight around!
KEEP THAT BUTT BACK!
How to Perform a Front Squat
If you’re up for a similar-but-different squat, try…
The barbell front squat!
A front squat moves the weight from behind you to in front of you, which requires different muscles and mobility in different places.
I personally alternate front squats and back squats on my leg days.
I know all of this can be overwhelming, so the important thing is that you START! I realize I sound like a broken record at this point, but I really want you to begin strength training today.
We created our free guide, Strength Training 101: Everything You Need to Know, just for that purpose. I’d love to send it to you, because I know it’ll help you overcome any fears and confusion and have you getting stronger TODAY
Get it when you sign up in this box below – I’m excited to hear what you think of it!
Download our comprehensive guideSTRENGTH TRAINING 101!
Everything you need to know about getting strong.
Workout routines for bodyweight AND weight training.
How to find the right gym and train properly in one.
How to Perform a One-Legged Squat (The Pistol Squat)
In the video above, Coach Jim shows you how to perform the one-legged squat, also known as the pistol squat.
To perform a one-legged squat:
Squat down on one leg as low as you can go.
Keep the heel flat on the ground and lift the other leg out in front of you.
It’ll look something like this:
If this is too much, work on performing an assisted one-legged squat.
Perform an assisted one-legged squat by holding onto a doorframe, squat rack, rings or another stable object, then squat down on one leg as low as you can go.
How to Start Squatting Like A Pro
Squats are awesome.
How awesome? Look at that woman above owning her squat before owning her putt!
Once you’ve mastered the Back Squat, give Front Squats a try!
And if you want to learn more about squats, or you’re looking to build more confidence before you get started, we have a few options for you:
You’ll work with our certified NF instructors who will get to know you better than you know yourself, check your form, and program your workouts and nutrition for you.
2) If you want a snazzy app to teach you exactly how to start crushing squats, check out NF Journey. Our fun habit-building app helps you exercise more frequently, eat healthier, and level up your life (literally).
Try your free trial right here:
3) Download our free Strength 101 Guide, which you can get when you sign up in the box below:
Download our comprehensive guideSTRENGTH TRAINING 101!
Everything you need to know about getting strong.
Workout routines for bodyweight AND weight training.
How to find the right gym and train properly in one.
And I’d love to hear from you! PLEASE leave your questions, squat or fitness or otherwise below so we can answer them and become best friends:
What struggles do you have when trying to squat?
What questions do you have?
If you haven’t squatted before, what else do you need us to tell you to give you the confidence to start squatting TODAY!?
-Staci
PS: Be sure to check out the rest of the Strength Training 101 series:
The health and wellness industry has perpetuated a narrow and scale-driven perspective of fitness for years. The way we’ve been taught to measure our happiness and success is by the size of our jeans or a number on a scale. This shouldn’t define our success and there is so much more to our health and wellness than a number.
In this episode, Robin shares her fitness journey and how it inspired her to create a new approach to fitness. She discusses what drives her to create a more accepting and gracious atmosphere to help women embrace their bodies as they are. Join Robin in this episode to hear more about The Balanced Life’s mission to help women feel healthier, happier, and more confident.
Show highlights: what you can look forward to in this episode!
How Robin began teaching and entered the health and wellness space
Why Robin wanted to change the focus from physical to mental results
Looking past physical appearance goals in the fitness space
Why Robin wanted to create a new approach to how we view fitness
How to live from a place of freedom
The impact of before and after photos and why The Balanced Life doesn’t use them
Setting a positive example for others around us and changing the wellness culture
Trying to improve the quality of your sleep? Give this new Pilates for Better Sleep routine a try!
This Pilates workout includes a balance of movement and stretching to help you reduce stress, relieve tension, wind down, and prepare for a good night of sleep.
Click here to watch on Youtube. And Sisterhood members, this workout has already been dropped into your workout library for your convenience.
We’ve helped hundreds of thousands of people like you transform into actual superheroes, and we focus on proper nutrition to do so.
These are the exact strategies we teach our Online Coaching clients, and we’ve used these tips to help them lose weight and get in great shape without being miserable.
Plus, we use fun LEGO photos and gifs to keep you entertained.
In this Ultimate Guide, we’ll cover everything you need to start eating healthy today:
It’s really easy to tell people the following advice:
“To lose weight, just eat more REAL food.”
“Just eat less fast food and junk food.”
“Try to eat more organic vegetables watered by unicorn tears, farm-to-table meals served by centaurs, and kale omletes made with eggs from chickens that you raised since birth.”
Okay so maybe people don’t say the last one.
But it’s not far from what healthy people say to people who can’t seem to get healthy.
In my opinion, these positions are completely out of touch with reality and it makes me plum dog mad.
For starters, fast food is crazy delicious and dirt cheap, and often the only way that many busy parents can feed themselves and their kids.[1]
Next, applying morality and guilt to food consumption (“I’m being ‘so bad’ by eating this cookie”) creates an emotional rollercoaster – my least favorite kind of roller coaster.
I mean come on, we don’t need to be told that freshly grown fruits and veggies are better for us than junk food.
We don’t need to be told that organic grilled chicken and kale salad is healthier than a Double Whopper with Cheese.
We all know this!
So rather than “trying harder” to eat healthier we’re going to use things like “science” and “human psychology” and “excessive quotation marks.”
Cool?
Here’s what you need to know: If you’re just trying to be healthier and maybe lose some weight, there’s no need to start funneling kale smoothies, mainlining chicken and broccoli, and abandoning your loyalty to the Burger King.
You can lose weight and be healthy while still eating these foods occasionally.
Heck, people have lost weight by eating Twinkies[2] and drinking soda and eating at McDonald’s 3 times per day[3].
I share this info not to promote those foods, but rather to make a big point:
If you are terrified of giving up all “junk food”…
You do not need to give up fast food if it brings you joy.
You do not need to feel shame for eating ice cream.
You do not need to use terms like “cheat meal” or “guilty pleasure” when talking about a chocolate chip cookie.
Food isn’t good or evil, my dear friend!
It’s just food!
Let’s bring it all together:
If we have certain health goals, we can give ourselves the best chance of success by getting strategic about what foods we say “YES” to, and what foods we say “SOMETIMES” to.
These YES foods give us more energy and have fewer calories on average than “junk food,” which means we’re likely to eat fewer total calories without realizing it.
We humans are terrible at estimating how many calories we eat.
Like, really really bad at it. I bet the proportions of the above foods surprised you.
We consistently eat much more than we realize, by as much as 47%+.[10]
To make matters worse, we also OVERestimate how many calories we burn through exercise.
One study showed that Fitness trackers like AppleWatch or Fitbit do not estimate energy burned through exercise accurately, some by as much as 90%![11].
That’s why we made this fun infographic:
So when we “can’t lose weight,” it’s not because we have a broken metabolism.
It’s because we consistently eat too much food without realizing it.
Because we always have a ready supply of new energy from recently eaten food, more than we need, our body NEVER has to dip into our stored fat to burn for fuel.
And when we think we’ve out-exercised our bad diet, we really haven’t.
So it’s time to stop “trying harder” and instead “try differently”:
In order for us to get healthy, we need to find ways to include more foods that fill us up AND taste good.
Luckily, I have that list riiiiight here!
How to Start Eating Healthy (Healthy Food List)
There are three big macronutrients that we’re going to focus on as we build our plate like the image above:
Protein: building blocks for our muscles.
Carbohydrates: our bodies will burn as fuel.
Fats: can be burned as fuel, and also helps with nutrition absorption!
#1) PROTEIN: Priority Numero Uno.
Protein is amazing.
Your body uses protein to rebuild your muscles and keep you strong, especially if you are exercising or strength training regularly.
Protein is both good for you AND highly satiating.[13]
Protein can come from any number of sources, including:
A serving of protein is about the size and thickness of your palm.
*The 4 oz serving is for an uncooked piece of meat. Cooking reduces about 25% of the weight, bringing it down to about 3 oz.
When building a plate, aim for the following amount of protein:
Dudes: 1-2 servings (6-8 oz or about 170-228 g): two palms
Dudettes: 1 serving (3-4 oz or about 85-114 g): 1 palm.
If you’re curious, here’s how much protein is in a serving of food:
4 oz (113 g) serving of chicken has around 30 g of protein.
4 oz (113 g) serving of salmon has 23 g of protein
4 oz (113 g) of steak has 28 g of protein.
As we cover in our “how much protein should I eat per day?” you can target anywhere from 80% to 100% of your bodyweight in pounds per gram of protein, with an upper limit of 250g[15]:
If you weigh 150 pounds (68 kg), target 120-150g of protein.
If you weigh 200 pounds (90 kg), target 160-200g of protein.
If you weigh 250 pounds (113 kg), target 200-250g of protein.
If you weigh more than 250 pounds (113 kg), target 250g of protein.
#2: VEGETABLES: The difference-maker when it comes to healthy eating and weight management.
They are nutrient-dense: full of all the good nutrients that your body can use to function at optimal performance.
Next, they are voluminous but calorie-light, which means you can eat lots of them, you’ll feel full, but you’re unlikely to over-consume calories.
A serving of veggies is about the size of your fist.
Remember this is what just 200 calories of broccoli looks like (holy crap). This is at least 5 full servings:
Here’s a quick, non-complete list of veggies that can fill your plate:
These are the foods that can be an important part of a diet, provided you eat them in the right quantities for your goals.
These foods are also great to consume right after a strenuous strength training workout to help your muscles and liver refill their glycogen stores (their energy tanks[17], essentially).
Back to healthy carbs: when consumed in appropriate amounts, these are great foods that can help you feel full and give you energy and all that jazz.
Just make sure you know what an actual portion of these foods are!
A LOT of people accidentally overeats carbohydrate-heavy foods, even healthy ones, and then wonders why they aren’t losing weight.
To help you get better at eyeballing serving sizes:
1 serving of a starchy carbohydrate is 1 cupped hand (uncooked), or your two hands forming a cup (cooked).
Here are some images to help you learn proper portion sizes (thanks to SafeFood):
#4) HEALTHY FATS: No longer the enemy!
Fat had a bad rep in the 70s, 80s, and 90s, but now things are swinging wayyyyy back in the other direction.
In some circles, dietary fat is considered a superfood – the healthiest thing on the planet that also does your taxes for you.
Let’s get to the truth:
Fat is neither a superfood nor evil.
It’s just a macronutrient that you can eat that can help you reach your goals in the right quantity, or keep you from your goals if it’s overconsumed.
When your doctor tells you to eat more healthy fats, she’s referring to polyunsaturated and monounsaturated fats[19].
Healthy fat can be found in foods like:
Avocado
Almonds
Walnuts
Macadamia nuts
Olive oil
Almond butter
Peanut butter
Now, science has recently come around on saturated fat too[20]– once completely vilified, but now cautiously considered okay for moderate consumption.
Saturated fats can come from things like:
Whole milk
Full fat dairy
Coconut oil
Grass-fed butter
Lard
Fatty cuts of meat
Fat can be good for you provided you’re eating the right quantity for your goals.
However, like carbs, fats can be overconsumed accidentally too.
To help you gauge: a serving size of fat is roughly the size of your thumb!
THIS is a single serving of almonds (162 calories):
THIS is a serving of olive oil (119 calories, taken from Runtastic):
As you can see, if you’re not careful – you can accidentally eat an extra 500 calories of “healthy fats” by absentmindedly eating too many “heart-healthy” fats.
Many folks in our Coaching Program had us analyze why they weren’t losing weight, even though they “only ate grilled chicken and veggies.”
When we dug into it, they had been preparing all of their food in an extra 500-600 calories worth of olive oil they weren’t accounting for.
To recap carbs and fats: feel free to include a starchy carb on your plate in the form of rice, potatoes, pasta, or legumes. Healthy fats can spice up a meal, provided you’re using an appropriate portion size
I realize that was a CRAZY amount of info, so let’s put it all on the same Healthy Plate:
1-2 servings of protein (¼ of plate)
2 servings of vegetables (½ of plate)
1 serving potatoes, rice, or pasta. (1/4th of plate)
1 serving of fat (size of your thumb)
1 zero-calorie or low-calorie beverage (water, diet soda, tea)
I know that not all of your meals are going to be perfectly segmented like a bento box. For example:
A fatty cut of meat like chicken thighs means your fat and protein are commingling. Cool.
Lentils and legumes mean your protein and your carbs are attached at the hip. Swell.
A burrito bowl with chicken, rice, guacamole, and cheese means all of your macros are cohabitating. Neato!
Salmon cooked in olive oil and coated in almond flakes means your fat and protein have fused. Stupendous!
This plate and serving size stuff above is just to help you get started thinking about healthy food differently and in proper portion sizes:
Trying to lose weight? Reduce your portions of carbs and fats.
Trying to gain weight? Increase your portions of carbs and fats!
Remember, all calories count.
I can already predict your next series of questions:
“What about beverages?” Simple. Liquid calories count too. So stick to low or zero-calorie drinks like water, tea, coffee, and diet soda.
“How about condiments?” Grilled chicken slathered in 1000 calories of buffalo sauce means you’re still eating a calorie bomb!
“But what about things like Paleo or Keto? I thought low carb = healthy?”I address that in the “which diet is right for me?” section. Keep reading.
What’s the Deal with Fruit? Is Fruit Healthy?
As we lay out in our “Is Fruit Healthy?” Guide, fruit is absolutely healthy and can help you reach your goals – in the right quantities.
Fruits are full of nutrients, packed with fiber, and can make for a great snack or part of a protein-focused breakfast!
#2) Dried fruit: notoriously easy to overeat because they are so small. Since the water has been taken out, all that’s left is the sugar and fiber.
Here’s 1 serving of raisins, which is 108 calories and 21 g of sugar:
If you are saying “oh man, I eat 5x that many raisins when I eat them…” then multiply those calorie and sugar numbers by 5!
3) Fruit Smoothies: Just because it’s a fruit smoothie doesn’t mean it won’t make you fat! Have you seen the calorie count and sugar content of smoothies and ‘green drinks’? Yikes.
Green Machine Naked Juice (15.2 oz or 450 ml bottle): 270 calories, 53 g of sugar.
Smoothie King Banana Boat (20 oz or 591 ml smoothie): 450 calories, 70 g of sugar.
**If you prepare your smoothie at home with a blender, it can actually be healthy since the fiber is intact. Here’s my personal recipe.**
To recap: fruit is healthy, provided you stick to fresh or frozen and not fruit-like food, dried fruit, or canned fruit packed in syrup.
If you enjoy a small glass of orange juice occasionally, or you pack a serving of raisins in your lunch and it makes life worth living, by all means!
Just don’t chug OJ by the gallon, drink a 64 oz “real fruit smoothie,” and eat raisins by the handful and then wonder why you’re not losing weight.
Are Cheese and Dairy healthy?
We get questions about these two types of food frequently.
Let me start by saying I’m assuming you’re not doing Paleo (which says “NO dairy and NO cheese”), or plant-based (which says NO to all animal products).
I’ll also assume you’re not doing Keto, which almost requires you to load up on dairy and cheese to eat enough fat every day!
Let’s pretend you’re just curious if cheese and/or dairy can be consumed on a “healthy diet:”:
YES, you can still eat cheese and be healthy.
YES, you can still eat dairy and be healthy.
And there was much rejoicing:
Like the healthy carbs and fats listed above, it all comes down to your calories consumed in a day, and if these foods fit into your daily calorie goals:
Want to put cheese on top of your salad of chicken and vegetables? Great!
Want to eat greek yogurt, a scoop of protein powder, and frozen berries for your breakfast? Amazing!
Want to eat a bowl of cereal with skim milk (or whole milk) in the morning with your kid before school? No problem.
This is true for higher-fat cheeses or full-fat dairy too – the food just needs to fit into your goals!
Luckily, all dairy comes labeled, and most cheese will come with a nutrition label on it too.
Just ensure that you’re choosing appropriate portion sizes. For reference, here are four different servings of cheddar cheese (about 113 calories a serving):
And here’s a serving of greek yogurt (120 calories in 142 grams):[25]
And although nobody in the history of the world has ever eaten just one serving…here is a serving of ice cream:
(A scoop of ice cream the size of a tennis ball is about 127 calories, cleverly shown above.)
So, dairy and cheese are both perfectly acceptable healthy food options! Just make sure they fit into your goals.
If you are NOT losing weight, and you consume a lot of dairy and/or cheese, consider measuring your intake and see if it’s in line with your expectations!
What’s the best diet for me? Keto vs Paleo vs Plant-based.
“Low fat diets? Low carb diets? No carb diets? I don’t know which one is the BEST diet!”
“Help me, Steve Kamb, you’re my only hope.”
Okay, you’re probably not saying that, but it’s an excuse to pay homage to Star Wars so I can use the great photo above.
You probably do have questions though about what’s healthier, a low fat diet or a low carb diet.
Low carb diets are all the rage right now, but are they healthy and will they help you lose weight?
Maybe.
It may depend on how your body regulates glucose (blood sugar)[26]:
Some who don’t regulate glucose well may do better on a lower-carb diet.
Others who do regulate glucose well might do better on a lower-fat diet.
Studies show that people who follow EITHER a low fat OR a low carb diet will still lose weight, as long as they are in caloric restriction and can adhere to the diet for at least a year.[27]
So, it comes down to: “which diet are you more likely to stick with for a year or longer?”
Let’s look at each of these diets and explain why they will help you lose weight, at least temporarily:
Truth #1: Every diet works in the short term.
Truth #2: Nearly every diet fails in the long term.
Let’s address these two truths individually:
Why does every diet work in the short term?
All the diets above have a clever way of restricting calories without you needing to count calories, which leads to weight loss:
Paleo Diet: eliminate everything but veggies, meat, fruit, and nuts.
Intermittent Fasting: skip an entire meal!
Keto Diet: remove an entire macronutrient from your diet (carbs).
Military Diet: Only eat specific foods in certain quantities.
Plant-based Diet: Only eat foods from plants.
Carnivore Diet: Only eat meat! Eliminate everything else.
Of course, there are plenty of benefits from following certain diets for certain groups of people. For example, Larry went Keto and it helped him reduce inflammation from rheumatoid arthritis.
However, 99% of the reason why these diets result in short-term weight loss is that they get us to eat fewer calories!
The problems arise when we get to Truth 2:
“Nearly every diet fails in the long term.”
Put another way:
Temporary changes create temporary results.
If somebody “goes Keto” for 60 days, they’ll most likely lose weight, and might even feel better! This is cool.
BUT!
(There’s always a but…)
If they spend those 60 days in misery, dreaming of carbs, counting down the meals until they can “go back to eating like normal,” they will put all of the weight back.
In order for restrictive diets to create permanent results for somebody, they need to be adopted PERMANENTLY!
For most of us mere mortals, we can’t stick with a restrictive diet for 30 days, let alone a year or a decade.
For these reasons, I strongly advise you to change how you think about dieting.
You need to determine how likely you are to stick with a restrictive diet permanently:
How averse are you to change?
How likely are you to stick with your changes?
Have you tried a restrictive diet in the past and failed?
Do you have a healthy relationship with food?
Do you have an “all or nothing?” mindset?
Like playing a video game, you need to determine what level of difficulty you are willing to attempt.
Playing on “Ultra Hard Difficulty” (like Keto) gives you less room for error, but it can also produce impressive results quickly – if you don’t rage quit.
And 99% of people rage quit restrictive diets like Keto.
It’s not a diet. It’s a lifestyle change. Permanently.
And that’s what I would recommend for you:
Small, non-scary, permanent changes over a long time period!
You need to start thinking in terms of “days and years,” not “weeks and months:”
How to Grocery Shop, Cook and Meal Prep!
Okay! Now that you’ve determined your healthy eating strategy, it’s time to take action.
There are three big steps you’ll want to master if this is your path:
Step #1: Grocery Shopping! You can read our full guide on “How to grocery shop”, and we even have a video that keeps things fun too:
Here’s how to grocery shop like a pro:
Stick mostly to the outer rim. This means you’re mostly buying meat, fruit, and veggies[28].
Read the nutrition label! Just because it says it’s healthy on the front doesn’t mean it is. Read the nutrition label and learn portion sizes. This can help keep you below your daily calorie goal.
Don’t shop hungry! It may seem silly, but you end up buying way more junk food accidentally if you shop while hangry (a mix of hungry-angry, never a great emotion).
Make a list. Before you go grocery shopping, write down everything you should get. You can even put “non-healthy” food items on the list. But then you can only buy what’s on your list! This means no candy in the check-out aisle, or buying Oreos just because they’re on sale! Plan ahead. Stick to the script, sister.
Step #2: Learn to cook!
In the next section, we share recipes for basic healthy meals that you can cook at home.
Here’s why cooking at home is amazing:
You know all of the ingredients. When you eat at restaurants or pick up fast food, there are often hidden calories in the cooking oils and sauces that are sabotaging your healthy efforts. Because of this, it’s really hard to have an idea of how many calories you’re consuming. When you prepare food at home, you know what you’re getting.
You can recreate healthier versions of your favorite foods. Making homemade tacos or pizza with homemade dough can be a great date-night experience, makes your stomach happy, AND can help you reach your goals!
You save money. If your budget is tight, grocery shopping and cooking your own meals is a great way to balance your budget and free up some cash! Our most successful coaching clients work with their coaches on building the habit of cooking at home.
Now, if you’re somebody who only ever uses your kitchen to heat up microwave meals, that’s no problem.
Here are the guides you should check out:
Cooking 101: Essential Kitchen Tools: Not sure what kind of knives to get, or what you REALLY need? I’ve been there. This is why we created this guide for you!
How to Stock Your Pantry: If you’re not sure what to stock your shelves with, and how to set yourself up for long-term success.
Step #3 (BONUS): Meal Prep and Batch Cooking! This step isn’t necessary, but if your goal is to make healthy eating a habit for you and your family, batch cooking can be the difference maker!
By “batch cooking,” I simply mean setting aside time to prepare larger quantities of food at the start of the week, so that throughout the week you already have meals to eat!
And every single success story we’ve featured on Nerd Fitness (like this one) involved some sort of batch cooking (planning your meals for the week ahead).
Follow these rules, and you will crush it in the Healthy Eating Department[29]!
19 Healthy Eating Meals You Can Cook Today
“Okay Steve, you have me convinced I should be eating more healthy foods. But I am a nerd and I need specific instructions to follow!”
I got you.
As a kid raised on LEGO and K’nex, I am the exact same way!
Here are options to get the ball rolling on healthy breakfasts, lunches, snacks, and dinners. Use these as inspiration or starting points for your meal planning!
As we start to wrap up this guide, I have one BIG final question for you:
“Why the hell are you reading this?”
Sorry to be so blunt, but your answer matters!
If you are trying to eat better because somebody told you to, or because you think you should, you’re setting yourself up to fail.
You might be excited and motivated to eat healthy today, and that’s great!
But next week, Oscar in Accounting will put cake in front of you at work, and ask you to “live a little” and eat some cake “just this once.”
And then you’ll discover apps are half-priced at Chatchki’s during happy hour, and you figure “well I already had cake, might as well split some shrimp poppers and extreme fajitas with Meredith.”
It’s our Big Why that stops us from living emotionally and chasing instant gratification from a donut or six slices of pizza when we’re sad or stressed.
It’s our Big Why that allows us to say “Yes, I can have a slice of pizza, because I planned for it in my ‘calorie budget’ today. I’m not gonna feel bad about it either, because my breakfast tomorrow is gonna be great.”
It’s our Big Why that allows us to get back on track after a vacation or after just one day of poor eating, instead of letting things slide for a week or a month.
Have your Big Why, and remind yourself of it constantly!
Write it down, put it on a post-it note on your bathroom mirror, staple it to your forehead.
But have a REASON you’re committing to change.
It will be crucial when life starts to get busy next week and you want to give up. So let’s talk about next week (and beyond!)
Healthy Eating: Next Steps!
This guide has provided you with all of the tools you need to start making healthier choices, but if you are looking to go a bit further…
#1) Our 1-on-1 Online Coaching program: a coaching program for busy people to help them make better food choices, stay accountable, and get healthier, permanently.
You can schedule a free call with our team so we can get to know you and see if our coaching program is right for you. Just click on the image below for more details:
#2) If you want an exact blueprint leveling up your nutrition, check out Nerd Fitness Journey! Our fun habit-building app helps you exercise more frequently, eat healthier, and level up your life (literally).
If you follow our Nutrition missions, you’ll learn to eat healthier while earning XP! Sah-weeeet.
Try your free trial right here:
#3) Join The Rebellion! We have a free email newsletter that we send out twice per week, full of tips and tricks to help you get healthy, get strong, and have fun doing so.
I’ll also send you tons of free guides that you can use to start leveling up your life too:
Download our free weight loss guide
THE NERD FITNESS DIET: 10 Levels to Change Your Life
Follow our 10-level nutrition system at your own pace
What you need to know about weight loss and healthy eating
3 Simple rules we follow every day to stay on target
Healthy eating will change your life.
But it needs to fit INTO your life too.
Small changes, not dramatic shifts!
You don’t have to give up the foods you love, you just need to PLAN for them.
Prioritize protein, and always put a fruit or vegetable on your plate before filling the rest of it up!
This will get you 90% of the way towards a great healthy eating strategy.
And when in doubt, whenever you’re not sure if you should eat a particular food, ask yourself “What would Batman do?”
Seriously, this has been studied with children, and it helped them make healthier food choices by giving the decision-making over to somebody they looked up to [22]. It’s called “self-distancing,” and there’s no reason it can’t work for you too.
Oh, and when you eat a bad meal – who cares?! “Never two in a row,” right? Make the next meal healthy.
YOUR MISSION, SHOULD YOU CHOOSE TO ACCEPT IT:
Start eating healthy today with literally one change:
Try a new vegetable.
Cut one soda out of your day.
Prioritize protein in your next meal.
Swap out one high-calorie drink for a zero-calorie drink.
I don’t care what the change is, just as long as you make one!
Okay enough about me, let’s talk about you:
What’s the ONE change you’re going to make today?
For the Rebellion!
-Steve
PS: Make sure you read the rest of the articles in our “How to Lose Weight 101” Series!
You can read a study about what drives fast-food intake right here. Tangentially related, but this Atlantic article is fantastic: How Junk Food Can End Obesity.
Read, “Adherence to Mediterranean diet and health status: meta-analysis.” Source, PubMed.
Read, “Longitudinal association of changes in diet with changes in body weight and waist circumference in subjects at high cardiovascular risk: the PREDIMED trial.” Source, PubMed.
Read, “Evolution of Well-Being and Happiness After Increases in Consumption of Fruit and Vegetables.” Source, PubMed.
Fiber is a carbohydrate that can’t be broken down by the body, so it travels through you relatively intact. However along the way it can do all sorts of good stuff! For example, increased fiber intake can help reduce blood glucose levels.
This won’t be on the test, but here’s what unsaturated means in this context: a type of fat containing a high proportion of fatty acid molecules with at least one double bond (mono) or many double bonds (poly).
Today I’m going to help you achieve your first push-up!
Yep, I know that sounds super confident. But it’s because I have a push-up progression plan that’s helped loads of clients in our Online Coaching Programcrush their first push-up.
Follow our guide and you’ll be doing “Earth Downs” in no time:
Let’s get started.
What’s the Best Push-up Progression Plan?
As I discuss in the video above, the most important part of your push-up progression plan: consistency.
Yeah, I know, there’s nothing too earth-shattering there.
But no matter what your current strength level is, the best way to work towards a push-up is to train your push muscles consistently. No matter where you’re starting today.
This is how our friend Mason went from wall push-ups to regular push-ups, then all the way to diamond push-ups.
Oh, and he lost like 70 pounds along the way too!
I’ll discuss push-up variations you should start with in the next section. Plus, we’ll wrap up today’s guide by discussing just how often you should train your push muscles.
Just remember, if you want your first push-up (and you should, cause push-ups are awesome), then you’ll need to be consistent with our push-up progression plan.
Cool?
Cool.
Our first stop on the Push-up Progression Plan: finding a push-up variation for you to become comfortable with. Something you can do about 8-10 reps with, for about 3-4 sets.
To start, you’ll probably train with an elevated push-up variation:
These will be easier than a regular push-up, since the higher the elevation, the less of your body’s weight you’ll be lifting during the movement.
Conversely, if you were to elevate your feet, you’d actually be lifting more than a regular push-up:
Here’s a rough breakdown of the percentage of your bodyweight lifted for different elevations of push-ups:[1]
4’ Elevated Push-up (Wall): 9%
3′ Elevated Push-up (Countertop): 20%
2′ Elevated Push-up: 36-41%
Knee Push-up: 49%
1′ Elevated Push-up: 54%
Regular Push-up: 64%
The strategy behind our push-up progression plan is to slowly move you down to the ground, lifting more and more of your own weight as you go.
Think of it like gaining XP in a video game, so one day you’ll be able to tackle the final boss: the floor.
It might help to pretend there’s a witch below it.
Alright, let’s show you exactly how to do some of these push-up variations.
5 Push-up Variations (to Progress to a Full Push-Up)
The push-up variations below can be thought of as benchmarks.
If you can’t complete 8-10 reps, nbd.
We’ll have you train at the level below and you’ll move up before you know it.
Here are 5 variations for our Push-up Progression Plan:
Push-up Progression Level 1: Wall Push-ups
Place your hands on a wall about chest weight (roughly 4′, 48″, or 122 cm). Bend your arms and get as close to the wall before pushing back up.
Push-up Progression Level 2: Waist-High Push-ups
Place your hands on a surface about waist high (roughly 3′, 36″, or 92 cm). Bend your arms and touch your chest to the surface before pushing back up.
Push-up Progression Level 3: Knee-High Push-ups
Place your hands on a surface about knee high (roughly 1.5′, 18″, or 46 cm). Bend your arms and touch your chest to the surface before pushing back up.
Push-up Progression Level 4: Knee Push-ups
Hold yourself up on your hands and knees, with the body in a straight line from shoulders to knees. Lower down to the ground before pushing back up.
Our next section will dive into the correct form, since this is a guide on getting your first proper push-up (I wouldn’t hold out on you).
But first, you may be asking yourself a question: when do I progress up to the next level?
For that, I’d recommend downloading our new app (it’s free to try out).
Nerd Fitness Journey will guide you through a workout routine specifically designed to help you get your first push-up, with benchmarks and signals on when to move up.
Plus, you get to earn actual XP so you level up your very own superhero!
You can give it a free test drive right here:
What Is the Proper Form for a Push-Up?
The video above walks you through the correct way to do a proper push-up, and also includes a few well-placed jokes from yours truly.
Here’s how to complete one perfect push-up:
With your arms straight, glutes clenched, and abs braced, steadily lower yourself until your elbows are at a 90-degree angle or less.
Try to keep your elbows relatively close to your body, and keep note of when they start to flare out as you get tired.
Once your chest (or nose/chin) touches the floor (or your arms go down to a 90-degree angle), pause slightly and then push back up until you’re at the starting position.
Here are 4 common mistakes I see with push-ups:
#1) Make sure you keep your elbows in. Often, beginners will flare out their elbows when doing a push-up.
A good way to think of this, is you want your body to appear more like an ARROW from the top, not a T.
This infographic on the proper push-up form shows you want I mean:
#2) Keep your head in line with your body. We don’t want your head shifting forward, which could put unnecessary stress on your neck and prevent a full range of motion.
#3) Keep your hips in line with your body (no sagging). We want you in one straight line as you push your body up and down:
#4) Attempt to do a full range of motion with your push-up (as long as it’s pain-free). Shoot to come all the way down, so your chest is touching the ground or the object you’re doing push-ups against.
If you want more help here, we have a full guide on how to do proper push-ups, (including advanced variations to try).
Exercises For Achieving a Full Push-Up
There are two exercises that will go a long way towards achieving your first push-up:
Push-up Negatives
Front Planks or Top of Push-up Holds
First, let’s talk about push-up negatives.
“Negative” in exercise terminology generally means only doing half of a traditional rep, normally lowering the movement.
To do a Push-up Negative:
Hold yourself up at the top of a push-up, with the body in a straight line from shoulders to feet.
Lower down and touch the ground, then let the knees rest on the ground to help you push back up.
Next, let’s talk about Front Planks or Holding at the Top of a Push-up.
This is important for a few reasons:
Builds a strong midsection. A sturdy core will help a lot when doing push-ups.
If you can’t hold the top of a push-up position, doing one complete rep will prove almost impossible.
Holding a plank might be tough for you, so let’s talk about a few variations you can experiment with.
Hold Level 1: Knee Planks
Hold yourself up on your forearms and knees, with the body in a straight line from shoulders to knees.
Hold Level 2: Front Planks
Lie on the floor with your forearms flat, making sure that your elbows are aligned directly under your shoulders.
Engage your core and raise your body off the floor in a straight line from head to feet, keeping your forearms planted. Try not to let your hips rise or drop.
Hold Level 3: Push-up Hold
Hold yourself up at the top of a push-up position, with the body in a straight line from shoulders to feet.
If you follow the Push-up Challenge in NF Journey, you’ll notice that pretty much every workout ends with a type of one of these holds, since core strength is so critical for push-ups.
Oh, and if you want to just try Nerd Fitness Journey to see what I mean, you can do so right here:
The Push-up Workout Plan
Remember earlier when I said the name of the game with push-up progression is consistency?
To show you what I mean, it’s time to build a workout for conquering push-ups.
I’d recommend three workouts a week for a Push-up Progression Plan, with a rest day between.
Could be Monday-Wednesday-Friday or Tuesday-Thursday-Sunday.
You can always do a more formal warm-up routine, but just make sure you include some variation of these two moves.
Step #2) Train with a Push-up Variation
Earlier, we went through 5 variations that will help you get your first push-up.
After your warm-up, you should train with one of them.
For our Push-up Progression Plan, I want you to alternate between two variations:
On Day A, do 3 or 4 sets of a push-up variation that you can do 8-10 reps in.
On Day B, do 3 or 4 sets of a push-up variation that you can do 5-8 reps in (so a harder variation).
For example:
On Monday maybe you do 3 sets of waist-high push-ups for 10 reps.
Wednesday, you can do 3 sets of knee-high push-ups for 8 reps.
Then Friday, back to the waist-high variation.
Step #3) Do a Negative
After you train with your push-up variation, I want you to attempt 2-3 reps of a negative push-up.
If these are too tough, simply do an easier variation, like knee push-up negatives:
Any of the 5 variations we discussed earlier can be done as a “negative.”
These negatives will be important, as they’ll go a long way towards building strength for a regular push-up.
Step #4) Plank/Hold for 60 seconds
We’re going to end our “Get Your First Push-up” Workout with a hold:
Front Plank
Holding the Top of the Push-up
Choose whichever variation you like, but attempt to hold the position for a full minute, with as few sets as possible.
If you need to break up the 60-second hold, you could:
Do three sets of 20 seconds each.
Do two sets of 30 seconds each.
Just aim to go longer and longer as you go. If you can’t make it to a full minute, don’t stress. Just work on holding a knee or elevated plank.
These holds will help strengthen your core, which will be critical for doing push-ups with proper form.
Oh, and if you want someone to modify this workout for you (let’s say you also want to do some HIIT for fat loss) our 1-on-1 Online Coaching Program can do just that.
Plus, your coach can review your movements through our app so you’ll know your training correctly and safely.
How to Achieve Your First Push-up (Next Steps)
That should give you everything you need to get started with the push-up progression plan.
Remember, your “Get Your First Push-up” Workout is:
A Warm-Up
3 or 4 sets of a Push-up Variation
2 or 3 reps of a Push-up Negative
60 second Plank or Hold
Do this three times a week, with a day of rest between workouts, and you’ll be good to go.
As you continue on the Push-up Progression Plan, remember to keep pushing harder. We want you slowly but surely increasing the challenge of the workout (known in the biz as “progressive overload.”)
This could be:
Adding another rep (8 reps of waist-high push-ups to 9)
Adding another set (3 sets of knee push-ups to 4)
Moving up to a more difficult variation (waist-high push-ups to knee-high)
Oh, and if you need any help along the way, I gotcha boo.
Here’s how to continue your journey with Nerd Fitness.
#1) Our Online Coaching Program: perfect for someone who wants an expert (like me!) to design the right path for conquering push-ups. We’re all different, so why not have a coach guide you through a program that’s custom-made for you?
You can schedule a free call with our team so we can get to know you and see if our coaching program would be a good fit. Just click on the image below for more details:
#2) If you want an exact blueprint for crushing push-ups, check out NF Journey. Our fun habit-building app helps you exercise more frequently, eat healthier, and level up your life (literally).
Plus, our 6-week Push-up Challenge has helped quite a few Rebels achieve their first push-up!
Try your free trial right here:
#3) Join the Rebellion! We need good people like you in our community, the Nerd Fitness Rebellion. You’ll meet individuals from all different walks of life, all of whom are trying to level up their lives.
Sign up in the box below to enlist and get our “Strength Training 101: Everything You Need to Know” guide, which will teach you exactly how to grow strong enough to rock push-ups:
Download our comprehensive guideSTRENGTH TRAINING 101!
Everything you need to know about getting strong.
Workout routines for bodyweight AND weight training.
How to find the right gym and train properly in one.
Alright, I want to hear from you now:
Can you do a proper push-up?
If not, what level are you on?
Are we missing any helpful suggestions for a beginner?
Let me know in the comments!
-Jim
PS: Check out the rest of our guides on doing push-ups:
The way you stand, sit, or even walk can be impacting your health in ways you didn’t even know. Our posture affects the way we breathe and, in turn, our health. Addressing your breath and posture is one of the best ways to optimize your long-term health.
In this episode, Robin shares how our breath can affect our blood pressure, circulation, energy, focus, and much more. She also shares how we can use it as a tool to reset our nervous system and manage stress. Join Robin to learn more simple strategies you can do to improve your health and wellbeing by focusing on breath.
Show highlights: what you can look forward to in this episode!
Indicators that you may not be breathing properly
The importance of breath
Why breath is integrated into the Pilates practice and how we can use it as a tool
How Robin has used breathwork to reset and combat anxiety
The effects of shallow breathing
How does your breath affect your pelvic floor
Ways posture can improve our health and our breath